從實例分析ELF格式的.gnu.hash區與glibc的符號查詢全過程
前言
ELF格式的.gnu.hash節在設計上比較復雜,直接從glibc源碼進行分析的難度也比較大。今天靜下心來看瞭這篇精彩的文章,終於將佈隆濾波器、算數運算轉為位運算等一系列細節搞懂瞭(值得一提的是,這篇博客十分值得花一些時間讀懂,它不僅對總體有一個較好的描述,而且還涉及瞭許多有益的實現細節)。但本人愚鈍異常,沒有一個完整的walkthrough就不能覺得自己真的搞懂瞭一個東西。所以本文從查找一個符號的真實情況出發,把ELF格式是如何組織一個符號,以及動態鏈接器如何讀取並處理這些信息以進行符號查詢的全過程詳細地講清楚。
本文假定讀者已經讀過上文中提到的博客,並理解佈隆濾波器,GNU hash采用的單一哈希策略,把取模轉為取與這些名詞。在後續有時間時我可能會對它們進行簡單介紹,但珠玉在前讓人確實不想獻醜。
本文的實現以及so文件均以glibc 2.31為準。
符號哈希,符號表與字符表
一個符號的相關信息會在ELF文件中dynamic section的三塊出現:.gnu.hash對應的符號哈希,.dynsym對應的動態符號表,.dynstr對應的字符表。在查找符號時,動態鏈接器首先從.gnu.hash中進行查詢,得到該符號在動態符號表中的偏移。動態鏈接器根據這個偏移讀出一個符號,並找到這個符號的名字在字符表中的偏移。從字符表中讀出符號的名稱如果與要查找的符號匹配,則找到瞭這個符號,再從符號表中讀出符號的相關信息並返回。
64位ELF格式的符號定義如下:
// in <elf.h>
typedef struct
{
  // 32 bits
  Elf64_Word	st_name;		/* Symbol name (string tbl index) */
  // 8 bit
  unsigned char	st_info;		/* Symbol type and binding */
  // 8 bit
  unsigned char st_other;		/* Symbol visibility */
  // 16 bits
  Elf64_Section	st_shndx;		/* Section index */
  // 64 bits
  Elf64_Addr	st_value;		/* Symbol value */
  // 64 bits
  Elf64_Xword	st_size;		/* Symbol size */
} Elf64_Sym;
這個數據結構占用內存的大小為24B,這也是合理安排成員順序以節約文件大小的一個例子。
.gnu.hash的結構
glibc使用如下函數從ELF文件中讀取符號哈希相關信息:
// in elf/dl-lookup.c
void
_dl_setup_hash (struct link_map *map)
{
  Elf_Symndx *hash;

  if (__glibc_likely (map->l_info[ELF_MACHINE_GNU_HASH_ADDRIDX] != NULL))
    {
      // 一個指向32位長內存的指針,用來讀取哈希相關變量,故名hash32
      Elf32_Word *hash32
	= (void *) D_PTR (map, l_info[ELF_MACHINE_GNU_HASH_ADDRIDX]);
      map->l_nbuckets = *hash32++;
      Elf32_Word symbias = *hash32++;
      Elf32_Word bitmask_nwords = *hash32++;
      /* Must be a power of two.  */
      assert ((bitmask_nwords & (bitmask_nwords - 1)) == 0);
      map->l_gnu_bitmask_idxbits = bitmask_nwords - 1;
      map->l_gnu_shift = *hash32++;

      map->l_gnu_bitmask = (ElfW(Addr) *) hash32;
      hash32 += __ELF_NATIVE_CLASS / 32 * bitmask_nwords;

      map->l_gnu_buckets = hash32;
      hash32 += map->l_nbuckets;
      map->l_gnu_chain_zero = hash32 - symbias;

      /* Initialize MIPS xhash translation table.  */
      ELF_MACHINE_XHASH_SETUP (hash32, symbias, map);

      return;
    }
  // 以下處理古老的DT_HASH項,現已不用
  if (!map->l_info[DT_HASH])
    return;
  hash = (void *) D_PTR (map, l_info[DT_HASH]);//Q: what about some non-GNU ELFs

  map->l_nbuckets = *hash++;
  /* Skip nchain.  */
  hash++;
  map->l_buckets = hash;
  hash += map->l_nbuckets;
  map->l_chain = hash;
}
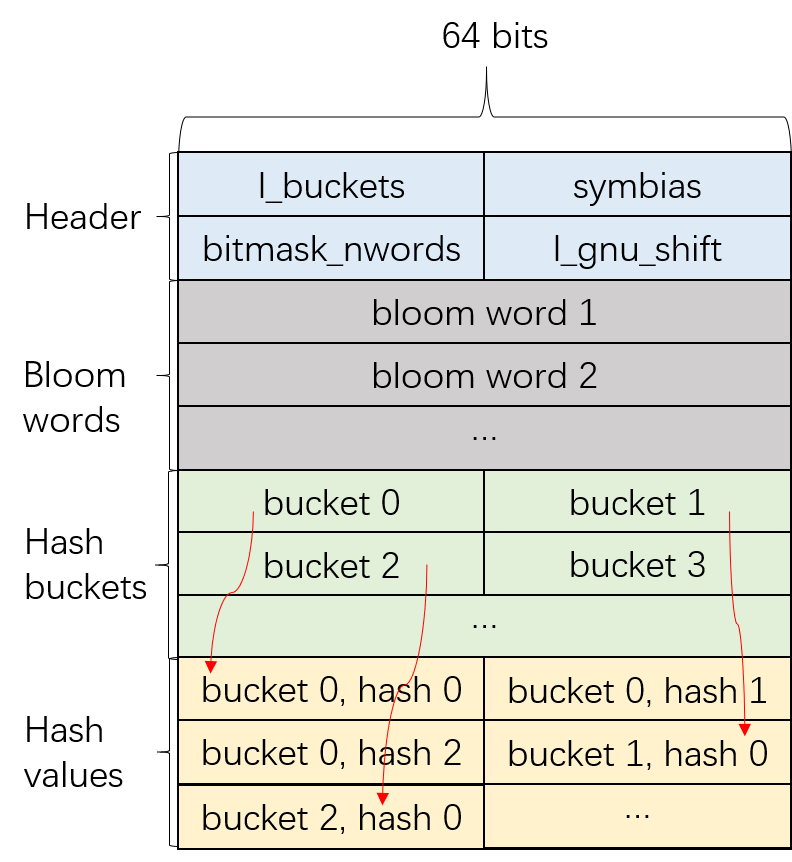
上述代碼讀取瞭關鍵變量賦值:l_nbuckets,symbias,bitmask_nwords,l_gnu_shift,l_gnu_buckets,l_gnu_chain_zero。其中,以“l”開頭的變量存儲在ELF文件的link_map中,具體定義見<link.h>。還有不是從文件中讀出的變量l_gnu_bitmask_idxbits,它們的具體含義為:
- l_nbuckets:使用哈希桶的數量
- symbias:動態符號表中外部不能訪問的符號數量,但它們仍然占用瞭動態符號表項
- bitmask_nwords:使用bitmask_nwords個字作為佈隆濾波器的向量
- l_gnu_shift:為使用同一哈希函數實現k=2的佈隆濾波器,需要右移的位數
- l_gnu_buckets:哈希桶的開始地址
- l_gnu_chain_zero:符號哈希值的開始地址
- l_gnu_bitmask_idxbits:為對bitmask_nwords取模化為取與,由bitmask_nwords-1而來
為瞭便於理解,將.gnu.hash節中的內容畫成示意圖:

以libc為例。檢查對應字段的值:
$ objdump -s /lib/x86_64-linux-gnu/libc.so.6 | grep .gnu.hash -A 5

Contents of section .gnu.hash:
 38a0 (f3030000)        (0c000000)      (00010000)            (0e000000)     ................
      ->l_nbuckets=1011 ->symbias=12    ->bitmask_nwords=256  ->l_gnu_shift=14
 38b0 (00301044 a0200201) (8803e690 c5458c00)  .0.D. .......E..
      ->第一個bloom word 0x010220a044103000
 38c0 c4005800 07840070 c280010d 8a0c4104  ..X....p......A.
 38d0 10008840 32082a40 88543c2d 200e3248  ...@2.*@.T<- .2H
 38e0 2684c08c 04080002 020ea1ac 1a0666c8  &.............f.
可以看到symbias=12,即有12個內部符號:
$ readelf -s /lib/x86_64-linux-gnu/libc.so.6 | head -n 20

Symbol table '.dynsym' contains 2367 entries:
   Num:    Value          Size Type    Bind   Vis      Ndx Name
     0: 0000000000000000     0 NOTYPE  LOCAL  DEFAULT  UND
     1: 0000000000000000     0 NOTYPE  WEAK   DEFAULT  UND __libpthread_freeres
     2: 0000000000000000     0 OBJECT  GLOBAL DEFAULT  UND _rtld_global@GLIBC_PRIVATE (33)
     3: 0000000000000000     0 OBJECT  GLOBAL DEFAULT  UND __libc_enable_secure@GLIBC_PRIVATE (33)
     4: 0000000000000000     0 FUNC    GLOBAL DEFAULT  UND __tls_get_addr@GLIBC_2.3 (34)
     5: 0000000000000000     0 FUNC    GLOBAL DEFAULT  UND _dl_exception_create@GLIBC_PRIVATE (33)
     6: 0000000000000000     0 OBJECT  GLOBAL DEFAULT  UND _rtld_global_ro@GLIBC_PRIVATE (33)
     7: 0000000000000000     0 FUNC    GLOBAL DEFAULT  UND __tunable_get_val@GLIBC_PRIVATE (33)
     8: 0000000000000000     0 FUNC    GLOBAL DEFAULT  UND _dl_find_dso_for_object@GLIBC_PRIVATE (33)
     9: 0000000000000000     0 NOTYPE  WEAK   DEFAULT  UND _dl_starting_up
    10: 0000000000000000     0 NOTYPE  WEAK   DEFAULT  UND __libdl_freeres
    11: 0000000000000000     0 OBJECT  GLOBAL DEFAULT  UND _dl_argv@GLIBC_PRIVATE (33)
    12: 00000000000ab970    33 FUNC    GLOBAL DEFAULT   16 __strspn_c1@GLIBC_2.2.5
    13: 0000000000089260   352 FUNC    GLOBAL DEFAULT   16 putwchar@@GLIBC_2.2.5
    14: 00000000001324f0    20 FUNC    GLOBAL DEFAULT   16 __gethostname_chk@@GLIBC_2.4
    15: 00000000000ab9a0    44 FUNC    GLOBAL DEFAULT   16 __strspn_c2@GLIBC_2.2.5
    16: 000000000014f580   218 FUNC    GLOBAL DEFAULT   16 setrpcent@@GLIBC_2.2.5
可見符號0-11為內部符號。
查找符號
下面以查找符號printf為例,介紹符號查找的過程。
首先使用下面的哈希函數生成符號的32位哈希:
// in elf/dl-lookup.c
static uint_fast32_t
dl_new_hash (const char *s)
{
  uint_fast32_t h = 5381;
  for (unsigned char c = *s; c != '\0'; c = *++s)
    h = h * 33 + c;
  return h & 0xffffffff;
}
得到printf的哈希值為0x156b2bb8。
隨後計算佈隆濾波器需要的兩個hashbit:
unsigned int hashbit1 = new_hash & (__ELF_NATIVE_CLASS - 1);
    unsigned int hashbit2 = ((new_hash >> l->l_gnu_shift) & (__ELF_NATIVE_CLASS - 1));
得到hashbit1 = 56,hashbit2 = 44。
找到該hash對應的bloom word:
  const Elf64_Addr *bitmask = l->l_gnu_bitmask;
    // l->l_gnu_bitmask_idxbits = bitmask_nwords - 1,將取模變為取與
    // (new_hash / __ELF_NATIVE_CLASS) & l->l_gnu_bitmask_idxbits = 174
    Elf64_Addr bitmask_word = bitmask[(new_hash / __ELF_NATIVE_CLASS) & l->l_gnu_bitmask_idxbits];
printf對應的hash在第174個bloom word處,它的值位於bloom word的開始地址0x38b0+174*8=3e20
檢查3e20處對應的值:
$ objdump -s /lib/x86_64-linux-gnu/libc.so.6 | grep " 3e20 "

 3e20 d0884a41 c0703429 10ec4303 92003103  ..JA.p4)..C...1.
其bloom word為0x293470c0414a88d0。
將其右移56位:0b0010 1001
將其右移44位:0b10 1001 0011 0100 0111
二者的最後一位均為1,說明佈隆濾波器不能拒絕這個哈希值。
這時在對應的哈希桶上進行尋找:
Elf32_Word bucket = l->l_gnu_buckets[new_hash % l->l_nbuckets];
由於0x156b2bb8 % 1011 = 295,需要找到第296個哈希桶。
而哈希桶的起始地址為l_gnu_bitmask + 64 / 32 * bitmask_nwords = 0x40b0,對應哈希桶的地址為0x40b0+295*4=0x454c。
查看0x454c處對應的哈希桶內容:
$ objdump -s /lib/x86_64-linux-gnu/libc.so.6 | grep " 4540 "

 4540 77020000 00000000 7a020000 **7c020000**  w.......z...|...
哈希桶的內容為0x27c。
而l_gnu_chain_zero的地址為:
l_gnu_chain_zero = l_gnu_buckets + l_nbuckets - symbias;
可計算出l_gnu_chain_zero的地址為0x504c,所以第296個哈希桶包含的真正哈希位於0x504c+27c*4=0x5a3c
查看具體的哈希內容:
$ objdump -s /lib/x86_64-linux-gnu/libc.so.6 | grep " 5a30 " -A 2

 5a30 ade8dbbb 142dcb13 bb86f85f e6952000  .....-....._.. .
 5a40 **b82b6b15** 0a05f1d5 deb6427f 856177fd  .+k.......B..aw.
 5a50 1ae585e7 ec296fa8 1ae585e7 29ce248f  .....)o.....).$.
於0x5a40處找到我們之前計算的哈希0x156b2bb8(註意小端序)。
此時,這個符號在.gnu.hash的下標,就是它在動態符號表中的(下標-symbias)。但由於之前l_gnu_chain_zero已經整體減掉瞭symbias,所以此處用該符號的地址減掉l_gnu_chain_zero可直接得到符號在符號表中的下標。
0x5a40 – 0x504c = 0x9f4 = 2548,由於一個哈希值為4字節,故下標為2548 / 4 = 637
找到動態符號表的起始地址:
$ objdump -s /lib/x86_64-linux-gnu/libc.so.6 | grep .dynsym -A 1

Contents of section .dynsym:
 07548 00000000 00000000 00000000 00000000  ................
上文中提到,64位ELF文件中一個符號的長度位24字節,故符號在符號表上的起始地址應當為0x7548 + 24*637 = 0xb100
找到動態符號表對應位置的內容:
$ objdump -s /lib/x86_64-linux-gnu/libc.so.6 | grep " 0b0f8 " -A 1

 0b0f8 16000000 00000000 **f3040000** 12001000  ................
 0b108 104e0600 00000000 cc000000 00000000  .N..............
讀出符號在字符表上的偏移量為0x4f3。
找到字符表的起始地址:
$ objdump -s /lib/x86_64-linux-gnu/libc.so.6 | grep .dynstr -A 1

Contents of section .dynstr:
 15330 00786472 5f755f6c 6f6e6700 5f5f7763  .xdr_u_long.__wc
起始地址為0x15330,故該符號的地址為0x15330 + 0x4f3 = 0x15823
讀出字符表對應位置的值:
$ objdump -s /lib/x86_64-linux-gnu/libc.so.6 | grep " 15820 " -A 1

 15820 494f5f**70** 72696e74 66007265 67697374  IO_printf.regist
 15830 65725f70 72696e74 665f6675 6e637469  er_printf_functi
查找到瞭符號printf,它是IO_printf的別名,在字符表中為瞭節省空間將二者合並瞭。
這樣,就完成瞭一次符號查詢的全過程。
以上就是從實例分析ELF格式的.gnu.hash區與glibc的符號查找的詳細內容,更多關於ELF格式的.gnu.hash區與glibc的符號查找的資料請關註WalkonNet其它相關文章!