vue實現滾動加載的表格
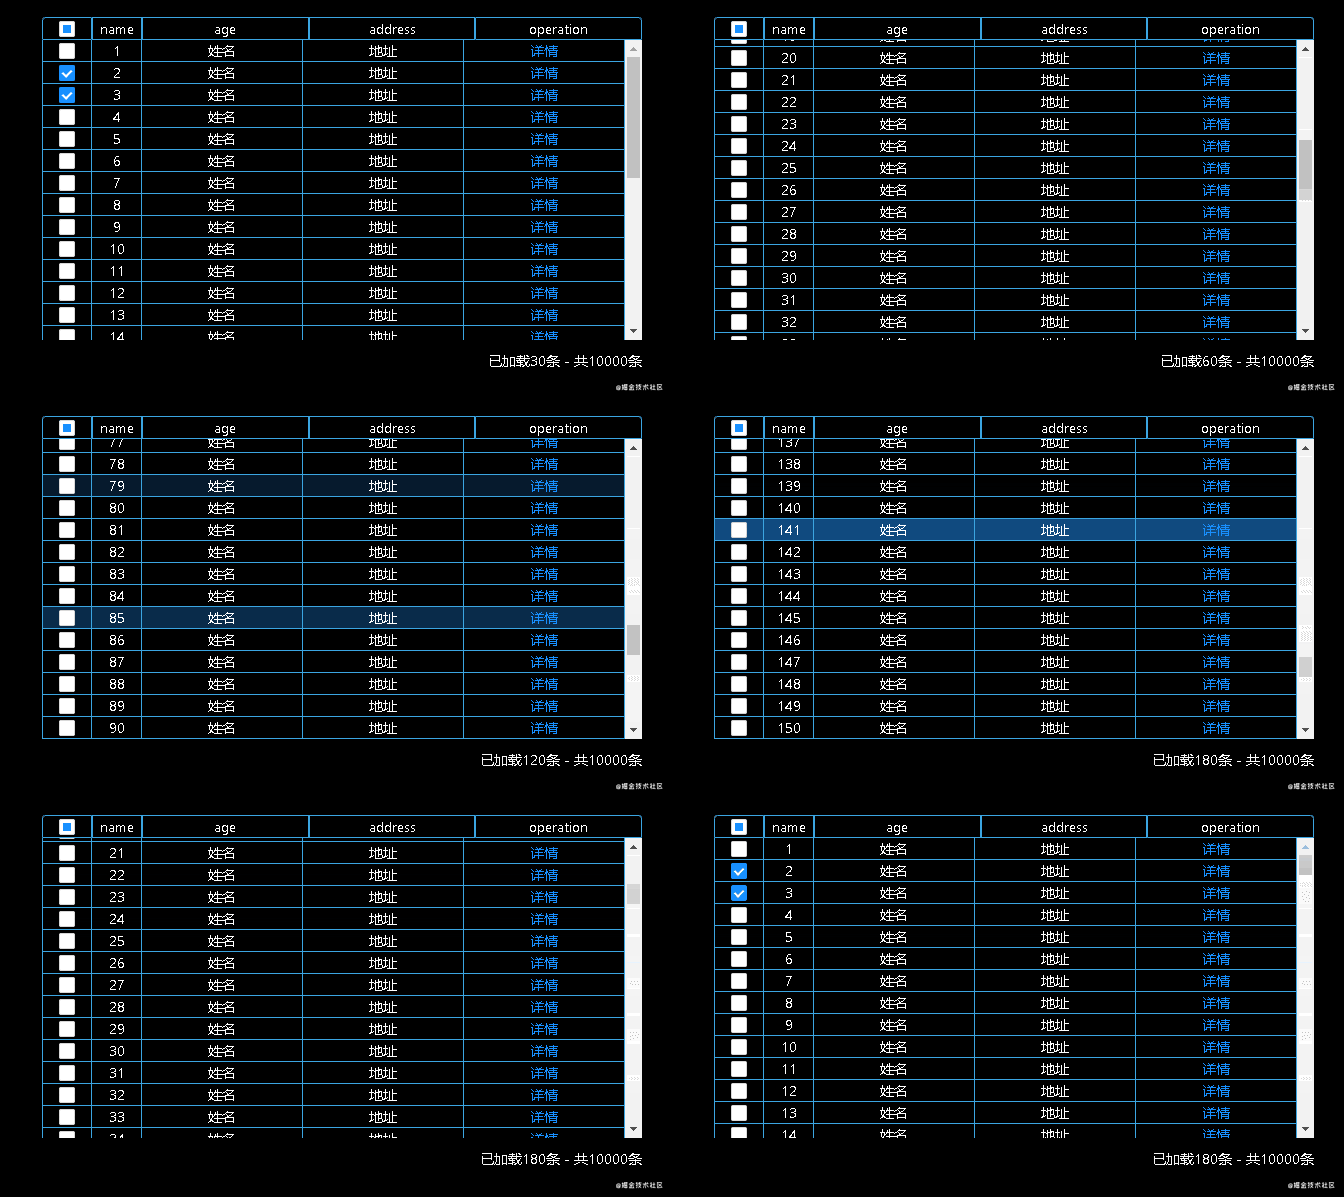
實現效果

碼雲地址
滾動加載知識儲備
參考ant-design-vue中list滾動加載的思路,使用vue-infinite-scroll加上vue-virtual-scroller作為解決方案。
組件封裝
因為整個系統使用的框架是ant-dsign-vue,所以組件封裝的變量命名風格盡可能的與a-table保持一致。
1. 組件命名
XScrollTable.vue
2. 提供的props
必填字段:
dataSource — 數據源
columns — 表格展示的列信息,插槽用法和a-table不完全一樣,下面會提到。
itemSize — 每行數據的高度
選填字段:
rowKey — 數據主鍵標識,默認為’key’
height — 表格展示區域的高度,默認為500
pageSize — 表格滾動每次滾動加載的數據量,默認為30
infiniteScrollDistance — 表格觸發加載的距離條件,默認為10
rowSelection — 表格多選配置,已處理的屬性有selectedRowKeys、onChange、width。默認為null,不展示多選。
3.使用舉例
首先初始化10000條數據,放在表格中進行顯示。
let data = new Array(10000).fill(1);

data = data.map((item1, index) => {
    let item = {};
    item.id = index;
    item.age = "姓名";
    item.address = "地址";
    return item;
});
export default data;
註意:這裡之所以加瞭fill(1),是因為通過Array構造函數產生的數據全是empty,沒有數組索引,無法進行map循環。
加載表格
<x-scroll-table
                style="margin-top: 10px"
                row-key="id"
                :itemSize="22"
                :rowSelection="{selectedRowKeys: selectedRowKeys, onChange: onSelectChange,width:50}"
                :columns="columns"
                :dataSource="data">
            <template slot="action" slot-scope="{record,text}">
                <a @click="handleDetail(record)">詳情</a>
            </template>
        </x-scroll-table>
組件封裝總結
1.盡可能地使用computed計算屬性
雖然隻是簡單地封裝瞭表格,但還是需要定義瞭很多的屬性,使用計算屬性代替在data裡定義變量,可以減少變量的維護工作量。
整個組件隻定義瞭一個page變量,其它都是使用計算屬性的方式。
  data() {
    return {
      // 當前展示頁數
      page: 1,
    };
  },
舉個栗子:
通過page屬性定義一個計算屬性來表示當前已經加載的數據量
 // 展示的最大下標數量,存在比總數據條數多的情況,使用slice解決這個問題
    lastIndex() {
      return this.pageSize * this.page;
    },
通過這個計算屬性同時衍生出其他的計算屬性
// 表示表格數據是否已經加載完畢
busy() {
      return this.lastIndex >= this.dataSource.length;
    },
 // 當前已經加載到RecycleScroller滾動組件的數據
    tableData() {
      return this.dataSource.slice(0, this.lastIndex);
    },
通過一個page屬性衍生出一系列的計算屬性,我隻需要維護page屬性,其他都是自動計算的。
2.給表格提供插槽
首先通過表格傳入的columns參數,計算出需要渲染的列,這裡同樣使用計算屬性。
 // 將列數組轉為列對象,將columnFieldKey值作為鍵,數組項作為值
    columnMap() {
      return this.columns.reduce((returnValue, cur) => {
        returnValue[cur[columnFieldKey]] = cur;
        return returnValue;
      }, {});
    },
    // 取數組裡的列鍵值--columnFieldKey
    columnKeys() {
      return this.columns
          .map(item => item[columnFieldKey]);
    },
在template中遍歷
<div v-for="(key) of columnKeys"
             class="ellipsis-cell"
             :key="key"
             :style="itemStyle(columnMap[key])"
        >
          <slot v-if="izSlotRender(columnMap[key])"
                :name="columnMap[key].scopedSlots.customRender"
                :record="row"
                :text="row[key]">
          </slot>
          <span v-else :title="row[key]">{{ renderItem(row, index, key) }}</span>
        </div>

  // 是否使用插槽渲染
    izSlotRender(item) {
      return item.scopedSlots && item.scopedSlots.customRender;
    },
如果在定義columns時傳入瞭scopedSlots和customRender,將使用插槽渲染。
但是這裡存在和ant-design-vue中表格插槽渲染不一樣的地方。
我通過slot標簽定義的插槽,在父組件獲取插槽參數的時候,隻能使用slot-scope=”{record,text}”對象解構的方式。而ant-design-vue表格是可以直接使用slot-scope=”record,text”獲取參數的。
另一種滾動加載數據的實現
table數據多的時候打開頁面會加載一會才顯示數據,這樣體驗不好,所以要做滾動加載數據
<el-table :data="materielList" style="width: 100%" class="familyDataDetail" height="250">
                <el-table-column prop="eventId" label="事件ID">
                    <template scope="scope">
                        <label>{{eventMap[scope.row.eventId] == null ? '--': eventMap[scope.row.eventId].sn}}</label>
                    </template>
                </el-table-column>
                <el-table-column prop="title" label="對應事件">
                    <template scope="scope">
                        <label>{{eventMap[scope.row.eventId] == null ? '--': eventMap[scope.row.eventId].title}}</label>
                    </template>
                </el-table-column>
                <el-table-column prop="age" label="負責人">
                    <template scope="scope">
                        <label>{{eventMap == null || eventMap[scope.row.eventId] == null || eventMap[scope.row.eventId].personalInformation == null ? '--':
                            eventMap[scope.row.eventId].personalInformation.name}}</label>
                    </template>
                </el-table-column>
                <el-table-column prop="birthday" label="物料名稱">
                    <template scope="scope">
                        <label>{{materirlName}}</label>
                    </template>
                </el-table-column>
                <el-table-column prop="idcardNo" label="狀態">
                    <template scope="scope">
                        <label>{{formatType(scope.row.type)}}</label>
                    </template>
                </el-table-column>
                <el-table-column prop="relationship" label="數量">
                    <template scope="scope">
                        <label>{{formatUseNum(scope.row.useNum)}}</label>
                    </template>
                </el-table-column>
                <el-table-column prop="ethtic" label="使用時間">
                    <template scope="scope">
                        <label>{{changeTime(scope.row.createOn)}}</label>
                    </template>
                </el-table-column>
            </el-table>
下面是js部分
methods: {
  init (param) {
  let id = param.param && param.param.id
  if(id){
      this.start = 0
          MaterialRecordService.query({param: {baseId: this.baseId, materialId: id},start: this.start,limit: 30}).then(rsp => {//初次請求數據,30條
            this.start += 30
            this.materielList = rsp.data
            MissionEventService.microList({ids: rsp.data.map(n => n.eventId)}).then(rsp3 => {
                this.eventMap = {}
                rsp3.data.forEach(n => (this.eventMap[n.id] = n))

            })
          })
  }
  },
  onScroll() {
      let inner = document.querySelector('.el-table__body-wrapper');
      if(inner.scrollHeight - inner.scrollTop <= inner.clientHeight){//為true時證明已經到底,可以請求接口
        if(this.flag){//設一個滾動事件的開關,(在data裡面聲明 flag: true)默認為true
             this.flag = false
             MaterialRecordService.query({param: {baseId: this.baseId, materialId: this.entity.id},start: this.start,limit:30}).then(rsp => {//每次加載30條
              this.materielList = this.materielList.concat(rsp.data)
                  this.start += 30
                  this.flag = true
              MissionEventService.microList({ids: rsp.data.map(n => n.eventId)}).then(rsp3 => {
               rsp3.data.forEach(n => (this.eventMap[n.id] = n))
              })
             })
        }
      }
   }
},
mounted () {
      this.init({...this.param})<br>    //監聽表格dom對象的滾動事件
      document.querySelector('.el-table__body-wrapper').addEventListener('scroll', this.onScroll);
    }
在這裡我要說明一下監聽的dom對象是哪一個

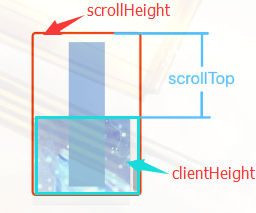
我還要解釋下scrollHeight、scrollTop、clientHeight這三個屬性

這是我截的別人的圖加瞭幾筆
scrollHeight:網頁正文全文高度,
scrollTop:網頁滾動的高度,
clientHeight:網頁可視區域的高度
以上就是vue實現滾動加載的表格的詳細內容,更多關於vue 滾動加載的表格的資料請關註WalkonNet其它相關文章!
推薦閱讀:
- vue中的slot-scope及scope.row用法
- Vue使用ElemenUI對table的指定列進行合算的方法
- 關於el-table表格組件中插槽scope.row的使用方式
- vue表格(table)計算總計方式
- vue實現表格分頁功能