Redhat7.3安裝MySQL8.0.22的詳細教程(二進制安裝)
一、MySQL安裝包下載
官網地址:https://dev.mysql.com/downloads/mysql/
下載步驟:
過濾操作系統版本
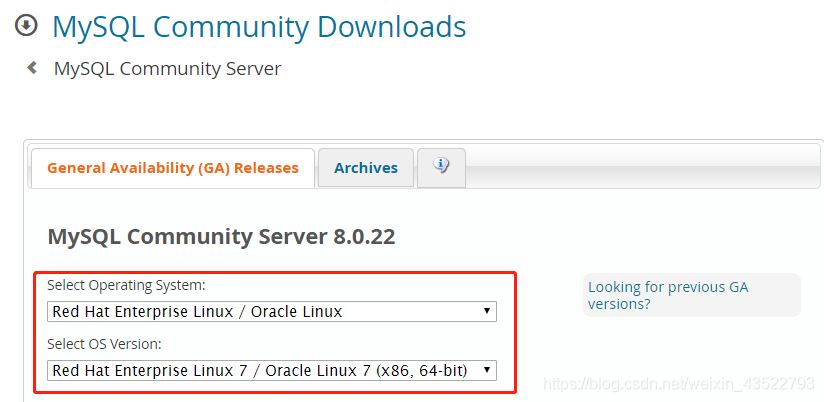
選擇歸檔安裝包

下載後,上傳並md5校驗安裝包是否與上圖官方提供的值一致,確保傳輸過程安裝包無損害
[root@MyDB1 ~]# cd /usr/local/software/
[root@MyDB1 software]# md5sum mysql-8.0.22-el7-x86_64.tar.gz
52e312605f66aaaa0efcd272b9fc0a1f mysql-8.0.22-el7-x86_64.tar.gz
解壓安裝包
[root@MyDB1 software]# tar -zxvf mysql-8.0.22-el7-x86_64.tar.gz
[root@MyDB1 software]# ln -s mysql-8.0.22-el7-x86_64/ mysql			#創建鏈接,方便操作
二、MySQL卸載說明
- 隻有rpm安裝方式是需要卸載舊版本的mysql,二進制安裝和編譯安裝不需要,但是要註意端口沖突
- rpm若不卸載舊版本,在安裝時,它會提示你mysql已安裝,此時是無法再次安裝的,隻有通過yum更新版本
- 為瞭保證後續操作不會產生其他沖突,我們卸載原有的mysql
註:在卸載舊的MySQL之前,註意備份數據
[root@MyDB1 ~]# rpm -qa|grep mysql								#查看是否已安裝mysql數據庫
[root@MyDB1 ~]# rpm -qa|grep mysql|xargs rpm -e --nodeps					#卸載mysql
[root@MyDB1 software]# rpm -qa|grep mariadb-libs|xargs rpm -e --nodeps		#卸載mariadb
三、創建用戶和組
新建組和用戶
[root@MyDB1 ~]# groupadd -g 2000 mysql
[root@MyDB1 ~]# useradd -u 2000 -g mysql -c "MySQL Server" -s /sbin/nologin mysql
[root@MyDB1 ~]# cat /etc/group|grep mysql
mysql:x:2000:
[root@MyDB1 ~]# cat /etc/passwd|grep mysql
mysql:x:2000:2000:Mysql software:/home/mysql:/sbin/nologin
註:若組和用戶已存在,則刪除系統默認組和用戶,再次創建!
刪除組和用戶
[root@MyDB1 ~]# userdel mysql #刪除用戶同時會刪除相應的組
賦權給mysql路徑
[root@MyDB1 ~]# cd /usr/local/software/
[root@MyDB1 software]# chown -R mysql:mysql mysql*
初始化之前的目錄結構
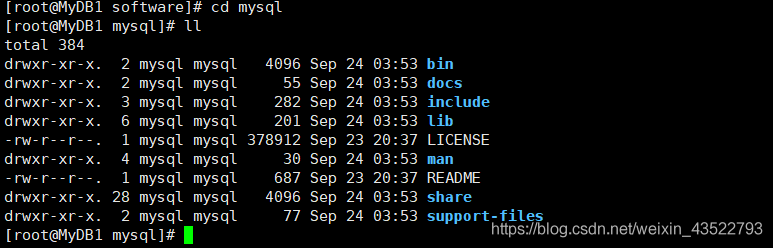
註:此時是沒有data目錄
四、MySQL初始化
初始化之前先編輯好配置文件
[root@MyDB1 ~]# vi /etc/my.cnf
[root@MyDB1 ~]# cat /etc/my.cnf


內容如下:(其他的根據實際需求配置)
[mysqld]
basedir = /usr/local/software/mysql
datadir = /usr/local/software/mysql/data
log_error = /usr/local/software/mysql/mysql-error.log
port = 3306
socket = /usr/local/software/mysql/mysqld.sock
pid_file = /usr/local/software/mysql/mysqld.pid

character-set-server=utf8
lower_case_table_names=1
max_connections=1000
sql_mode='STRICT_TRANS_TABLES,NO_ZERO_IN_DATE,NO_ZERO_DATE,ERROR_FOR_DIVISION_BY_ZERO,NO_ENGINE_SUBSTITUTION'

[mysql]
default-character-set=utf8

[client]
default-character-set=utf8
初始化開始
[root@MyDB1 ~]# /usr/local/software/mysql/bin/mysqld --initialize --user=mysql --basedir=/usr/local/software/mysql --datadir=/usr/local/software/mysql/data
初始化過程,輸出日志文件中有root用戶的臨時密碼

初始化之後的目錄結構

五、MySQL啟動服務
方式1——init.d: 啟動服務
[root@MyDB1 ~]# cp /usr/local/software/mysql/support-files/mysql.server /etc/init.d/mysqld
[root@MyDB1 ~]# /etc/init.d/mysqld start
驗證服務
[root@MyDB1 ~]# ps -ef|grep mysql

解釋說明
圖中有兩個進程,一個主進程,一個守護進程。當mysql意外停止時,守護進程會自動重啟mysql服務
演示demo
[root@MyDB1 ~]# kill -9 75341 #直接殺死進程

方式2——systemctl: 編輯啟動配置文件
[root@MyDB1 subsys]# vi /etc/systemd/system/mysqld.service


內容如下:(缺點:當kill掉時,無法自動啟動恢復)
[Unit]
Description=MySQL Server
Documentation=man:mysqld(8)
Documentation=http://dev.mysql.com/doc/refman/en/using-systemd.html
Documentation=https://www.freedesktop.org/software/systemd/man/systemd.unit.html
After=network.target
After=syslog.target
[Install]
WantedBy=multi-user.target
[Service]
User=mysql
Group=mysql
LimitNOFILE = 5000
ExecStart=/usr/local/software/mysql/bin/mysqld --defaults-file=/etc/my.cnf
啟動服務
[root@MyDB1 ~]# systemctl start mysqld.service
[root@MyDB1 ~]# systemctl status mysqld.service
六、安全效率優化
啟動權限限制
[root@MyDB1 ~]# cd /usr/local/software/mysql/bin/
[root@MyDB1 bin]# chmod 700 mysqld mysqld_safe
[root@MyDB1 bin]# ll mysqld mysqld_safe
-rwx------. 1 mysql mysql 441010738 Sep 24 03:42 mysqld
-rwx------. 1 mysql mysql  29157 Sep 24 03:18 mysqld_safe
註:現在隻要root用戶才能夠啟動停止MySQL服務!
服務隨系統啟動
systemctl enable mysqld.service
systemctl list-unit-files|grep mysql
七、配置環境變量
[root@MyDB1 ~]# vi /etc/profile

追加內容如下:
MYSQL_HOME=/usr/local/software/mysql
export PATH=.:$PATH:$MYSQL_HOME/bin

[root@MyDB1 ~]# source /etc/profile						#重新加載,生效!
八、修改root初始密碼
創建socket鏈接
[root@MyDB1 ~]# ln -s /usr/local/software/mysql/mysqld.sock /tmp/mysql.sock
使用臨時密碼登錄
[root@MyDB1 ~]# mysql -uroot -p
Enter password:
Welcome to the MySQL monitor. Commands end with ; or \g.
Your MySQL connection id is 10
Server version: 8.0.22

Copyright (c) 2000, 2020, Oracle and/or its affiliates. All rights reserved.

Oracle is a registered trademark of Oracle Corporation and/or its
affiliates. Other names may be trademarks of their respective
owners.

Type 'help;' or '\h' for help. Type '\c' to clear the current input statement.

mysql>
註:當臨時密碼含有特使符號時,可能命令行輸入會產生歧義。此時,交互時輸入密碼即可!
修改root密碼
mysql> alter user root@'localhost' identified by 'MyDB12@com';
Query OK, 0 rows affected (0.00 sec)

mysql> flush privileges;
Query OK, 0 rows affected (0.00 sec)
註:MySQL8密碼必須符合一定復雜度,否則無法修改;退出當前會話後,重啟登錄生效!
九、配置mysql遠程登錄
- 關閉防火墻或開放MySQL端口
- 查看允許訪問MySQL的用戶和地址
mysql> select user,host from mysql.user;
+------------------+-----------+
| user    | host  |
+------------------+-----------+
| mysql.infoschema | localhost |
| mysql.session | localhost |
| mysql.sys  | localhost |
| root    | localhost |
+------------------+-----------+
4 rows in set (0.00 sec)
遇到的問題
mysql> grant all privileges on *.* to root@'%' identified by 'MyDB12@com';
ERROR 1064 (42000): You have an error in your SQL syntax; check the manual that corresponds to your MySQL server version for the right syntax to use
 near 'identified by 'MyDB12@com'' at line 1
註:該錯誤並不是語法錯誤,是因為mysql該版本不支持直接創建用戶和賦權,而需要分別實現
創建遠程登錄用戶
mysql> create user 'root'@'%' identified by 'MyDB12@com';
Query OK, 0 rows affected (0.01 sec)
賦權
mysql> grant all privileges on *.* to 'root'@'%';
Query OK, 0 rows affected (0.01 sec)

mysql> flush privileges;
Query OK, 0 rows affected (0.01 sec)
到此這篇關於Redhat7.3安裝MySQL8.0.22(二進制安裝)的文章就介紹到這瞭,更多相關Redhat7.3安裝MySQL8.0.22內容請搜索WalkonNet以前的文章或繼續瀏覽下面的相關文章希望大傢以後多多支持WalkonNet!
推薦閱讀:
- Centos8安裝mysql8的詳細過程(免安裝版/或者二進制包方式安裝)
- Linux環境下安裝MySQL8.0的完整步驟
- MySQL8.0修改密碼的正確姿勢分享
- Navicat連接MySQL8.0的正確方法(親測有效)
- CentOS7安裝MySQL 8.0.26的過程