Python爬蟲實戰之使用Scrapy爬取豆瓣圖片
使用Scrapy爬取豆瓣某影星的所有個人圖片
以莫妮卡·貝魯奇為例

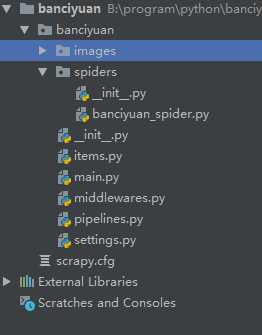
1.首先我們在命令行進入到我們要創建的目錄,輸入 scrapy startproject banciyuan 創建scrapy項目
創建的項目結構如下

2.為瞭方便使用pycharm執行scrapy項目,新建main.py
from scrapy import cmdline

cmdline.execute("scrapy crawl banciyuan".split())
再edit configuration

然後進行如下設置,設置後之後就能通過運行main.py運行scrapy項目瞭

3.分析該HTML頁面,創建對應spider

from scrapy import Spider
import scrapy

from banciyuan.items import BanciyuanItem


class BanciyuanSpider(Spider):
    name = 'banciyuan'
    allowed_domains = ['movie.douban.com']
    start_urls = ["https://movie.douban.com/celebrity/1025156/photos/"]
    url = "https://movie.douban.com/celebrity/1025156/photos/"

    def parse(self, response):
        num = response.xpath('//div[@class="paginator"]/a[last()]/text()').extract_first('')
        print(num)
        for i in range(int(num)):
            suffix = '?type=C&start=' + str(i * 30) + '&sortby=like&size=a&subtype=a'
            yield scrapy.Request(url=self.url + suffix, callback=self.get_page)

    def get_page(self, response):
        href_list = response.xpath('//div[@class="article"]//div[@class="cover"]/a/@href').extract()
        # print(href_list)
        for href in href_list:
            yield scrapy.Request(url=href, callback=self.get_info)

    def get_info(self, response):
        src = response.xpath(
            '//div[@class="article"]//div[@class="photo-show"]//div[@class="photo-wp"]/a[1]/img/@src').extract_first('')
        title = response.xpath('//div[@id="content"]/h1/text()').extract_first('')
        # print(response.body)
        item = BanciyuanItem()
        item['title'] = title
        item['src'] = [src]
        yield item
4.items.py
# Define here the models for your scraped items
#
# See documentation in:
# https://docs.scrapy.org/en/latest/topics/items.html

import scrapy


class BanciyuanItem(scrapy.Item):
    # define the fields for your item here like:
    src = scrapy.Field()
    title = scrapy.Field()
pipelines.py
# Define your item pipelines here
#
# Don't forget to add your pipeline to the ITEM_PIPELINES setting
# See: https://docs.scrapy.org/en/latest/topics/item-pipeline.html


# useful for handling different item types with a single interface
from itemadapter import ItemAdapter
from scrapy.pipelines.images import ImagesPipeline
import scrapy

class BanciyuanPipeline(ImagesPipeline):
    def get_media_requests(self, item, info):
        yield scrapy.Request(url=item['src'][0], meta={'item': item})

    def file_path(self, request, response=None, info=None, *, item=None):
        item = request.meta['item']
        image_name = item['src'][0].split('/')[-1]
        # image_name.replace('.webp', '.jpg')
        path = '%s/%s' % (item['title'].split(' ')[0], image_name)

        return path
settings.py
# Scrapy settings for banciyuan project
#
# For simplicity, this file contains only settings considered important or
# commonly used. You can find more settings consulting the documentation:
#
#     https://docs.scrapy.org/en/latest/topics/settings.html
#     https://docs.scrapy.org/en/latest/topics/downloader-middleware.html
#     https://docs.scrapy.org/en/latest/topics/spider-middleware.html

BOT_NAME = 'banciyuan'

SPIDER_MODULES = ['banciyuan.spiders']
NEWSPIDER_MODULE = 'banciyuan.spiders'


# Crawl responsibly by identifying yourself (and your website) on the user-agent
USER_AGENT = {'User-Agent':'Mozilla/5.0 (Windows NT 10.0; Win64; x64) AppleWebKit/537.36 (KHTML, like Gecko) Chrome/71.0.3578.80 Safari/537.36'}


# Obey robots.txt rules
ROBOTSTXT_OBEY = False

# Configure maximum concurrent requests performed by Scrapy (default: 16)
#CONCURRENT_REQUESTS = 32

# Configure a delay for requests for the same website (default: 0)
# See https://docs.scrapy.org/en/latest/topics/settings.html#download-delay
# See also autothrottle settings and docs
#DOWNLOAD_DELAY = 3
# The download delay setting will honor only one of:
#CONCURRENT_REQUESTS_PER_DOMAIN = 16
#CONCURRENT_REQUESTS_PER_IP = 16

# Disable cookies (enabled by default)
#COOKIES_ENABLED = False

# Disable Telnet Console (enabled by default)
#TELNETCONSOLE_ENABLED = False

# Override the default request headers:
#DEFAULT_REQUEST_HEADERS = {
#   'Accept': 'text/html,application/xhtml+xml,application/xml;q=0.9,*/*;q=0.8',
#   'Accept-Language': 'en',
#}

# Enable or disable spider middlewares
# See https://docs.scrapy.org/en/latest/topics/spider-middleware.html
#SPIDER_MIDDLEWARES = {
#    'banciyuan.middlewares.BanciyuanSpiderMiddleware': 543,
#}

# Enable or disable downloader middlewares
# See https://docs.scrapy.org/en/latest/topics/downloader-middleware.html
#DOWNLOADER_MIDDLEWARES = {
#    'banciyuan.middlewares.BanciyuanDownloaderMiddleware': 543,
#}

# Enable or disable extensions
# See https://docs.scrapy.org/en/latest/topics/extensions.html
#EXTENSIONS = {
#    'scrapy.extensions.telnet.TelnetConsole': None,
#}

# Configure item pipelines
# See https://docs.scrapy.org/en/latest/topics/item-pipeline.html
ITEM_PIPELINES = {
   'banciyuan.pipelines.BanciyuanPipeline': 1,
}
IMAGES_STORE = './images'

# Enable and configure the AutoThrottle extension (disabled by default)
# See https://docs.scrapy.org/en/latest/topics/autothrottle.html
#AUTOTHROTTLE_ENABLED = True
# The initial download delay
#AUTOTHROTTLE_START_DELAY = 5
# The maximum download delay to be set in case of high latencies
#AUTOTHROTTLE_MAX_DELAY = 60
# The average number of requests Scrapy should be sending in parallel to
# each remote server
#AUTOTHROTTLE_TARGET_CONCURRENCY = 1.0
# Enable showing throttling stats for every response received:
#AUTOTHROTTLE_DEBUG = False

# Enable and configure HTTP caching (disabled by default)
# See https://docs.scrapy.org/en/latest/topics/downloader-middleware.html#httpcache-middleware-settings
#HTTPCACHE_ENABLED = True
#HTTPCACHE_EXPIRATION_SECS = 0
#HTTPCACHE_DIR = 'httpcache'
#HTTPCACHE_IGNORE_HTTP_CODES = []
#HTTPCACHE_STORAGE = 'scrapy.extensions.httpcache.FilesystemCacheStorage'
5.爬取結果

reference
源碼
到此這篇關於Python爬蟲實戰之使用Scrapy爬取豆瓣圖片的文章就介紹到這瞭,更多相關Scrapy爬取豆瓣圖片內容請搜索WalkonNet以前的文章或繼續瀏覽下面的相關文章希望大傢以後多多支持WalkonNet!
推薦閱讀:
- 使用python scrapy爬取天氣並導出csv文件
- Python Scrapy實戰之古詩文網的爬取
- 詳解Python之Scrapy爬蟲教程NBA球員數據存放到Mysql數據庫
- Python 詳解通過Scrapy框架實現爬取百度新冠疫情數據流程
- python實戰之Scrapy框架爬蟲爬取微博熱搜