python實現學生信息管理系統源碼
本文實例為大傢分享瞭python實現學生信息管理系統的具體代碼,供大傢參考,具體內容如下
代碼如下:
Project.py文件內容:
class Student(object):
# 建立學生信息儲存的列表(嵌套的方式)
studentInformation = []
# 對學生對象的數據進行說明
studentShow = ["學號:", "姓名:", "年齡:"]
# 錄入學生
def addstudent(self):
sno = input("請輸入學號:")
name = input("請輸入姓名:")
sage = input("請輸入年齡:")
# 建立一個列表,用於暫時存儲
student = [sno, name, sage]
# 加入學生(判斷學號是否重復)
x = 0
# 剛開始錄入學生時,學號不可能重復
if len(self.studentInformation) == 0:
self.studentInformation.append(student)
# 判斷重復
else:
while x < len(self.studentInformation):
if self.studentInformation[x][0] != sno:
x += 1
else:
print("學號重復!!!\n請重新輸入序號!!!")
break
else:
self.studentInformation.append(student)
print("加入成功!!!")
# 輸出學生
def showstudent(self):
print("學生信息輸出如下:")
for i in range(len(self.studentInformation)):
print(self.studentShow[0]+self.studentInformation[i][0], end=" ")
print(self.studentShow[1] + self.studentInformation[i][1], end=" ")
print(self.studentShow[2] + self.studentInformation[i][2])
# 刪除學生
def deletestudent(self):
x = 0
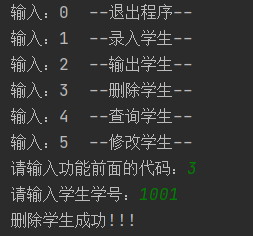
sno = input("請輸入學生學號:")
while x < len(self.studentInformation):
if self.studentInformation[x][0] == sno:
del self.studentInformation[x]
print("刪除學生成功!!!")
break
else:
x += 1
else:
print("不存在當前學生!!!")
# 查詢學生
def selectstudent(self):
x = 0
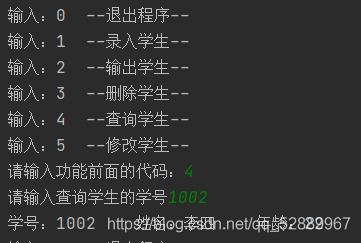
sno = input("請輸入查詢學生的學號")
while x < len(self.studentInformation):
if self.studentInformation[x][0] == sno:
print(self.studentShow[0] + self.studentInformation[x][0], end=" ")
print(self.studentShow[1] + self.studentInformation[x][1], end=" ")
print(self.studentShow[2] + self.studentInformation[x][2])
break
else:
x += 1
else:
print("未查詢到當前學生!!!")
# 修改學生
def changestudent(self):
x = 0
sno = input("請輸入修改學生的學號:")
while x < len(self.studentInformation):
if self.studentInformation[x][0] == sno:
name = input("請輸入修改後的姓名:")
sage = input("請輸入修改後的年齡:")
self.studentInformation[x][1] = name
self.studentInformation[x][2] = sage
print("修改成功!!!")
break
else:
x += 1
# 界面打印
@staticmethod
def printui():
print("輸入:0 --退出程序--")
print("輸入:1 --錄入學生--")
print("輸入:2 --輸出學生--")
print("輸入:3 --刪除學生--")
print("輸入:4 --查詢學生--")
print("輸入:5 --修改學生--")
# 程序調用
def run(self):
self.printui()
number = input("請輸入功能前面的代碼:")
# 無限循環
var = 1
while var == 1:
if int(number) == 1:
self.addstudent()
self.printui()
number = input("請輸入功能前面的代碼:")
elif int(number) == 2:
self.showstudent()
self.printui()
number = input("請輸入功能前面的代碼:")
elif int(number) == 3:
self.deletestudent()
self.printui()
number = input("請輸入功能前面的代碼:")
elif int(number) == 4:
self.selectstudent()
self.printui()
number = input("請輸入功能前面的代碼:")
elif int(number) == 5:
self.changestudent()
self.printui()
number = input("請輸入功能前面的代碼:")
elif int(number) == 0:
break
else:
print("您輸入的序號不對!\n請重新輸入!")
self.printui()
number = input("請輸入功能前面的代碼:")
else:
print("再見!")
exit()
text.py文件:
from Project import Student
# 實例化對象
stu = Student()
stu.run()
運行結果:


以上就是本文的全部內容,希望對大傢的學習有所幫助,也希望大傢多多支持WalkonNet。
推薦閱讀:
- Python實現功能全面的學生管理系統
- Python實現學生管理系統(面向對象版)
- python實現學生信息管理系統(面向對象)
- Python實現學生管理系統並生成exe可執行文件詳解流程
- python實現學生管理系統源碼