Spring Boot和Thymeleaf整合結合JPA實現分頁效果(實例代碼)
在項目裡,我需要做一個Spring Boot結合Thymeleaf前端模版,結合JPA實現分頁的演示效果。做的時候發現有些問題,也查瞭現有網上的不少文檔,發現能全棧實現的不多,所以這裡我就把我的做法,全部代碼和步驟貼出來供大傢參考。
1 創建項目,用pom.xml引入依賴
這裡將創建名為ThymeleafWithDB的Maven,在pom.xml裡引入如下的依賴包。
 <dependencies>
	  <dependency>
	   <groupId>org.springframework.boot</groupId>
	   <artifactId>spring-boot-starter-web</artifactId>
		 </dependency>
	  <dependency>
	   <groupId>org.springframework.boot</groupId>
	<artifactId>spring-boot-starter-thymeleaf</artifactId>
	  </dependency>
	 </dependencies>
而在此項目裡,對應的Stock庫存表如下所示。
|
字段名 |
類型 |
說明 |
|
id |
int |
主鍵 |
|
name |
varchar |
庫存貨物名 |
|
num |
int |
庫存數量 |
|
description |
varchar |
庫存貨物的描述 |
2 編寫啟動類
這個類是中規中矩的,代碼如下。
package prj;
	import org.springframework.boot.SpringApplication;
	import org.springframework.boot.autoconfigure.SpringBootApplication;
	@SpringBootApplication
	public class SpringBootApp {
	 public static void main(String[] args) {
	  SpringApplication.run(SpringBootApp.class, args);
	 }
	}
3 在控制器類裡,添加支持分頁的方法
@RequestMapping("/listByPage")
	 public ModelAndView listByPage(@RequestParam(value = "pageNum", defaultValue = "0") int pageNum,
	@RequestParam(value = "pageSize", defaultValue = "3") int pageSize) {
	  Page<Stock> stocks=stockService.getStockListByPage(pageNum, pageSize);
	  System.out.println("total page:" + stocks.getTotalPages());
	  System.out.println("current Page:" + pageNum);
	  ModelAndView modelAndView = new ModelAndView("listByPage");
	  //傳遞參數
	  modelAndView.addObject("stocks",stocks);
	  return modelAndView;
	 }
在第2行和第3行定義該方法的參數時,由於表示當前頁的pageNum和每頁數據個數的pageSize參數都是從url請求裡以get參數的形式得到,所以在之前要加@RequestParam註解,否則的話就無法從請求裡得到這兩個參數。
在該方法的第4行裡,調用瞭stockService對象的getStockListByPage方法,在傳入分頁參數的情況下,得到瞭當前頁面中的數據。同時為瞭調試,還在第5行和第6行裡,輸出瞭當前頁和每頁個數的信息。
在拿到當前頁面的數據後,該方法時通過第9行的方法,把它加到modelAndView對象裡,並在第10行裡,通過該對象,向listByPage視圖返回數據。
4 編寫業務邏輯方法
public Page<Stock> getStockListByPage(int pageNum, int pageSize) {
	  Sort sort = new Sort(Sort.Direction.ASC , "ID");
	  Pageable pageable = PageRequest.of(pageNum, pageSize, sort);
	  Page<Stock> stocks = stockRepo.findAll(pageable);
	  return stocks;
	 }
在這個方法的第2行裡,首先通過Sort對象,定義瞭“按ID進行升序排列”的排序方式,隨後通過第3行的PageRequest對象,定義的分頁的方式,這裡表示起始數據的pageNum和每頁展示數據的pageSize值,都是來自於外部傳入的參數。
在確定好排序和分頁的方式後,本方法在第4行裡,通過調用PagingAndSortingRepository類型對象stockRepo的findAll方法,根據在參數pageable裡封裝好的分頁和排序的方式,向MySQL的stock數據表裡請求數據,並把得到的數據通過第5行的return語句返回。
5 編寫Repo類
package prj.repo;
	import org.springframework.data.repository.PagingAndSortingRepository;
	import org.springframework.stereotype.Component;
	import prj.model.Stock;
	@Component
	public interface StockRepo extends PagingAndSortingRepository<Stock, Integer> { }
從第6行的代碼裡大傢能看到,該Repo類實現( implements)瞭JPA裡包含分頁和排序功能的PagingAndSortingRepository接口,由於在StockService裡調用的findAll方法已經封裝在該JPA接口裡瞭,所以這裡在StockRepo類裡,甚至不需要再寫代碼。
6 在application.yml文件裡編寫JPA和Thymeleaf的配置參數
spring:
	 jpa:
	 show-sql: true
	 hibernate:
	  dll-auto: validate
	 datasource:
	 url: jdbc:mysql://localhost:3306/stock?serverTimezone=GMT
	 username: root
	 password: 123456
	 driver-class-name: com.mysql.jdbc.Driver
	 thymeleaf:
	 enabled: true
	 content-type: text/html
	 check-template-location: true
	 cache: false
	 prefix: classpath:/templates/
	 suffix: .html
其中在第1行到第10行的代碼裡,給出瞭JPA和MySQL的相關定義,而在第11行到第17行的代碼裡,給出瞭Thymeleaf模板的參數。
這裡用到的配置參數,其實在前文裡都已經說明過,不過請註意第2行和第11行的縮進,根據yml配置文件的縮進格式,第11行的thymeleaf其實是和第2行的jpa同級,它們均屬於第1行的spring的子級配置。
7 添加listByPage.html頁面,實現分頁的效果
根據配置,該文件是需要放在resources/templates目錄裡,具體代碼如下。
<!DOCTYPE html>
	<html lang="en" xmlns:th="http://www.thymeleaf.org">
	<head>
	 <meta charset="UTF-8">
	 <title>庫存列表</title>
	</head>
	<body>
	<table border="2">
	 <tr>
	  <td>庫存編號</td>
	  <td>庫存貨物</td>
	  <td>數量</td>
	  <td>描述</td>
	 </tr>
	 <tr th:each="stock : ${stocks}">
	  <td th:text="${stock.ID}"></td>
	  <td th:text="${stock.name}"></td>
	  <td th:text="${stock.num}"></td>
		<td th:text="${stock.description}"></td>
	 </tr>

	</table>
	<div>
	 <ul>
	  <li>
	   <a th:href="'/listByPage?pageNum=0'" rel="external nofollow" rel="external nofollow" >首頁</a>
	  </li>
	  <li th:if="${stocks.hasPrevious()}">
	   <a th:href="'/listByPage?pageNum='%20+%20${stocks.previousPageable().getPageNumber()}" rel="external nofollow" th:text="上一頁"></a>
	  </li>
	  <li th:if="${stocks.hasNext()}">
	   <a th:href="'/listByPage?pageNum='%20+%20${stocks.nextPageable().getPageNumber()}" rel="external nofollow" th:text="下一頁"></a>
	  </li>
	  <li>
	   <a th:href="'/listByPage?pageNum='%20+%20${stocks.getTotalPages()%20-%201}" rel="external nofollow" rel="external nofollow" >尾頁</a>
	  </li>
	 </ul>
	</div>
	</body>
	</html>
在第22行到第37行的<div>屬性元素裡,加入瞭分頁的效果,具體說明如下。
- 在第25行的代碼,通過th:href=”‘/listByPage?pageNum=0′” rel=”external nofollow” rel=”external nofollow” 代碼,以url參數的形式,向控制器類的listByPage方法,傳遞瞭pageNum為0的參數,以展示首頁數據。
- 在顯示“上一頁”的效果前,先需要通過第27行的th:if代碼判斷stocks對象裡是否包含瞭上一頁的數據,如果是,則通過第28行的代碼展示“上一頁”鏈接,請註意這裡“上一頁”鏈接所對應的參數,這樣就能通過該鏈接,得到上一頁的數據。
- 展示“下一頁”的方法和展示“上一頁”的很相似,都是先通過th:if判斷是否有下一頁數據,然後再通過鏈接得到下一頁的數據。
- 在第34行的代碼裡,通過th:href=”‘/listByPage?pageNum=’%20+%20${stocks.getTotalPages()%20-%201}” rel=”external nofollow” rel=”external nofollow” 的代碼得到瞭尾頁的數據,請註意這裡是用url中pageNum的參數值,得到尾頁的數據。
8 觀察效果
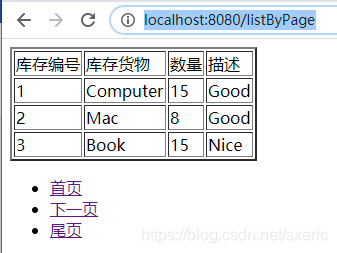
編寫完成後,啟動該項目,此時如果在瀏覽器裡輸入http://localhost:8080/listByPage,就能看到如下圖所示的效果。

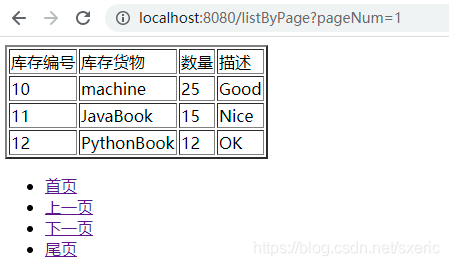
從中大傢能看到,上圖裡每頁的數據是3條,而且在數據下方展示瞭對應的分頁鏈接,由於是第一頁,所以沒有包含“上一頁”的鏈接。如果點擊上圖裡的“下一頁”鏈接,就能看到頁面跳轉的效果,如下圖所示。

從中大傢不僅能看到頁面上的數據變化,而且還能看到在url裡,通過攜帶pageNum參數的方式,取到瞭下一頁數據。並且,由於參數stocks裡已經包含瞭“上一頁”的數據,所以還能看到對應的鏈接。同樣地,大傢還能自行點擊“首頁”、“下一頁”和“尾頁”等鏈接,以觀察對應的效果。
到此這篇關於Spring Boot和Thymeleaf整合結合JPA實現分頁效果的文章就介紹到這瞭,更多相關Spring Boot和Thymeleaf實現分頁內容請搜索WalkonNet以前的文章或繼續瀏覽下面的相關文章希望大傢以後多多支持WalkonNet!
推薦閱讀:
- SpringBoot靜態資源CSS等修改後再運行無效的解決
- SpringBoot中JPA實現Sort排序的三種方式小結
- node+express實現分頁效果
- Spring Boot 整合 Thymeleaf 實例分享
- SpringBoot @ExceptionHandler與@ControllerAdvice異常處理詳解