spring框架學習總結
Spring 框架概述
- Spring 使創建 Java 企業應用程序變得容易。它提供瞭在企業環境中使用 Java 語言所需的一切,並支持 Groovy 和 Kotlin 作為 JVM 上的替代語言,並且可以根據應用程序的需求靈活地創建多種體系結構。從 Spring Framework 5.0 開始,Spring 需要 JDK 8(Java SE 8),並且已經為 JDK 9 提供瞭現成的支持。
- Spring 是分層的 Java SE/EE full-stack 輕量級開源框架,以 IoC(Inverse of Control,控制反轉)和 AOP(Aspect Oriented Programming,面向切面編程)為內核,使用基本的 JavaBean 完成以前隻可能由 EJB 完成的工作,取代瞭 EJB 臃腫和低效的開發模式。
- Spring 是開源的。它擁有一個龐大而活躍的社區,可以根據各種實際用例提供持續的反饋。這幫助 Spring 在很長一段時間內成功地 Developing 瞭。
Spring優點
- 方便解耦,簡化開發
- Spring 就是一個大工廠,可以將所有對象的創建和依賴關系的維護交給 Spring 管理。
- 方便集成各大優秀框架
- Spring 不排斥各種優秀的開源框架,其內部提供瞭對各種優秀框架(如 Struts2、Hibernate、MyBatis 等)的直接支持。
- 方便程序的測試
- Spring 支持 JUnit4,可以通過註解方便地測試 Spring 程序。
- AOP 編程的支持
- Spring 提供面向切面編程,可以方便地實現對程序進行權限攔截和運行監控等功能。
- 聲明式事務的支持
- 隻需要通過配置就可以完成對事務的管理,而無須手動編程。
Spring體系結構
Spring 框架采用分層架構,根據不同的功能被劃分成瞭多個模塊,這些模塊大體可分為 Data Access/Integration、Web、AOP、Aspects、Messaging、Instrumentation、Core Container 和 Test,具體如下圖所示:
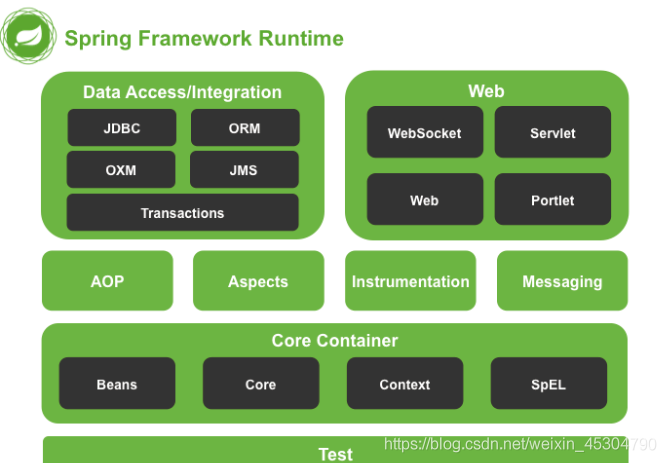
Data Access/Integration(數據訪問/集成)
數據訪問/集成層包括 JDBC、ORM、OXM、JMS 和 Transactions 模塊,具體介紹如下。
JDBC 模塊:提供瞭一個 JDBC 的抽象層,大幅度減少瞭在開發過程中對數據庫操作的編碼。 ORM 模塊:對流行的對象關系映射 API,包括 JPA、JDO、Hibernate 和 iBatis 提供瞭的集成層。 OXM 模塊:提供瞭一個支持對象/XML 映射的抽象層實現,如 JAXB、Castor、XMLBeans、JiBX 和 XStream。 JMS 模塊:指 Java 消息服務,包含的功能為生產和消費的信息。 Transactions 事務模塊:支持編程和聲明式事務管理實現特殊接口類,並為所有的 POJO。
Web 模塊
Spring 的 Web 層包括 Web、Servlet、Struts 和 Portlet 組件,具體介紹如下。
Web 模塊:提供瞭基本的 Web 開發集成特性,例如多文件上傳功能、使用的 Servlet 監聽器的 IoC 容器初始化以及 Web 應用上下文。 Servlet模塊:包括 Spring 模型—視圖—控制器(MVC)實現 Web 應用程序。 Struts 模塊:包含支持類內的 Spring 應用程序,集成瞭經典的 Struts Web 層。 Portlet 模塊:提供瞭在 Portlet 環境中使用 MV C實現,類似 Web-Servlet 模塊的功能。
Core Container(核心容器)
Spring 的核心容器是其他模塊建立的基礎,由 Beans 模塊、Core 核心模塊、Context 上下文模塊和 Expression Language 表達式語言模塊組成,具體介紹如下。
Beans 模塊:提供瞭 BeanFactory,是工廠模式的經典實現,Spring 將管理對象稱為 Bean。 Core 核心模塊:提供瞭 Spring 框架的基本組成部分,包括 IoC 和 DI 功能。 Context 上下文模塊:建立在核心和 Beans 模塊的基礎之上,它是訪問定義和配置任何對象的媒介。ApplicationContext 接口是上下文模塊的焦點。 Expression Language 模塊:是運行時查詢和操作對象圖的強大的表達式語言。
其他模塊
Spring的其他模塊還有 AOP、Aspects、Instrumentation 以及 Test 模塊,具體介紹如下。
AOP 模塊:提供瞭面向切面編程實現,允許定義方法攔截器和切入點,將代碼按照功能進行分離,以降低耦合性。 Aspects 模塊:提供與 AspectJ 的集成,是一個功能強大且成熟的面向切面編程(AOP)框架。 Instrumentation 模塊:提供瞭類工具的支持和類加載器的實現,可以在特定的應用服務器中使用。 Test 模塊:支持 Spring 組件,使用 JUnit 或 TestNG 框架的測試。
Spring拓展
Spring Boot與Spring Cloud
- Spring Boot 是 Spring 的一套快速配置腳手架,可以基於Spring Boot 快速開發單個微服務。
- Spring Cloud是基於Spring Boot實現的。
- Spring Boot專註於快速、方便集成的單個微服務個體,Spring Cloud關註全局的服務治理框架。
- Spring Boot使用瞭約束優於配置的理念,很多集成方案已經幫你選擇好瞭,能不配置就不配置 , Spring Cloud很大的一部分是基於Spring Boot來實現,Spring Boot可以離開Spring Cloud獨立使用開發項目,但是Spring Cloud離不開Spring Boot,屬於依賴的關系。
- SpringBoot在SpringClound中起到瞭承上啟下的作用,如果你要學習SpringCloud必須要學習SpringBoot。
Spring IoC 容器 (IoC 也稱為依賴項註入(DI),或DI是實現IoC的一種方法)
IoC容器概述
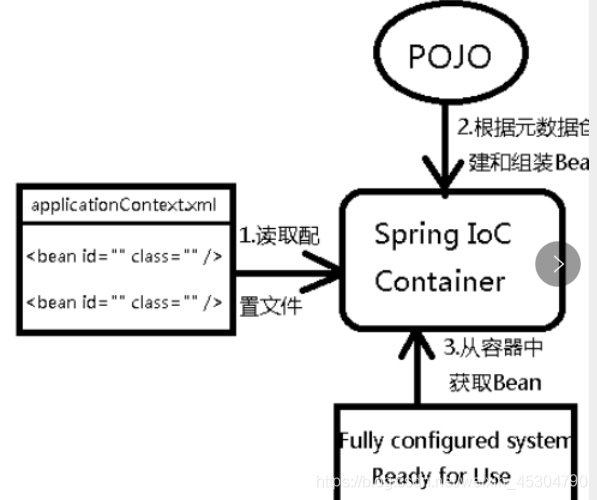
- 控制反轉是一種通過描述(XML或註解)並通過第三方去生產或獲取特定對象的方式。在Spring中實現控制反轉的是IoC容器,其實現方法是依賴註入。
- Spring容器在初始化時先讀取配置文件,根據配置文件或元數據創建與組織對象存入容器中,程序使用時再從Ioc容器中取出需要的對象。
- Spring 提供瞭兩種 IoC 容器,分別為 BeanFactory 和 ApplicationContext。
1.BeanFactory
beanFactory是一個Factory,用於管理bean的,有瞭一個Spring的beanFactory,我們就可以從spring中獲取註冊到其中的bean來使用。
2.ApplicationContext
ApplicationContext 是 BeanFactory 的子接口,也被稱為應用上下文。該接口的全路徑為:
org.springframework.context.ApplicationContext,它不僅提供瞭 BeanFactory 的所有功能,還添加瞭對 i18n(國際化)、資源訪問、事件傳播等方面的良好支持。
ApplicationContext 接口有兩個常用的實現類:ClassPathXmlApplicationContext和FileSystemXmlApplicationContext。 ClassPathXmlApplicationContext從類路徑 ClassPath 中尋找指定的 XML 配置文件,找到並裝載完成 ApplicationContext 的實例化工作,具體如下所示。ApplicationContext applicationContext = new ClassPathXmlApplicationContext(String configLocation);configLocation 參數用於指定 Spring 配置文件的名稱和位置,如 applicationContext.xml。
FileSystemXmlApplicationContext從指定的文件系統路徑中尋找指定的 XML 配置文件,找到並裝載完成 ApplicationContext 的實例化工作,具體如下所示。ApplicationContext applicationContext = new FileSystemXmlApplicationContext(String configLocation);它與 ClassPathXmlApplicationContext 的區別是:在讀取 Spring 的配置文件時,FileSystemXmlApplicationContext 不再從類路徑中讀取配置文件,而是通過參數指定配置文件的位置,它可以獲取類路徑之外的資源,如“D:/workspaces/applicationContext.xml”。
3.BeanFactory 和 ApplicationContext區別:
BeanFactory在初始化容器時,並未實例化Bean,直到第一次訪問某個Bean 時才實例目標Bean;而ApplicationContext 則在初始化應用上下文時就實例化所有單實例的Bean 。
在實際開發中,通常都選擇使用 ApplicationContext,而隻有在系統資源較少時,才考慮使用 BeanFactory。(但是,它們都是通過 XML 配置文件加載 Bean 的。)
Spring入門程序
1.創建maven項目
2.在pom.xml導入jar包依賴
    <dependencies>
        <!--導入spring,maven依賴-->
        <dependency>
            <groupId>org.springframework</groupId>
            <artifactId>spring-webmvc</artifactId>
            <version>5.2.12.RELEASE</version>
        </dependency>
        <!--導入junit-->
        <dependency>
            <groupId>junit</groupId>
            <artifactId>junit</artifactId>
            <version>4.12</version>
        </dependency>
    </dependencies>
3.編寫接口
package com.xxx.mapper;
/**
 * @author shkstart
 * @create 2021-06-11 15:50
 */
public interface UserMapper {
    public void hello();
}
4.編寫接口實現類
package com.xxx.mapper;/**
 * @author shkstart
 * @create 2021-06-11 15:50
 */
/**
 *@program: springTest
 *@description:
 *@author: XieXianXin
 *@create: 2021-06-11 15:50
 */
public class UserMapperImpl implements UserMapper{
    @Override
    public void hello() {
        System.out.println("Spring入門程序!");
    }
}
編寫Spring核心配置文件applicationContext.xml
<?xml version="1.0" encoding="UTF-8"?>
<beans xmlns="http://www.springframework.org/schema/beans"
       xmlns:xsi="http://www.w3.org/2001/XMLSchema-instance"
       xsi:schemaLocation="http://www.springframework.org/schema/beans
        http://www.springframework.org/schema/beans/spring-beans.xsd">
    <!--
    使用Spring來創建對象,在Spring這些都稱為Bean
    類型 變量名 = new 類型();
    Hello hello = new Hello();
    id = 變量名
    class = new 的對象
    -->
    <beans>
        <bean id="hello" class="com.xxx.mapper.UserMapperImpl">
        </bean>
    </beans>
</beans>
測試
package com.xxx.mapper;/**
* @author shkstart
* @create 2021-06-11 15:57
*/
import org.junit.Test;
import org.springframework.context.ApplicationContext;
import org.springframework.context.support.ClassPathXmlApplicationContext;
/**
*@program: springTest
*@description:
*@author: XieXianXin
*@create: 2021-06-11 15:57
*/
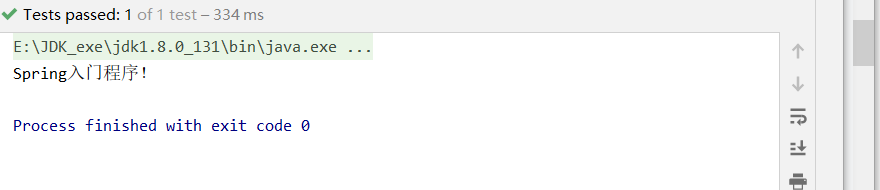
public class helloTest {
@Test
public void helloTest1(){
// 1. 初始化Spring容器,加載配置文件
ApplicationContext context = new ClassPathXmlApplicationContext("applicationContext.xml");
// 2. 通過容器獲取userMapper實例
UserMapper hello = context.getBean("hello", UserMapper.class);
// 3.調用實例中的hello()方法
hello.hello();
}
}
測試結果
IoC創建對象的三種方式
通過無參構造(要提供set方法)
編寫實體類User:
public class User {
    private String name;
    // set方法
    public void setName(String name) {
        this.name=name;
    }
    public User() {
        System.out.println("無參構造方法執行瞭!");
    }
    public void print(){
        System.out.println("學生名字為:"+name);
    }
}
編寫Spring核心配置文件:
<!--無參構造,但是要有set方法-->
        <bean id="user" class="com.xxx.pojo.User">
            <property name="name" value="小新"/>
        </bean>
測試以及結果:
 @Test
    public void helloTest2(){
        // 1. 初始化Spring容器,加載配置文件
        ApplicationContext context = new ClassPathXmlApplicationContext("applicationContext.xml");
        // 2. 通過容器獲取userMapper實例
        User user = context.getBean("user", User.class);
        // 3.調用實例中的print()方法
        user.print();
    }

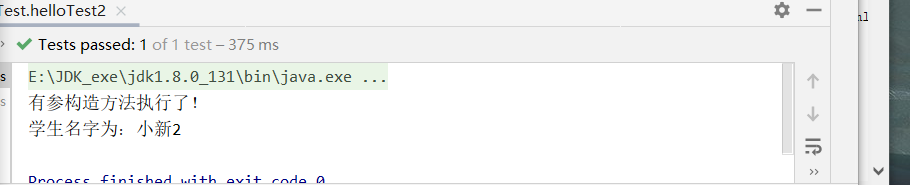
通過有參構造(要提供get方法)
編寫實體類User:
public class User {
    private String name;
    //get方法
    public String getName() {
        return name;
    }
    public User(String name) {
        System.out.println("有參構造方法執行瞭!");
        this.name = name;
    }
    public void print(){
        System.out.println("學生名字為:"+name);
    }
}
編寫Spring核心配置文件:
 <!--有參構造,但是要有get方法-->
        <bean id="user" class="com.xxx.pojo.User">
            <constructor-arg value="小新2" index="0"/>
        </bean>
測試以及結果:
  @Test
    public void helloTest2(){
        // 1. 初始化Spring容器,加載配置文件
        ApplicationContext context = new ClassPathXmlApplicationContext("applicationContext.xml");
        // 2. 通過容器獲取userMapper實例
        User user = context.getBean("user", User.class);
        // 3.調用實例中的print()方法
        user.print();
    }
拓展:Spring核心配置文件有三種寫法:
<!--有參構造,但是要有get方法-->
        <bean id="user" class="com.xxx.pojo.User">
            <constructor-arg index="0" value="小新-index屬性(0開始,按順序)"/>
            <constructor-arg name="name" value="小新-name屬性"/>
            <constructor-arg type="java.lang.String" value="小新-參數類型"/>
        </bean>
結果展示:


通過工廠類
編寫工廠類:
public class Factory {
    //方法一,靜態方法
    public static User getStaticInstance(){
        return new User("小新2——靜態方法創建對象");
    }
    //方法二,實例方法
    public User getInstance(){
        return new User("小新3-實例方法創建對象");
    }
}
編寫Spring核心配置文件:
<!--工廠類創建對象-->
        <!--創建工廠-->
        <bean id="factory" class="com.xxx.mapper.Factory"/>
        <!--靜態方法對象-->
        <bean id="staticFactory-user" class="com.xxx.mapper.Factory" factory-method="getStaticInstance"/>
        <!--實例方法對象-->
        <bean id="factory-user" factory-bean="factory" factory-method="getInstance"/>
測試以及結果:靜態方法:
 @Test
    public void helloTest4(){
        // 1. 初始化Spring容器,加載配置文件
        ApplicationContext context = new ClassPathXmlApplicationContext("applicationContext.xml");
        // 2. 通過容器獲取userMapper實例
        User user = context.getBean("staticFactory-user", User.class);
        // 3.調用實例中的print()方法
        user.print();
    }

實例方法:
@Test
    public void helloTest3(){
        // 1. 初始化Spring容器,加載配置文件
        ApplicationContext context = new ClassPathXmlApplicationContext("applicationContext.xml");
        // 2. 通過容器獲取userMapper實例
        User user = context.getBean("factory-user", User.class);
        // 3.調用實例中的print()方法
        user.print();
    }

Spring依賴註入(DI)和Bean的作用域
什麼是依賴註入:Spring 容器在創建被調用者的實例時,會自動將調用者需要的對象實例註入給調用者,這樣,調用者通過 Spring 容器獲得被調用者實例。
依賴註入主要有兩種實現方式,分別是屬性 setter 註入和構造方法註入,其中setter註入要求重點掌握。
- 屬性 setter 註入(重點展開講解)
- 指 IoC 容器使用 setter 方法註入被依賴的實例。通過調用無參構造器或無參 static 工廠方法實例化 bean 後,調用該 bean 的 setter 方法,即可實現基於 setter 的 DI。
- 構造方法註入
- 指 IoC 容器使用構造方法註入被依賴的實例。基於構造器的 DI 通過調用帶參數的構造方法實現,每個參數代表一個依賴。
屬性 setter 註入講解:
環境搭建:(創建一個Student和Book類):
Student
package com.xxx.pojo;/**
 * @author shkstart
 * @create 2021-06-11 17:45
 */
import java.util.*;
/**
 *@program: Spring_study
 *@description:
 *@author: XieXianXin
 *@create: 2021-06-11 17:45
 */
public class Student {
    private String name;
    private Book book;
    private String[] course;
    private List<String> hobbies;
    private Map<String,String> card;
    private Set<String> fruit;
    private String marriage;
    private Properties info;
    public Student() {
    }
    public Student(String name, Book book, String[] course, List<String> hobbies, Map<String, String> card, Set<String> fruit, String marriage, Properties info) {
        this.name = name;
        this.book = book;
        this.course = course;
        this.hobbies = hobbies;
        this.card = card;
        this.fruit = fruit;
        this.marriage = marriage;
        this.info = info;
    }
    @Override
    public String toString() {
        return "Student{" +
                "name='" + name + '\'' +
                ", book=" + book +
                ", course=" + Arrays.toString(course) +
                ", hobbies=" + hobbies +
                ", card=" + card +
                ", fruit=" + fruit +
                ", marriage='" + marriage + '\'' +
                ", info=" + info +
                '}';
    }
    public String getName() {
        return name;
    }
    public void setName(String name) {
        this.name = name;
    }
    public Book getBook() {
        return book;
    }
    public void setBook(Book book) {
        this.book = book;
    }
    public String[] getCourse() {
        return course;
    }
    public void setCourse(String[] course) {
        this.course = course;
    }
    public List<String> getHobbies() {
        return hobbies;
    }
    public void setHobbies(List<String> hobbies) {
        this.hobbies = hobbies;
    }
    public Map<String, String> getCard() {
        return card;
    }
    public void setCard(Map<String, String> card) {
        this.card = card;
    }
    public Set<String> getFruit() {
        return fruit;
    }
    public void setFruit(Set<String> fruit) {
        this.fruit = fruit;
    }
    public String getMarriage() {
        return marriage;
    }
    public void setMarriage(String marriage) {
        this.marriage = marriage;
    }
    public Properties getInfo() {
        return info;
    }
    public void setInfo(Properties info) {
        this.info = info;
    }
}
Book
package com.xxx.pojo;/**
 * @author shkstart
 * @create 2021-06-11 17:45
 */
/**
 *@program: Spring_study
 *@description:
 *@author: XieXianXin
 *@create: 2021-06-11 17:45
 */
public class Book {
    private String name;
    private int id;
    public Book() {
    }
    @Override
    public String toString() {
        return "Book{" +
                "name='" + name + '\'' +
                ", id=" + id +
                '}';
    }
    public String getName() {
        return name;
    }
    public void setName(String name) {
        this.name = name;
    }
    public int getId() {
        return id;
    }
    public void setId(int id) {
        this.id = id;
    }
    public Book(String name, int id) {
        this.name = name;
        this.id = id;
    }
}
常量註入:
<bean class="com.xxx.pojo.Student" id="student">
            <!--常量註入-->
            <property name="name" value="小新"/>
</bean>
Bean註入:
<bean class="com.xxx.pojo.Book" id="book">
           <property name="name" value="Java放棄"/>
           <property name="id" value="100"/>
       </bean>
       <bean class="com.xxx.pojo.Student" id="student">
       	 <!--Bean註入-->
          <property name="book" ref="book"/>
   	 </bean>
數組註入:
<property name="course">
              <array>
                  <value>高數</value>
                  <value>計算機網絡</value>
                  <value>數據庫</value>
              </array>
           </property>
List註入:
<property name="hobbies">
               <list>
                   <value>唱</value>
                   <value>跳</value>
                   <value>Rap</value>
               </list>
           </property>
Map註入:
<property name="card">
               <map>
                   <entry key="銀行卡:" value="2501314"/>
                   <entry key="身份證:" value="1314520"/>
               </map>
           </property>
Set註入:
 <property name="fruit">
               <set>
                   <value>香蕉</value>
                   <value>蘋果</value>
                   <value>雪梨</value>
               </set>
           </property>
Null註入:
<property name="marriage">
               <null/>
           </property>
Properties註入:
<property name="info">
               <props>
                   <prop key="username">小新</prop>
                   <prop key="password">520</prop>
               </props>
           </property>
測試及結果展示:
public class BeanTest {
    @Test
    public void beanTest(){
        ApplicationContext context = new ClassPathXmlApplicationContext("applicationContext.xml");
        Student student = context.getBean("student", Student.class);
        System.out.println(student);
    }
}

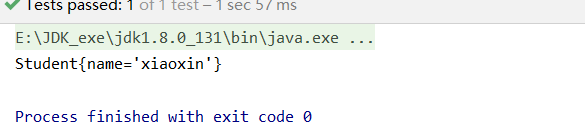
Student{name=‘小新’, book=Book{name=‘Java放棄’, id=100}, course=[高數, 計算機網絡, 數據庫], hobbies=[唱, 跳, Rap], card={銀行卡:=2501314, 身份證:=1314520}, fruit=[香蕉, 蘋果, 雪梨], marriage=‘null’, info={password=520, username=小新}}
Process finished with exit code 0
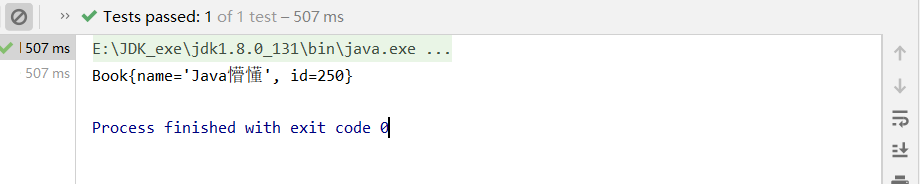
p命名空間(以Book類舉例)導入約束 xmlns:p=“http://www.springframework.org/schema/p”
<bean id="pBook" class="com.xxx.pojo.Book" p:name="Java懵懂" p:id="250"/>
測試及結果:
 @Test
    public void cpTest(){
        ApplicationContext context = new ClassPathXmlApplicationContext("applicationContext.xml");
        Book pBook = context.getBean("pBook", Book.class);
        System.out.println(pBook);
    }
c命名空間導入約束 xmlns:c=“http://www.springframework.org/schema/c”
<bean id="cBook" class="com.xxx.pojo.Book" c:id="520" c:name="Java入坑"/>
測試及結果:
  @Test
    public void cpTest(){
        ApplicationContext context = new ClassPathXmlApplicationContext("applicationContext.xml");
        Book cBook = context.getBean("cBook", Book.class);
        System.out.println(cBook);
    }

作用域種類
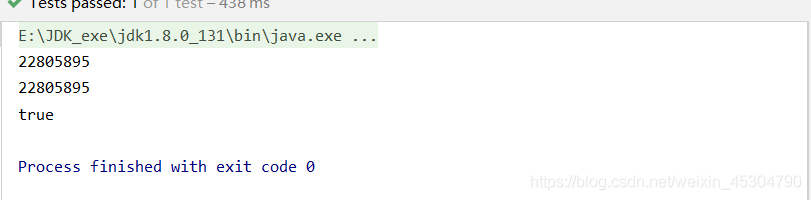
singleton(以Book舉例)單例模式,使用 singleton 定義的 Bean 在 Spring 容器中隻有一個實例,這也是 Bean 默認的作用域。
<bean class="com.xxx.pojo.Book" id="scopeBook" scope="singleton">
            <property name="id" value="1"/>
        </bean>
@Test
    public void scopeTest(){
        ApplicationContext context = new ClassPathXmlApplicationContext("applicationContext.xml");
        Book book1 = context.getBean("scopeBook", Book.class);
        Book book2 = context.getBean("scopeBook", Book.class);
        System.out.println(book1.hashCode());
        System.out.println(book2.hashCode());
        System.out.println(book1==book2);
    }
}
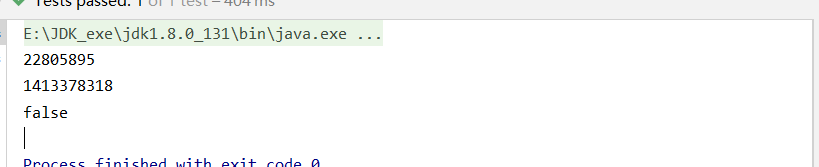
prototype 原型模式,每次通過 Spring 容器獲取 prototype 定義的 Bean 時,容器都將創建一個新的 Bean 實例,即每次調用getBean()時,相當於執行瞭一次new XxxBean()。
<bean class="com.xxx.pojo.Book" id="scopeBook" scope="prototype">
            <property name="id" value="1"/>
        </bean>
@Test
    public void scopeTest(){
        ApplicationContext context = new ClassPathXmlApplicationContext("applicationContext.xml");
        Book book1 = context.getBean("scopeBook", Book.class);
        Book book2 = context.getBean("scopeBook", Book.class);
        System.out.println(book1.hashCode());
        System.out.println(book2.hashCode());
        System.out.println(book1==book2);
    }
}
- request
在一次 HTTP 請求中,容器會返回該 Bean 的同一個實例。而對不同的 HTTP 請求,會返回不同的實例,該作用域僅在當前 HTTP Request 內有效。
- session
在同一個 HTTP Session 中,容器會返回該 Bean 的同一個實例。而對不同的 HTTP 請求,會返回不同的實例,該作用域僅在當前 HTTP Session 內有效。
- global Session
在一個全局的 HTTP Session 中,容器會返回該 Bean 的同一個實例。該作用域僅在使用 portlet context 時有效。
Spring 常用配置及屬性
Spring自動裝配
- Bean 的裝配可以理解為依賴關系註入,Bean 的裝配方式也就是 Bean 的依賴註入方式。Spring 容器支持多種形式的 Bean的裝配方式,如基於 XML 的 Bean 裝配、基於Annotation 的 Bean 裝配和自動裝配等。之前的舉例是通過XML的Bean裝配的。接下來講解自動裝配。
- 自動裝配就是指 Spring 容器可以自動裝配(autowire)相互協作的 Bean 之間的關聯關系,將一個 Bean 註入其他 Bean 的 Property 中。
- Spring的自動裝配需要從兩個角度來實現:
1.組件掃描(component scanning):spring會自動發現應用上下文中所創建的bean;
2.自動裝配(autowiring):spring自動滿足bean之間的依賴,也就是我們說的IoC/DI;
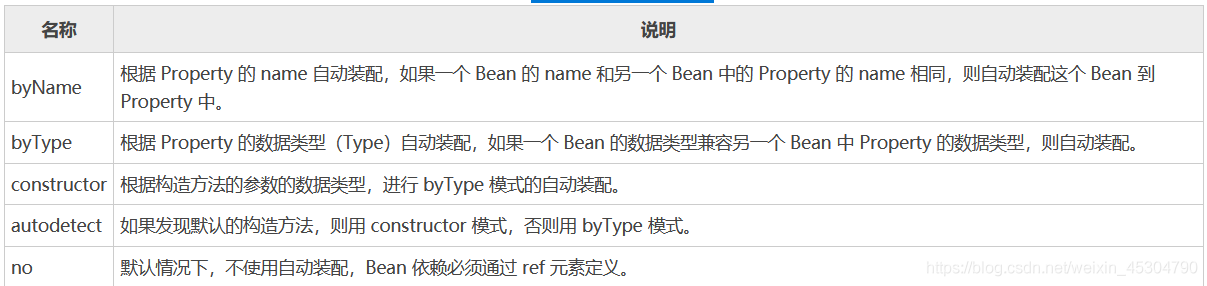
autowire 的屬性和作用
- 環境搭建:(分別創建一個Student和Student2類,再創建一個Teacher類)
public class Student {
   public void study(){
       System.out.println("Student類的方法study執行瞭");
   }
}
public class Student2 {
    public void study(){
        System.out.println("Student2類的方法study執行瞭");
    }
}
public class Teacher {
    private Student student;
    private Student2 student2;
    private String teach;
    public Teacher() {
    }
    @Override
    public String toString() {
        return "Teacher{" +
                "student=" + student +
                ", student2=" + student2 +
                ", teach='" + teach + '\'' +
                '}';
    }
    public Student getStudent() {
        return student;
    }
    public void setStudent(Student student) {
        this.student = student;
    }
    public Student2 getStudent2() {
        return student2;
    }
    public void setStudent2(Student2 student2) {
        this.student2 = student2;
    }
    public String getTeach() {
        return teach;
    }
    public void setTeach(String teach) {
        this.teach = teach;
    }
    public Teacher(Student student, Student2 student2, String teach) {
        this.student = student;
        this.student2 = student2;
        this.teach = teach;
    }
}
配置Spring核心配置文件
使用autowire=“byName”:
   <bean class="com.xxx.pojo.Student" id="student"/>
 <bean class="com.xxx.pojo.Student" id="student"/>
    <bean class="com.xxx.pojo.Student2" id="student2"/>
    <bean class="com.xxx.pojo.Teacher" id="teacher" autowire="byName">
        <property name="teach" value="Java"/>
    </bean>
測試及結果:
public class BeanTest {
    @Test
    public void beanTest(){
        ApplicationContext context = new ClassPathXmlApplicationContext("applicationContext.xml");
        Teacher teacher = context.getBean("teacher", Teacher.class);
        teacher.getStudent().study();
        teacher.getStudent2().study();
    }
}

若修改Student的bean id值不為student,如:<bean class="com.xxx.pojo.Student" id="s"/>則會報空指針異常java.lang.NullPointerException at BeanTest.beanTest(BeanTest.java:24)。因為按byName規則找不對應set方法,真正的setStudent就沒執行,對象就沒有初始化,所以調用時就會報空指針錯誤。
當一個bean節點帶有 autowire byName的屬性時:
1.將查找其類中所有的set方法名,例如setStudent,獲得將set去掉並且首字母小寫的字符串,即student。
2.去spring容器中尋找是否有此字符串名稱id的對象,如果有,就取出註入;如果沒有,就報空指針異常。
Spring註解開發
環境搭建
1.在spring配置文件中引入context文件頭
xmlns:context="http://www.springframework.org/schema/context"
http://www.springframework.org/schema/context
http://www.springframework.org/schema/context/spring-context.xsd
開啟屬性註解支持!
<context:annotation-config/>
編寫一個 Student類
public class Student {
    private String name;
    @Override
    public String toString() {
        return "Student{" +
                "name='" + name + '\'' +
                '}';
    }
    public String getName() {
        return name;
    }
    public void setName(String name) {
        this.name = name;
    }
    public Student() {
    }
    public Student(String name) {
        this.name = name;
    }
}
編寫Spring核心配置文件:
<bean class="com.xxx.pojo.Student" id="student">
       <property name="name" value="小新"/>
   </bean>
測試及結果:
@Test
    public void beanTest(){
       ApplicationContext context = new ClassPathXmlApplicationContext("applicationContext.xml");
        Student student = context.getBean("student",Student.class);
        System.out.println(student);

使用@Configuration和@Bean給容器中註冊組件 編寫一個配置類
/**
 *@program: springTest
 *@description: 在類上添加@Configuration註解使得該類成為Spring配置類,通過@Bean註解將該類註入到IoC容器,此時配置類==配置文件
 *@author: XieXianXin
 *@create: 2021-06-12 23:06
 */
// 這個配置類也是一個組件
@Configuration// 告訴Spring這是一個配置類
public class AnnotationStudent {
    @Bean// @Bean註解是給IOC容器中註冊一個bean,id默認是用方法名作為id
    public Student student(){
        return new Student("小新");
    }
}
測試及結果:
    @Test
    public void beanTest(){
        AnnotationConfigApplicationContext context = new AnnotationConfigApplicationContext(AnnotationStudent.class);
        Student bean = context.getBean(Student.class);
        //返回Student類在IoC容器中的id值
        String[] namesForType = context.getBeanNamesForType(Student.class);
        for (String s : namesForType) {
            System.out.println(s);
        }
        System.out.println(bean);
    }
}

若在配置類中給@Bean設置一個value值,如@Bean("stu")則測試結果為:
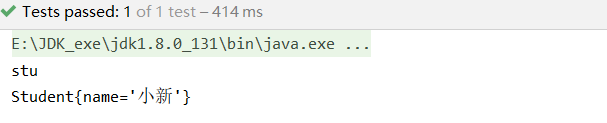
則我們在使用註解方式向Spring的IOC容器中註入JavaBean時,如果沒有在@Bean註解中明確指定bean的名稱,那麼就會使用當前方法的名稱來作為bean的名稱;如果在@Bean註解中明確指定瞭bean的名稱,那麼就會使用@Bean註解中指定的名稱來作為bean的名稱。
使用@ComponentScan自動掃描組件並指定掃描規則
開啟註解掃描,並刪除之前配置文件中的bean
<context:component-scan base-package="com.xxx"/>
在原有環境下創建一個com.xxx.service包,並創建一個Teacher類,並在類上添加一個@Service註解,同時,之前的Student類上也添加一個@Component註解
@Service
public class Teacher {
   private Student student;
   public void teach(){
       System.out.println("教授的學生是"+student);
   }
    @Override
    public String toString() {
        return "Teacher{" +
                "student=" + student +
                '}';
    }
    public Student getStudent() {
        return student;
    }
    public void setStudent(Student student) {
        this.student = student;
    }
    public Teacher(Student student) {
        this.student = student;
    }
    public Teacher() {
    }
}
測試及結果:
public class BeanTest {
        @Test
        public void beanTest() {
            ApplicationContext context = new ClassPathXmlApplicationContext("applicationContext.xml");
            String[] beanDefinitionNames = context.getBeanDefinitionNames();
            for (String definitionName : beanDefinitionNames) {
                System.out.println(definitionName);
            }
        }
}
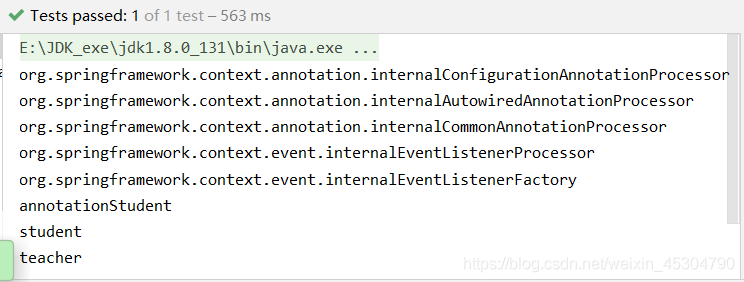
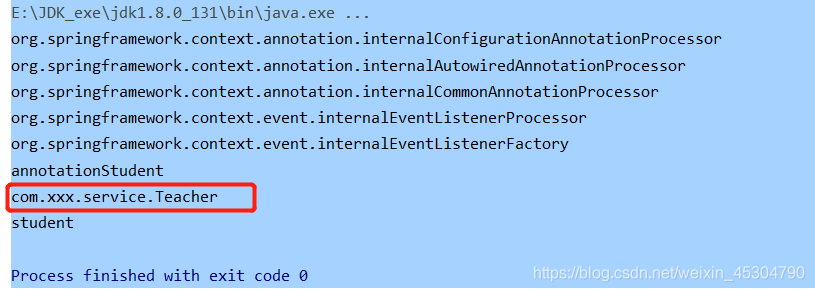
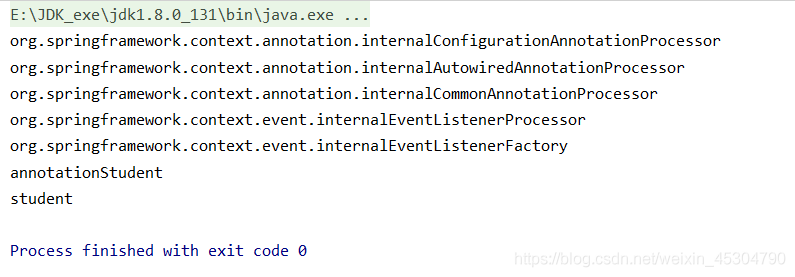
以上可以看到:在配置註解掃描後,隻要在com.xxx包下的所有子包中,加上瞭@Repository(Dao)、@Service(service)、@Controller、(web)@Component註解的類都會被掃描到,並自動註入到Spring容器中。(其實上面四個功能,目前為止是一樣的)
- 使用註解配置XML包掃描
我們可以在配置類中(前面的AnnotationStudent)使用@ComponentScan註解配置包掃描,由此代替xml中的<context:component-scan base-package="com.xxx"/>。先註釋掉之前的xml方式的註解掃描,接著
@Configuration// 告訴Spring這是一個配置類@ComponentScan(value = "com.xxx")public class AnnotationStudent { @Bean// @Bean註解是給IOC容器中註冊一個bean,id默認是用方法名作為id public Student student(){ return new Student("小新"); }}
測試結果跟之前一樣。因此,推薦以後都使用註解掃描就好瞭,Spring還是盡量用註解開發,MyBatis中還是用xml配置文件。
- ComponentScan方法使用
excludeFilters()不包含哪些包、includeFilters()包含哪些包,使用includeFilters時,需要在XML配置文件中先配置use-default-filters="false",即禁用默認的掃描所有包過濾規則才能生效。另外,ComponentScan還是一個可重復註解的註解,因此可以在一個類上重復使用這個註解。
使用@Scope註解設置組件的作用域
通過在類中添加註解@scope註解設置作用域,如:
// 這個配置類也是一個組件
@Configuration// 告訴Spring這是一個配置類
public class AnnotationStudent {
    @Scope("prototype")
    @Bean// @Bean註解是給IOC容器中註冊一個bean,id默認是用方法名作為id
    public Student student(){
        return new Student("小新");
    }
}
- 結果:
如果為false。
- @Scope註解中的取值如下所示:

註解自動裝配組件(@Resource是JDK自帶的)
- @Autowired
@Autowired註解可以對類成員變量、方法和構造函數進行標註,完成自動裝配的工作。@Autowired註解可以放在類、接口以及方法上。等價於<property name="屬性名" value=" 屬性值"/>@Autowired註解默認是優先按照類型去容器中找對應的組件,即:context.getBean(類名.class);,如果找到多個相同類型的組件,那麼是將屬性名稱作為組件的id,到IOC容器中進行查找,即:context.getBean("組件的id");
- @Qualifier
@Autowired是根據類型自動裝配的,加上@Qualifier則可以根據byName的方式自動裝配,且Qualifier不能單獨使用。
- @Resource
是JDK自帶的註解 可以按名稱註入也可以按類型註入,默認是按名稱註入,沒有顯式指定名稱時,在spring容器中匹配與需要註入的bean屬性名相同的bean,如果還不同,@Resource會找到一個主類型匹配而不是一個特定的命名bean。
懶加載@Lazy
懶加載就是Spring容器啟動的時候,先不創建對象,在第一次使用(獲取)bean的時候Xxx xxx = context.getBean(Xxx.class);再來創建對象,並進行一些初始化。使用時,隻需要在配置類的方法上加上@Lazy註解即可。
public class AnnotationStudent {
    @Lazy
    @Bean// @Bean註解是給IOC容器中註冊一個bean,id默認是用方法名作為id
    public Student student(){
        System.out.println("在容器中添加對象!");
        return new Student("小新");
    }
}
public class BeanTest {
        @Test
        public void beanTest() {
            ApplicationContext context = new ClassPathXmlApplicationContext("applicationContext.xml");
            System.out.println("容器創建完成!");
            Student student = context.getBean(Student.class);
            Student student1 = context.getBean(Student.class);
            System.out.println(student==student1);
        }
}
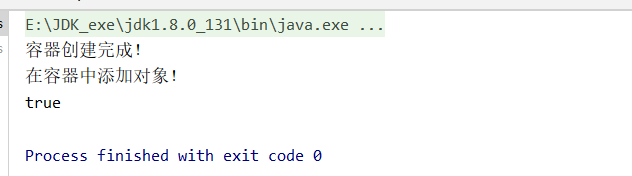
- 非懶加載模式(默認情況):bean在Spring容器啟動的時候ApplicationContext context = new ClassPathXmlApplicationContext(“applicationContext.xml”);就會被創建,並且還加載到Spring容器中去瞭。
@Configuration// 告訴Spring這是一個配置類
public class AnnotationStudent {
    @Bean// @Bean註解是給IOC容器中註冊一個bean,id默認是用方法名作為id
    public Student student(){
        System.out.println("在容器中添加對象!");
        return new Student("小新");
    }
}
public class BeanTest {
        @Test
        public void beanTest() {
            ApplicationContext context = new ClassPathXmlApplicationContext("applicationContext.xml");
            System.out.println("容器創建完成!");
        }
}

使用@Import註解給容器中快速導入一個組件
註冊bean的方式通常有以下幾種:
1.包掃描+給組件標註註解(@Controller、@Servcie、@Repository、@Component
2.@Bean註解
3.@Import註解(隻作用在類上,可以在實際開發項目中導入別人的類並註冊到容器中,這是兩外兩種無法做到的)例如在AnnotationStudent配置類上導入Teacher類對應的bean實例(id默認是組件的全類名)
4.使用FactoryBean接口(支持泛式)向Spring容器中註冊bean
// 這個配置類也是一個組件
    @Configuration// 告訴Spring這是一個配置類
    @Import(Teacher.class)
    public class AnnotationStudent {
        @Bean// @Bean註解是給IOC容器中註冊一個bean,id默認是用方法名作為id
        public Student student(){
            return new Student("小新");
        }
    }
public class BeanTest {
        @Test
        public void beanTest() {
           /* ApplicationContext context = new ClassPathXmlApplicationContext("applicationContext.xml");
            */
            AnnotationConfigApplicationContext applicationContext = new AnnotationConfigApplicationContext(AnnotationStudent.class);
            String[] beanNamesForType = applicationContext.getBeanDefinitionNames();
            for (String s : beanNamesForType) {
                System.out.println(s);
            }
        }
}
當去除@Import後,輸出結果為:
Bean生命周期
常意義上講的bean的生命周期,指的是bean從創建到初始化,經過一系列的流程,最終銷毀的過程,如下圖所示。在Spring中,我們可以自己來指定bean的初始化和銷毀的方法@Bean(initMethod = "自定義的初始化方法名",destroyMethod = "自定義的銷毀方法名")。當容器在bean進行到當前生命周期的階段時,會自動調用我們自定義的初始化和銷毀方法。

自定義一個Life類:
public class Life {
    public Life(){
        System.out.println("Life構造方法執行瞭!");
    }
    public void init(){
        System.out.println("Life初始化方法執行瞭!");
    }
    public void destroy(){
        System.out.println("Life銷毀方法執行瞭!");
    }
}
配置類中註冊bean:
@Configuration// 告訴Spring這是一個配置類
    public class AnnotationStudent {
        @Bean(initMethod = "init",destroyMethod = "destroy")
        public Life life(){
            return new Life();
        }
    }
測試及結果:
public class BeanTest {
        @Test
        public void beanTest() {
            AnnotationConfigApplicationContext applicationContext = new AnnotationConfigApplicationContext(AnnotationStudent.class);
            System.out.println("容器創建完成!");
            Life bean = applicationContext.getBean(Life.class);
        }
}
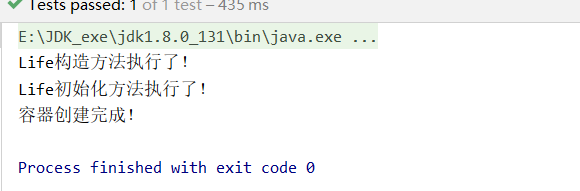
可以看到,對於單實例對象,先執行構造方法,再到初始化方法,而銷毀方法執行需要顯式關閉容器時候才執行applicationContext.close();
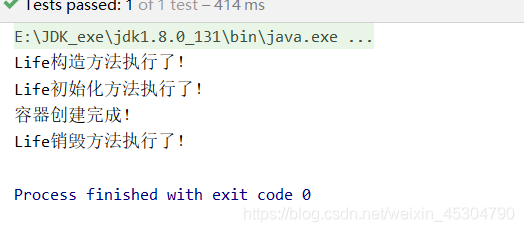
因此,我們可以自定義初始化方法和銷毀方法處理配置數據源問題,在初始化的時候,會對很多的數據源的屬性進行賦值操作;在銷毀的時候,我們需要對數據源的連接等信息進行關閉和清理。
@Value註解為屬性賦值
在Student類中的name屬性上加上@Value註解,等價於配置文件中的<bean id="student" class="com.xxx.pojo.Student"> <property name="name" value="xiaoxin"/> </bean>裡的<property name=”name” value=”xiaoxin”/>,外面的bean是@Component註解作用。
@Component
public class Student {
    @Value("xiaoxin")
    private String name;
    @Override
    public String toString() {
        return "Student{" +
                "name='" + name + '\'' +
                '}';
    }
    public String getName() {
        return name;
    }
    public void setName(String name) {
        this.name = name;
    }
    public Student() {
    }
    public Student(String name) {
        this.name = name;
    }
}
測試及結果:
public class BeanTest {
        @Test
        public void beanTest() {
            ApplicationContext context = new ClassPathXmlApplicationContext("applicationContext.xml");
            Student student = context.getBean("student", Student.class);
            System.out.println(student);
        }
}
使用@PropertySource加載配置文件
- 原始xml方式:
- 在resources包下創建一個applicationContext.properties配置文件,內容為鍵值對形式:
name=xiaoxin password=888888 - 編寫一個Property類,用於測試:
public class Property {
    private String username;
    private Integer password;
    @Override
    public String toString() {
        return "Property{" +
                "username='" + username + '\'' +
                ", password=" + password +
                '}';
    }
    public String getUsername() {
        return username;
    }
    public void setUsername(String username) {
        this.username = username;
    }
    public Integer getPassword() {
        return password;
    }
    public void setPassword(Integer password) {
        this.password = password;
    }
    public Property(String username, Integer password) {
        this.username = username;
        this.password = password;
    }
    public Property() {
    }
}
Spring核心配置文件內容為:
    <context:annotation-config />
    <context:component-scan base-package="com.xxx"/>
    <context:property-placeholder location="applicationContext.properties"/>
    <bean class="com.xxx.pojo.Property" id="property">
        <property name="username" value="${name}"/>
        <property name="password" value="${password}"/>
    </bean>
測試及結果:
public class BeanTest {
@Test
public void beanTest() {
ApplicationContext context = new ClassPathXmlApplicationContext("applicationContext.xml");
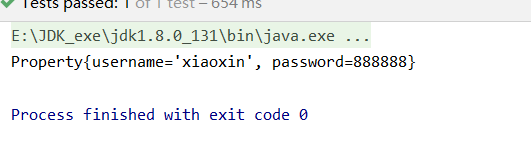
Property property = context.getBean("property", Property.class);
System.out.println(property.toString());
}
}
註解方式:
- 保留原applicationContext.properties配置文件
- 將Spring核心配置文件內容刪除:隻保留開啟註解:<
context:annotation-config /> - Property類完全使用註解代替:
@Configuration//表示該類是配置類,等價於核心配置文件
@ComponentScan(value = "com.xxx")//等價於<context:component-scan base-package="com.xxx"/>
@Component//註冊bean,默認id為類名(首字母小寫),等價於<bean class="com.xxx.pojo.Property" id="property"></bean>
@PropertySource("classpath:applicationContext.properties")//等價於<context:property-placeholder location="applicationContext.properties"/>
public class Property {
    @Value("${name}")//等價於<property name="username" value="${name}"/>
    private String username;
    @Value("${password}")//等價於<property name="password" value="${password}"/>
    private Integer password;
    @Override
    public String toString() {
        return "Property{" +
                "username='" + username + '\'' +
                ", password=" + password +
                '}';
    }
    public String getUsername() {
        return username;
    }
    public void setUsername(String username) {
        this.username = username;
    }
    public Integer getPassword() {
        return password;
    }
    public void setPassword(Integer password) {
        this.password = password;
    }
    public Property(String username, Integer password) {
        this.username = username;
        this.password = password;
    }
    public Property() {
    }
}
測試及結果:
public class BeanTest {
@Test
public void beanTest() {
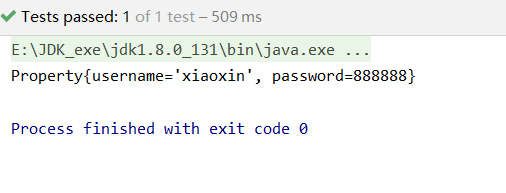
AnnotationConfigApplicationContext applicationContext = new AnnotationConfigApplicationContext(Property.class);
Property bean = applicationContext.getBean(Property.class);
System.out.println(bean.toString());
}
}
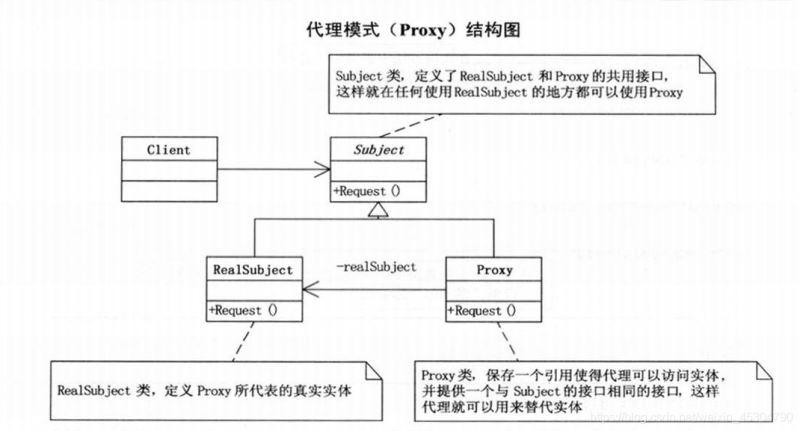
代理模式
代理模式:為其他對象提供一種代理以控制對這個對象的訪問。
靜態代理
案例:男孩相親,想找女孩結婚,於是男孩找媒婆進行代理,媒婆代理介紹女孩同時,還要收取一定的介紹費。
接口類
/**
 *@program: springTest
 *@description: 相親接口
 *@author: XieXianXin
 *@create: 2021-06-13 20:36
 */
public interface Marry {
    //相親
    void marry();
}
女孩(目標對象)
/**
 *@program: springTest
 *@description: 目標對象
 *@author: XieXianXin
 *@create: 2021-06-13 20:32
 */
public class Girl {
    private String name;
    @Override
    public String toString() {
        return "Girl{" +
                "name='" + name + '\'' +
                '}';
    }
    public Girl(String name) {
        this.name = name;
    }
    public Girl() {
    }
    public String getName() {
        return name;
    }
    public void setName(String name) {
        this.name = name;
    }
}
男孩(被代理對象)
/**
*@program: springTest
*@description: 被代理對象
*@author: XieXianXin
*@create: 2021-06-13 20:33
*/
public class Boy implements Marry {
private Girl girl;
public Boy(Girl girl) {
this.girl = girl;
}
@Override
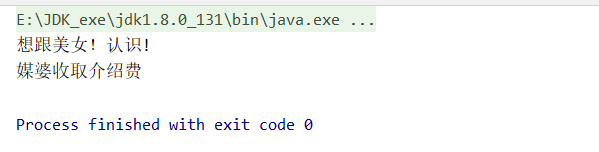
public void marry() {
System.out.println("想跟"+girl.getName()+"認識!");
}
}
媒婆(代理對象)
/**
*@program: springTest
*@description: 代理類
*@author: XieXianXin
*@create: 2021-06-13 20:33
*/
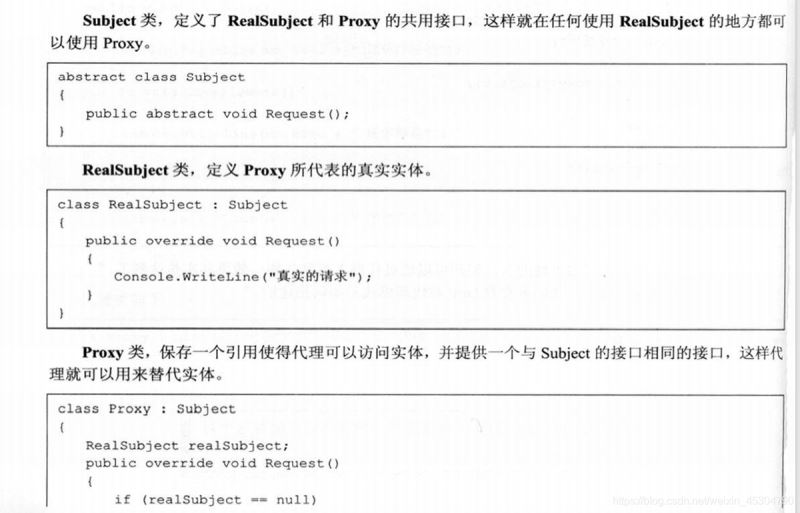
public class Proxy implements Marry {
private Boy boy;
public Proxy(Girl girl){
boy = new Boy(girl);
}
@Override
public void marry() {
boy.marry();
}
public void earn(){
System.out.println("媒婆收取介紹費");
}
}
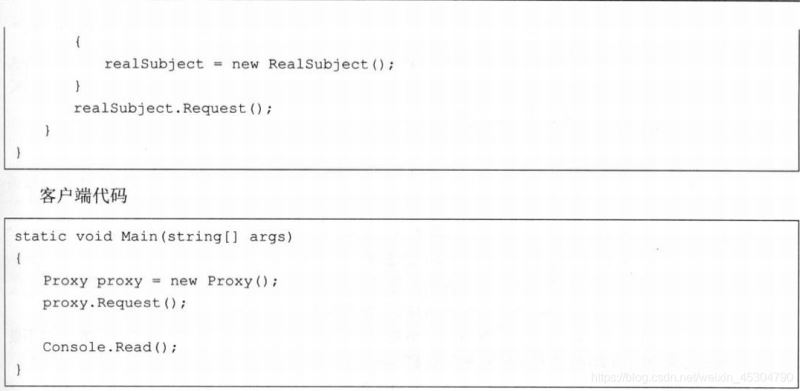
測試及結果
public class ProxyTest {
    @Test
    public void proxyTest(){
        Girl girl = new Girl();
        girl.setName("美女!");
        Proxy proxy = new Proxy(girl);
        proxy.marry();
        proxy.earn();
    }
}
- 靜態代理的好處:
可以使得我們的真實角色更加純粹 . 不再去關註一些公共的事情。
公共的業務由代理來完成 . 實現瞭業務的分工。
公共業務發生擴展時變得更加集中和方便。
- 靜態代理缺點:
冗餘,由於代理對象要實現與目標對象一致的接口,會產生過多的代理類。
不易維護,一旦接口增加方法,目標對象與代理對象都要進行修改。
Spring AOP AOP
AOP
(Aspect Oriented Programming)意為:面向切面編程,通過預編譯方式和運行期動態代理實現程序功能的統一維護的一種技術。AOP是OOP的延續,是軟件開發中的一個熱點,也是Spring框架中的一個重要內容,是函數式編程的一種衍生范型。利用AOP可以對業務邏輯的各個部分進行隔離,從而使得業務邏輯各部分之間的耦合度降低,提高程序的可重用性,同時提高瞭開發的效率。
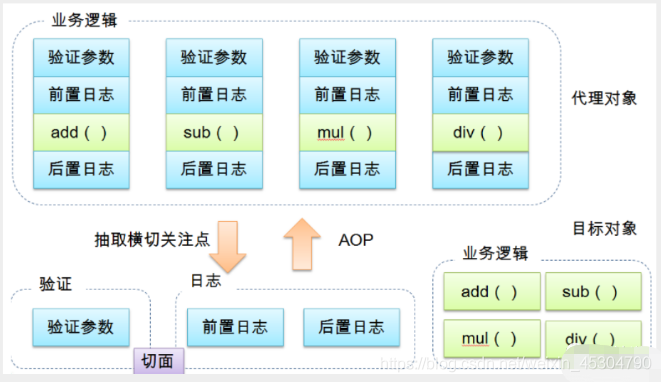
總的來說,AOP是指在程序的運行期間動態地將某段代碼切入到指定方法、指定位置進行運行的編程方式。AOP的底層是使用動態代理實現的。
AOP中相關概念
橫切關註點:跨越應用程序多個模塊的方法或功能。即是,與我們業務邏輯無關的,但是我們需要關註的部分,就是橫切關註點。如日志 , 安全 , 緩存 , 事務等等 …
切面(ASPECT):橫切關註點 被模塊化 的特殊對象。即,它是一個類。
通知(Advice):切面必須要完成的工作。即,它是類中的一個方法。
目標(Target):被通知對象。
代理(Proxy):向目標對象應用通知之後創建的對象。
切入點(PointCut):切面通知 執行的 “地點”的定義。
連接點(JointPoint):與切入點匹配的執行點。
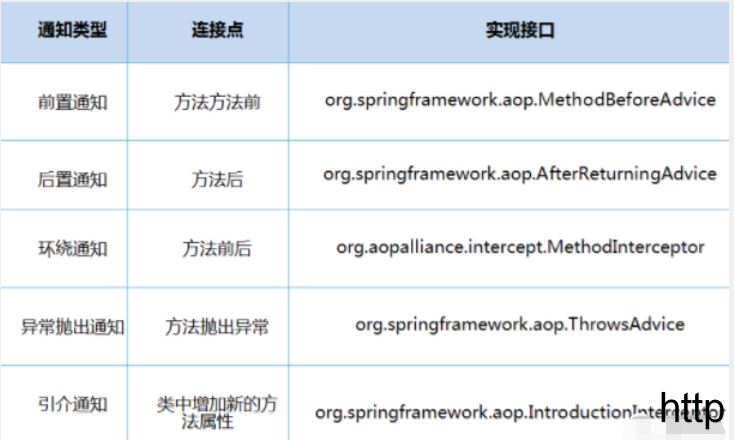
SpringAOP中支持5種類型的Advice
Spring AOP的實現(3種)
- 導入依賴
在原有的maven的pom.xml文件中加上AOP織入依賴包
<!--使用Spring實現Aop,使用AOP織入,需要導入一個依賴包!-->
      <dependency>
          <groupId>org.aspectj</groupId>
          <artifactId>aspectjweaver</artifactId>
          <version>1.9.4</version>
      </dependency>
通過 Spring API 實現
編寫業務接口及其實現類
/**
 * @author shkstart 第一種,有接口方式,通過 Spring API 實現,要實現Uservice接口,具體看advice包
 *                  第二種,通過自定義類實現,運用的是AOP定義,不需要實現接口,具體看diy包
 *                  第三種,使用註解實現,具體看annotation包
 * @create 2021-06-04 16:12
 */
public interface UserService {
    public void add();
    public void delete();
    public void update();
    public void select();
}
/**
 *@program: Spring_study
 *@description:
 *@author: XieXianXin
 *@create: 2021-06-04 16:14
 */
public class UserServiceImpl implements UserService{
    @Override
    public void add() {
        System.out.println("增加用戶");
    }
    @Override
    public void delete() {
        System.out.println("刪除用戶");
    }
    @Override
    public void update() {
        System.out.println("更新用戶");
    }
    @Override
    public void select() {
        System.out.println("查詢用戶");
    }
}
編寫增強類(分別有前置通知、後置通知和環繞通知)
/**
 *@program: Spring_study
 *@description: 前置通知,在方法前增強,實現MethodBeforeAdvice接口
 *@author: XieXianXin
 *@create: 2021-06-04 16:21
 */
public class BeforeAdvice implements MethodBeforeAdvice {
    //method : 要執行的目標對象的方法
    //args : 被調用的方法的參數
    //target : 目標對象
    @Override
    public void before(Method method, Object[] args, Object target) throws Throwable {
        System.out.println("前置通知的"+target.getClass().getName()+"的"+method.getName()+"方法被執行瞭");
    }
}
/**
 *@program: Spring_study
 *@description: 後置通知,在方法後執行,實現AfterReturningAdvice接口
 *@author: XieXianXin
 *@create: 2021-06-04 17:00
 */
public class AfterAdvice implements AfterReturningAdvice {
    //returnValue 返回值
    //method被調用的方法
    //args 被調用的方法的對象的參數
    //target 被調用的目標對象
    @Override
    public void afterReturning(Object returnValue, Method method, Object[] args, Object target) throws Throwable {
        System.out.println("後置通知的"+target.getClass().getName()+"的"+method.getName()+"執行瞭,返回值為:"+returnValue);
    }
}
/**
 *@program: Spring_study
 *@description: 環繞通知,在方法前後執行,實現MethodInterceptor接口
 *@author: XieXianXin
 *@create: 2021-06-04 17:07
 */
public class InterceptAdvice implements MethodInterceptor {
    @Override
    public Object invoke(MethodInvocation invocation) throws Throwable {
        try {
            System.out.println("環繞通知"+invocation.getMethod().getName()+"——方法前執行的");
            Method invocationMethod = (Method) invocation.proceed();
            System.out.println("環繞通知"+invocation.getMethod().getName()+"——方法後執行的");
            return invocationMethod;
        } catch (Throwable throwable) {
            throwable.printStackTrace();
        }
        return invocation;
    }
}
配置Spring核心配置文件,實現AOP切入
    <!--第一種方式,通過接口實現-->
    <!--1.註冊bean-->
    <bean id="userService" class="com.xxx.service.UserServiceImpl"/>
    <bean id="beforeAdvice" class="com.xxx.advice.BeforeAdvice"/>
    <bean id="afterAdvice" class="com.xxx.advice.AfterAdvice"/>
    <bean id="interceptAdvice" class="com.xxx.advice.InterceptAdvice"/>
    <bean id="throwAdvice" class="com.xxx.advice.ThrowAdvice"/>
    <!--2.aop的配置-->
    <aop:config>
        <!--切入點 expression:表達式匹配要執行的方法-->
        <aop:pointcut id="pointCut" expression="execution(* com.xxx.service.UserServiceImpl.*(..))"/>
        <!--執行環繞; advice-ref執行方法 . pointcut-ref切入點-->
        <!--前置通知-->
        <aop:advisor advice-ref="beforeAdvice" pointcut-ref="pointCut"/>
        <!--後置通知-->
        <aop:advisor advice-ref="afterAdvice" pointcut-ref="pointCut"/>
        <!--環繞通知-->
        <aop:advisor advice-ref="interceptAdvice" pointcut-ref="pointCut"/>
        <!--異常拋出通知-->
        <aop:advisor advice-ref="throwAdvice" pointcut-ref="pointCut"/>
    </aop:config>
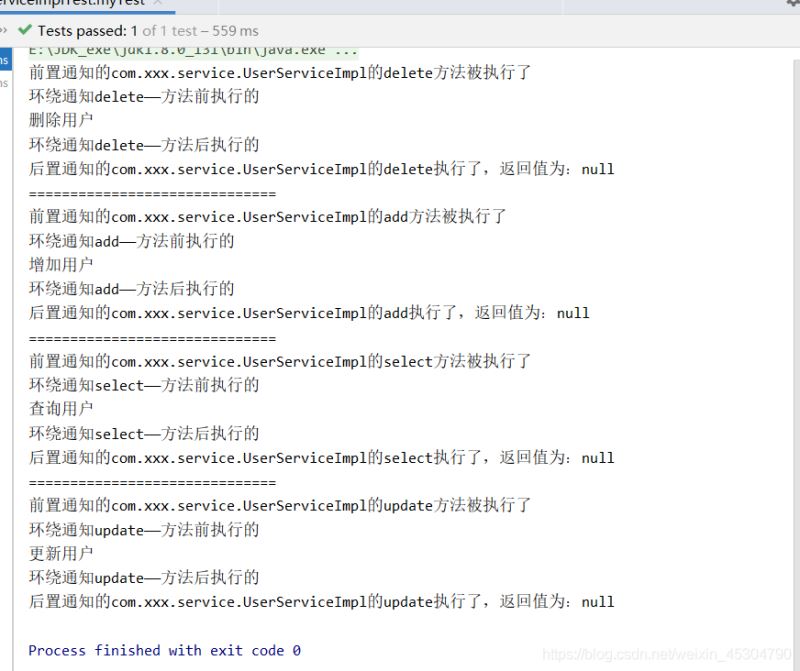
測試及結果
public class UserServiceImplTest {
    @Test
    public void myTest(){
        ApplicationContext context = new ClassPathXmlApplicationContext("beans.xml");
        //動態代理的是接口,不是實體類,因此不是UserServiceImpl.class
        UserService userService = context.getBean("userService", UserService.class);
        userService.delete();
        System.out.println("==============================");
        UserService userService1 = context.getBean("userService", UserService.class);
        userService1.add();
        System.out.println("==============================");
        UserService userService2 = context.getBean("userService", UserService.class);
        userService2.select();
        System.out.println("==============================");
        UserService userService3 = context.getBean("userService", UserService.class);
        userService3.update();
    }
}
通過自定義類來實現 保留之前的業務類UserServiceImpl編寫自定義類DiyPointcut
/**
 *@program: Spring_study
 *@description: 自定義類實現AOP,一個類相當於一個切面,類的方法相當於通知
 *@author: XieXianXin
 *@create: 2021-06-04 21:16
 */
public class DiyPointcut {
    public void beforeAdvice(){
        System.out.println("前置通知");
    }
    public void afterAdvice(){
        System.out.println("後置通知");
    }
    public void interceptAdvice(ProceedingJoinPoint joinPoint){//環繞通知要有ProceedingJoinPoint joinPoint參數
        System.out.println("方法"+joinPoint.getSignature().getName()+"環繞通知前執行的語句");
        Object[] args = joinPoint.getArgs();
        try {
            Object proceed = joinPoint.proceed(args);
        } catch (Throwable throwable) {
            throwable.printStackTrace();
        }
        System.out.println("方法"+joinPoint.getSignature().getName()+"環繞通知後執行的語句");
    }
}
配置Spring核心配置文件
    <!--第二種方式,通過自定義類實現-->
    <!--1.註冊bean-->
    <bean id="userService" class="com.xxx.service.UserServiceImpl"/>
    <bean id="diyPointcut" class="com.xxx.diy.DiyPointcut"/>
    <aop:config>
        <!--2.使用AOP標簽-->
        <aop:aspect ref="diyPointcut">
            <!--3.切入點-->
            <aop:pointcut id="pointcut" expression="execution(* com.xxx.service.UserServiceImpl.*(..))"/>
            <!--4.通知-->
            <!--前置通知-->
            <aop:before method="beforeAdvice" pointcut-ref="pointcut"/>
            <!--後置通知-->
            <aop:after method="afterAdvice" pointcut-ref="pointcut"/>
            <!--環繞通知-->
            <aop:around method="interceptAdvice" pointcut-ref="pointcut"/>
        </aop:aspect>
    </aop:config>
測試及結果
public class UserServiceImplTest {
    @Test
    public void myTest(){
        ApplicationContext context = new ClassPathXmlApplicationContext("beans.xml");
        //動態代理的是接口,不是實體類,因此不是UserServiceImpl.class
        UserService userService = context.getBean("userService", UserService.class);
        userService.delete();
        System.out.println("==============================");
        UserService userService1 = context.getBean("userService", UserService.class);
        userService1.add();
        System.out.println("==============================");
        UserService userService2 = context.getBean("userService", UserService.class);
        userService2.select();
        System.out.println("==============================");
        UserService userService3 = context.getBean("userService", UserService.class);
        userService3.update();
    }
}

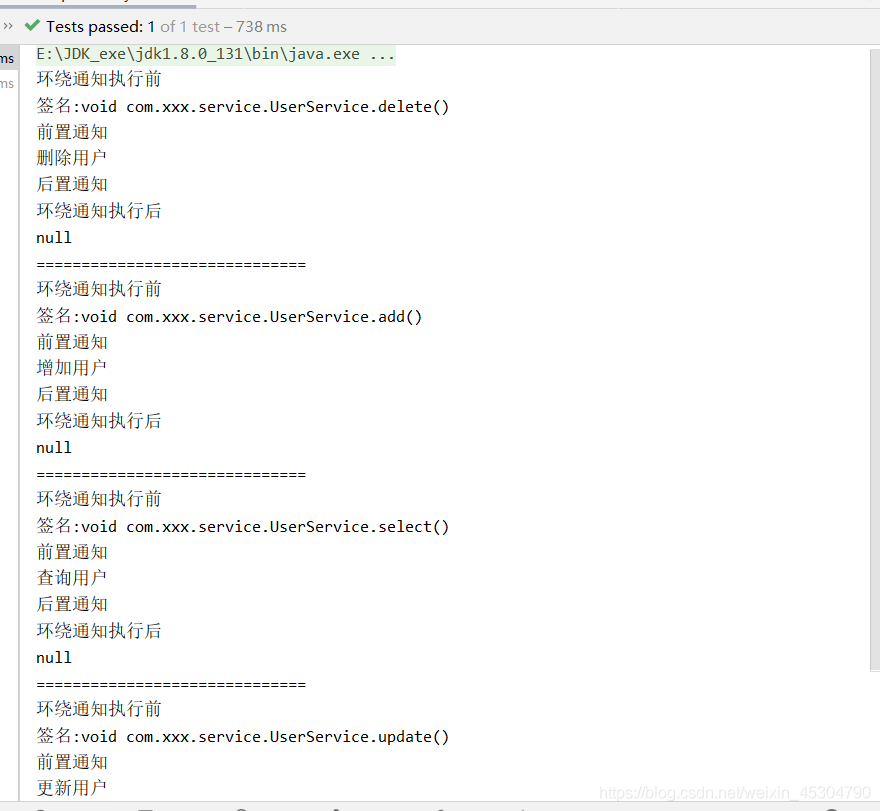
通過自定義類來實現 編寫註解實現的增強類AnnotationAdvice
/**
 *@program: Spring_study
 *@description: 使用註解進行AOP設計
 *@author: XieXianXin
 *@create: 2021-06-04 22:18
 */
@Aspect
public class AnnotationAdvice {
    @Before("execution(* com.xxx.service.UserServiceImpl.*(..))")//表達式中寫要被增強的類
    public void before(){
        System.out.println("前置通知");
    }
    @After("execution(* com.xxx.service.UserServiceImpl.*(..))")
    public void after(){
        System.out.println("後置通知");
    }
    @Around("execution(* com.xxx.service.UserServiceImpl.*(..))")
    public void around(ProceedingJoinPoint joinPoint) throws Throwable {
        System.out.println("環繞通知執行前");
        System.out.println("簽名:"+joinPoint.getSignature());
        //執行目標方法proceed
        Object proceed = joinPoint.proceed();
        System.out.println("環繞通知執行後");
        System.out.println(proceed);
    }
}
開啟註解掃描和註冊bean
<!--指定要掃描的包,這個包下的註解就會生效-->
    <context:component-scan base-package="com.xxx.service"/>
    <context:annotation-config/>
 <aop:aspectj-autoproxy proxy-target-class="false"/>
    <!--2.註冊bean,隻需要註冊增強的那個類-->
    <bean class="com.xxx.service.UserServiceImpl" id="userService"/>
    <bean id="annotationAdvice" class="com.xxx.annotation.AnnotationAdvice"/>
測試及結果
public class UserServiceImplTest {
    @Test
    public void myTest(){
        ApplicationContext context = new ClassPathXmlApplicationContext("beans.xml");
        //動態代理的是接口,不是實體類,因此不是UserServiceImpl.class
        UserService userService = context.getBean("userService", UserService.class);
        userService.delete();
        System.out.println("==============================");
        UserService userService1 = context.getBean("userService", UserService.class);
        userService1.add();
        System.out.println("==============================");
        UserService userService2 = context.getBean("userService", UserService.class);
        userService2.select();
        System.out.println("==============================");
        UserService userService3 = context.getBean("userService", UserService.class);
        userService3.update();
    }
}
Spring事務管理及Spring整合MyBatis代碼示例
Spring事務管理
- 什麼是事務:事務就是把一系列的動作當成一個獨立的工作單元,這些動作要麼都執行,要麼都不執行。
- 事務四個特性-ACID:
原子性(atomicity)
事務是原子性操作,由一系列動作組成,事務的原子性確保動作要麼全部完成,要麼完全不起作用
一致性(consistency)
一旦所有事務動作完成,事務就要被提交。數據和資源處於一種滿足業務規則的一致性狀態中
隔離性(isolation)
可能多個事務會同時處理相同的數據,因此每個事務都應該與其他事務隔離開來,防止數據損壞
持久性(durability)
事務一旦完成,無論系統發生什麼錯誤,結果都不會受到影響。通常情況下,事務的結果被寫到持久化存儲器中Spring支持編程
- 式事務管理和聲明式的事務管理:
聲明式事務管理
聲明式事務管理建立在AOP之上,其本質是對方法前後進行攔截,然後在目標方法開始之前創建或者加入一個事務,執行完目標方法之後根據執行的情況提交或者回滾。
編程式事務每次實現都要單獨實現,但業務量大功能復雜時,使用編程式事務無疑是痛苦的,而聲明式事務不同,聲明式事務屬於無侵入式,不會影響業務邏輯的實現,隻需要在配置文件中做相關的事務規則聲明或者通過註解的方式,便可以將事務規則應用到業務邏輯中。
顯然聲明式事務管理要優於編程式事務管理,這正是Spring倡導的非侵入式的編程方式。唯一不足的地方就是聲明式事務管理的粒度是方法級別,而編程式事務管理是可以到代碼塊的,但是可以通過提取方法的方式完成聲明式事務管理的配置。
使用Spring管理事務,註意頭文件的約束導入:
xmlns:tx="http://www.springframework.org/schema/tx"
http://www.springframework.org/schema/tx
http://www.springframework.org/schema/tx/spring-tx.xsd">
聲明式事務配置拓展:
JDBC事務
<bean id="transactionManager" class="org.springframework.jdbc.datasource.DataSourceTransactionManager">
       <property name="dataSource" ref="dataSource" />
</bean>
自動代理的配置
!-- Spring事務管理 -->
<bean id="transactionManager" class="org.springframework.jdbc.datasource.DataSourceTransactionManager">
    <property name="dataSource" ref="dataSource" />
</bean>
<!-- 配置事務的傳播特性 -->
<bean id="baseTransactionProxy" class="org.springframework.transaction.interceptor.TransactionProxyFactoryBean" abstract="true" >
  <property name="transactionManager" ref="transactionManager" />
  <property name="transactionAttributes">
    <props>
      <prop key="add*">PROPAGATION_REQUIRED</prop>
      <prop key="edit*">PROPAGATION_REQUIRED</prop>
      <prop key="remove*">PROPAGATION_REQUIRED</prop>
      <prop key="insert*">PROPAGATION_REQUIRED</prop>
      <prop key="update*">PROPAGATION_REQUIRED</prop>
      <prop key="del*">PROPAGATION_REQUIRED</prop>
      <prop key="*">readOnly</prop>
    </props>
  </property>
</bean>
基於 命名空間的聲明式事務管理
<beans......>
  ......
  <bean id="bankService"
  class="footmark.spring.core.tx.declare.namespace.BankServiceImpl">
    <property name="bankDao" ref="bankDao"/>
  </bean>
  <tx:advice id="bankAdvice" transaction-manager="transactionManager">
    <tx:attributes>
      <tx:method name="transfer" propagation="REQUIRED"/>
    </tx:attributes>
  </tx:advice>
  <aop:config>
    <aop:pointcut id="bankPointcut" expression="execution(* *.transfer(..))"/>
    <aop:advisor advice-ref="bankAdvice" pointcut-ref="bankPointcut"/>
  </aop:config>
  ......
</beans>
- @Transactional 的聲明式事務管理
啟用tx的annotation:
<tx:annotation-driven transaction-manager="transactionManager"/>
@Transactional 可以作用於接口、接口方法、類以及類方法上。當作用於類上時,該類的所有 public 方法將都具有該類型的事務屬性,同時,我們也可以在方法級別使用該標註來覆蓋類級別的定義。
編程式事務管理
編程式事務管理是侵入性事務管理,使用TransactionTemplate或者直接使用PlatformTransactionManager,對於編程式事務管理,Spring推薦使用TransactionTemplate。
- Spring事務的傳播行為:
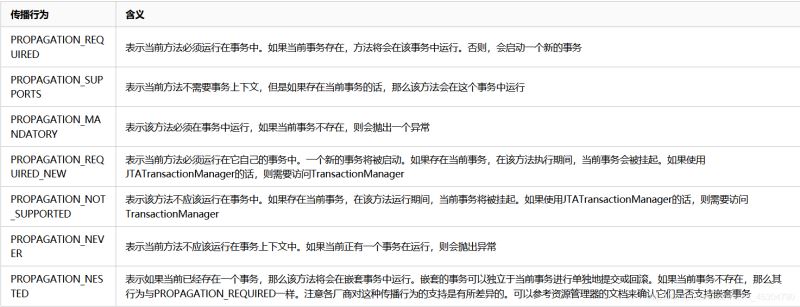
事務的第一個方面是傳播行為(propagation behavior)。當事務方法被另一個事務方法調用時,必須指定事務應該如何傳播。例如:方法可能繼續在現有事務中運行,也可能開啟一個新事務,並在自己的事務中運行。Spring定義瞭七種傳播行為:
- 事務的隔離級別:
事務的第二個維度就是隔離級別(isolation level)。
臟讀(Dirty reads)——臟讀發生在一個事務讀取瞭另一個事務改寫但尚未提交的數據時。如果改寫在稍後被回滾瞭,那麼第一個事務獲取的數據就是無效的。 不可重復讀(Nonrepeatable read)——不可重復讀發生在一個事務執行相同的查詢兩次或兩次以上,但是每次都得到不同的數據時。這通常是因為另一個並發事務在兩次查詢期間進行瞭更新。 幻讀(Phantom read)——幻讀與不可重復讀類似。它發生在一個事務(T1)讀取瞭幾行數據,接著另一個並發事務(T2)插入瞭一些數據時。在隨後的查詢中,第一個事務(T1)就會發現多瞭一些原本不存在的記錄。
Spring結合事務整合MyBatis示例
1.導入相關Jar包
<!--Spring整合Mybatis需要如下包,都是放在dependencies內-->
    <dependencies>
        <!--junit-->
        <dependency>
            <groupId>junit</groupId>
            <artifactId>junit</artifactId>
            <version>4.12</version>
            <scope>test</scope>
        </dependency>
        <!--mysql驅動-->
        <dependency>
            <groupId>mysql</groupId>
            <artifactId>mysql-connector-java</artifactId>
            <version>8.0.15</version>
        </dependency>
        <!--mybatis-->
        <dependency>
            <groupId>org.mybatis</groupId>
            <artifactId>mybatis</artifactId>
            <version>3.5.2</version>
        </dependency>
        <!--導入spring,maven依賴-->
        <dependency>
            <groupId>org.springframework</groupId>
            <artifactId>spring-webmvc</artifactId>
            <version>5.2.12.RELEASE</version>
        </dependency>
        <!--使用Spring實現Aop,使用AOP織入-->
        <dependency>
            <groupId>org.aspectj</groupId>
            <artifactId>aspectjweaver</artifactId>
            <version>1.9.4</version>
        </dependency>
        <!--spring操作數據庫也需要一個spring-jdbc包-->
        <dependency>
            <groupId>org.springframework</groupId>
            <artifactId>spring-jdbc</artifactId>
            <version>5.3.7</version>
        </dependency>
        <!--整合必要的一個包,mybatis-spring,使用2.0以上版本-->
        <dependency>
            <groupId>org.mybatis</groupId>
            <artifactId>mybatis-spring</artifactId>
            <version>2.0.5</version>
        </dependency>
        <!--LOG4J-->
        <dependency>
            <groupId>log4j</groupId>
            <artifactId>log4j</artifactId>
            <version>1.2.17</version>
        </dependency>
        <dependency>
            <groupId>org.testng</groupId>
            <artifactId>testng</artifactId>
            <version>RELEASE</version>
            <scope>compile</scope>
        </dependency>
        <dependency>
            <groupId>log4j</groupId>
            <artifactId>log4j</artifactId>
            <version>1.2.17</version>
            <scope>compile</scope>
        </dependency>
    </dependencies>
    <!--需要解決的亂碼以及maven靜態資源過濾問題等在build內完成-->
    <!--解決單元測試中文亂碼-->
    <build>
        <plugins>
            <plugin>
                <groupId>org.apache.maven.plugins</groupId>
                <artifactId>maven-surefire-plugin</artifactId>
                <version>2.12.4</version>
                <configuration>
                    <argLine>
                        -Dfile.encoding=UTF-8
                    </argLine>
                </configuration>
            </plugin>
        </plugins>
        <!--可能出現問題說明:Maven靜態資源過濾(導出)問題
         Cause: org.apache.ibatis.builder.BuilderException: Error parsing SQL Mapper Configuration.
         Cause: java.io.IOException: Could not find resource com/xxx/dao/UserMapper.xml
         原因是idea默認不編譯src目錄下的xml文件,所以加載不到
         解決辦法在pom文件中的build標簽內加入如下配置,則可以找到java和resources下的所有properties和xml文件瞭
     -->
        <resources>
            <resource>
                <directory>src/main/resources</directory>
                <includes>
                    <include>**/*.properties</include>
                    <include>**/*.xml</include>
                </includes>
                <filtering>true</filtering>
            </resource>
            <resource>
                <directory>src/main/java</directory>
                <includes>
                    <include>**/*.properties</include>
                    <include>**/*.xml</include>
                </includes>
                <filtering>true</filtering>
            </resource>
        </resources>
    </build>
2.編寫配置文件及加入日志
mybatis-config.xml
<configuration>
    <!--
    configuration" 裡的標簽順序如下:(否則報錯如下信息)
     "(properties?,settings?,typeAliases?,typeHandlers?,objectFactory?
     objectWrapperFactory?,reflectorFactory?,plugins?,environments?,
     databaseIdProvider?,mappers?)".
    -->
    <!--標準的日志工廠實現(常用:STDOUT_LOGGING,LOG4J),下面的value值建議去mybaits文檔復制
        日志就是記錄程序的運行軌跡,方便查找關鍵信息,也方便快速定位解決問題。
    -->
    <settings>
        <!--下劃線駝峰自動轉換-->
        <setting name="mapUnderscoreToCamelCase" value="true"/>
        <setting name="logImpl" value="LOG4J"/>
    </settings>
    <!--給這個包下的類起別名-->
    <typeAliases>
        <package name="com.xxx.pojo"/>
    </typeAliases>
    <mappers>
        <mapper resource="com/xxx/mapper/UserMapper.xml"/>
    </mappers>

</configuration>
spring-mybatis.xml
<!--
spring整合mybatis,根據mybatis-spring文檔可以,需要一個數據源獲取SqlSessionFactory 和至少一個數據映射器類
具體查看文檔:http://mybatis.org/spring/zh/getting-started.html
-->
<!--
DataSource:使用Spring的數據源替換Mybatis的配置:druid c3p0,dbcp
這裡使用Speing提供的JDBC:org.springframework.jdbc.datasource.DriverManagerDataSource
前提是要導入:spring-jdbc 包
-->
<bean id="dataSource" class="org.springframework.jdbc.datasource.DriverManagerDataSource">
<property name="driverClassName" value="com.mysql.cj.jdbc.Driver"/>
<property name="url" value="jdbc:mysql://localhost:3306/mybaits?serverTimezone=UTC&allowPublicKeyRetrieval=true&useSSL=false&characterEncoding=UTF-8"/>
<property name="username" value="root"/>
<property name="password" value="123456"/>
</bean>
<!--MyBatis-Spring 中,可使用 SqlSessionFactoryBean來創建 SqlSessionFactory-->
<bean id="sqlSessionFactory" class="org.mybatis.spring.SqlSessionFactoryBean">
<property name="dataSource" ref="dataSource" />
<!--跟在mybatis中學習一樣,需要在mybatis核心配置文件綁定xxxmapper.xml文件
這裡也需要綁定mybatis核心配置文件,綁定後,mybatis核心配置文件可以完成的這裡也都可以完成,則mybatis-config文件可以不要也行
-->
<!--綁定mybatis-->
<property name="configLocation" value="classpath:mybatis-config.xml"/>
<!--註冊映射器,等價於mybatis核心配置文件中的:
<mappers>
<mapper resource="com/xxx/mapper/UserMapper.xml"/>
</mappers>
-->
<!--<property name="mapperLocations" value="classpath:com/xxx/mapper/*.xml"/>-->
</bean>
<!--註冊SqlSessionTemplate,相當於我們使用的sqlSession,因此可將id命名為此好記-->
<bean id="sqlSession" class="org.mybatis.spring.SqlSessionTemplate">
<!--因為sqlSessionTemplate隻有構造方法而無set方法,隻能使用構造器註入-->
<constructor-arg index="0" ref="sqlSessionFactory"/>
</bean>
<!--配置聲明式事務(AOP原理,不改變源代碼條件下增加事務),而編程式事務要在源代碼上自動try catch
具體可查看文檔:http://mybatis.org/spring/zh/transactions.html
-->
<bean id="transactionManager" class="org.springframework.jdbc.datasource.DataSourceTransactionManager">
<property name="dataSource" ref="dataSource"/>
</bean>
<!--結合AOP實現事務的織入-->
<!--配置事務的通知-->
<tx:advice id="transactionAdvice" transaction-manager="transactionManager">
<!--給具體方法配置事務和傳播新特性(propagation=REQUIRED是默認的,即會自動創建事務)
具體查看:https://blog.csdn.net/edward0830ly/article/details/7569954
name="*"表示給所有方法配置事務,也可給具體方法,給出方法名即可
-->
<tx:attributes>
<tx:method name="*" propagation="REQUIRED"/>
</tx:attributes>
</tx:advice>
<!--配置事務切入-->
<aop:config>
<aop:pointcut id="transactionPointcut" expression="execution(* com.xxx.mapper.*.*(..))"/>
<aop:advisor advice-ref="transactionAdvice" pointcut-ref="transactionPointcut"/>
</aop:config>
applicationContext.xml
 <import resource="spring-mybatis.xml"/>
    <bean id="userMapperImpl_2" class="com.xxx.mapper.UserMapperImpl_2">
        <property name="sqlSessionFactory" ref="sqlSessionFactory"/>
    </bean>
log4j.properties
#將等級為DEBUG的日志信息輸出到console和file這兩個目的地,console和file的定義在下面的代碼
log4j.rootLogger=DEBUG,console,file
#控制臺輸出的相關設置
log4j.appender.console = org.apache.log4j.ConsoleAppender
log4j.appender.console.Target = System.out
log4j.appender.console.Threshold=DEBUG
log4j.appender.console.layout = org.apache.log4j.PatternLayout
log4j.appender.console.layout.ConversionPattern=[%c]-%m%n
#文件輸出的相關設置
log4j.appender.file = org.apache.log4j.RollingFileAppender
log4j.appender.file.File=./log/xxx.log
log4j.appender.file.MaxFileSize=10mb
log4j.appender.file.Threshold=DEBUG
log4j.appender.file.layout=org.apache.log4j.PatternLayout
log4j.appender.file.layout.ConversionPattern=[%p][%d{yy-MM-dd}][%c]%m%n
#日志輸出級別
log4j.logger.org.mybatis=DEBUG
log4j.logger.java.sql=DEBUG
log4j.logger.java.sql.Statement=DEBUG
log4j.logger.java.sql.ResultSet=DEBUG
log4j.logger.java.sql.PreparedStatement=DEBUG
3.編寫接口及其實現類和配置對應的mapper.xml文件
UserMapper接口
public interface UserMapper {
    //查詢所有用戶
    public List<User> queryUser();
    //添加一個用戶
    int addUser(User user);
    //根據id刪除用戶
    int deleteUser(int id);
}
UserMapperImpl_2實現類
/**
 *@program: Spring_study
 *@description: spring-mybatis整合方式二:繼承SqlSessionDaoSupport實現接口
 *@author: XieXianXin
 *@create: 2021-06-05 22:08
 */
public class UserMapperImpl_2 extends SqlSessionDaoSupport implements UserMapper {
    @Override
    public List<User> queryUser() {
        return getSqlSession().getMapper(UserMapper.class).queryUser();
    }
    @Override
    public int addUser(User user) {
        return getSqlSession().getMapper(UserMapper.class).addUser(user);
    }
    @Override
    public int deleteUser(int id) {
        return getSqlSession().getMapper(UserMapper.class).deleteUser(id);
    }
}
UserMapper.xml
<!--namespace==綁定一個對應的Dao/Mapper接口,以後Mapper.xml文件都放在resourse下,
                                            但是要建立一個跟Mapper接口相對應得包
    註意!!這裡有一個坑,當在resources下建立包時候,不要寫為:com.xxx.dao
                                                      應該為:com/xxx/dao
                                           -->
<!--詭異事件,在學習mabatis適合,寫UTF-8沒錯,但是整合這裡的所有XML卻報錯:1 字節的 UTF-8 序列的字節 1 無效。
    解決方法:將所有的XML文件UTF-8改為UTF8即可-->
<mapper namespace="com.xxx.mapper.UserMapper">
    <!--
    last_name已經進行自動駝峰轉換,則這裡不用resultMap進行不同名的映射
    resultType中也起瞭別名,不用再寫com.xxx.pojo瞭
    -->
    <select id="queryUser" resultType="User">
        select * from user
    </select>
    <insert id="addUser" parameterType="User">
        insert into user (id,last_name,email) values (#{id},#{lastName},#{email})
    </insert>
    <delete id="deleteUser" parameterType="_int">
        delete from user where id = #{id}
    </delete>
</mapper>
測試及結果
手動設置錯誤,如在插入語句上寫錯insert為inserts
  <insert id="addUser" parameterType="User">
        inserts into user (id,last_name,email) values (#{id},#{lastName},#{email})
    </insert>
public class UserMapperTest {
    static Logger logger = Logger.getLogger(UserMapperTest.class);
    @Test
   @Test
    public void userMapperImpl_2(){
       ApplicationContext context = new ClassPathXmlApplicationContext("applicationContext.xml");
        UserMapper userMapperImpl_2 = context.getBean("userMapperImpl_2", UserMapper.class);
        userMapperImpl_2.addUser(new User(12,"xiaoxin","com@xiaoxin"));
        userMapperImpl_2.deleteUser(8);
        for (User user : userMapperImpl_2.queryUser()) {
            System.out.println(user);
        }
    }
}
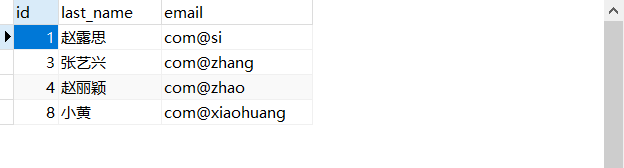
如果為插入語句錯誤,則項目不能正常插入,事務會回滾。
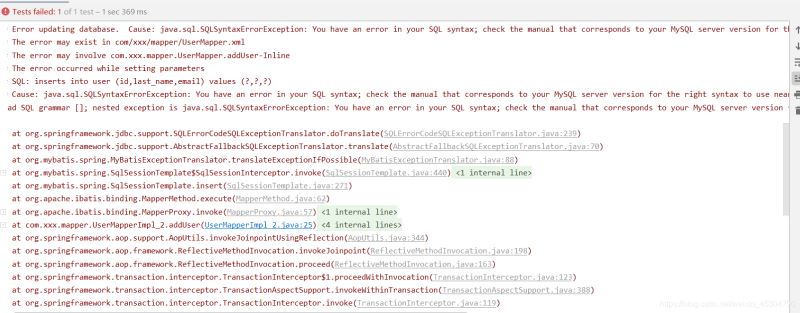
查看並刷新數據庫表,沒有變化。
接著將錯誤改正後,再次測試結果為:
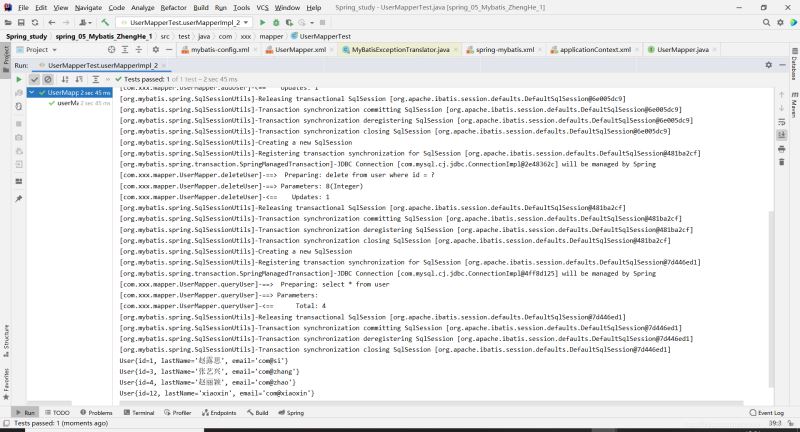
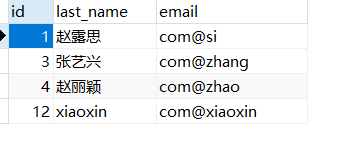
成功添加和刪除,事務保證瞭數據的一致性。查看數據庫表為:
總結
本篇文章的內容就到這瞭,希望大傢可以喜歡,也希望大傢可以多多關註WalkonNet的其他精彩內容!
推薦閱讀:
- Java基礎之Spring5的核心之一IOC容器
- Spring為singleton bean註入prototype bean
- Java Spring框架簡介與Spring IOC詳解
- Java Spring5學習之JdbcTemplate詳解
- Spring IOC容器Bean管理XML註入集合類型屬性