Python道路車道線檢測的實現
車道線檢測是自動駕駛汽車以及一般計算機視覺的關鍵組件。這個概念用於描述自動駕駛汽車的路徑並避免進入另一條車道的風險。
在本文中,我們將構建一個機器學習項目來實時檢測車道線。我們將使用 OpenCV 庫使用計算機視覺的概念來做到這一點。為瞭檢測車道,我們必須檢測車道兩側的白色標記。
使用 Python 和 OpenCV 進行道路車道線檢測
使用 Python 中的計算機視覺技術,我們將識別自動駕駛汽車必須行駛的道路車道線。這將是自動駕駛汽車的關鍵部分,因為自動駕駛汽車不應該越過它的車道,也不應該進入對面車道以避免事故。
幀掩碼和霍夫線變換
要檢測車道中的白色標記,首先,我們需要屏蔽幀的其餘部分。我們使用幀屏蔽來做到這一點。該幀隻不過是圖像像素值的 NumPy 數組。為瞭掩蓋幀中不必要的像素,我們隻需將 NumPy 數組中的這些像素值更新為 0。
制作後我們需要檢測車道線。用於檢測此類數學形狀的技術稱為霍夫變換。霍夫變換可以檢測矩形、圓形、三角形和直線等形狀。
代碼下載
源碼請下載:車道線檢測項目代碼
按照以下步驟在 Python 中進行車道線檢測:
1.導入包
import matplotlib.pyplot as plt

import numpy as np
import cv2
import os
import matplotlib.image as mpimg
from moviepy.editor import VideoFileClip
import math
2. 應用幀屏蔽並找到感興趣的區域:
def interested_region(img, vertices):
    if len(img.shape) > 2:
        mask_color_ignore = (255,) * img.shape[2]
    else:
        mask_color_ignore = 255

    cv2.fillPoly(np.zeros_like(img), vertices, mask_color_ignore)
    return cv2.bitwise_and(img, np.zeros_like(img))
3.霍夫變換空間中像素到線的轉換:
def hough_lines(img, rho, theta, threshold, min_line_len, max_line_gap):
    lines = cv2.HoughLinesP(img, rho, theta, threshold, np.array([]), minLineLength=min_line_len, maxLineGap=max_line_gap)
    line_img = np.zeros((img.shape[0], img.shape[1], 3), dtype=np.uint8)
    lines_drawn(line_img,lines)
    return line_img
4. 霍夫變換後在每一幀中創建兩條線:
def lines_drawn(img, lines, color=[255, 0, 0], thickness=6):
    global cache
    global first_frame
    slope_l, slope_r = [],[]
    lane_l,lane_r = [],[]

    α =0.2
  for line in lines:
        for x1,y1,x2,y2 in line:
            slope = (y2-y1)/(x2-x1)
            if slope > 0.4:
                slope_r.append(slope)
                lane_r.append(line)
            elif slope < -0.4:
                slope_l.append(slope)
                lane_l.append(line)
        img.shape[0] = min(y1,y2,img.shape[0])
    if((len(lane_l) == 0) or (len(lane_r) == 0)):
        print ('no lane detected')
        return 1
    slope_mean_l = np.mean(slope_l,axis =0)
    slope_mean_r = np.mean(slope_r,axis =0)
    mean_l = np.mean(np.array(lane_l),axis=0)
    mean_r = np.mean(np.array(lane_r),axis=0)

    if ((slope_mean_r == 0) or (slope_mean_l == 0 )):
        print('dividing by zero')
        return 1

    x1_l = int((img.shape[0] - mean_l[0][1] - (slope_mean_l * mean_l[0][0]))/slope_mean_l)
    x2_l = int((img.shape[0] - mean_l[0][1] - (slope_mean_l * mean_l[0][0]))/slope_mean_l)
    x1_r = int((img.shape[0] - mean_r[0][1] - (slope_mean_r * mean_r[0][0]))/slope_mean_r)
    x2_r = int((img.shape[0] - mean_r[0][1] - (slope_mean_r * mean_r[0][0]))/slope_mean_r)


    if x1_l > x1_r:
        x1_l = int((x1_l+x1_r)/2)
        x1_r = x1_l
        y1_l = int((slope_mean_l * x1_l ) + mean_l[0][1] - (slope_mean_l * mean_l[0][0]))
        y1_r = int((slope_mean_r * x1_r ) + mean_r[0][1] - (slope_mean_r * mean_r[0][0]))
        y2_l = int((slope_mean_l * x2_l ) + mean_l[0][1] - (slope_mean_l * mean_l[0][0]))
        y2_r = int((slope_mean_r * x2_r ) + mean_r[0][1] - (slope_mean_r * mean_r[0][0]))
    else:
        y1_l = img.shape[0]
        y2_l = img.shape[0]
        y1_r = img.shape[0]
        y2_r = img.shape[0]

    present_frame = np.array([x1_l,y1_l,x2_l,y2_l,x1_r,y1_r,x2_r,y2_r],dtype ="float32")

    if first_frame == 1:
        next_frame = present_frame
        first_frame = 0
    else :
        prev_frame = cache
        next_frame = (1-α)*prev_frame+α*present_frame

    cv2.line(img, (int(next_frame[0]), int(next_frame[1])), (int(next_frame[2]),int(next_frame[3])), color, thickness)
    cv2.line(img, (int(next_frame[4]), int(next_frame[5])), (int(next_frame[6]),int(next_frame[7])), color, thickness)

    cache = next_frame
5.處理每一幀視頻以檢測車道:
def weighted_img(img, initial_img, α=0.8, β=1., λ=0.):
    return cv2.addWeighted(initial_img, α, img, β, λ)


def process_image(image):

    global first_frame

    gray_image = cv2.cvtColor(image, cv2.COLOR_BGR2GRAY)
    img_hsv = cv2.cvtColor(image, cv2.COLOR_RGB2HSV)


    lower_yellow = np.array([20, 100, 100], dtype = "uint8")
    upper_yellow = np.array([30, 255, 255], dtype="uint8")

    mask_yellow = cv2.inRange(img_hsv, lower_yellow, upper_yellow)
    mask_white = cv2.inRange(gray_image, 200, 255)
    mask_yw = cv2.bitwise_or(mask_white, mask_yellow)
    mask_yw_image = cv2.bitwise_and(gray_image, mask_yw)

    gauss_gray= cv2.GaussianBlur(mask_yw_image, (5, 5), 0)

    canny_edges=cv2.Canny(gauss_gray, 50, 150)

    imshape = image.shape
    lower_left = [imshape[1]/9,imshape[0]]
    lower_right = [imshape[1]-imshape[1]/9,imshape[0]]
    top_left = [imshape[1]/2-imshape[1]/8,imshape[0]/2+imshape[0]/10]
    top_right = [imshape[1]/2+imshape[1]/8,imshape[0]/2+imshape[0]/10]
    vertices = [np.array([lower_left,top_left,top_right,lower_right],dtype=np.int32)]
    roi_image = interested_region(canny_edges, vertices)

    theta = np.pi/180

    line_image = hough_lines(roi_image, 4, theta, 30, 100, 180)
    result = weighted_img(line_image, image, α=0.8, β=1., λ=0.)
    return result
6. 將輸入視頻剪輯成幀並得到結果輸出視頻文件:
first_frame = 1
white_output = '__path_to_output_file__'
clip1 = VideoFileClip("__path_to_input_file__")
white_clip = clip1.fl_image(process_image)
white_clip.write_videofile(white_output, audio=False)
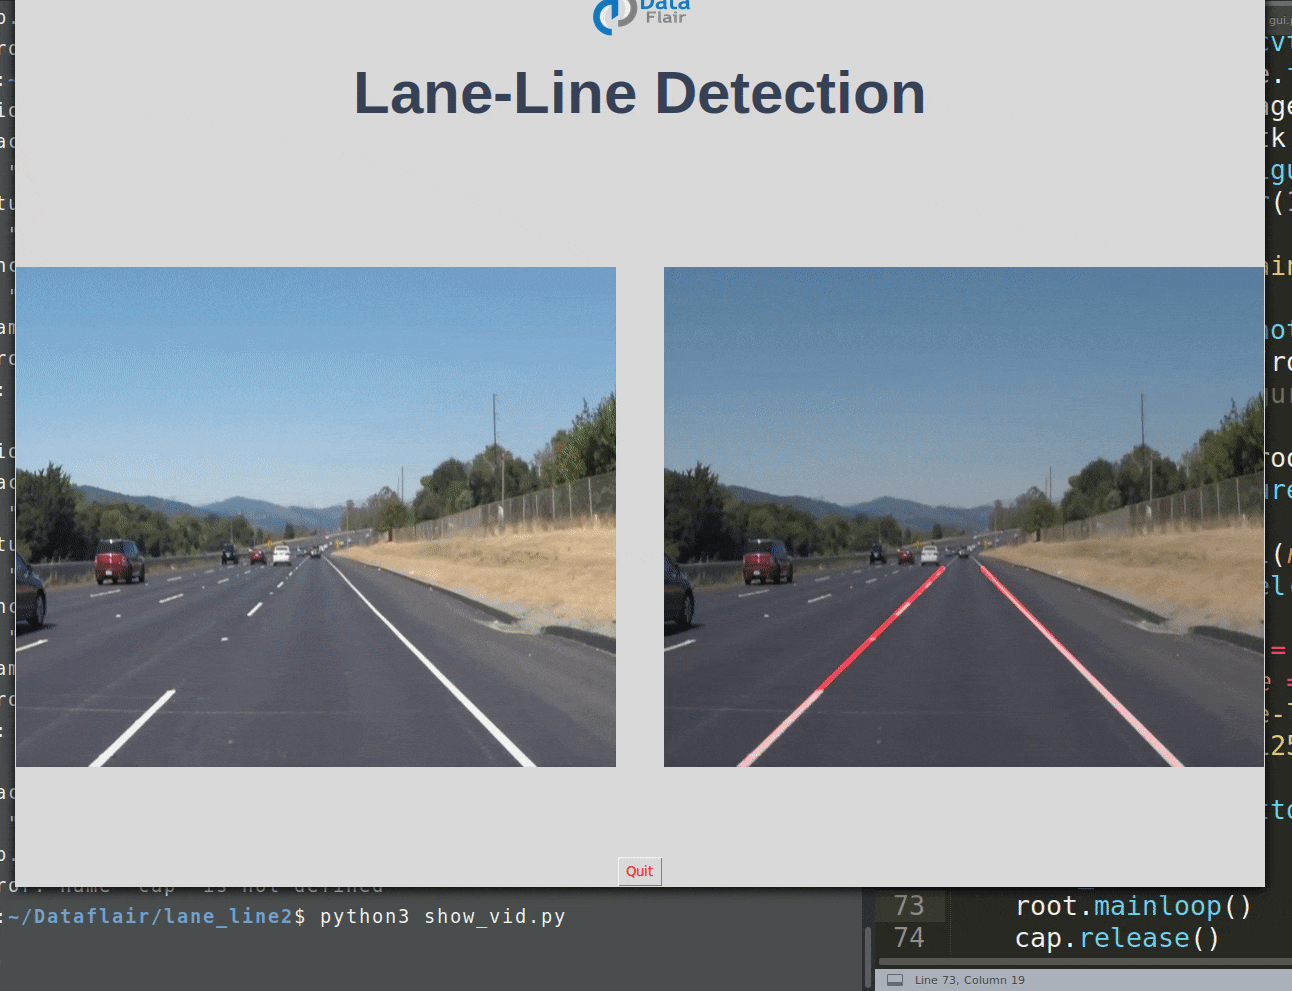
車道線檢測項目 GUI 代碼:

import tkinter as tk
from tkinter import *
import cv2
from PIL import Image, ImageTk
import os
import numpy as np


global last_frame1
last_frame1 = np.zeros((480, 640, 3), dtype=np.uint8)
global last_frame2
last_frame2 = np.zeros((480, 640, 3), dtype=np.uint8)
global cap1
global cap2
cap1 = cv2.VideoCapture("path_to_input_test_video")
cap2 = cv2.VideoCapture("path_to_resultant_lane_detected_video")

def show_vid():
    if not cap1.isOpened():
        print("cant open the camera1")
    flag1, frame1 = cap1.read()
    frame1 = cv2.resize(frame1,(400,500))
    if flag1 is None:
        print ("Major error!")
    elif flag1:
        global last_frame1
        last_frame1 = frame1.copy()
        pic = cv2.cvtColor(last_frame1, cv2.COLOR_BGR2RGB)
        img = Image.fromarray(pic)
        imgtk = ImageTk.PhotoImage(image=img)
        lmain.imgtk = imgtk
        lmain.configure(image=imgtk)
        lmain.after(10, show_vid)


def show_vid2():
    if not cap2.isOpened():
        print("cant open the camera2")
    flag2, frame2 = cap2.read()
    frame2 = cv2.resize(frame2,(400,500))
    if flag2 is None:
        print ("Major error2!")
    elif flag2:
        global last_frame2
        last_frame2 = frame2.copy()
        pic2 = cv2.cvtColor(last_frame2, cv2.COLOR_BGR2RGB)
        img2 = Image.fromarray(pic2)
        img2tk = ImageTk.PhotoImage(image=img2)
        lmain2.img2tk = img2tk
        lmain2.configure(image=img2tk)
        lmain2.after(10, show_vid2)

if __name__ == '__main__':
    root=tk.Tk()
    lmain = tk.Label(master=root)
    lmain2 = tk.Label(master=root)

    lmain.pack(side = LEFT)
    lmain2.pack(side = RIGHT)
    root.title("Lane-line detection")
    root.geometry("900x700+100+10")
    exitbutton = Button(root, text='Quit',fg="red",command=   root.destroy).pack(side = BOTTOM,)
    show_vid()
    show_vid2()
    root.mainloop()
    cap.release()
到此這篇關於Python道路車道線檢測的實現的文章就介紹到這瞭,更多相關Python 道路車道線檢測內容請搜索WalkonNet以前的文章或繼續瀏覽下面的相關文章希望大傢以後多多支持WalkonNet!
推薦閱讀:
- 基於OpenCV實現車道線檢測(自動駕駛 機器視覺)
- python+opencv實現車道線檢測
- OpenCV實戰案例之車道線識別詳解
- C++ opencv實現車道線識別
- opencv python 對指針儀表讀數識別的兩種方式