一文幫你理解PReact10.5.13源碼
React源碼看過幾次,每次都沒有堅持下來,索性學習一下PReact部分,網上講解源碼的不少,但是基本已經過時,所以自己來梳理下
render.js部分
import { EMPTY_OBJ, EMPTY_ARR } from './constants';
import { commitRoot, diff } from './diff/index';
import { createElement, Fragment } from './create-element';
import options from './options';

/**
 * Render a Preact virtual node into a DOM element
 * @param {import('./internal').ComponentChild} vnode The virtual node to render
 * @param {import('./internal').PreactElement} parentDom The DOM element to
 * render into
 * @param {import('./internal').PreactElement | object} [replaceNode] Optional: Attempt to re-use an
 * existing DOM tree rooted at `replaceNode`
 */
export function render(vnode, parentDom, replaceNode) {
 if (options._root) options._root(vnode, parentDom);

 // We abuse the `replaceNode` parameter in `hydrate()` to signal if we are in
 // hydration mode or not by passing the `hydrate` function instead of a DOM
 // element..
 let isHydrating = typeof replaceNode === 'function';

 // To be able to support calling `render()` multiple times on the same
 // DOM node, we need to obtain a reference to the previous tree. We do
 // this by assigning a new `_children` property to DOM nodes which points
 // to the last rendered tree. By default this property is not present, which
 // means that we are mounting a new tree for the first time.
  // 為瞭支持多次在一個dom節點上調用render函數,需要在dom節點上添加一個飲用,用來獲取指向上一次渲染的虛擬dom樹。
  // 這個屬性默認是指向空的,也意味著我們第一次正在裝備一顆新的樹
  // 所以開始時這裡的oldVNode是空(不論isHydrating的值),但是如果重復在這個節點上調用render那oldVNode是有值的
 let oldVNode = isHydrating
  ? null
  : (replaceNode && replaceNode._children) || parentDom._children;

 // 用Fragment包裹一下vnode,同時給replaceNode和parentDom的_children賦值
  vnode = (
  (!isHydrating && replaceNode) ||
  parentDom
 )._children = createElement(Fragment, null, [vnode]);

 // List of effects that need to be called after diffing.
  // 用來放置diff之後需要進行各種生命周期處理的Component,比如cdm、cdu;componentWillUnmount在diffChildren的unmount函數中執行不在commitRoot時執行
 let commitQueue = [];
 diff(
  parentDom, // 這個使用parentDom的_children屬性已經指向[vnode]瞭
  // Determine the new vnode tree and store it on the DOM element on
  // our custom `_children` property.
  vnode,
  oldVNode || EMPTY_OBJ, // 舊的樹
  EMPTY_OBJ,
  parentDom.ownerSVGElement !== undefined,
    // excessDomChildren,這個參數用來做dom復用的作用
  !isHydrating && replaceNode
   ? [replaceNode]
   : oldVNode
   ? null
   : parentDom.firstChild // 如果parentDom有子節點就會把整個子節點作為待復用的節點使用
   ? EMPTY_ARR.slice.call(parentDom.childNodes)
   : null,
  commitQueue,
    // oldDom,在後續方法中用來做標記插入位置使用
  !isHydrating && replaceNode
   ? replaceNode
   : oldVNode
   ? oldVNode._dom
   : parentDom.firstChild,
  isHydrating
 );

 // Flush all queued effects
  // 調用所有commitQueue中的節點_renderCallbacks中的方法
 commitRoot(commitQueue, vnode);
}

/**
 * Update an existing DOM element with data from a Preact virtual node
 * @param {import('./internal').ComponentChild} vnode The virtual node to render
 * @param {import('./internal').PreactElement} parentDom The DOM element to
 * update
 */
export function hydrate(vnode, parentDom) {
 render(vnode, parentDom, hydrate);
}
create-context.js部分
Context的使用:
Provider的props中有value屬性
Consumer中直接獲取傳值
import { createContext, h, render } from 'preact';

const FontContext = createContext(20);

function Child() {
 return <FontContext.Consumer>
 {fontSize=><div style={{fontSize:fontSize}}>child</div>}
 </FontContext.Consumer>
}
function App(){
 return <Child/>
}
render(
 <FontContext.Provider value={26}>
 <App/>
 </FontContext.Provider>,
 document.getElementById('app')
);
看一下源碼:
import { enqueueRender } from './component';

export let i = 0;

export function createContext(defaultValue, contextId) {
 contextId = '__cC' + i++; // 生成一個唯一ID

 const context = {
  _id: contextId,
  _defaultValue: defaultValue,
  /** @type {import('./internal').FunctionComponent} */
  Consumer(props, contextValue) {
   // return props.children(
   //  context[contextId] ? context[contextId].props.value : defaultValue
   // );
   return props.children(contextValue);
  },
  /** @type {import('./internal').FunctionComponent} */
  Provider(props) {
   if (!this.getChildContext) { // 第一次調用時進行一些初始化操作
    let subs = [];
    let ctx = {};
    ctx[contextId] = this;

       // 在diff操作用,如果判斷一個組件在Comsumer中,會調用sub進行訂閱;
       // 同時這個節點後續所有diff的地方都會帶上這個context,調用sub方法進行調用
       // context具有層級優先級,組件會先加入最近的context中
    this.getChildContext = () => ctx;

    this.shouldComponentUpdate = function(_props) {
     if (this.props.value !== _props.value) {
      // I think the forced value propagation here was only needed when `options.debounceRendering` was being bypassed:
      // https://github.com/preactjs/preact/commit/4d339fb803bea09e9f198abf38ca1bf8ea4b7771#diff-54682ce380935a717e41b8bfc54737f6R358
      // In those cases though, even with the value corrected, we're double-rendering all nodes.
      // It might be better to just tell folks not to use force-sync mode.
      // Currently, using `useContext()` in a class component will overwrite its `this.context` value.
      // subs.some(c => {
      //  c.context = _props.value;
      //  enqueueRender(c);
      // });

      // subs.some(c => {
      //  c.context[contextId] = _props.value;
      //  enqueueRender(c);
      // });
            // enqueueRender最終會進入renderComponent函數,進行diff、commitRoot、updateParentDomPointers等操作
      subs.some(enqueueRender);
     }
    };

    this.sub = c => {
     subs.push(c);// 進入訂閱數組,
     let old = c.componentWillUnmount;
     c.componentWillUnmount = () => { // 重寫componentWillUnmount
      subs.splice(subs.indexOf(c), 1);
      if (old) old.call(c);
     };
    };
   }

   return props.children;
  }
 };

 // Devtools needs access to the context object when it
 // encounters a Provider. This is necessary to support
 // setting `displayName` on the context object instead
 // of on the component itself. See:
 // https://reactjs.org/docs/context.html#contextdisplayname
 // createContext最終返回的是一個context對象,帶著Provider和Consumer兩個函數
 // 同時Consumber函數的contextType和Provider函數的_contextRef屬性都指向context
 return (context.Provider._contextRef = context.Consumer.contextType = context);
}
所以對於Provider組件,在渲染時會判斷有沒有getChildContext方法,如果有的話調用得到globalContext並一直向下傳遞下去
if (c.getChildContext != null) {
    globalContext = assign(assign({}, globalContext), c.getChildContext());
   }

   if (!isNew && c.getSnapshotBeforeUpdate != null) {
    snapshot = c.getSnapshotBeforeUpdate(oldProps, oldState);
   }

   let isTopLevelFragment =
    tmp != null && tmp.type === Fragment && tmp.key == null;
   let renderResult = isTopLevelFragment ? tmp.props.children : tmp;

   diffChildren(
    parentDom,
    Array.isArray(renderResult) ? renderResult : [renderResult],
    newVNode,
    oldVNode,
    globalContext,
    isSvg,
    excessDomChildren,
    commitQueue,
    oldDom,
    isHydrating
   );
當渲染遇到Consumer時,即遇到contextType屬性,先從Context中拿到provider,然後拿到provider的props的value值,作為組件要獲取的上下文信息。同時這時候會調用provider的sub方法,進行訂閱,當調用到Provider的shouldComponentUpdate中發現value發生變化時就會將所有的訂閱者進入enqueueRender函數。
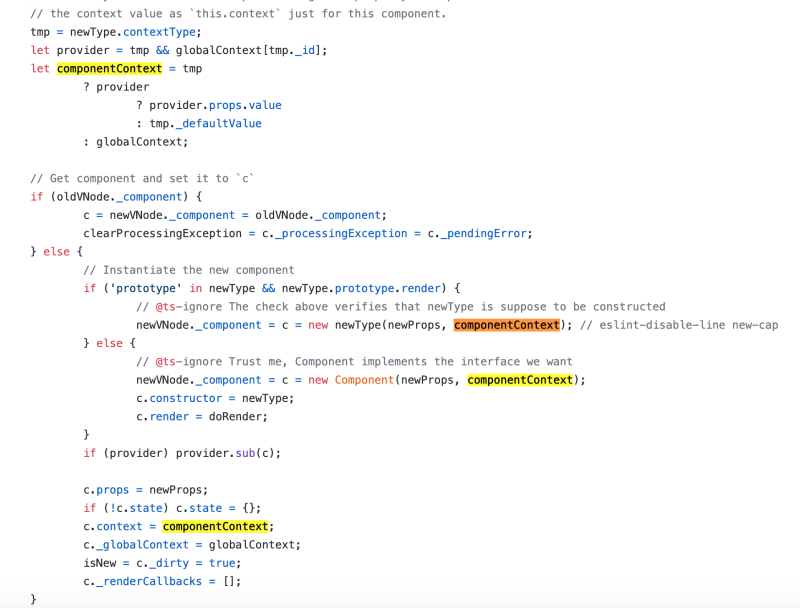
所以源碼中,globalContext對象的每一個key指向一個Context.Provider;componentContext代表組件所在的Consumer傳遞的上下文信息即配對的Provider的props的value;
同時Provider的shouldComponentUpdate方法中用到瞭 ·this.props.value !== _props.value· 那麼這裡的this.props是哪來的?Provider中並沒有相關屬性。
主要是下面這個地方,當判斷沒有render方法時,會先用Compoent來實例化一個對象,並將render方法設置為doRender,並將constructor指向newType(當前函數),在doRender中調用this.constructor方法
// Instantiate the new component
    if ('prototype' in newType && newType.prototype.render) {
     // @ts-ignore The check above verifies that newType is suppose to be constructed
     newVNode._component = c = new newType(newProps, componentContext); // eslint-disable-line new-cap
    } else {
     // @ts-ignore Trust me, Component implements the interface we want
     newVNode._component = c = new Component(newProps, componentContext);
     c.constructor = newType;
     c.render = doRender;
    }
/** The `.render()` method for a PFC backing instance. */
function doRender(props, state, context) {
 return this.constructor(props, context);
}
diff部分
diff部分比較復雜,整體整理瞭一張大圖

真是不得不吐槽,博客園的編輯器bug太多瞭,尤其是mac上使用,比如第二次上傳代碼提交不瞭;賦值粘貼用不瞭。。。
隻有情懷讓我繼續在這裡更新
到此這篇關於一文幫你理解PReact10.5.13源碼的文章就介紹到這瞭,更多相關PReact10.5.13源碼內容請搜索WalkonNet以前的文章或繼續瀏覽下面的相關文章希望大傢以後多多支持WalkonNet!
推薦閱讀:
- None Found