springboot中swagger、異步/定時/郵件任務的問題
1、SpringBoot:集成Swagger終極版

學習目標:
- 瞭解Swagger的概念及作用
- 掌握在項目中集成Swagger自動生成API文檔
1.1、Swagger簡介
前後端分離
- 前端 -> 前端控制層、視圖層
- 後端 -> 後端控制層、服務層、數據訪問層
- 前後端通過API進行交互
- 前後端相對獨立且松耦合
產生的問題
- 前後端集成,前端或者後端無法做到“及時協商,盡早解決”,最終導致問題集中爆發
解決方案
- 首先定義schema [ 計劃的提綱 ],並實時跟蹤最新的API,降低集成風險
Swagger
- 號稱世界上最流行的API框架
- Restful Api 文檔在線自動生成器 => API 文檔 與API 定義同步更新
- 直接運行,在線測試API
- 支持多種語言 (如:Java,PHP等)
- 官網:https://swagger.io/
1.2、SpringBoot集成Swagger
SpringBoot集成Swagger => springfox,兩個jar包
- Springfox-swagger2
- swagger-springmvc
使用Swagger
要求:jdk 1.8 + 否則swagger2無法運行
步驟:
1、新建一個SpringBoot-web項目
2、添加Maven依賴
   <!-- https://mvnrepository.com/artifact/io.springfox/springfox-swagger-ui -->
        <dependency>
            <groupId>io.springfox</groupId>
            <artifactId>springfox-swagger-ui</artifactId>
            <version>3.0.0</version>
        </dependency>
        <!-- https://mvnrepository.com/artifact/io.springfox/springfox-swagger2 -->
        <dependency>
            <groupId>io.springfox</groupId>
            <artifactId>springfox-swagger2</artifactId>
            <version>3.0.0</version>
        </dependency>
3、編寫HelloController,測試確保運行成功!
4、要使用Swagger,我們需要編寫一個配置類-SwaggerConfig來配置 Swagger
@Configuration //配置類
@EnableSwagger2// 開啟Swagger2的自動配置
public class SwaggerConfig {
}
5、訪問測試 :http://localhost:8080/swagger-ui.html ,可以看到swagger的界面;

重要在於寫 文檔名和描述,即ApiInfo有參構造的前2個參數。
1.3、配置Swagger
1、Swagger實例Bean是Docket,所以通過配置Docket實例來配置Swaggger。
  //配置瞭swagger的docket的bean實例
    @Bean
    public Docket getDocket(){
        return new Docket(DocumentationType.SWAGGER_2);
    }
2、可以通過apiInfo()屬性配置文檔信息
//配置文檔信息
private ApiInfo apiInfo() {
   Contact contact = new Contact("聯系人名字", "http://xxx.xxx.com/聯系人訪問鏈接", "聯系人郵箱");
   return new ApiInfo(
           "Swagger學習", // 標題
           "學習演示如何配置Swagger", // 描述
           "v1.0", // 版本
           "http://terms.service.url/組織鏈接", // 組織鏈接
           contact, // 聯系人信息
           "Apach 2.0 許可", // 許可
           "許可鏈接", // 許可連接
           new ArrayList<>()// 擴展
  );
}
3、Docket 實例關聯上 apiInfo()
@Bean
public Docket docket() {
   return new Docket(DocumentationType.SWAGGER_2).apiInfo(apiInfo());
}
4、重啟項目,訪問測試 http://localhost:8080/swagger-ui.html 看下效果;

1.4、配置掃描接口
1、構建Docket時通過select()方法配置怎麼掃描接口。
@Bean
public Docket docket() {
    return new Docket(DocumentationType.SWAGGER_2)
        .apiInfo(apiInfo())
        .select()// 通過.select()方法,去配置掃描接口,RequestHandlerSelectors配置如何掃描接口
        .apis(RequestHandlerSelectors.basePackage("com.wei.swagger.controller"))
        .build();
}
2、重啟項目測試,由於我們配置根據包的路徑掃描接口,所以我們隻能看到一個類
3、除瞭通過包路徑配置掃描接口外,還可以通過配置其他方式掃描接口,這裡註釋一下所有的配置方式:
any() // 掃描所有,項目中的所有接口都會被掃描到
none() // 不掃描接口
// 通過方法上的註解掃描,如withMethodAnnotation(GetMapping.class)隻掃描get請求
withMethodAnnotation(final Class<? extends Annotation> annotation)
// 通過類上的註解掃描,如.withClassAnnotation(Controller.class)隻掃描有controller註解的類中的接口
withClassAnnotation(final Class<? extends Annotation> annotation)
basePackage(final String basePackage) // 根據包路徑掃描接口
4、除此之外,我們還可以配置接口掃描過濾 paths :
 //配置瞭swagger的docket的bean實例
    @Bean
    public Docket getDocket(Environment environment){
        return new Docket(DocumentationType.SWAGGER_2)
                .apiInfo(getApiInfo())
                .select()
                //RequestHandlerSelectors配置要掃描接口的方式、
                //basePackage 指定要讓swagger掃描的包
                //RequestHandlerSelectors 還有any 和none方法
                //withClassAnnotation 隻掃描類上有XX註解
                //withMethodAnnotation 隻掃描方法上有XX註解
                .apis(RequestHandlerSelectors.basePackage("com.wei.swagger.controller"))
                //paths 過濾路徑
                .paths(PathSelectors.ant("/wei/**"))
                .build();
    }
5、這裡的可選值還有
any() // 任何請求都掃描
none() // 任何請求都不掃描
regex(final String pathRegex) // 通過正則表達式控制
ant(final String antPattern) // 通過ant()控制
1.5、配置Swagger開關
1、通過enable()方法配置是否啟用swagger,如果是false,swagger將不能在瀏覽器中訪問瞭
enable 鏈式編程
@Bean
    public Docket getDocket(Environment environment){
        return new Docket(DocumentationType.SWAGGER_2)
                .enable(false)// 關閉swagger : false。 默認ture 開啟
                .apiInfo(getApiInfo())
                .select()
                //RequestHandlerSelectors配置要掃描接口的方式、
                //basePackage 指定要讓swagger掃描的包
                //RequestHandlerSelectors 還有any 和none方法
                //withClassAnnotation 隻掃描類上有XX註解
                //withMethodAnnotation 隻掃描方法上有XX註解
                .apis(RequestHandlerSelectors.basePackage("com.wei.swagger.controller"))
                //paths 過濾路徑
                .paths(PathSelectors.ant("/wei/**"))
                .build();
    }
2、如何動態配置當項目處於test、dev環境時顯示swagger,處於prod時不顯示?
 @Bean
    public Docket getDocket(Environment environment){
        Profiles profiles = Profiles.of("dev","test"); //dev or test
        System.out.println(profiles);
        //通過environment.acceptsProfiles(profiles) 判斷是否處在自己設定的環境當中
        boolean b = environment.acceptsProfiles(profiles);
        return new Docket(DocumentationType.SWAGGER_2)
                .enable(b)// 關閉swagger : false。 默認ture 開啟
                .apiInfo(getApiInfo())
                .select()
                //RequestHandlerSelectors配置要掃描接口的方式、
                //basePackage 指定要讓swagger掃描的包
                //RequestHandlerSelectors 還有any 和none方法
                //withClassAnnotation 隻掃描類上有XX註解
                //withMethodAnnotation 隻掃描方法上有XX註解
                .apis(RequestHandlerSelectors.basePackage("com.wei.swagger.controller"))
                //paths 過濾路徑
                .paths(PathSelectors.ant("/wei/**"))
                .build();
    }
3、可以在項目中增加一個dev的配置文件查看效果!

4、也可以通過配置文件實現,隻是界面顯示不友好。
application.properties
spring.profiles.active=prod
application-dev.properties
springfox.documentation.swagger-ui.enabled=true
application-prod.properties
springfox.documentation.swagger-ui.enabled=false

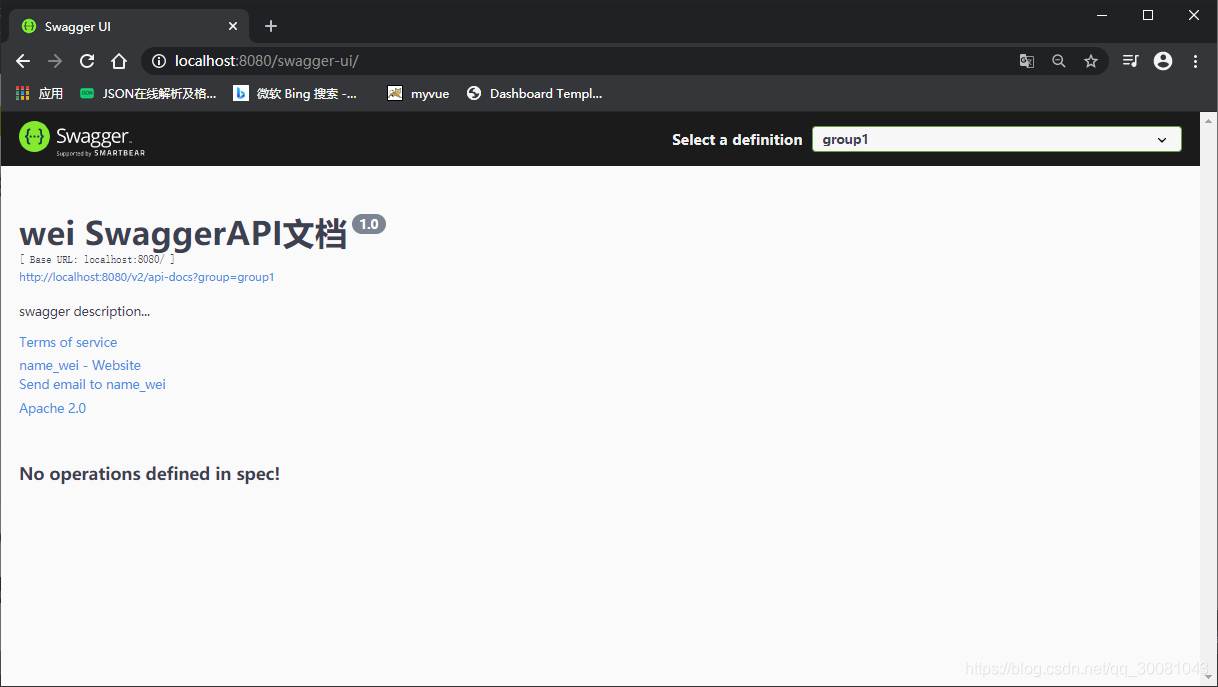
1.6、配置API分組

1、如果沒有配置分組,默認是default。通過groupName()方法即可配置分組:
@Bean
public Docket docket(Environment environment) {
   return new Docket(DocumentationType.SWAGGER_2).apiInfo(apiInfo())
      .groupName("group1") // 配置分組
       // 省略配置....
}
2、重啟項目查看分組
3、如何配置多個分組?配置多個分組隻需要配置多個docket即可:
@Bean
    public Docket getDocket2(){
        return new Docket(DocumentationType.SWAGGER_2).groupName("group2");
    }
    @Bean
    public Docket getDocket3(){
        return new Docket(DocumentationType.SWAGGER_2).groupName("group3");
    }
4、重啟項目查看即可
1.7、實體配置
1、新建一個實體類
package com.wei.swagger.pojo;

import io.swagger.annotations.ApiModel;
import io.swagger.annotations.ApiModelProperty;
import lombok.Data;

@ApiModel("user實體類")
@Data
public class User {
    @ApiModelProperty("用戶名")
    private String username;
    @ApiModelProperty("密碼")
    private String password;
}
2、隻要這個實體在請求接口的返回值上(即使是泛型),都能映射到實體項中:
 @RequestMapping(value = "/user" , method = RequestMethod.POST)
    public User user(){
        return new User();
    }
3、重啟查看測試
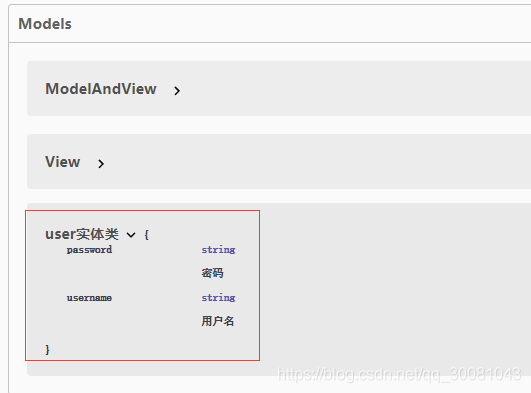
註:並不是因為@ApiModel這個註解讓實體顯示在這裡瞭,而是隻要出現在接口方法的返回值上的實體都會顯示在這裡,而@ApiModel和@ApiModelProperty這兩個註解隻是為實體添加註釋的。
@ApiModel為類添加註釋
@ApiModelProperty為類屬性添加註釋
1.8、常用註解
Swagger的所有註解定義在io.swagger.annotations包下
下面列一些經常用到的,未列舉出來的可以另行查閱說明:
| Swagger註解 | 簡單說明 |
|---|---|
| @Api(tags = “xxx模塊說明”) | 作用在模塊類上 |
| @ApiOperation(“xxx接口說明”) | 作用在接口方法上 |
| @ApiModel(“xxxPOJO說明”) | 作用在模型類上:如VO、BO |
| @ApiModelProperty(value = “xxx屬性說明”,hidden = true) | 作用在類方法和屬性上,hidden設置為true可以隱藏該屬性 |
| @ApiParam(“xxx參數說明”) | 作用在參數、方法和字段上,類似@ApiModelProperty |
我們也可以給請求的接口配置一些註釋
 @ApiOperation("test請求")
    @RequestMapping(value = "/test" , method = RequestMethod.GET)
    public String test(@ApiParam("名字") String name){
        return "test "+name;
    }
測試結果如下

給controller添加註釋
@Api(tags = "hello 控制器")
public class HelloController {
}
這樣的話,可以給一些比較難理解的屬性或者接口,增加一些配置信息,讓人更容易閱讀!
相較於傳統的Postman或Curl方式測試接口,使用swagger簡直就是傻瓜式操作,不需要額外說明文檔(寫得好本身就是文檔)而且更不容易出錯,隻需要錄入數據然後點擊Execute,如果再配合自動化框架,可以說基本就不需要人為操作瞭。
Swagger是個優秀的工具,現在國內已經有很多的中小型互聯網公司都在使用它,相較於傳統的要先出Word接口文檔再測試的方式,顯然這樣也更符合現在的快速迭代開發行情。當然瞭,提醒下大傢在正式環境要記得關閉Swagger,一來出於安全考慮二來也可以節省運行時內存。
總結:
1、我們可以通過swagger給一些比較難理解的屬性或者接口,增加註釋信息
2、接口文檔實時更新
3、可以在線測試
1.9、拓展:其他皮膚
我們可以導入不同的包實現不同的皮膚定義:
1、默認的 訪問 http://localhost:8080/swagger-ui/
<dependency>
   <groupId>io.springfox</groupId>
   <artifactId>springfox-swagger-ui</artifactId>
   <version>2.9.2</version>
</dependency>
2、bootstrap-ui 訪問 http://localhost:8080/doc.html
<!-- 引入swagger-bootstrap-ui包 /doc.html-->
<dependency>
    <groupId>com.github.xiaoymin</groupId>
    <artifactId>swagger-bootstrap-ui</artifactId>
    <version>1.9.1</version>
</dependency>

3、Layui-ui 訪問 http://localhost:8080/docs.html
<!-- 引入swagger-ui-layer包 /docs.html-->
<dependency>
    <groupId>com.github.caspar-chen</groupId>
    <artifactId>swagger-ui-layer</artifactId>
    <version>1.1.3</version>
</dependency>

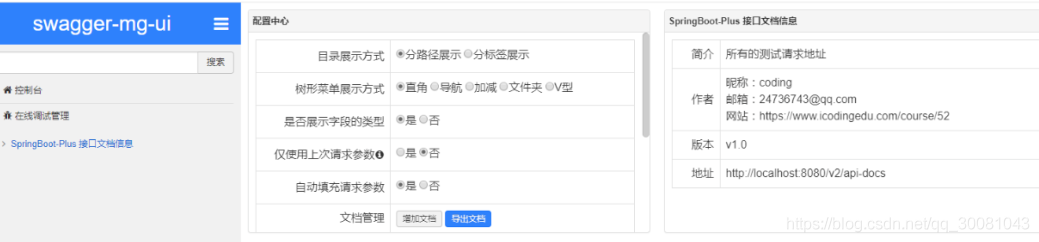
4、mg-ui 訪問 http://localhost:8080/document.html
<!-- 引入swagger-ui-layer包 /document.html-->
<dependency>
    <groupId>com.zyplayer</groupId>
    <artifactId>swagger-mg-ui</artifactId>
    <version>1.0.6</version>
</dependency>
2、SpringBoot:異步、定時、郵件任務
2.1、異步任務
編寫方法,假裝正在處理數據,使用線程設置一些延時,模擬同步等待的情況;
@Service
public class AsyncService {

   public void hello(){
       try {
           Thread.sleep(3000);
      } catch (InterruptedException e) {
           e.printStackTrace();
      }
       System.out.println("業務進行中....");
  }
}
3、編寫controller包
4、編寫AsyncController類
我們去寫一個Controller測試一下
@RestController
public class AsyncController {

   @Autowired
   AsyncService asyncService;

   @GetMapping("/hello")
   public String hello(){
       asyncService.hello();
       return "hello!!!ok!!!";
  }

}
5、訪問http://localhost:8080/hello進行測試,3秒後出現hello!!!ok!!!,這是同步等待的情況。
問題:我們如果想讓用戶直接得到消息,就在後臺使用多線程的方式進行處理即可,但是每次都需要自己手動去編寫多線程的實現的話,太麻煩瞭,我們隻需要用一個簡單的辦法,在我們的方法上加一個簡單的註解即可,如下:
6、給hello方法添加@Async註解;
//告訴Spring這是一個異步方法
@Async
public void hello(){
   try {
       Thread.sleep(3000);
  } catch (InterruptedException e) {
       e.printStackTrace();
  }
   System.out.println("業務進行中....");
}
SpringBoot就會自己開一個線程池,進行調用!但是要讓這個註解生效,我們還需要在主程序上添加一個註解@EnableAsync ,開啟異步註解功能;
@EnableAsync //開啟異步註解功能
@SpringBootApplication
public class SpringbootTaskApplication {

   public static void main(String[] args) {
       SpringApplication.run(SpringbootTaskApplication.class, args);
  }

}
7、重啟測試,網頁瞬間響應,後臺代碼依舊執行!
無需等待AsyncService 的hello 方法走完,可以繼續執行下面的語句。
2.2、郵件任務
郵件發送,在我們的日常開發中,也非常的多,Springboot也幫我們做瞭支持郵件發送需要引入spring-boot-start-mail
SpringBoot 自動配置MailSenderAutoConfiguration
定義MailProperties內容,配置在application.yml中
自動裝配JavaMailSender(實現類:JavaMailSenderImpl 來寫代碼)
測試郵件發送
測試:
1、引入pom依賴
 <dependency>
        <groupId>org.springframework.boot</groupId>
        <artifactId>spring-boot-starter-mail</artifactId>
    </dependency>
2、查看自動配置類:MailSenderAutoConfiguration

這個類中存在bean,JavaMailSenderImpl

然後我們去看下配置文件
@ConfigurationProperties(
   prefix = "spring.mail"
)
public class MailProperties {
   private static final Charset DEFAULT_CHARSET;
   private String host;
   private Integer port;
   private String username;
   private String password;
   private String protocol = "smtp";
   private Charset defaultEncoding;
   private Map<String, String> properties;
   private String jndiName;
}
3、配置文件:
spring.mail.username=xxx@163.com
spring.mail.password=你的163授權碼
spring.mail.host=smtp.163.com

# 如果使用qq,需要配置ssl
spring.mail.properties.mail.smtp.ssl.enable=true
4、Spring單元測試
package com.wei;

import org.junit.jupiter.api.Test;
import org.springframework.beans.factory.annotation.Autowired;
import org.springframework.boot.test.context.SpringBootTest;
import org.springframework.mail.SimpleMailMessage;
import org.springframework.mail.javamail.JavaMailSenderImpl;
import org.springframework.mail.javamail.MimeMessageHelper;

import javax.mail.MessagingException;
import javax.mail.internet.MimeMessage;
import java.io.File;
import java.io.IOException;

@SpringBootTest
class Springboot09TestApplicationTests {
    @Autowired
    JavaMailSenderImpl javaMailSender;

    @Test
    void contextLoads() {
        // 發送郵件
        SimpleMailMessage mailMessage = new SimpleMailMessage();
        mailMessage.setFrom("xxx@163.com");
        mailMessage.setTo("xxx@163.com");
        mailMessage.setSubject("subject2..");
        mailMessage.setText("text2...");
        javaMailSender.send(mailMessage);
    }
    @Test
    void contextLoads2() throws MessagingException, IOException {
        // 發送復雜的郵件
        MimeMessage mimeMessage  = javaMailSender.createMimeMessage();
        // 組裝
        MimeMessageHelper helper = new MimeMessageHelper(mimeMessage,true);    // true ,支持多組件 multipart
        helper.setSubject("subject");
        helper.setText("<h1 style='color:red'>test 復雜郵件</h1>",true);     // true ,支持html
        //附件
        String fileName = this.getClass().getClassLoader().getResource("1.jpg").getPath();   // 獲取resources下的絕對路徑
        helper.addAttachment("1.jpg", new File(fileName));
        helper.addAttachment("2.jpg", new File(fileName));

        helper.setFrom("xxx@163.com");     //發送
        helper.setTo("xxx@163.com");       //接收
        javaMailSender.send(mimeMessage);
    }

}
contextLoads 結果

contextLoads2 結果

查看郵箱,郵件接收成功!
我們隻需要使用Thymeleaf進行前後端結合即可開發自己網站郵件收發功能瞭!
2.3、定時任務
項目開發中經常需要執行一些定時任務,比如需要在每天凌晨的時候,分析一次前一天的日志信息,Spring為我們提供瞭異步執行任務調度的方式,提供瞭兩個接口。
- TaskExecutor接口
- TaskScheduler接口
兩個註解:
- @EnableScheduling
- @Scheduled
cron表達式參考:https://www.cnblogs.com/javahr/p/8318728.html
測試步驟:
1、創建一個ScheduledService
我們裡面存在一個hello方法,他需要定時執行,怎麼處理呢?
import org.springframework.scheduling.annotation.Scheduled;
import org.springframework.stereotype.Service;
@Service
public class ScheduledService {
    //在一個特定的時間執行這個方法
    @Scheduled(cron = "秒 分 時 * * ?")
    public void hello(){
        System.out.println("hello 執行瞭");
    }

}
2、這裡寫完定時任務之後,我們需要在主程序上增加@EnableScheduling 開啟定時任務功能
@EnableAsync //開啟異步註解功能
@EnableScheduling //開啟基於註解的定時任務
@SpringBootApplication
public class SpringbootTaskApplication {

   public static void main(String[] args) {
       SpringApplication.run(SpringbootTaskApplication.class, args);
  }

}
3、表達式生成器
http://www.bejson.com/othertools/cron/
4、常用的表達式
(1)0/2 * * * * ?   表示每2秒 執行任務
(1)0 0/2 * * * ?   表示每2分鐘 執行任務
(1)0 0 2 1 * ?   表示在每月的1日的凌晨2點調整任務
(2)0 15 10 ? * MON-FRI   表示周一到周五每天上午10:15執行作業
(3)0 15 10 ? 6L 2002-2006   表示2002-2006年的每個月的最後一個星期五上午10:15執行作
(4)0 0 10,14,16 * * ?   每天上午10點,下午2點,4點
(5)0 0/30 9-17 * * ?   朝九晚五工作時間內每半小時
(6)0 0 12 ? * WED   表示每個星期三中午12點
(7)0 0 12 * * ?   每天中午12點觸發
(8)0 15 10 ? * *   每天上午10:15觸發
(9)0 15 10 * * ?     每天上午10:15觸發
(10)0 15 10 * * ?   每天上午10:15觸發
(11)0 15 10 * * ? 2005   2005年的每天上午10:15觸發
(12)0 * 14 * * ?     在每天下午2點到下午2:59期間的每1分鐘觸發
(13)0 0/5 14 * * ?   在每天下午2點到下午2:55期間的每5分鐘觸發
(14)0 0/5 14,18 * * ?     在每天下午2點到2:55期間和下午6點到6:55期間的每5分鐘觸發
(15)0 0-5 14 * * ?   在每天下午2點到下午2:05期間的每1分鐘觸發
(16)0 10,44 14 ? 3 WED   每年三月的星期三的下午2:10和2:44觸發
(17)0 15 10 ? * MON-FRI   周一至周五的上午10:15觸發
(18)0 15 10 15 * ?   每月15日上午10:15觸發
(19)0 15 10 L * ?   每月最後一日的上午10:15觸發
(20)0 15 10 ? * 6L   每月的最後一個星期五上午10:15觸發
(21)0 15 10 ? * 6L 2002-2005   2002年至2005年的每月的最後一個星期五上午10:15觸發
(22)0 15 10 ? * 6#3   每月的第三個星期五上午10:15觸發
到此這篇關於springboot中swagger、異步/定時/郵件任務的問題的文章就介紹到這瞭,更多相關springboot swagger內容請搜索WalkonNet以前的文章或繼續瀏覽下面的相關文章希望大傢以後多多支持WalkonNet!
推薦閱讀:
- Springboot集成swagger實現方式
- Spring boot配置 swagger的示例代碼
- 手把手教你SpringBoot快速集成Swagger的配置過程
- 關於springboot集成swagger及knife4j的增強問題
- Java集成swagger文檔組件