vue項目中掃碼支付的實現示例(附demo)
需求背景
市場報告列表展示的報告有兩種類型,一種是免費報告,另一種是付費報告。免費報告用戶可以直接查看,付費報告需要用戶購買之後才能查看。

思路分析
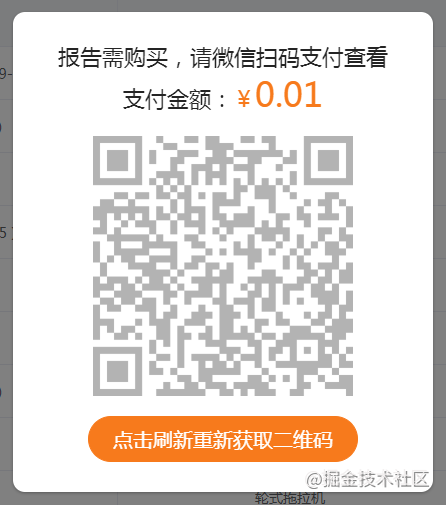
- 點擊查看為付費報告,彈出支付二維碼。
- 創建訂單,二維碼進行倒計時,其展示5秒後開始監聽支付回調結果,頻次為五秒一次。
- 倒計時第一次倒數到0秒,提醒二維碼過期讓用戶點擊刷新二維碼。
- 繼續倒計時並開始監聽支付回調結果。
- 刷新之後倒數到0秒還沒有監聽到結果則關閉支付彈窗,讓用戶重新發起支付。
UI展示
支付彈窗未過期長這樣子喔

支付彈窗過期時長這樣子喔

開始使用
支付功能作為項目的公共功能,所以我們單獨封裝一個組件,這樣其他模塊使用的時候就以子組件的方式引入。
一 編寫支付組件模板
下面是模板具體的源碼,由於樣式不是我們考慮的重點,所以就不展示樣式的代碼瞭,根據需要自行添加哈。
<template>
  <div>
    <el-dialog
      class="dialog-pay"
      title=""
      :visible.sync="dialogVisible"
      :show-close="false"
      @close="handleClosePay"
    >
      <div class="content">
        <p class="tip">{{ pay.title }}</p>
        <p class="tip">
          支付金額:<span class="small">¥</span
          ><span class="large">{{ pay.money }}</span>
        </p>
        <img
          class="pic"
          :style="{ opacity: btnDisabled ? 1 : 0.3 }"
          :src="pay.url"
        />
        <el-button
          class="btn"
          :class="btnDisabled ? 'disabled' : ''"
          type="primary"
          :disabled="btnDisabled"
          @click="handleRefreshCode"
          >{{ btnText }}</el-button
        >
      </div>
    </el-dialog>
  </div>
</template>
二 支付組件的JS相關代碼和說明
1. 監聽支付彈窗是否顯示
子組件通過props屬性,在子組件中接收父組件傳過來的值。用watch監聽pay.show,隻有為true的時候顯示支付彈窗,並且在顯示5秒後開始執行監聽支付結果的方法。
watch: {
    'pay.show': {
      handler(val) {
        if (val) {
          this.dialogVisible = this.pay.show
          setTimeout(this.handleReportPayNotify(), 5000)
        }
      },
      immediate: true
    }
},
2. 二維碼開始倒計時
二維碼開始進行60秒的倒計時,到0秒提示點擊刷新重新獲取二維碼,繼續開始倒計時,此時如果到0秒則關閉支付彈窗,提示用戶等待時間過長,請重新發起支付。
handleCountDown() {
  if (this.second == 1) {
    if (this.refresh) {
      this.second = 60
      this.btnDisabled = false
      this.btnText = '點擊刷新重新獲取二維碼'
      if (this.timer) {
        clearInterval(this.timer)
      }
    } else {
      this.$emit('closePay', { type: 'fail' })
      clearInterval(this.timer)
      this.$message.warning('等待時間過長,請重新發起支付')
    }
  } else {
    this.second--
    this.btnDisabled = true
    this.btnText = `距離二維碼過期剩餘${this.second}秒`
    this.downTimer = setTimeout(() => {
      this.handleCountDown()
    }, 1000)
  }
},
3. 監聽支付彈窗關閉
handleClosePay() {
  if (this.timer) {
    clearInterval(this.timer)
  }
  if (this.downTimer) {
    clearTimeout(this.downTimer)
  }
  this.$emit('closePay', { type: 'fail' })
  this.$message.warning('您已取消支付')
},
4. 監聽支付回調結果
回調結果有兩種,如果是正常范圍內監聽成功,則執行父組件傳過來的fn,並清除定時器;如果監聽到次數為12的時候還沒有得到相應的結果,則關閉支付彈窗,提示用戶等待時間過長,請重新發起支付,並清除定時器。
handleReportPayNotify() {
      let num = 0
      this.timer = setInterval(() => {
        num++
        this.pay.fn().then(res => {
          if (res.status == 111111) {
            this.$emit('closePay', { type: 'success' })
            clearInterval(this.timer)
          }
        })
        if (num == 12) {
          this.$emit('closePay', { type: 'fail' })
          clearInterval(this.timer)
          this.$message.warning('等待時間過長,請重新發起支付')
        }
      }, 5000)
    }
5. 支付組件銷毀時清除定時器
這一步是容易忽略但是也是需要做的,當組件銷毀時將定時器及時的清除掉。
  beforeDestroy() {
    if (this.timer) {
      clearInterval(this.timer)
    }
    if (this.downTimer) {
      clearTimeout(this.downTimer)
    }
  }
}
附:組件JS完整的源碼
<script>
export default {
  name: 'WechatPay',
  props: {
    pay: Object
  },
  data() {
    return {
      dialogVisible: false,
      btnDisabled: true,
      btnText: '',
      second: 60,
      timer: null,
      refresh: true
    }
  },
  watch: {
    'pay.show': {
      handler(val) {
        if (val) {
          this.dialogVisible = this.pay.show
          setTimeout(this.handleReportPayNotify(), 5000)
        }
      },
      immediate: true
    }
  },
  mounted() {
    this.handleCountDown()
  },
  methods: {
    /**
     * @descripttion: 刷新二維碼
     */
    handleRefreshCode() {
      this.$bus.$emit('refreshCode')
      this.handleCountDown()
      this.handleReportPayNotify()
      this.refresh = false
    },
    /**
     * @descripttion: 二維碼倒計時
     */
    handleCountDown() {
      if (this.second == 1) {
        if (this.refresh) {
          this.second = 60
          this.btnDisabled = false
          this.btnText = '點擊刷新重新獲取二維碼'
          if (this.timer) {
            clearInterval(this.timer)
          }
        } else {
          this.$emit('closePay', { type: 'fail' })
          clearInterval(this.timer)
          this.$message.warning('等待時間過長,請重新發起支付')
        }
      } else {
        this.second--
        this.btnDisabled = true
        this.btnText = `距離二維碼過期剩餘${this.second}秒`
        this.downTimer = setTimeout(() => {
          this.handleCountDown()
        }, 1000)
      }
    },
    /**
     * @descripttion: 監聽支付彈窗關閉
     */
    handleClosePay() {
      if (this.timer) {
        clearInterval(this.timer)
      }
      if (this.downTimer) {
        clearTimeout(this.downTimer)
      }
      this.$emit('closePay', { type: 'fail' })
      this.$message.warning('您已取消支付')
    },
    /**
     * @descripttion: 監測支付回調結果
     */
    handleReportPayNotify() {
      let num = 0
      this.timer = setInterval(() => {
        num++
        this.pay.fn().then(res => {
          if (res.status == 111111) {
            this.$emit('closePay', { type: 'success' })
            clearInterval(this.timer)
          }
        })
        if (num == 12) {
          this.$emit('closePay', { type: 'fail' })
          clearInterval(this.timer)
          this.$message.warning('等待時間過長,請重新發起支付')
        }
      }, 5000)
    }
  },
  beforeDestroy() {
    if (this.timer) {
      clearInterval(this.timer)
    }
    if (this.downTimer) {
      clearTimeout(this.downTimer)
    }
  }
}
</script>
到此這篇關於vue項目中掃碼支付的實現示例(附demo)的文章就介紹到這瞭,更多相關vue 掃碼支付內容請搜索WalkonNet以前的文章或繼續瀏覽下面的相關文章希望大傢以後多多支持WalkonNet!
推薦閱讀:
- 關於vue.extend的使用及說明
- vue實現驗證碼倒計時按鈕
- 利用Vue實現一個累加向上漂浮動畫
- Vue3封裝 Message消息提示實例函數詳解
- 利用momentJs做一個倒計時組件(實例代碼)