一文搞懂JMeter engine中HashTree的配置問題
一、前言
- 之前介紹瞭JMeter engine啟動原理,但是裡面涉及到HashTree這個類結構沒有給大傢詳細介紹,這邊文章就詳細介紹JMeter engine裡面的HashTree結構具體用來做什麼
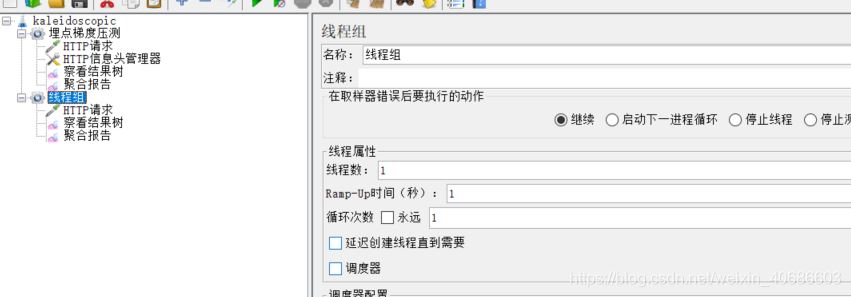
- 大傢看到下面是JMeter控制臺配置截圖,是一個標準的菜單形式;菜單形式其實就類似於“樹型”的數據結構,而HashTree其實就是一個樹型數據結構
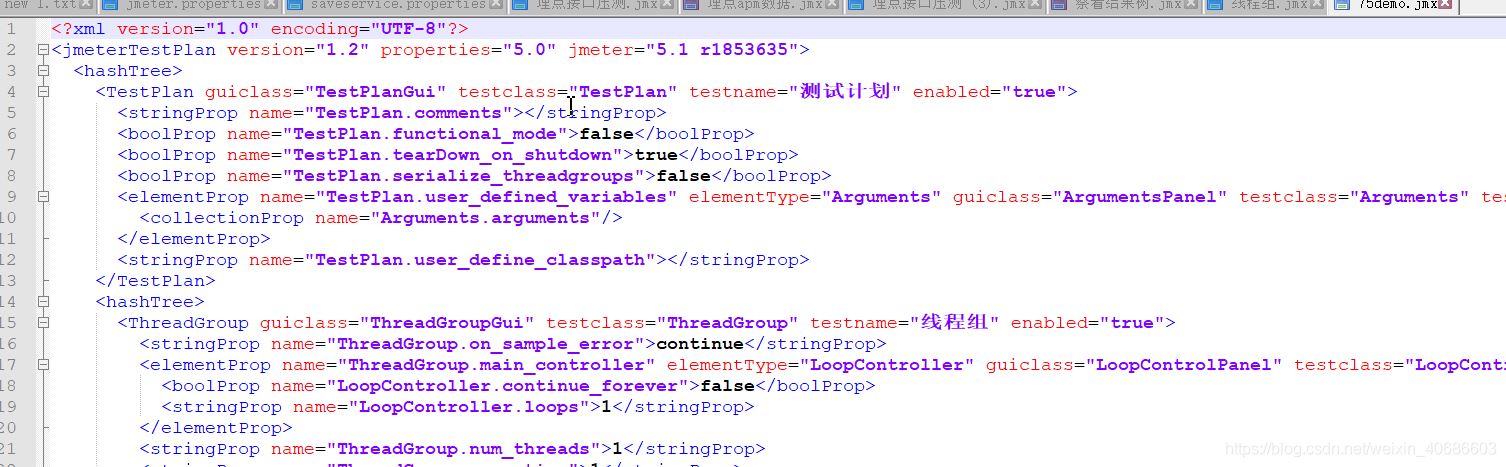
我們在JMeter控制臺導出的jmx文件,是一個xml結構的數據,他其實就是由HashTree生成的,後面我們會講到
二、HashTree的用法
首先通過HashTree類介紹,它一個集合類;具備Map結構的功能,而且是一種樹型結構
/**
 * This class is used to create a tree structure of objects. Each element in the
 * tree is also a key to the next node down in the tree. It provides many ways
 * to add objects and branches, as well as many ways to retrieve.
 * <p>
 * HashTree implements the Map interface for convenience reasons. The main
 * difference between a Map and a HashTree is that the HashTree organizes the
 * data into a recursive tree structure, and provides the means to manipulate
 * that structure.
 * <p>
 * Of special interest is the {@link #traverse(HashTreeTraverser)} method, which
 * provides an expedient way to traverse any HashTree by implementing the
 * {@link HashTreeTraverser} interface in order to perform some operation on the
 * tree, or to extract information from the tree.
 *
 * @see HashTreeTraverser
 * @see SearchByClass
 */
public class HashTree implements Serializable, Map<Object, HashTree>, Cloneable {
}
JMeter常用的HashTree方法(以下圖配置為例)
//ListedHashTree是HashTree的繼承類,可以保證HashTree的順序性
HashTree tree = new ListedHashTree();
//TestPlan對象,測試計劃
TestPlan plan = new TestPlan();
//ThreadGroup對象,線程組
ThreadGroup group = new ThreadGroup();
//創建線程組數結構的對象groupTree
HashTree groupTree = new ListedHashTree();
//表示取樣器中的HTTP請求
HTTPSamplerProxy sampler = new HTTPSamplerProxy();
//創建HTTP請求的數結構對象samplerTree
//調用put方法相當於在plan(測試計劃)菜單對象下添加group(線程組)子菜單,這樣就形成瞭一種樹型結構
HashTree samplerTree = new ListedHashTree();
samplerTree.put(sampler,new ListedHashTree())
//groupTree樹結構添加子樹samplerTree
groupTree.put(group,samplerTree)
//tree樹結構為測試計劃對象,添加子樹groupTree,這樣就形成瞭上圖的層級形式
tree.put(plan, groupTree)
//調用add方法相當於在tree菜單對象下添加同級菜單
tree.add(Object key)
三、JMeter源碼導出jmx腳本文件介紹
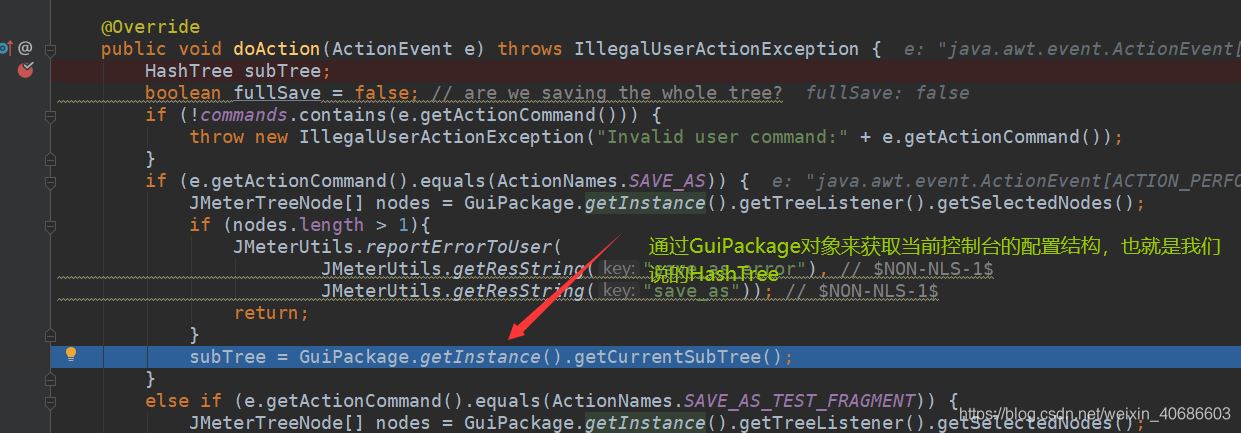
首先在JMeter控制臺所有點擊事件,都會被ActionRouter中performaAction方法進行監聽執行,點擊導出按鈕,會進入到如圖方法通過反射由Save類執行
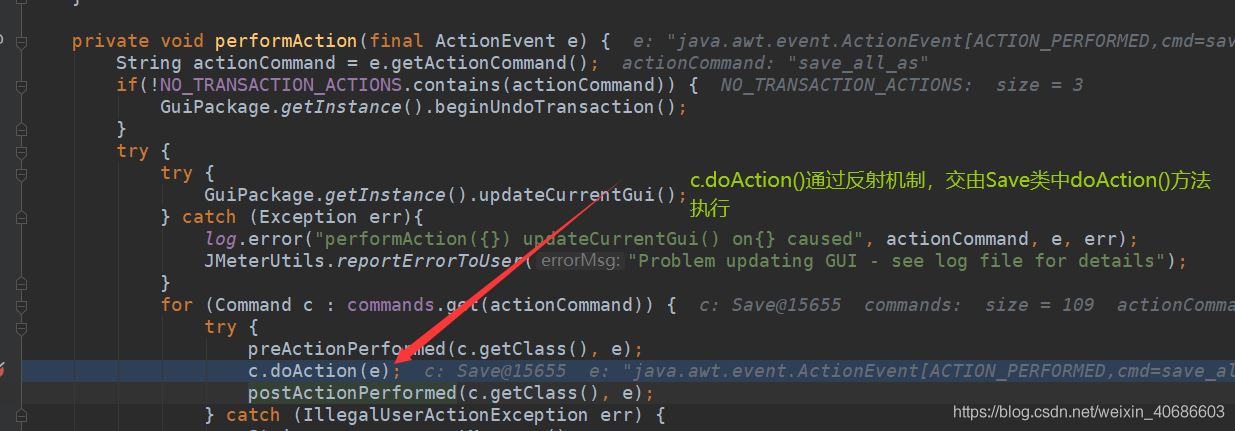
在Save類中執行doAction主要是獲取到配置的HashTree
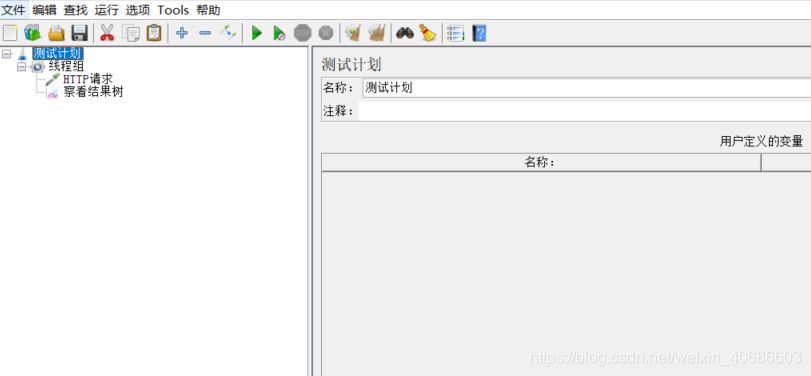
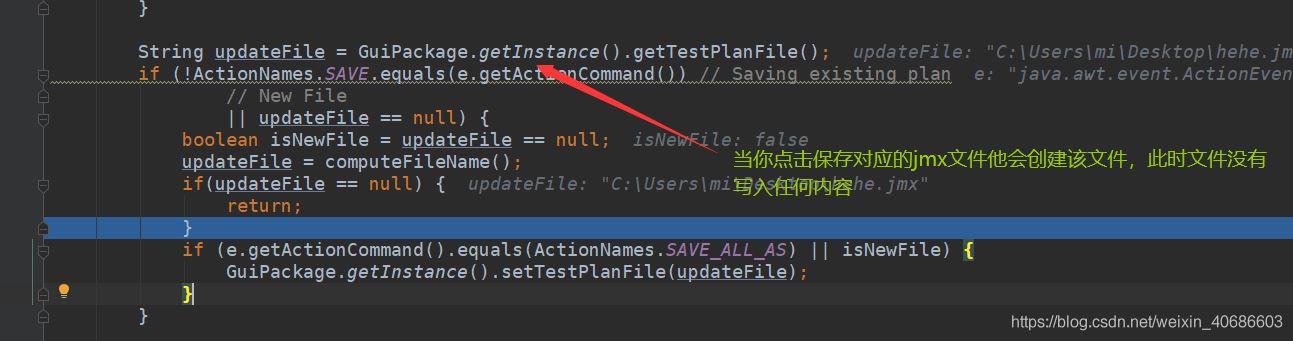
當你點擊保存的時候,它會創建一個空文件,此時文件沒有任何內容
Save
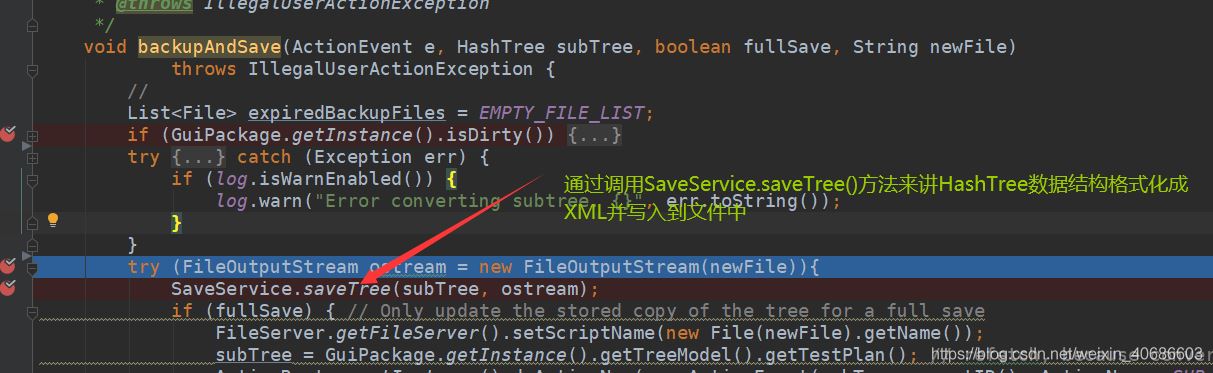
類的doAction方法最後會調用backupAndSave(e, subTree, fullSave, updateFile)這個是來將創建的空文件寫入xml內容的
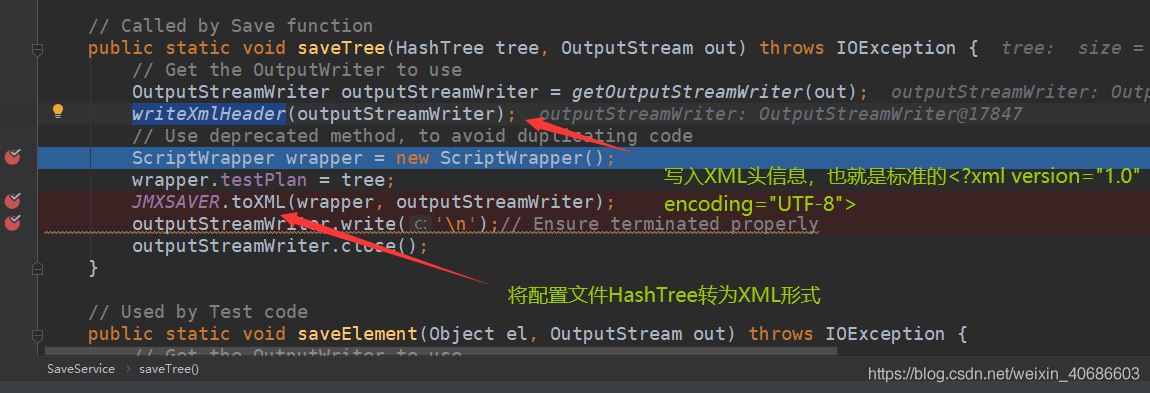
在SaveService中saveTree方法,其中JMXSAVER是XStream對象,對應的maven坐標如下
<!-- https://mvnrepository.com/artifact/com.thoughtworks.xstream/xstream -->
<dependency>
    <groupId>com.thoughtworks.xstream</groupId>
    <artifactId>xstream</artifactId>
    <version>1.4.15</version>
</dependency>
四、自定義HashTree生成JMeter腳本
首先maven引入以下幾個坐標<jmeter.version>5.3</jmeter.version>
        <dependency>
            <groupId>org.apache.jmeter</groupId>
            <artifactId>ApacheJMeter_http</artifactId>
            <version>${jmeter.version}</version>
            <exclusions>
                <exclusion>
                    <groupId>org.apache.logging.log4j</groupId>
                    <artifactId>log4j-slf4j-impl</artifactId>
                </exclusion>
            </exclusions>
        </dependency>
        <dependency>
            <groupId>org.apache.jmeter</groupId>
            <artifactId>ApacheJMeter_functions</artifactId>
            <version>${jmeter.version}</version>
        </dependency>
        <dependency>
            <groupId>org.apache.jmeter</groupId>
            <artifactId>ApacheJMeter_jdbc</artifactId>
            <version>${jmeter.version}</version>
        </dependency>

        <dependency>
            <groupId>org.apache.jmeter</groupId>
            <artifactId>ApacheJMeter_tcp</artifactId>
            <version>${jmeter.version}</version>
        </dependency>
先創建一個取樣器,然後寫成HashTree的數據結構
public static ThreadGroup threadGroup;
//創建一個標準的線程組
private static void initThreadGroup(){
    LoopController loopController = new LoopController();
    loopController.setName("LoopController");
    loopController.setProperty(TestElement.TEST_CLASS, LoopController.class.getName());
    loopController.setProperty(TestElement.GUI_CLASS, JMeterUtil.readSaveProperties("LoopControlPanel"));
    loopController.setEnabled(true);
    loopController.setLoops(1);
    ThreadGroup group = new ThreadGroup();
    group.setEnabled(true);
    group.setName("ThreadGroup");
    group.setProperty(TestElement.TEST_CLASS, JMeterUtil.readSaveProperties("ThreadGroup"));
    group.setProperty(TestElement.GUI_CLASS, JMeterUtil.readSaveProperties("ThreadGroupGui"));
    group.setProperty(ThreadGroup.ON_SAMPLE_ERROR,"continue");
    group.setProperty(ThreadGroup.IS_SAME_USER_ON_NEXT_ITERATION,true);
    group.setProperty(TestElement.COMMENTS,"");
    group.setNumThreads(1);
    group.setRampUp(1);
    group.setDelay(0);
    group.setDuration(0);
    group.setProperty(ThreadGroup.ON_SAMPLE_ERROR, ThreadGroup.ON_SAMPLE_ERROR_CONTINUE);
    group.setScheduler(false);
    group.setSamplerController(loopController);
    threadGroup = group;
}
創建一個標準的線程組
public static ThreadGroup threadGroup;
//創建一個標準的線程組
private static void initThreadGroup(){
    LoopController loopController = new LoopController();
    loopController.setName("LoopController");
    loopController.setProperty(TestElement.TEST_CLASS, LoopController.class.getName());
    loopController.setProperty(TestElement.GUI_CLASS, JMeterUtil.readSaveProperties("LoopControlPanel"));
    loopController.setEnabled(true);
    loopController.setLoops(1);
    ThreadGroup group = new ThreadGroup();
    group.setEnabled(true);
    group.setName("ThreadGroup");
    group.setProperty(TestElement.TEST_CLASS, JMeterUtil.readSaveProperties("ThreadGroup"));
    group.setProperty(TestElement.GUI_CLASS, JMeterUtil.readSaveProperties("ThreadGroupGui"));
    group.setProperty(ThreadGroup.ON_SAMPLE_ERROR,"continue");
    group.setProperty(ThreadGroup.IS_SAME_USER_ON_NEXT_ITERATION,true);
    group.setProperty(TestElement.COMMENTS,"");
    group.setNumThreads(1);
    group.setRampUp(1);
    group.setDelay(0);
    group.setDuration(0);
    group.setProperty(ThreadGroup.ON_SAMPLE_ERROR, ThreadGroup.ON_SAMPLE_ERROR_CONTINUE);
    group.setScheduler(false);
    group.setSamplerController(loopController);
    threadGroup = group;
}
創建一個標準的測試計劃
public static TestPlan testPlan;
//創建一個標準的測試計劃
private static void initTestPlan() {
    TestPlan plan = new TestPlan();
    //設置測試計劃屬性及內容,最後都會轉為xml標簽的屬性及內容
    plan.setProperty(TestElement.NAME, "測試計劃");
    plan.setProperty(TestElement.TEST_CLASS, JMeterUtil.readSaveProperties("TestPlan"));
    plan.setProperty(TestElement.GUI_CLASS, JMeterUtil.readSaveProperties("TestPlanGui"));
    plan.setEnabled(true);
    plan.setComment("");
    plan.setFunctionalMode(false);
    plan.setTearDownOnShutdown(true);
    plan.setSerialized(false);
    plan.setProperty("TestPlan.user_define_classpath","");
    plan.setProperty("TestPlan.user_defined_variables","");
    plan.setUserDefinedVariables(new Arguments());
    testPlan = plan;
}
開始封裝成一個HashTree的配置
//先創建一個測試計劃hashtree對象
HashTree hashTree = new ListedHashTree();
//在創建一個線程組threaddGroupTree對象
HashTree threadGroupTree = new ListedHashTree();
//HttpRequestConfig為HTTP對應的請求頭、請求體等信息數據,傳入httpToHashTree靜態方法獲取到取樣器的HashTree數據結構,源碼上圖已分享
HashTree httpConfigTree = XXClass.httpToHashTree(HttpRequestConfig httpRequestData)
//threadGroupTree添加子菜單httpConfigTree對象
threadGroupTree.put(group, httpConfigTree);
//測試計劃hashTree添加子菜單threadGroupTree對象
hashTree.put(JMeterTestPlanConfigService.testPlan, threadGroupTree);
HashTree寫好後,調用JMeter原生方法SaveService.saveTree(hashTree,outStream);生成對應的xml
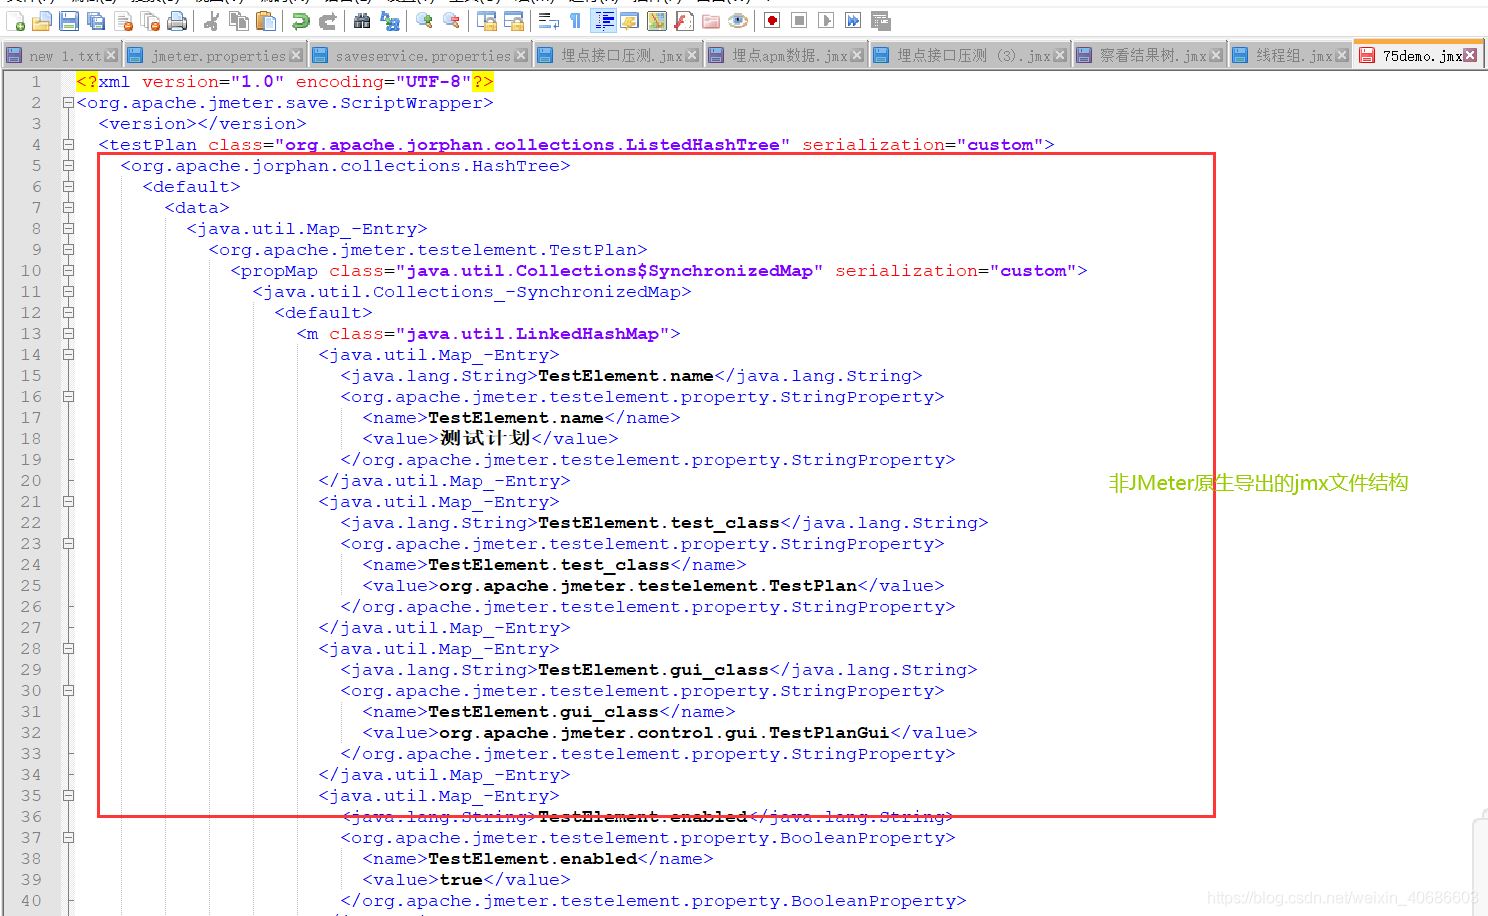
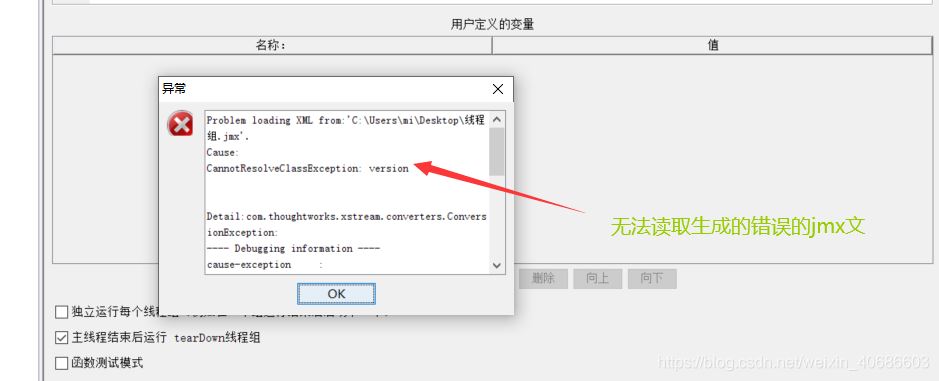
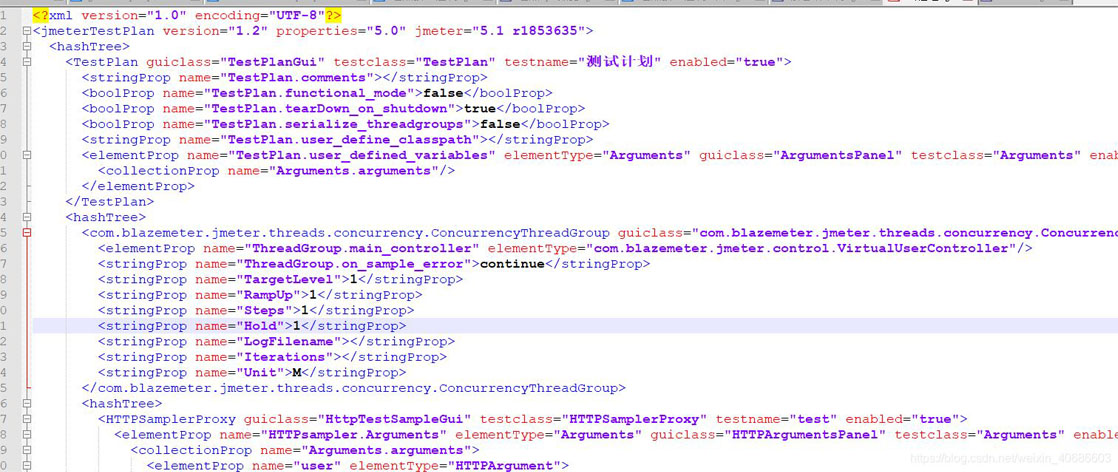
如果直接調用的話生成的xml格式會形成如下圖所示,而非JMeter原生導出jmx形式,這種文件結構JMeter控制臺讀取會報錯,識別不瞭
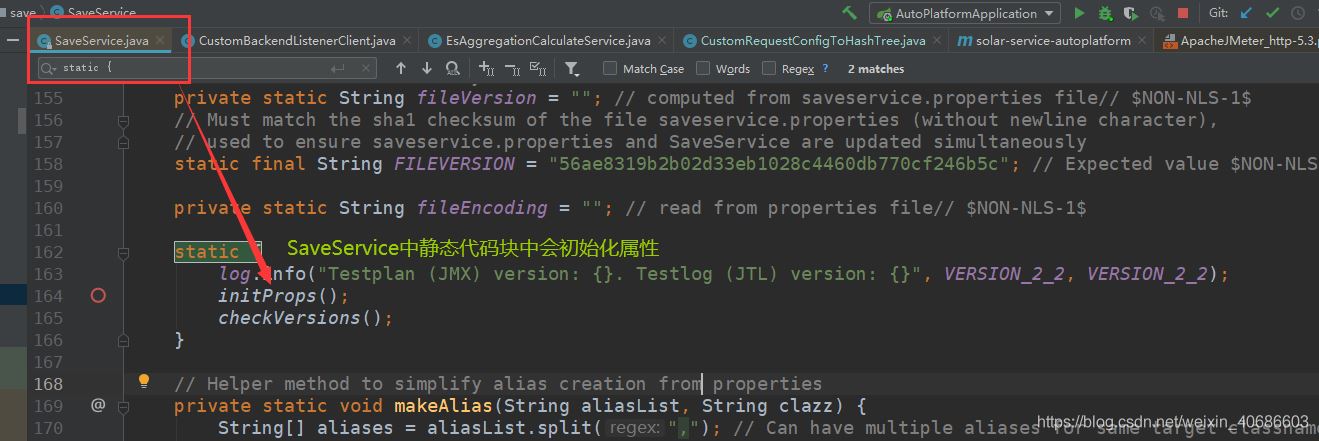
後面閱讀SaveService源碼才明白,生成xml文件之前會先初始化靜態代碼塊內容,初始化屬性
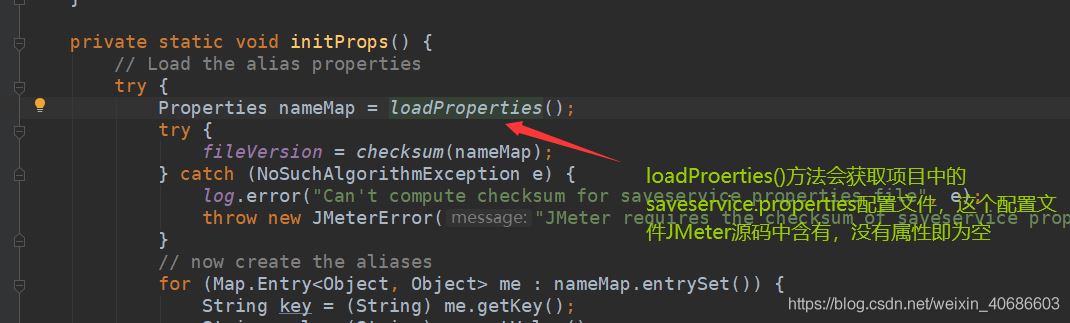
過程中會調用JMeterUtils中的findFile方法來尋找saveservice.properties文件
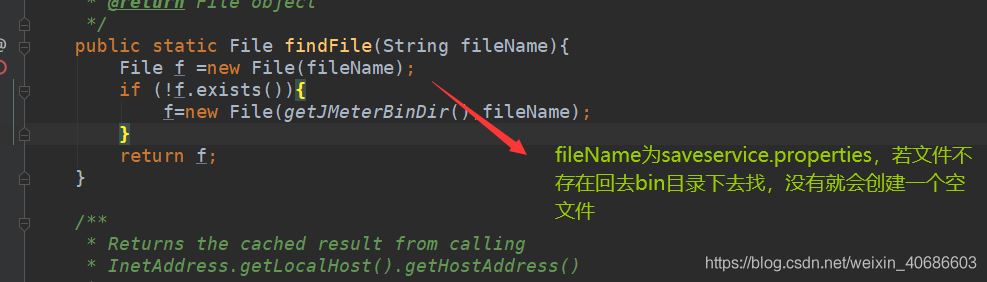
由於SaveService 中都是靜態方法無法重寫,所以根據最後調用JMeterUtils中的findFile方法來尋找saveservice.properties有兩種解決方案
方案一 :不推薦,在項目根目錄下存放saveservice.properties,這樣findFile方法就能拿到,但是這樣不好,因為maven打包的時候該文件會打不進去,至少我springboot項目是遇到這樣的問題
方案二:推薦,創建一個臨時文件命名為saveservice.properties,然後提前將saveservice.properties配置讀取到臨時文件中,這樣在調用JMeterUtils中的findFile方法同樣能夠找到配置,成功解決SaveService初始化屬性導致的問題,具體代碼如下
private void hashTreeToXML(HashTree hashTree,PressureConfigInfo configInfo){
    FileOutputStream outStream = null;
    File file = new File("temp.jmx");
    File tempFile = null;
    try {
    	//創建一個臨時的saveservice.properties文件
        tempFile = new File("saveservice.properties");
        InputStream is = JMeterUtil.class.getResource("/jmeter/saveservice.properties").openStream();
        //將配置文件寫入臨時文件中
        FileUtil.writeFromStream(is,tempFile);
        outStream = new FileOutputStream(file);
        //調用saveTree成功轉為xml
        SaveService.saveTree(hashTree,outStream);
        String xmlContent = FileUtil.readUtf8String(file);
        configInfo.setFile(xmlContent.getBytes());
    } catch (IOException e) {
        e.printStackTrace();
    }finally {
        try {
            FileUtils.forceDelete(file);
            FileUtils.forceDelete(tempFile);
        } catch (IOException e) {
            e.printStackTrace();
        }
    }
}
最後生成的xml文件結構如下圖,通過JMeter控制臺也能成功打開識別
到此這篇關於一文搞懂JMeter engine中HashTree的配置問題的文章就介紹到這瞭,更多相關JMeter engine中HashTree配置內容請搜索WalkonNet以前的文章或繼續瀏覽下面的相關文章希望大傢以後多多支持WalkonNet!
推薦閱讀:
- 淺談JMeter engine啟動原理
- JMeter對MySQL數據庫進行壓力測試的實現步驟
- springboot使用nacos的示例詳解
- 使用maven開發springboot項目時pom.xml常用配置(推薦)
- 使用log4j2關閉debug日志