Vuex總體案例詳解

一、簡介
我們來看看對 Vuex 比較專業的介紹:
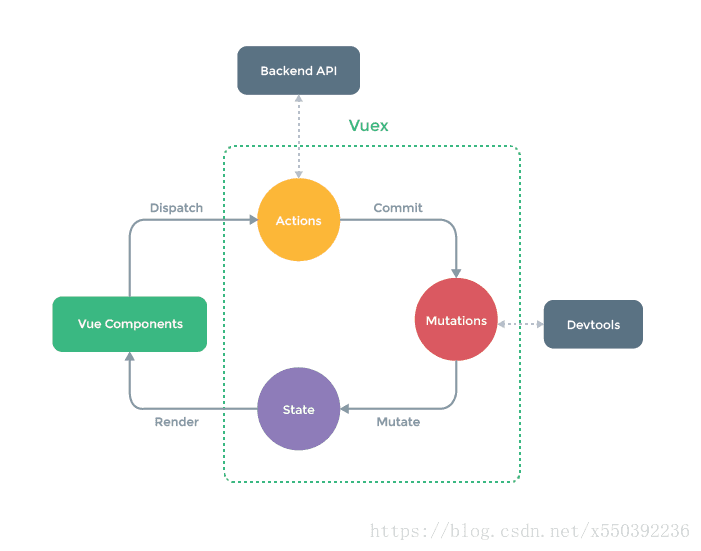
Vuex 是一個專為 Vue 開發的應用程序的狀態管理模式,它采用集中式存儲管理應用的所有組件的狀態,並以相應的規則保證狀態以一種可預測的方式發生變化。
簡而言之,Vuex 采用類似全局對象的形式來管理所有組件的公用數據,如果想修改這個全局對象的數據,得按照Vuex提供的方式來修改(不能自己隨意用自己的方式來修改)。
二、優點
Vuex狀態管理跟使用傳統全局變量的不同之處:
- Vuex的狀態存儲是響應式的: 就是當你的組件使用到瞭這個 Vuex 的狀態,一旦它改變瞭,所有關聯的組件都會自動更新相對應的數據,這樣開發者省事很多。
- 不能直接修改Vuex的狀態: 如果是個全局對象變量,要修改很容易,但是在 Vuex 中不能這樣做,想修改就得使用 Vuex 提供的唯一途徑:顯示地提交(
commint)mutations來實現修改。這樣做的好處就是方便我們跟蹤每一個狀態的變化,在開發過程中調試的時候,非常實用。
三、使用步驟
1. 安裝Vuex
npm install vuex --save
2. 引用Vuex
import Vue from 'vue'
import Vuex from 'vuex'
Vue.use(Vuex)
3. 創建倉庫Store
要使用 Vuex,我們要創建一個實例 store,我們稱之為倉庫,利用這個倉庫 store 來對我們的狀態進行管理。
//創建一個 store
const store = new Vuex.Store({});
四、包含模塊
- State:定義瞭應用狀態的數據結構,可以在這裡設置默認的初始狀態。
- Getter:允許組件從 store 中獲取數據,
mapGetters輔助函數僅僅是將 store 中的getter映射到局部計算屬性。 - Mutation:是唯一更改 store 中狀態的方法,且必須是同步函數。
- Action:用於提交
mutation,而不是直接變更狀態,可以包含任意異步操作。 - Module:可以將 store 分割成模塊(module)。每個模塊擁有自己的
state、mutation、action、getter、甚至是嵌套子模塊
Vuex的作用類似全局對象,Vuex 使用單一狀態樹,用一個對象State包含瞭整個應用層級的所有狀態,你可以理解為這些狀態就是一堆全局變量和數據。

1. State
假設我們有一個全局狀態 count 的值為 5。那麼,我們就可以將其定義為 state 對象中的 key 和 value,作為全局狀態供我們使用。如下:
 //創建一個 store
 const store = new Vuex.Store({
    //state存儲應用層的狀態
    state:{
        count:5  //總數:5
    }
 });
2. Getters
可以認為,getters 是store的計算屬性,類似於computed,對state裡的數據進行一些過濾,改造等等
假設我們要在state.count的基礎上派生出一個新的狀態newCount出來,就適合使用我們的 getters
getters 接受 state 作為其第一個參數
const store = new Vuex.Store({
   //state存儲應用層的狀態
   state:{
      count:5  //總數:5
   },
   getters:{
      newCount:state => state.count * 3
   }
});
在組件中獲取 {{newCount}} 方式:
export default {
  computed: {
      newCount(){
          return this.$store.getters.newCount;
      }
  }
};
3. Mutations
Vuex 給我們提供修改倉庫 store中的狀態的唯一辦法就是通過提交mutation ,且必須是同步函數
我們在 mutations中定義瞭一個叫increment的函數,函數體就是我們要進行更改的地方
會接受 state作為第一個參數,第二個是自定義傳參
 const store = new Vuex.Store({
    //state存儲應用層的狀態
    state:{
        count:5  //總數:5
    },
    // mutations是修改state中數據的唯一途徑
    mutations:{
        increment(state,value){
            state.count += value;
        }
    }
 });
我們在提交commit時候,第一個參數"increment",就是對應在 mutations中的increment方法,第二個參數是自定義值。例如:
 methods: {
   getVal(event) {
     //獲取當前的按鍵的值
     let value = event.target.dataset.value;
     //通過commit提交一個名為increment的mutation
     this.$store.commit("increment", value);
   }
 }
在組件中獲取 {{count}} 方式:
export default {
  computed: {
      count(){
          return this.$store.state.count;
      }
  }
};
4. Action
- 用於提交
mutation,而不是直接變更狀態,可以包含任意異步操作 - 隻有通過
action=>mutations=>states,這個流程進行操作,具體步驟如下:
export default new Vuex.Store({
    //存放數據
    state: {
        obj: {},
    },
    //4. 通過commit mutations中的方法來處理
    mutations: {
        getParam(state, Object) {
            //5.修改state中的數據
            state.obj = Object
        }
    },
    //2.接受dispatch傳遞過來的方法和參數
    actions: {
        getParamSync(store, Object) {
            // 處理異步操作
            setTimeout(() => {
                //3.通過commit提交一個名為getParam的mutation
                //action 函數接收一個 store 的實例對象,因此你可以調用 store.commit 提交一個 mutation
                store.commit('getParam', Object);
            }, 1000)
        }
    }
})
然後我們就在組件裡這麼調用就可以瞭
methods: {
   getVal() {
	  let name= 'xia';
	  let age= '26';
	  let sex= 'man';
	  //1.通過dispatch將方法getParamSync和多個參數{name,age,sex}傳遞給actions
	  this.$store.dispatch('getParamSync',{name,age,sex})
   }
}
5. Modules
隨著項目的復雜度增大,為瞭方便管理 Vuex,一般會將其按功能分割成不同的模塊(Module),方便日後管理。每個模塊擁有自己的 state、mutation、action、getter 甚至是嵌套子模塊
import Vue from 'vue'
import Vuex from 'vuex'
import state from './state'
import mutations from './mutations'
import actions from './actions'
import * as getters from './getters'

import moduleA from './module/moduleA' // 模塊A
import moduleB from './module/moduleB' // 模塊B

Vue.use(Vuex)

export default new Vuex.Store({
    actions,
    getters,
    state,
    mutations,
    modules: {
        moduleA,
        moduleB
    }
})
moduleA.js / moduleB.js 文件
// 每個模塊擁有自己的 state、mutation、action、getter、甚至是嵌套子模塊
export default {
    state: {
        text: 'moduleA'
    },
    getters: {},
    mutations: {},
    actions: {}
}
然後我們就在組件裡這麼調用就可以瞭
<template>
	<div class="demo">
		<h1>{{getText1}}</h1>
		<h1>{{getText2}}</h1>
	</div>
</template>
computed: {
    getText1(){
    	return this.$store.state.moduleA.text;
    },
    //或
	...mapState({
		getText2: state => state.moduleB.text;
	})
}
由此可知,模塊內部的 state 是局部的,隻屬於模塊本身所有,所以外部必須通過對應的模塊名進行訪問。
五、Vuex最最簡單的項目實例
運用vuex語法糖mapMutations和mapGetters
1. 存儲數據
a.vue 文件
import { mapMutations } from "vuex"; // 引入mapMutations
export default {
	methods: {
		...mapMutations({
		    // 將changeNews與mutations中的SET_NEWS關聯
		    changeNews: "SET_NEWS"
		}),
		submit(){
			// 提交一個名為changeNews的mutation,並傳入參數val
			let val = 'test news';
			this.changeNews(val);// 相當於this.$store.commit("changeNews", val);
		}
	}
}
2. 獲取數據
b.vue 文件
import { mapGetters } from "vuex"; // 引入mapGetters
export default {
	computed: {
        // 用vuex讀取數據(讀取的是getters.js中的數據)
        // 相當於this.$store.getters.news(vuex語法糖)
        ...mapGetters(["news"])
	},
	created() {
        // 獲取getters中news數據
        console.log(this.news);
	}
}
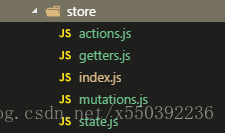
3. store文件目錄結構

index.js
import Vue from 'vue'
import Vuex from 'vuex'
import state from './state'
import mutations from './mutations'
import actions from './actions'
import * as getters from './getters'

//每次修改state都會在控制臺打印log
import createLogger from 'vuex/dist/logger'

Vue.use(Vuex)

const debug = process.env.NODE_ENV !== 'production'

export default new Vuex.Store({
	actions,
	getters,
	state,
	mutations,
	strict: debug, // 當debug=true時開啟嚴格模式(性能有損耗)
	plugins: debug ? [createLogger()] : []
})
state.js
const state = {
	news: {}
}

export default state;
mutations.js
const mutations = {
	SET_NEWS(state, val) {
		state.news= val
	}
}

export default mutations;
actions.js
//異步處理
const actions = {
    M_NEWS({ commit }, val) {
        commit('SET_NEWS', val);  // commit mutations修改
    }
}

export default actions;
getters.js
// 通常通過getters取數據 (this.$store.getters.news;)
export const news = state => state.news  // 不做其他處理 直接映射出去
4. 使用store
在 main.js 中引用
import store from './store' //vuex存儲文件

new Vue({
	el: '#app',
	router,
	store,
	components: {
		App
	},
	template: '<App/>'
})
到此這篇關於Vuex總體案例詳解的文章就介紹到這瞭,更多相關Vuex總體內容請搜索WalkonNet以前的文章或繼續瀏覽下面的相關文章希望大傢以後多多支持WalkonNet!