微信小程序實現左右聯動
本文實例為大傢分享瞭微信小程序實現左右聯動的具體代碼,供大傢參考,具體內容如下
最近學校課程系統分析項目使用瞭微信小程序來進行搭建,在選擇瞭點餐項目後,對主頁進行實現時,想要實現像麥當勞點餐一樣,左邊表示類別,右邊表示菜品,通過點擊左邊的類,右邊會滾動到對應的類,滾動右邊的菜品,左邊當前滾動到的菜品類別也回高亮顯示。那麼首先先展示一下成果吧!
雖然這個功能很小,但我覺得一旦搞清楚scroll-view的原理就很有用處。
首先查看微信小程序的官方文檔:scroll-view
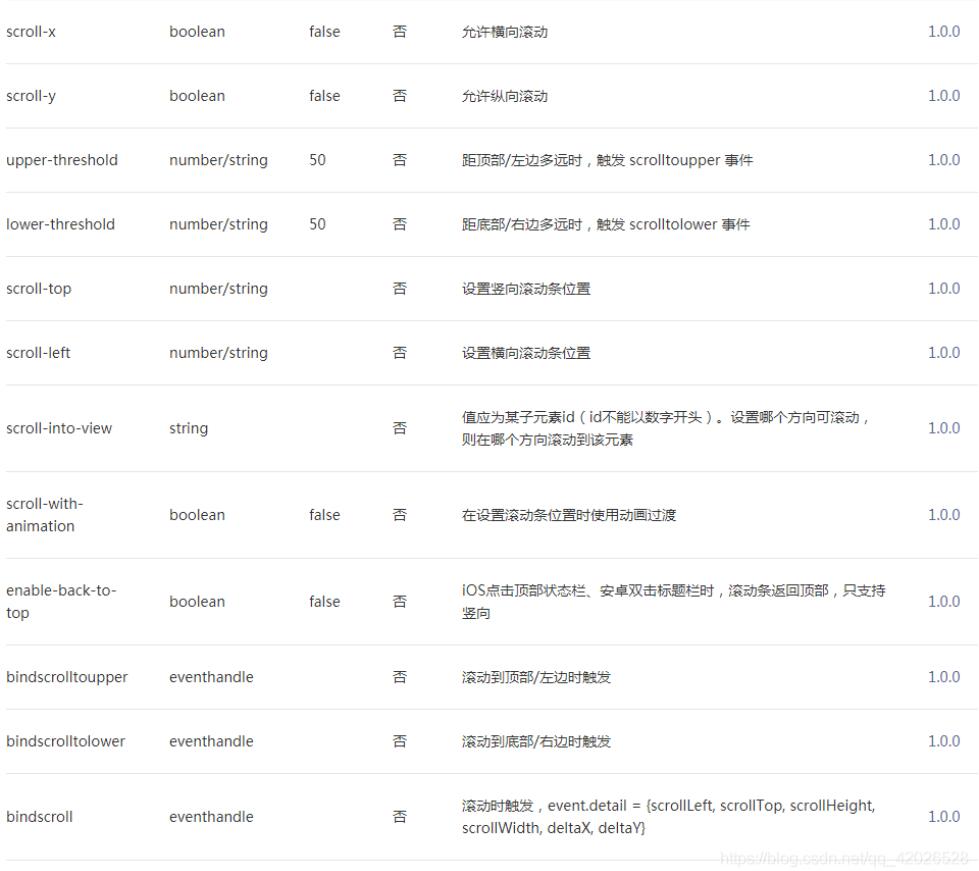
下面來按照我自己的理解介紹我所使用到的屬性:
- scroll-y: 設置滾動的方向,x就是橫著,y就是豎著,屬性的類型是boolean值
- scroll-top:就是說scroll-top的值是距離頂部的值,你將它寫在哪個scroll-view中,scroll-view就距離頂部多遠,不過我們可以設置變量值,在js中按照條件更改它,這也是實現左右聯動的關鍵步驟。
- scroll-into-view: scrol-into-view就是一個id值,我們實現左右聯動是豎直方向上的滾動,所以設置scroll-into-view就是說當前scroll-into-view的值是多少,那麼當前所在的scroll-view就會滾動到哪個id。
- style=‘height:這裡輸入高度’,你設置的要滾動的組件必須有個高度,否則就不會進行滾動,這也很好理解,你不設置一下他框的高度,那scroll-view也不知道從哪裡開始滑呀是不是。有時候需要在頁面中央(隻占部分高度)設置一個滑塊,有時候需要在整個窗口高度設置,所以高度也是必須的一個屬性。
- scroll-with-animation:是在設置滾動條位置進行動畫過渡,我發現刪除該屬性也可以正常使用,可能在我寫的頁面暫時沒有使用到吧,之後還需在進行瞭解
- bindscroll:綁定一個函數,由於是滾動,沒有點擊觸發,故有一個綁定的函數,用於在滑動時執行函數內容
- 好的既然搞清楚組件的屬性,那麼我們開始實現吧,我的思路是左右各設置一個滑塊,兩邊都可以滑,先實現左邊聯動右邊,左邊的功能是點擊類右邊就可以進行跳轉
<scroll-view class='aside' scroll-y='true' style='height:{{asideheight}}px' scroll-with-animation="true" scroll-top='{{itemLeftToTop}}'  >

    <view  wx:for="{{menus}}" wx:key="id"  data-id="{{item.id}}" bindtap='tabMenu' class="{{item.id === currentLeftSelected ? 'menu active' : 'menu'}}">

    <view id="{{item.id}}">{{item.name}}</view>
    </view>

    <view class="option" >
    <button id='user_btn' bindtap='getin' >個</button>
    <image id='user_img' src='../../images/index/user_option.png'></image>
    </view>

  </scroll-view>
  <!--每一類菜品的具體信息,可進行按鈕添加每個菜品的數量-->

  <scroll-view class="item-content" scroll-y='true' scroll-into-view="{{itemScrollId}}" scroll-with-animation='true' style='height:{{asideheight}}px'  bindscroll="right" >
    <view wx:for="{{menus}}" wx:for-index="parentIndex" wx:key="id" id="{{item.id}}" >
    <view class="item_title">{{item.name}}</view>
    <view class="{{orderCount.num === 0 ? 'box' : 'box active'}}">
      <view class="item" wx:for="{{item.categroy}}" wx:key="categroyid" data-parentIndex='{{parentIndex}}' data-index='{{index}}'>
        <image  src="{{item.url}}"></image>
        <text class="title">{{item.categroy_name}}</text>
        <text class="price">¥ {{item.price}} 元</text>
        <view class="opera">
          <text class="btn_price " bindtap='del' data-id="{{item.id}}"  data-parentIndex='{{parentIndex}}' data-index='{{index}}'>-</text>
          <text class="num">{{item.num}}</text>
          <text class="btn_price" bindtap="add" data-id="{{item.id}}"  data-parentIndex='{{parentIndex}}' data-index="{{index}}">+</text>
        </view>
      </view>
    </view>

    </view>
</scroll-view>
可以看到高度我是引用瞭一個變量,其在js中的實現如下:
wx.getSystemInfo({
      success: function (res) {
        var asideheight = res.windowHeight
        var asideheight1=0;
        that.setData({
          asideheight: asideheight,
          asideheight1:asideheight+80
        })
      },
      fail: () => { console.log("無法獲取顯示器高度,請檢查網絡連接") }
    });
並且在函數開頭設置好左右每一小格的高度
const RIGHT_BAR_HEIGHT = 41;
// 右側每個子類的高度(固定)
const RIGHT_ITEM_HEIGHT = 122;
// 左側每個類的高度(固定)
const LEFT_ITEM_HEIGHT = 41;
左邊的實現較為簡單,設置兩個個data,currentLeftSelected和itemScrollId當前點擊的類的ID值賦給這兩個,前者實現點擊時左邊類被選定的狀態,而右邊的值賦給 itemScrollId,然後再將這個值賦給前端右半邊scroll-view的scroll-into-view,從而實現左邊點擊右邊也跳轉。
tabMenu: function (e) {
    this.setData({
      currentLeftSelected: e.target.id || e.target.dataset.id,
      itemScrollId: e.target.id || e.target.dataset.id
    });
    console.log(e);
  },
右半邊的思路就是你需要算出右邊每一個菜品距離頂部的高度,保存至一個數組裡,然後滑動時獲取當前滑動的高度,然後在bindscroll裡綁定的函數裡進行比較,對應的是哪個高度的范圍就設置左邊的currentLeftSelected為那個類的id。
get_eachItemToTop: function () {
    var obj = {};
    var totop = 0;
    var menus_ex = {};
    var that = this;
    menus_ex= that.data.menus;
    console.log(menus_ex);
    for(let i=1;i<menus_ex.length;i++){
      totop += (RIGHT_BAR_HEIGHT + menus_ex[i - 1].categroy.length * RIGHT_ITEM_HEIGHT);
      obj[menus_ex[i] ? menus_ex[i].id : 'last'] = totop;
    }
    return obj;
  },

  right: function (e) {
      for (let i = 0; i < this.data.menus.length; i++) {
       let left = this.data.eachrightScrollToTop[this.data.menus[i].id]
       let right = this.data.eachrightScrollToTop[this.data.menus[i + 1] ? this.data.menus[i + 1].id : 'last']
       if (e.detail.scrollTop < right && e.detail.scrollTop >= left) {
       this.setData({
         currentLeftSelected: this.data.menus[i].id,
         itemLeftToTop: LEFT_ITEM_HEIGHT * i
            })
          }
        }

    },
這樣左右聯動就基本實現瞭。
以上就是本文的全部內容,希望對大傢的學習有所幫助,也希望大傢多多支持WalkonNet。