React組件間通信的三種方法(簡單易用)
React知識中一個主要內容便是組件之間的通信,以下列舉幾種常用的組件通信方式,結合實例,通俗易懂,建議收藏。
一、父子組件通信
原理:父組件通過props(與vue中的props區分開)向子組件通信,子組件通過回調事件與父組件通信。
首先,先創建一個父組件Parent.js跟子組件Children.js,二者的關系為直接父子關系。
Parent.js父組件如下,給父組件一個默認狀態state,引入子組件,通過在子組件加上toChildren={this.state.msg},該處即為向子組件傳props。
import React from 'react';
import { Button } from 'element-react';
import Children from './Children';
class Parent extends React.Component {
constructor(props) {
super(props);
this.state = {
msg:'父組件傳遞給子組件'
};
this.changeMsg = this.changeMsg.bind(this)
}
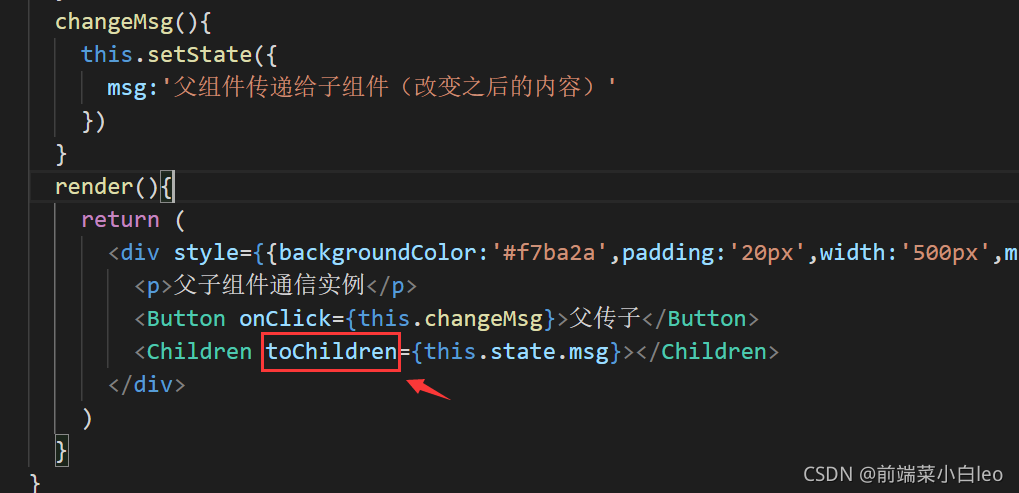
changeMsg(){
this.setState({
msg:'父組件傳遞給子組件(改變之後的內容)'
})
}
render(){
return (
<div style={{backgroundColor:'#f7ba2a',padding:'20px',width:'500px',margin:'auto',textAlign:'center'}}>
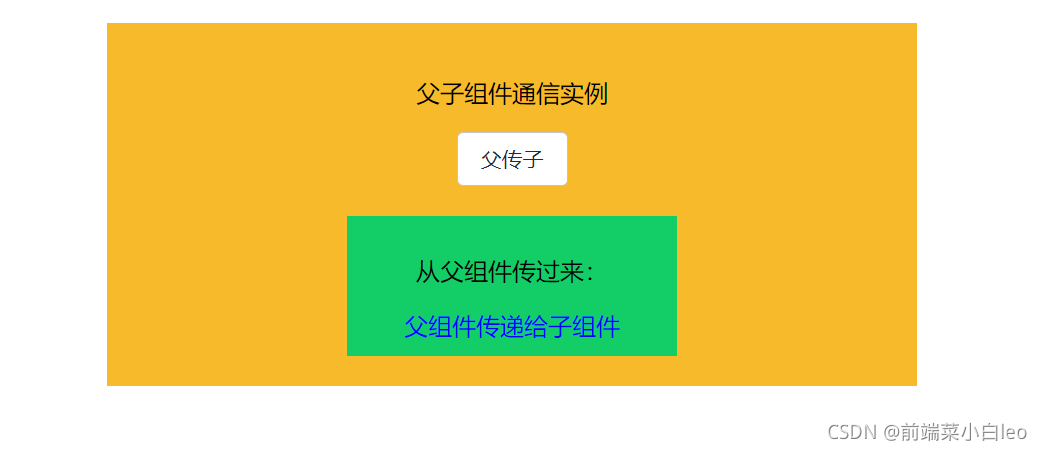
<p>父子組件通信實例</p>
<Button onClick={this.changeMsg}>父傳子</Button>
<Children toChildren={this.state.msg}></Children>
</div>
)
}
}
export default Parent
Children.js子組件如下,初始狀態通過props拿到父組件傳過來的值。
import React from 'react';

class Children extends React.Component {
  constructor(props) {
	super(props);
	this.state = {
		msg:this.props.toChildren   //通過props拿到父組件傳過來的值
	};
  }
  render(){
    return (
      <div style={{backgroundColor:'#13ce66',padding:'10px',width:'200px',margin:'auto',marginTop:'20px'}}>
        <p>從父組件傳過來:</p>
        <span style={{color:'blue'}}>{this.state.msg}</span>
      </div>
    )
  }
}

export default Children
註意:子組件取值時應與父組件放在子組件的字段props一致,即本例中的 toChildren,如下

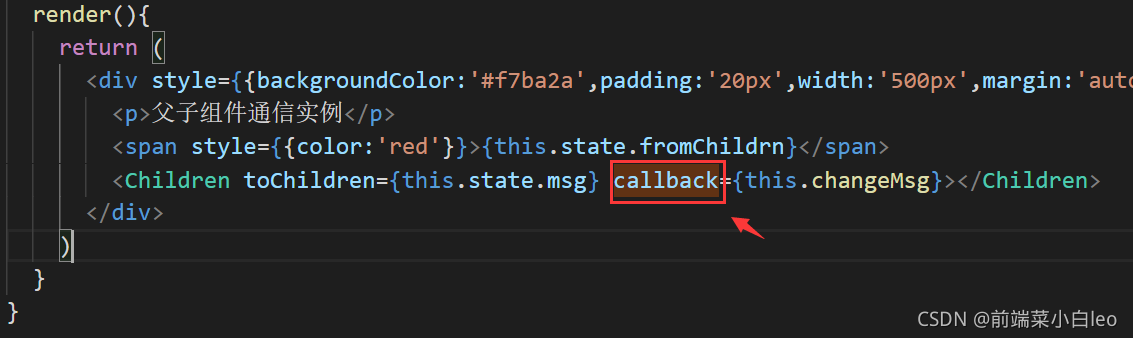
那麼子組件想向父組件傳值(向上傳值),可以通過調用父組件傳過來的回調函數
在Parent.js中向Children.js中加入回調函數callback,綁定changeMsg方法
import React from 'react';
import Children from './Children';

class Parent extends React.Component {
  constructor(props) {
	super(props);
	this.state = {
	    msg:'父組件傳遞給子組件',
        fromChildrn:''
	};
    this.changeMsg = this.changeMsg.bind(this)
  }
  changeMsg(val){
    this.setState({
      fromChildrn: val
    })
  }
  render(){
    return (
      <div style={{backgroundColor:'#f7ba2a',padding:'20px',width:'500px',margin:'auto',textAlign:'center'}}>
        <p>父子組件通信實例</p>
        <span style={{color:'red'}}>{this.state.fromChildrn}</span>
        <Children toChildren={this.state.msg} callback={this.changeMsg}></Children>
      </div>
    )
  }
}

export default Parent
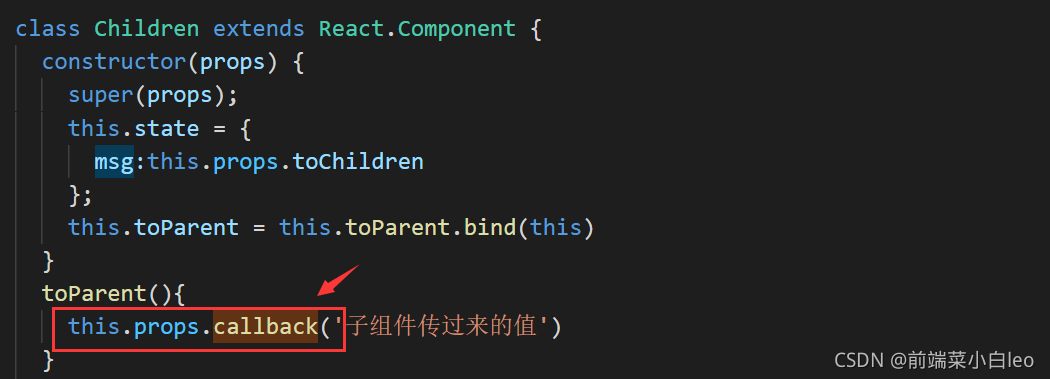
在子組件中,用this.props.callback()執行父組件的回調函數,從而執行綁定方法changeMsg,顯示子組件傳過來的值
import React from 'react';
import { Button } from 'element-react';

class Children extends React.Component {
  constructor(props) {
	super(props);
	this.state = {
		msg:this.props.toChildren
	};
    this.toParent = this.toParent.bind(this)
  }
  toParent(){
    this.props.callback('子組件傳過來的值')   //子組件通過此觸發父組件的回調方法
  }
  render(){
    return (
      <div style={{backgroundColor:'#13ce66',padding:'10px',width:'200px',margin:'auto',marginTop:'20px'}}>
        <p>從父組件傳過來:</p>
        <span style={{color:'blue'}}>{this.state.msg}</span>
        <Button onClick={this.toParent}>子傳父</Button>
      </div>
    )
  }
}

export default Children
註意:props中的回調函數名稱需一致,即本例中的callback,如下
小結: 以上為直接父子組件通信的其中一種方式,父傳子,通過props;子傳父,執行回調。
二、跨級組件通信
假設一個父組件中存在一個子組件,這個子組件中又存在一個子組件,暫且稱為“孫組件”,當父組件需要與“孫組件”通信時,常用的方式有兩種,逐層傳值與跨層傳值。
1、逐層傳值
這種方式就是上面的直接父子通信的基礎上在加上一個中間層。如父、“孫”組件通信,可以先父子通信,然後再子“孫”通信,傳遞的層級變成父–>子–>“孫”,同理,通過props往下傳,通過回調往上傳。不展開,有興趣的自己動手實現一下。
2、跨級傳值
顧名思義,父跟“孫”通信,不需要經過子(中間層)組件。這裡引出瞭Context。
React官方文檔對Context做出瞭解釋:
在一個典型的 React 應用中,數據是通過 props 屬性自上而下(由父及子)進行傳遞的,但這種做法對於某些類型的屬性而言是極其繁瑣的(例如:地區偏好,UI 主題),這些屬性是應用程序中許多組件都需要的。Context 提供瞭一種在組件之間共享此類值的方式,而不必顯式地通過組件樹的逐層傳遞 props。
一句話概括就是:跨級傳值,狀態共享。
看下簡單的實例,直接講用法。
首先,我先創建一個context.js文件(與父子孫同個目錄),默認值為一個對象。
import React from "react";
const MyContext = React.createContext({text:'luck'});
export default MyContext
然後,對父組件進行改寫,引入context,使用一個 Provider 來將當前的 value 傳遞給以下的組件樹,value為傳遞的值。
import React from 'react';
import Children from './Children';
import MyContext from './context';
class Parent extends React.Component {
constructor(props) {
super(props);
}
// 使用一個 Provider 來將當前的 value 傳遞給以下的組件樹。
// 無論多深,任何組件都能讀取這個值。
render(){
return (
<div style={{backgroundColor:'#f7ba2a',padding:'20px',width:'500px',margin:'auto',textAlign:'center'}}>
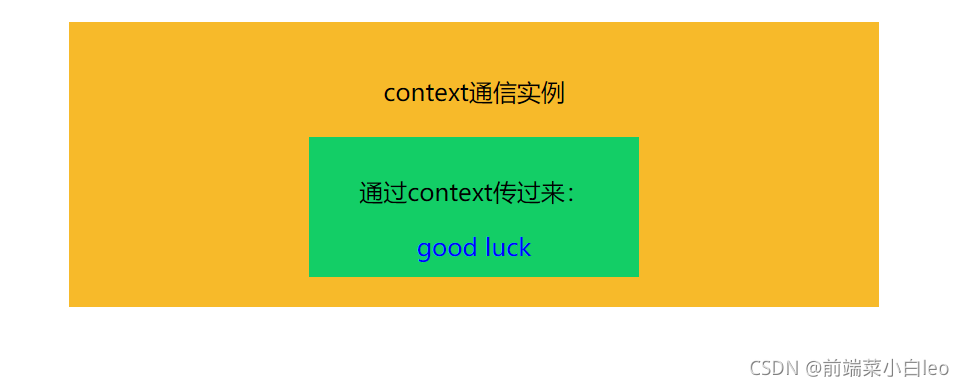
<p>context通信實例</p>
<MyContext.Provider value={{text:'good luck'}}>
<Children></Children>
</MyContext.Provider>
</div>
)
}
}
export default Parent
子組件為中間層,不做處理,用於包裹“孫”組件。
import React from 'react';
import Grandson from './Grandson';

class Children extends React.Component {
  render(){
    return (
      <div>
        <Grandson></Grandson>
      </div>
    )
  }
}

export default Children
新增一個“孫”組件,同樣需引入context,在組件內部添加static contextType = MyContext,此時將能通過this.context直接獲取到上層距離最近的Provider傳遞的值,此時this.context = {text:good luck},即父組件傳遞value。
import React from 'react';
import MyContext from './context';

class Grandson extends React.Component {
  static contextType = MyContext
  render(){
    return (
      <div style={{backgroundColor:'#13ce66',padding:'10px',width:'200px',margin:'auto',marginTop:'20px'}}>
        <p>通過context傳過來:</p>
        <span style={{color:'blue'}}>{this.context.text}</span>
      </div>
    )
  }
}

export default Grandson
通過this.context.text獲取到傳遞的值。
以上的是一個父–>孫的過程,即向下的流程,如果想孫–>父向上傳值,可以通過回調的方式
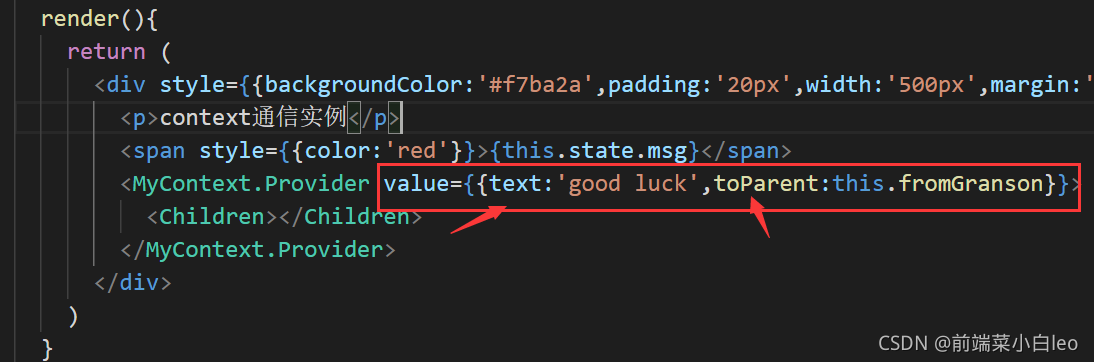
對父組件進行傳值修改,在傳過來的對象中添加一個屬性,裡面綁定父組件的方法value={{text:’good luck’,toParent:this.fromGranson}}
import React from 'react';
import Children from './Children';
import MyContext from './context';
class Parent extends React.Component {
constructor(props) {
super(props);
this.state = {
msg:''
};
this.fromGranson = this.fromGranson.bind(this)
}
fromGranson(val){
this.setState({
msg:val
})
}
// 使用一個 Provider 來將當前的 theme 傳遞給以下的組件樹。
// 無論多深,任何組件都能讀取這個值。
render(){
return (
<div style={{backgroundColor:'#f7ba2a',padding:'20px',width:'500px',margin:'auto',textAlign:'center'}}>
<p>context通信實例</p>
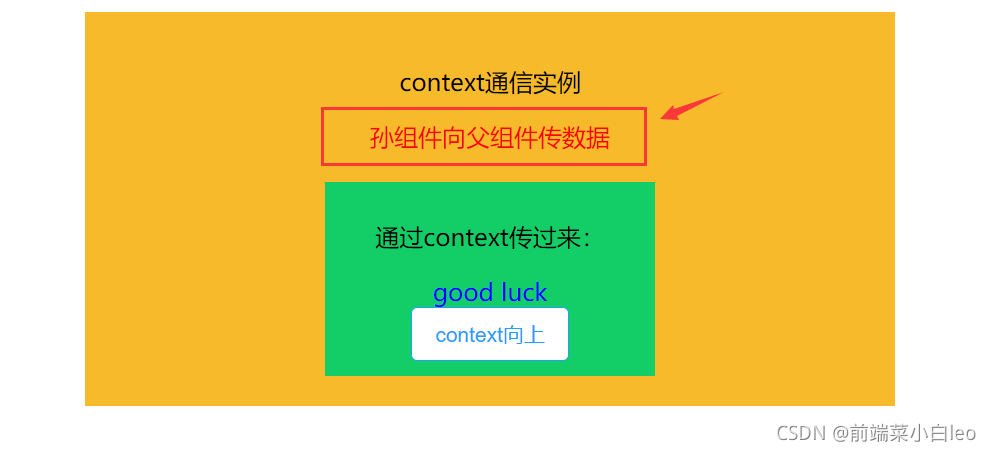
<span style={{color:'red'}}>{this.state.msg}</span>
<MyContext.Provider value={{text:'good luck',toParent:this.fromGranson}}>
<Children></Children>
</MyContext.Provider>
</div>
)
}
}
export default Parent
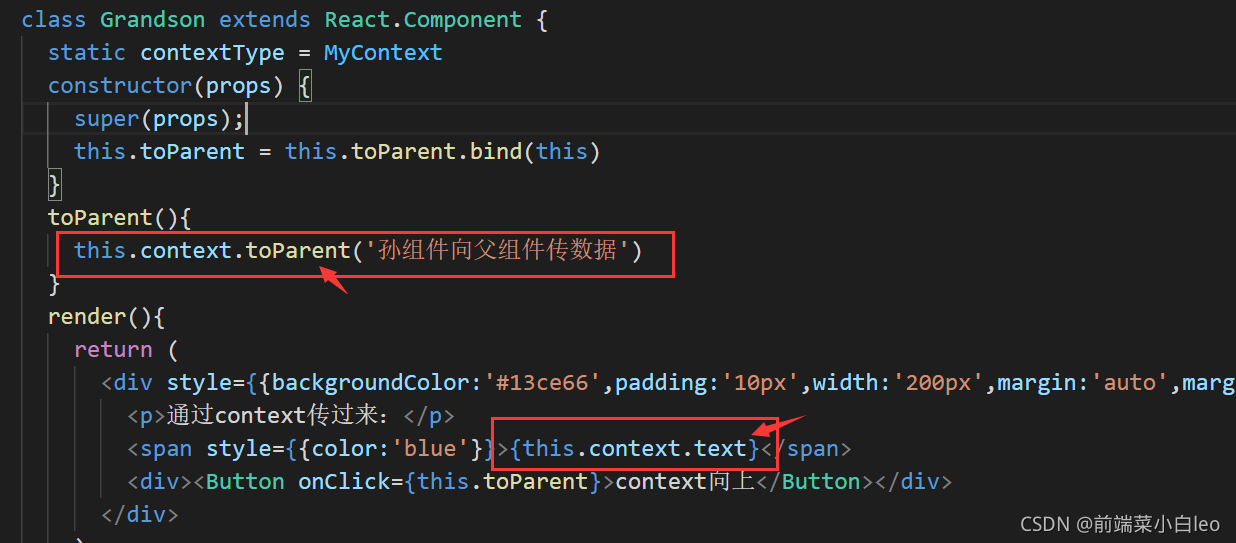
然後在孫組件中添加一個按鈕,綁定方法,執行函數回調
toParent(){
    this.context.toParent('孫組件向父組件傳數據')
 }
import React from 'react';
import MyContext from './context';
import { Button } from 'element-react'

class Grandson extends React.Component {
  static contextType = MyContext
  constructor(props) {
		super(props);
    this.toParent = this.toParent.bind(this)
	}
  toParent(){
    this.context.toParent('孫組件向父組件傳數據')
  }
  render(){
    return (
      <div style={{backgroundColor:'#13ce66',padding:'10px',width:'200px',margin:'auto',marginTop:'20px'}}>
        <p>通過context傳過來:</p>
        <span style={{color:'blue'}}>{this.context.text}</span>
        <div><Button onClick={this.toParent}>context向上</Button></div>
      </div>
    )
  }
}

export default Grandson
默認的頁面為:
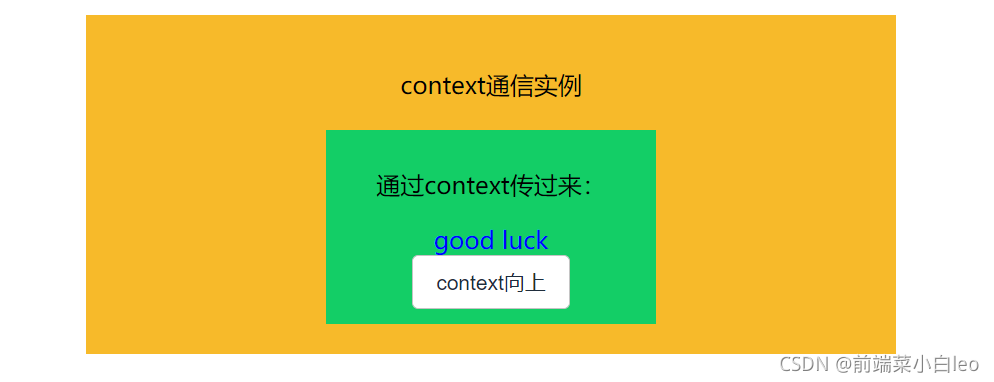
點擊按鈕之後,執行context中的回調,向上傳值。
不管層級有多深,都可以使用context進行向下或向上傳值。
註意:在下層組件中取的context中的字段需與value中傳遞字段保持一致。text與toParent
以上就是Context的大致使用,更多細節請往React官方文檔:
Context – React
三、兄弟(無嵌套)組件通信
當兩個組件互不嵌套,處在同個層級或者不同層級上,他們之間要進行通信,有以下幾種常用方法
1、某個組件先將值傳到同一個父組件,然後在通過父組件傳給另外一個組件,用到父子組件傳值
2、使用緩存sessionStorage、localStorage等
3、如果兩個組件之間存在跳轉,可以使用路由跳轉傳值,附上詳細用法
React學習筆記 — 組件通信之路由傳參(react-router-dom)_前端菜小白leo的博客-CSDN博客
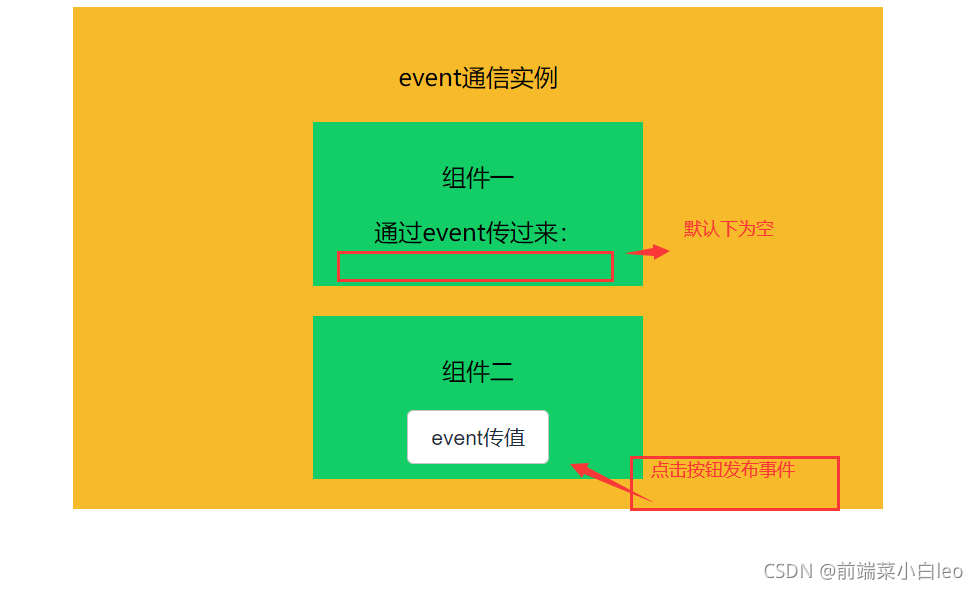
4、event(發佈–訂閱)
首先,安裝event
npm install event -save
新建一個event.js
import { EventEmitter } from 'events';
export default new EventEmitter();
然後另兩個組件處於同層級(不同個父組件或者不同層級都可以)
import React from 'react';
import Grandson from './Grandson';
import GrandsonOther from './GrandsonOther';

class Children extends React.Component {
  render(){
    return (
      <div>
        <Grandson></Grandson>
        <GrandsonOther></GrandsonOther>
      </div>
    )
  }
}

export default Children
組件一,導入event,在componentDidMount階段添加監聽addListener(訂閱),在componentWillUnmount移除監聽removeListener,事件名稱與組件二中emit一致。
import React from 'react';
import event from '../event';
import { Button } from 'element-react'

class Grandson extends React.Component {
  constructor(props) {
	super(props);
    this.state = {
      msg:''
    }
    this.toOther = this.toOther.bind(this)
  }
  toOther(){
    event.emit('eventMsg','通過evnet傳過來的值')
  }
  render(){
    return (
      <div style={{backgroundColor:'#13ce66',padding:'10px',width:'200px',margin:'auto',marginTop:'20px'}}>
        <p>組件二</p>
        <span style={{color:'blue'}}>{this.state.msg}</span>
        <div><Button onClick={this.toOther}>event傳值</Button></div>
      </div>
    )
  }
}

export default Grandson
組件二,導入event,按鈕綁定方法,使用event.emit觸發(發佈)事件。
import React from 'react';
import event from '../event';
import { Button } from 'element-react'

class Grandson extends React.Component {
  constructor(props) {
	super(props);
    this.state = {
      msg:''
    }
    this.toOther = this.toOther.bind(this)
  }
  toOther(){
    event.emit('eventMsg','通過evnet傳過來的值')
  }
  render(){
    return (
      <div style={{backgroundColor:'#13ce66',padding:'10px',width:'200px',margin:'auto',marginTop:'20px'}}>
        <p>組件二</p>
        <span style={{color:'blue'}}>{this.state.msg}</span>
        <div><Button onClick={this.toOther}>event傳值</Button></div>
      </div>
    )
  }
}

export default Grandson
點擊按鈕,組件二發佈事件,組件一監聽(訂閱)事件,更新內容。(如果交換發佈者訂閱者身份,寫法一致)
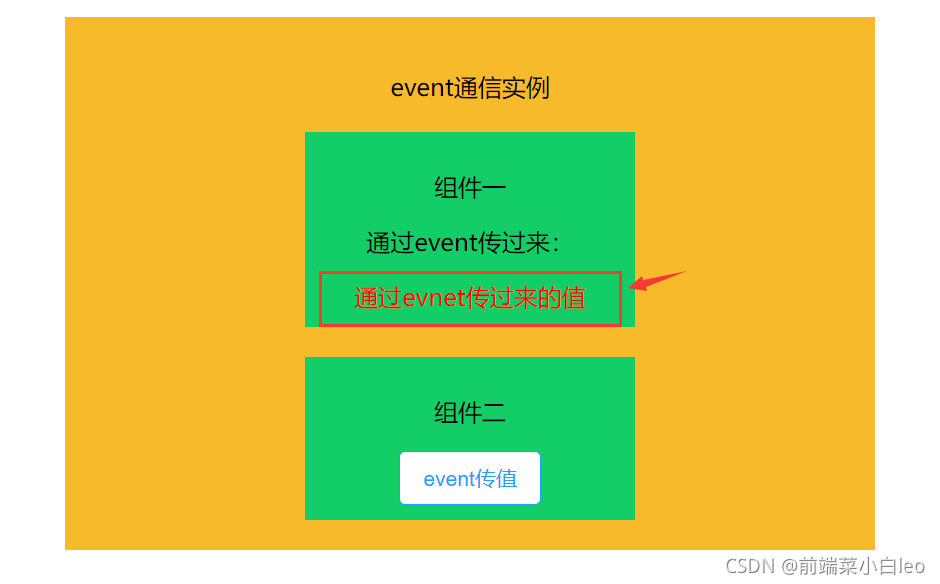
註意:如果兩個組件使用event進行通信,確保發佈訂閱的事件名稱一致,如上例中 eventMsg
小結: event的方式比較靈活,不管是父子、跨級、還是同級,甚至毫無關聯的組件,都可以使用此方式進行通信。
四、路由傳值
React學習筆記 — 組件通信之路由傳參(react-router-dom)
五、Redux
待發佈。
總結:主要講瞭react中常用的組件通信方式,在平時工作中,根據不同的應用場景,選擇不同的通信方式,會讓通信流程更加簡單、清晰。
對比Vue中的組件通信方式,你會發現很多相似之處:
Vue組件間的通信方式(多種場景,通俗易懂,建議收藏)
到此這篇關於React組件間通信的三種方法(簡單易用)的文章就介紹到這瞭,更多相關React組件間通信內容請搜索WalkonNet以前的文章或繼續瀏覽下面的相關文章希望大傢以後多多支持WalkonNet!