聊一聊我對 React Context 的理解以及應用
前言
Context被翻譯為上下文,在編程領域,這是一個經常會接觸到的概念,React中也有。
在React的官方文檔中,Context被歸類為高級部分(Advanced),屬於React的高級API,但官方並不建議在穩定版的App中使用Context。
The vast majority of applications do not need to use content.
If you want your application to be stable, don’t use context. It is an experimental API and it is likely to break in future releases of React.
不過,這並非意味著我們不需要關註Context。事實上,很多優秀的React組件都通過Context來完成自己的功能,比如react-redux的<Provider />,就是通過Context提供一個全局態的store,拖拽組件react-dnd,通過Context在組件中分發DOM的Drag和Drop事件,路由組件react-router通過Context管理路由狀態等等。在React組件開發中,如果用好Context,可以讓你的組件變得強大,而且靈活。
今天就想跟大傢聊一聊,我在開發當中,所認識到的這個Context,以及我是如何使用它來進行組件開發的。
註:本文中所有提到的App皆指Web端App。
初識React Context
官方對於Context的定義
React文檔官網並未對Context給出“是什麼”的定義,更多是描述使用的Context的場景,以及如何使用Context。
官網對於使用Context的場景是這樣描述的:
In Some Cases, you want to pass data through the component tree without having to pass the props down manuallys at every level. you can do this directly in React with the powerful “context” API.
簡單說就是,當你不想在組件樹中通過逐層傳遞props或者state的方式來傳遞數據時,可以使用Context來實現跨層級的組件數據傳遞。
使用props或者state傳遞數據,數據自頂下流。
使用Context,可以跨越組件進行數據傳遞。
如何使用Context
如果要Context發揮作用,需要用到兩種組件,一個是Context生產者(Provider),通常是一個父節點,另外是一個Context的消費者(Consumer),通常是一個或者多個子節點。所以Context的使用基於生產者消費者模式。
對於父組件,也就是Context生產者,需要通過一個靜態屬性childContextTypes聲明提供給子組件的Context對象的屬性,並實現一個實例getChildContext方法,返回一個代表Context的純對象 (plain object) 。
import React from 'react'
import PropTypes from 'prop-types'

class MiddleComponent extends React.Component {
 render () {
 return <ChildComponent />
 }
}

class ParentComponent extends React.Component {
 // 聲明Context對象屬性
 static childContextTypes = {
 propA: PropTypes.string,
 methodA: PropTypes.func
 }

 // 返回Context對象,方法名是約定好的
 getChildContext () {
 return {
  propA: 'propA',
  methodA: () => 'methodA'
 }
 }

 render () {
 return <MiddleComponent />
 }
}
而對於Context的消費者,通過如下方式訪問父組件提供的Context。
import React from 'react'
import PropTypes from 'prop-types'

class ChildComponent extends React.Component {
 // 聲明需要使用的Context屬性
 static contextTypes = {
 propA: PropTypes.string
 }

 render () {
 const {
  propA,
  methodA
 } = this.context

 console.log(`context.propA = ${propA}`) // context.propA = propA
 console.log(`context.methodA = ${methodA}`) // context.methodA = undefined

 return ...
 }
}
子組件需要通過一個靜態屬性contextTypes聲明後,才能訪問父組件Context對象的屬性,否則,即使屬性名沒寫錯,拿到的對象也是undefined。
對於無狀態子組件(Stateless Component),可以通過如下方式訪問父組件的Context
import React from 'react'
import PropTypes from 'prop-types'

const ChildComponent = (props, context) => {
 const {
 propA
 } = context

 console.log(`context.propA = ${propA}`) // context.propA = propA

 return ...
}

ChildComponent.contextProps = {
 propA: PropTypes.string
}
而在接下來的發行版本中,React對Context的API做瞭調整,更加明確瞭生產者消費者模式的使用方式。
import React from 'react';
import ReactDOM from 'react-dom';

const ThemeContext = React.createContext({
 background: 'red',
 color: 'white'
});
通過靜態方法React.createContext()創建一個Context對象,這個Context對象包含兩個組件,<Provider />和<Consumer />。
class App extends React.Component {
 render () {
 return (
  <ThemeContext.Provider value={{background: 'green', color: 'white'}}>
  <Header />
  </ThemeContext.Provider>
 );
 }
}
<Provider />的value相當於現在的getChildContext()。
class Header extends React.Component {
 render () {
 return (
  <Title>Hello React Context API</Title>
 );
 }
}

class Title extends React.Component {
 render () {
 return (
  <ThemeContext.Consumer>
  {context => (
   <h1 style={{background: context.background, color: context.color}}>
   {this.props.children}
   </h1>
  )}
  </ThemeContext.Consumer>
 );
 }
}
<Consumer />的children必須是一個函數,通過函數的參數獲取<Provider />提供的Context。
可見,Context的新API更加貼近React的風格。
幾個可以直接獲取Context的地方
實際上,除瞭實例的context屬性(this.context),React組件還有很多個地方可以直接訪問父組件提供的Context。比如構造方法:
- constructor(props, context)
比如生命周期:
- componentWillReceiveProps(nextProps, nextContext)
- shouldComponentUpdate(nextProps, nextState, nextContext)
- componetWillUpdate(nextProps, nextState, nextContext)
對於面向函數的無狀態組件,可以通過函數的參數直接訪問組件的Context。
const StatelessComponent = (props, context) => (
 ......
)
以上是Context的基礎,更具體的指南內容可參見這裡
我對Context的理解
OK,說完基礎的東西,現在聊一聊我對React的Context的理解。
把Context當做組件作用域
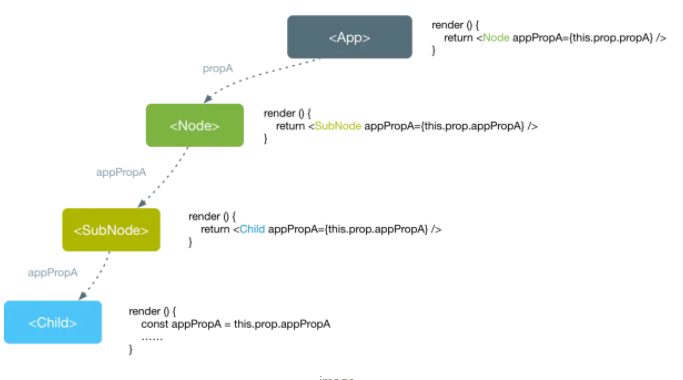
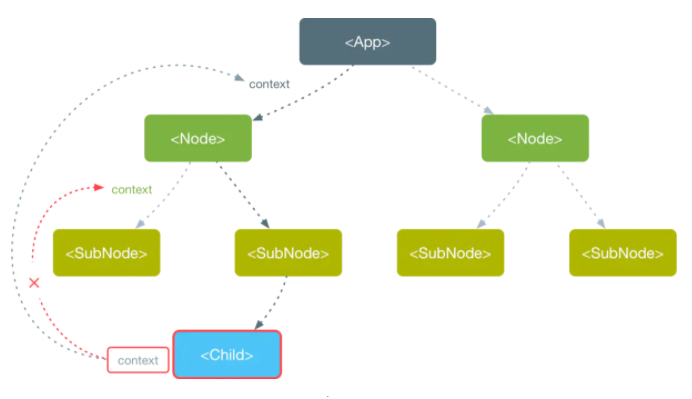
使用React的開發者都知道,一個React App本質就是一棵React組件樹,每個React組件相當於這棵樹上的一個節點,除瞭App的根節點,其他每個節點都存在一條父組件鏈。

例如上圖,<Child />的父組件鏈是<SubNode /> — <Node /> — <App />,<SubNode />的父組件鏈是<Node /> — <App />,<Node />的父組件鏈隻有一個組件節點,就是<App />。
這些以樹狀連接的組件節點,實際上也組成瞭一棵Context樹,每個節點的Context,來自父組件鏈上所有組件節點通過getChildContext()所提供的Context對象組合而成的對象。
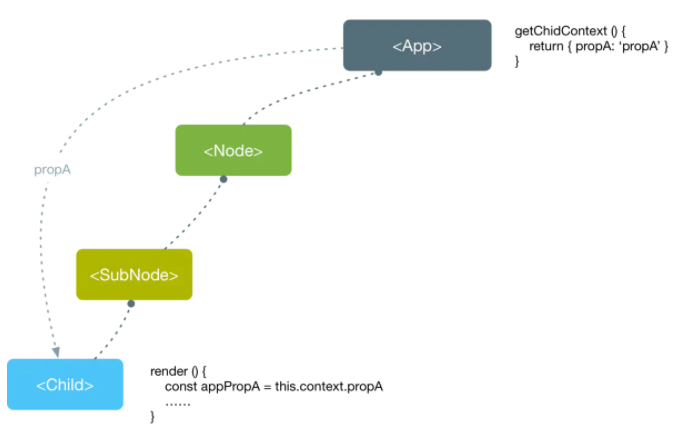
有瞭解JS作用域鏈概念的開發者應該都知道,JS的代碼塊在執行期間,會創建一個相應的作用域鏈,這個作用域鏈記錄著運行時JS代碼塊執行期間所能訪問的活動對象,包括變量和函數,JS程序通過作用域鏈訪問到代碼塊內部或者外部的變量和函數。
假如以JS的作用域鏈作為類比,React組件提供的Context對象其實就好比一個提供給子組件訪問的作用域,而Context對象的屬性可以看成作用域上的活動對象。由於組件的Context由其父節點鏈上所有組件通過getChildContext()返回的Context對象組合而成,所以,組件通過Context是可以訪問到其父組件鏈上所有節點組件提供的Context的屬性。
所以,我借鑒瞭JS作用域鏈的思路,把Context當成是組件的作用域來使用。
關註Context的可控性和影響范圍
不過,作為組件作用域來看待的Context與常見的作用域的概念 (就我個人目前接觸到的編程語言而言) 是有所區別的。我們需要關註Context的可控性和影響范圍。
在我們平時的開發中,用到作用域或者上下文的場景是很常見,很自然,甚至是無感知的,然而,在React中使用Context並不是那麼容易。父組件提供Context需要通過childContextTypes進行“聲明”,子組件使用父組件的Context屬性需要通過contextTypes進行“申請”,所以,我認為React的Context是一種“帶權限”的組件作用域。
這種“帶權限”的方式有何好處?就我個人的理解,首先是保持框架API的一致性,和propTypes一樣,使用聲明式編碼風格。另外就是,可以在一定程度上確保組件所提供的Context的可控性和影響范圍。
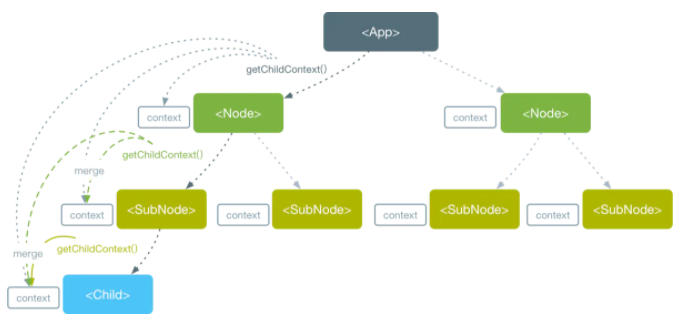
React App的組件是樹狀結構,一層一層延伸,父子組件是一對多的線性依賴。隨意的使用Context其實會破壞這種依賴關系,導致組件之間一些不必要的額外依賴,降低組件的復用性,進而可能會影響到App的可維護性。
通過上圖可以看到,原本線性依賴的組件樹,由於子組件使用瞭父組件的Context,導致<Child />組件對<Node />和<App />都產生瞭依賴關系。一旦脫離瞭這兩個組件,<Child />的可用性就無法保障瞭,減低瞭<Child />的復用性。
在我看來,通過Context暴露數據或者API不是一種優雅的實踐方案,盡管react-redux是這麼幹的。因此需要一種機制,或者說約束,去降低不必要的影響。
通過childContextTypes和contextTypes這兩個靜態屬性的約束,可以在一定程度保障,隻有組件自身,或者是與組件相關的其他子組件才可以隨心所欲的訪問Context的屬性,無論是數據還是函數。因為隻有組件自身或者相關的子組件可以清楚它能訪問Context哪些屬性,而相對於那些與組件無關的其他組件,無論是內部或者外部的 ,由於不清楚父組件鏈上各父組件的childContextTypes“聲明”瞭哪些Context屬性,所以沒法通過contextTypes“申請”相關的屬性。所以我理解為,給組件的作用域Context“帶權限”,可以在一定程度上確保Context的可控性和影響范圍。
在開發組件過程中,我們應該時刻關註這一點,不要隨意的使用Context。
不需要優先使用Context
作為React的高級API,React並不推薦我們優先考慮使用Context。我的理解是:
- Context目前還處於實驗階段,可能會在後面的發行版本中有大的變化,事實上這種情況已經發生瞭,所以為瞭避免給今後升級帶來較大影響和麻煩,不建議在App中使用Context。
- 盡管不建議在App中使用Context,但對於組件而言,由於影響范圍小於App,如果可以做到高內聚,不破壞組件樹的依賴關系,那麼還是可以考慮使用Context的。
- 對於組件之間的數據通信或者狀態管理,優先考慮用props或者state解決,然後再考慮用其他第三方成熟庫解決的,以上方法都不是最佳選擇的時候,那麼再考慮使用Context。
- Context的更新需要通過setState()觸發,但是這並不是可靠的。Context支持跨組件訪問,但是,如果中間的子組件通過一些方法不響應更新,比如shouldComponentUpdate()返回false,那麼不能保證Context的更新一定可達使用Context的子組件。因此,Context的可靠性需要關註。不過更新的問題,在新版的API中得以解決。
簡而言之,隻要你能確保Context是可控的,使用Context並無大礙,甚至如果能夠合理的應用,Context其實可以給React組件開發帶來很強大的體驗。
用Context作為共享數據的媒介
官方所提到Context可以用來進行跨組件的數據通信。而我,把它理解為,好比一座橋,作為一種作為媒介進行數據共享。數據共享可以分兩類:App級與組件級。
- App級的數據共享
App根節點組件提供的Context對象可以看成是App級的全局作用域,所以,我們利用App根節點組件提供的Context對象創建一些App級的全局數據。現成的例子可以參考react-redux,以下是<Provider />組件源碼的核心實現:
export function createProvider(storeKey = 'store', subKey) {
 const subscriptionKey = subKey || `${storeKey}Subscription`

 class Provider extends Component {
  getChildContext() {
   return { [storeKey]: this[storeKey], [subscriptionKey]: null }
  }

  constructor(props, context) {
   super(props, context)
   this[storeKey] = props.store;
  }

  render() {
   return Children.only(this.props.children)
  }
 }

 // ......

 Provider.propTypes = {
  store: storeShape.isRequired,
  children: PropTypes.element.isRequired,
 }
 Provider.childContextTypes = {
  [storeKey]: storeShape.isRequired,
  [subscriptionKey]: subscriptionShape,
 }

 return Provider
}

export default createProvider()
App的根組件用<Provider />組件包裹後,本質上就為App提供瞭一個全局的屬性store,相當於在整個App范圍內,共享store屬性。當然,<Provider />組件也可以包裹在其他組件中,在組件級的全局范圍內共享store。
- 組件級的數據共享
如果組件的功能不能單靠組件自身來完成,還需要依賴額外的子組件,那麼可以利用Context構建一個由多個子組件組合的組件。例如,react-router。
react-router的<Router />自身並不能獨立完成路由的操作和管理,因為導航鏈接和跳轉的內容通常是分離的,因此還需要依賴<Link />和<Route />等子組件來一同完成路由的相關工作。為瞭讓相關的子組件一同發揮作用,react-router的實現方案是利用Context在<Router />、<Link />以及<Route />這些相關的組件之間共享一個router,進而完成路由的統一操作和管理。
下面截取<Router />、<Link />以及<Route />這些相關的組件部分源碼,以便更好的理解上述所說的。
// Router.js

/**
 * The public API for putting history on context.
 */
class Router extends React.Component {
 static propTypes = {
 history: PropTypes.object.isRequired,
 children: PropTypes.node
 };

 static contextTypes = {
 router: PropTypes.object
 };

 static childContextTypes = {
 router: PropTypes.object.isRequired
 };

 getChildContext() {
 return {
  router: {
  ...this.context.router,
  history: this.props.history,
  route: {
   location: this.props.history.location,
   match: this.state.match
  }
  }
 };
 }

 // ......

 componentWillMount() {
 const { children, history } = this.props;

 // ......

 this.unlisten = history.listen(() => {
  this.setState({
  match: this.computeMatch(history.location.pathname)
  });
 });
 }

 // ......
}
盡管源碼還有其他的邏輯,但<Router />的核心就是為子組件提供一個帶有router屬性的Context,同時監聽history,一旦history發生變化,便通過setState()觸發組件重新渲染。
// Link.js

/**
 * The public API for rendering a history-aware <a>.
 */
class Link extends React.Component {

 // ......

 static contextTypes = {
 router: PropTypes.shape({
  history: PropTypes.shape({
  push: PropTypes.func.isRequired,
  replace: PropTypes.func.isRequired,
  createHref: PropTypes.func.isRequired
  }).isRequired
 }).isRequired
 };

 handleClick = event => {
 if (this.props.onClick) this.props.onClick(event);

 if (
  !event.defaultPrevented &&
  event.button === 0 &&
  !this.props.target &&
  !isModifiedEvent(event)
 ) {
  event.preventDefault();
  // 使用<Router />組件提供的router實例
  const { history } = this.context.router;
  const { replace, to } = this.props;

  if (replace) {
  history.replace(to);
  } else {
  history.push(to);
  }
 }
 };

 render() {
 const { replace, to, innerRef, ...props } = this.props;

 // ...

 const { history } = this.context.router;
 const location =
  typeof to === "string"
  ? createLocation(to, null, null, history.location)
  : to;

 const href = history.createHref(location);
 return (
  <a {...props} onClick={this.handleClick} href={href} ref={innerRef} />
 );
 }
}
<Link />的核心就是渲染<a>標簽,攔截<a>標簽的點擊事件,然後通過<Router />共享的router對history進行路由操作,進而通知<Router />重新渲染。
// Route.js

/**
 * The public API for matching a single path and rendering.
 */
class Route extends React.Component {

 // ......

 state = {
 match: this.computeMatch(this.props, this.context.router)
 };

 // 計算匹配的路徑,匹配的話,會返回一個匹配對象,否則返回null
 computeMatch(
 { computedMatch, location, path, strict, exact, sensitive },
 router
 ) {
 if (computedMatch) return computedMatch;

 // ......

 const { route } = router;
 const pathname = (location || route.location).pathname;

 return matchPath(pathname, { path, strict, exact, sensitive }, route.match);
 }

 // ......

 render() {
 const { match } = this.state;
 const { children, component, render } = this.props;
 const { history, route, staticContext } = this.context.router;
 const location = this.props.location || route.location;
 const props = { match, location, history, staticContext };

 if (component) return match ? React.createElement(component, props) : null;

 if (render) return match ? render(props) : null;

 if (typeof children === "function") return children(props);

 if (children && !isEmptyChildren(children))
  return React.Children.only(children);

 return null;
 }
}
<Route />有一部分源碼與<Router />相似,可以實現路由的嵌套,但其核心是通過Context共享的router,判斷是否匹配當前路由的路徑,然後渲染組件。
通過上述的分析,可以看出,整個react-router其實就是圍繞著<Router />的Context來構建的。
使用Context開發組件
之前,通過Context開發過一個簡單的組件,插槽分發組件。本章就借著這個插槽分發組件的開發經歷,聊聊如何使用Context進行組件的開發。
插槽分發組件
首先說說什麼是插槽分發組件,這個概念最初是在Vuejs中認識的。插槽分發是一種通過組件的組合,將父組件的內容插入到子組件模板的技術,在Vuejs中叫做Slot。
為瞭讓大傢更加直觀的理解這個概念,我從Vuejs搬運瞭一段關於插槽分發的Demo。
對於提供的插槽的組件<my-component />,模板如下:
<div>
 <h2>我是子組件的標題</h2>
 <slot>
 隻有在沒有要分發的內容時顯示
 </slot>
</div>
對於父組件,模板如下:
<div>
 <h1>我是父組件的標題</h1>
 <my-component>
 <p>這是一些初始內容</p>
 <p>這是更多的初始內容</p>
 </my-component>
</div>
最終渲染的結果:
<div>
 <h1>我是父組件的標題</h1>
 <div>
 <h2>我是子組件的標題</h2>
 <p>這是一些初始內容</p>
 <p>這是更多的初始內容</p>
 </div>
</div>
可以看到組件<my-component /> 的<slot />節點最終被父組件中<my-component />節點下的內容所替換。
Vuejs還支持具名插槽。
例如,一個佈局組件<app-layout />:
<div class="container">
 <header>
 <slot name="header"></slot>
 </header>
 <main>
 <slot></slot>
 </main>
 <footer>
 <slot name="footer"></slot>
 </footer>
</div>
而在父組件模板中:
<app-layout>
 <h1 slot="header">這裡可能是一個頁面標題</h1>
 <p>主要內容的一個段落。</p>
 <p>另一個段落。</p>
 <p slot="footer">這裡有一些聯系信息</p>
</app-layout>
最終渲染的結果:
<div class="container">
 <header>
 <h1>這裡可能是一個頁面標題</h1>
 </header>
 <main>
 <p>主要內容的一個段落。</p>
 <p>另一個段落。</p>
 </main>
 <footer>
 <p>這裡有一些聯系信息</p>
 </footer>
</div>
插槽分發的好處體現在,它可以讓組件具有可抽象成模板的能力。組件自身隻關心模板結構,具體的內容交給父組件去處理,同時,不打破HTML描述DOM結構的語法表達方式。我覺得這是一項很有意義的技術,可惜,React對於這項技術的支持不是那麼友好。於是我便參考Vuejs的插槽分發組件,開發瞭一套基於React的插槽分發組件,可以讓React組件也具模板化的能力。
對於<AppLayout />組件,我希望可以寫成下面這樣:
class AppLayout extends React.Component {
 static displayName = 'AppLayout'

 render () {
 return (
  <div class="container">
  <header>
   <Slot name="header"></Slot>
  </header>
  <main>
   <Slot></Slot>
  </main>
  <footer>
   <Slot name="footer"></Slot>
  </footer>
  </div>
 )
 }
}
在外層使用時,可以寫成這樣:
<AppLayout>
 <AddOn slot="header">
 <h1>這裡可能是一個頁面標題</h1>
 </AddOn>
 <AddOn>
 <p>主要內容的一個段落。</p>
 <p>另一個段落。</p>
 </AddOn>
 <AddOn slot="footer">
 <p>這裡有一些聯系信息</p>
 </AddOn>
</AppLayout>
組件的實現思路
根據前面所想的,先整理一下實現思路。
不難看出,插槽分發組件需要依靠兩個子組件——插槽組件<Slot />和分發組件<AddOn />。插槽組件,負責打樁,提供分發內容的坑位。分發組件,負責收集分發內容,並提供給插槽組件去渲染分發內容,相當於插槽的消費者。
顯然,這裡遇到瞭一個問題,<Slot />組件與<AddOn />組件是獨立的,如何將<AddOn />的內容填充到<Slot />中呢?解決這個問題不難,兩個獨立的模塊需要建立聯系,就給他們建立一個橋梁。那麼這個橋梁要如何搭建呢?回過頭來看看之前的設想的代碼。
對於<AppLayout />組件,希望寫成下面這樣:
class AppLayout extends React.Component {
 static displayName = 'AppLayout'

 render () {
 return (
  <div class="container">
  <header>
   <Slot name="header"></Slot>
  </header>
  <main>
   <Slot></Slot>
  </main>
  <footer>
   <Slot name="footer"></Slot>
  </footer>
  </div>
 )
 }
}
在外層使用時,寫成這樣:
<AppLayout>
 <AddOn slot="header">
 <h1>這裡可能是一個頁面標題</h1>
 </AddOn>
 <AddOn>
 <p>主要內容的一個段落。</p>
 <p>另一個段落。</p>
 </AddOn>
 <AddOn slot="footer">
 <p>這裡有一些聯系信息</p>
 </AddOn>
</AppLayout>
無論是<Slot />還是<AddOn />,其實都在<AppLayout />的作用域內。<Slot />是<AppLayout />組件render()方法返回的組件節點,而<AddOn />則是<AppLayout />的children節點,所以,可以將<AppLayout />視為<Slot />與<AddOn />的橋梁的角色。那麼,<AppLayout />通過什麼給<Slot />和<AddOn />建立聯系呢?這裡就用到本文的主角——Context。接下來的問題就是,如何使用Context給<Slot />和<AddOn />建立聯系?
前面提到瞭<AppLayout />這座橋梁。在外層組件,<AppLayout />負責通過<AddOn />收集為插槽填充的內容。<AppLayout />自身借助Context定義一個獲取填充內容的接口。在渲染的時候,因為<Slot />是<AppLayout />渲染的節點,所以,<Slot />可以通過Context獲取到<AppLayout />定義的獲取填充內容的接口,然後通過這個接口,獲取到填充內容進行渲染。
按照思路實現插槽分發組件
由於<AddOn />是<AppLayout />的children節點,並且<AddOn />是特定的組件,我們可以通過name或者displayName識別出來,所以,<AppLayout />在渲染之前,也就是render()的return之前,對children進行遍歷,以slot的值作為key,將每一個<AddOn />的children緩存下來。如果<AddOn />沒有設置slot,那麼將其視為給非具名的<Slot />填充內容,我們可以給這些非具名的插槽定一個key,比如叫$$default。
對於<AppLayout />,代碼大致如下:
class AppLayout extends React.Component {

 static childContextTypes = {
 requestAddOnRenderer: PropTypes.func
 }

 // 用於緩存每個<AddOn />的內容
 addOnRenderers = {}

 // 通過Context為子節點提供接口
 getChildContext () {
 const requestAddOnRenderer = (name) => {
  if (!this.addOnRenderers[name]) {
  return undefined
  }
  return () => (
  this.addOnRenderers[name]
  )
 }
 return {
  requestAddOnRenderer
 }
 }

 render () {
 const {
  children,
  ...restProps
 } = this.props

 if (children) {
  // 以k-v的方式緩存<AddOn />的內容
  const arr = React.Children.toArray(children)
  const nameChecked = []
  this.addOnRenderers = {}
  arr.forEach(item => {
  const itemType = item.type
  if (item.type.displayName === 'AddOn') {
   const slotName = item.props.slot || '$$default'
   // 確保內容唯一性
   if (nameChecked.findIndex(item => item === stubName) !== -1) {
   throw new Error(`Slot(${slotName}) has been occupied`)
   }
   this.addOnRenderers[stubName] = item.props.children
   nameChecked.push(stubName)
  }
  })
 }

 return (
  <div class="container">
  <header>
   <Slot name="header"></Slot>
  </header>
  <main>
   <Slot></Slot>
  </main>
  <footer>
   <Slot name="footer"></Slot>
  </footer>
  </div>
 )
 }
}
<AppLayout />定義瞭一個Context接口requestAddOnRenderer(),requestAddOnRenderer()接口根據name返回一個函數,這個返回的函數會根據name訪問addOnRenderers的屬性,addOnRenderers就是<AddOn />的內容緩存對象。
<Slot />的實現很簡單,代碼如下:
//   props,    context
const Slot = ({ name, children }, { requestAddOnRenderer }) => {
 const addOnRenderer = requestAddOnRenderer(name)
 return (addOnRenderer && addOnRenderer()) ||
 children ||
 null
}

Slot.displayName = 'Slot'
Slot.contextTypes = { requestAddOnRenderer: PropTypes.func }
Slot.propTypes = { name: PropTypes.string }
Slot.defaultProps = { name: '$$default' }
可以看到<Slot />通過context獲取到<AppLayout />提供的接口requestAddOnRenderer(),最終渲染的主要對象就是緩存在<AppLayout />中的<AddOn />的內容。如果沒有獲取到指定的<AddOn />的內容,則渲染<Slot />自身的children。
<AddOn />更簡單:
const AddOn = () => null

AddOn.propTypes = { slot: PropTypes.string }
AddOn.defaultTypes = { slot: '$$default' }
AddOn.displayName = 'AddOn'
<AddOn />不做任何事情,僅僅返回null,它的作用就是讓<AppLayout />緩存分發給插槽的內容。
可以讓<AppLayout />更具通用性
通過上文的代碼,基本將<AppLayout />改造成瞭一個具備插槽分發能力的組件,但是很明顯的,<AppLayout />並不具備通用性,我們可以將它提升成一個獨立通用的組件。
我給這個組件命名為SlotProvider
function getDisplayName (component) {
 return component.displayName || component.name || 'component'
}

const slotProviderHoC = (WrappedComponent) => {
 return class extends React.Component {
 static displayName = `SlotProvider(${getDisplayName(WrappedComponent)})`

 static childContextTypes = {
  requestAddOnRenderer: PropTypes.func
 }

 // 用於緩存每個<AddOn />的內容
 addOnRenderers = {}

 // 通過Context為子節點提供接口
 getChildContext () {
  const requestAddOnRenderer = (name) => {
  if (!this.addOnRenderers[name]) {
   return undefined
  }
  return () => (
   this.addOnRenderers[name]
  )
  }
  return {
  requestAddOnRenderer
  }
 }

 render () {
  const {
  children,
  ...restProps
  } = this.props

  if (children) {
  // 以k-v的方式緩存<AddOn />的內容
  const arr = React.Children.toArray(children)
  const nameChecked = []
  this.addOnRenderers = {}
  arr.forEach(item => {
   const itemType = item.type
   if (item.type.displayName === 'AddOn') {
   const slotName = item.props.slot || '$$default'
   // 確保內容唯一性
   if (nameChecked.findIndex(item => item === stubName) !== -1) {
    throw new Error(`Slot(${slotName}) has been occupied`)
   }
   this.addOnRenderers[stubName] = item.props.children
   nameChecked.push(stubName)
   }
  })
  }

  return (<WrappedComponent {...restProps} />)
 }
 }
}

export const SlotProvider = slotProviderHoC
使用React的高階組件對原來的<AppLayout />進行改造,將其轉變為一個獨立通用的組件。對於原來的<AppLayout />,可以使用這個SlotProvider高階組件,轉換成一個具備插槽分發能力的組件。
import { SlotProvider } from './SlotProvider.js'

class AppLayout extends React.Component {
 static displayName = 'AppLayout'

 render () {
 return (
  <div class="container">
  <header>
   <Slot name="header"></Slot>
  </header>
  <main>
   <Slot></Slot>
  </main>
  <footer>
   <Slot name="footer"></Slot>
  </footer>
  </div>
 )
 }
}

export default SlotProvider(AppLayout)
通過以上的經歷,可以看到,當設計開發一個組件時,
- 組件可能需要由一個根組件和多個子組件一起合作來完成組件功能。比如插槽分發組件實際上需要SlotProvider與<Slot />和<AddOn />一起配合使用,SlotProvider作為根組件,而<Slot />和<AddOn />都算是子組件。
- 子組件相對於根組件的位置或者子組件之間的位置是不確定。對於SlotProvider而言,<Slot />的位置是不確定的,它會處在被SlotProvider這個高階組件所包裹的組件的模板的任何位置,而對於<Slot />和<AddOn />,他們直接的位置也不確定,一個在SlotProvider包裝的組件的內部,另一個是SlotProvider的children。
- 子組件之間需要依賴一些全局態的API或者數據,比如<Slot />實際渲染的內容來自於SlotProvider收集到的<AddOn />的內容。
這時我們就需要借助一個中間者作為媒介來共享數據,相比額外引入redux這些第三方模塊,直接使用Context可以更優雅。
嘗試一下新版本的Context API
使用新版的Context API對之前的插槽分發組件進行改造。
// SlotProvider.js

function getDisplayName (component) {
 return component.displayName || component.name || 'component'
}

export const SlotContext = React.createContext({
 requestAddOnRenderer: () => {}
})

const slotProviderHoC = (WrappedComponent) => {
 return class extends React.Component {
 static displayName = `SlotProvider(${getDisplayName(WrappedComponent)})`

 // 用於緩存每個<AddOn />的內容
 addOnRenderers = {}

 requestAddOnRenderer = (name) => {
  if (!this.addOnRenderers[name]) {
  return undefined
  }
  return () => (
  this.addOnRenderers[name]
  )
 }

 render () {
  const {
  children,
  ...restProps
  } = this.props

  if (children) {
  // 以k-v的方式緩存<AddOn />的內容
  const arr = React.Children.toArray(children)
  const nameChecked = []
  this.addOnRenderers = {}
  arr.forEach(item => {
   const itemType = item.type
   if (item.type.displayName === 'AddOn') {
   const slotName = item.props.slot || '$$default'
   // 確保內容唯一性
   if (nameChecked.findIndex(item => item === stubName) !== -1) {
    throw new Error(`Slot(${slotName}) has been occupied`)
   }
   this.addOnRenderers[stubName] = item.props.children
   nameChecked.push(stubName)
   }
  })
  }

  return (
  <SlotContext.Provider value={
   requestAddOnRenderer: this.requestAddOnRenderer
   }>
   <WrappedComponent {...restProps} />
  </SlotContext.Provider>
  )
 }
 }
}

export const SlotProvider = slotProviderHoC
移除瞭之前的childContextTypes和getChildContext(),除瞭局部的調整,整體核心的東西沒有大變化。
// Slot.js

import { SlotContext } from './SlotProvider.js'

const Slot = ({ name, children }) => {
 return (
 <SlotContext.Consumer>
  {(context) => {
  const addOnRenderer = requestAddOnRenderer(name)
   return (addOnRenderer && addOnRenderer()) ||
   children ||
   null
  }}
 </SlotContext.Consumer>
 )
}

Slot.displayName = 'Slot'
Slot.propTypes = { name: PropTypes.string }
Slot.defaultProps = { name: '$$default' }
由於之前就按照生產者消費者的模式來使用Context,加上組件自身也比較簡單,因此使用新的API進行改造後,差別不大。
總結
- 相比props和state,React的Context可以實現跨層級的組件通信。
- Context API的使用基於生產者消費者模式。生產者一方,通過組件靜態屬性childContextTypes聲明,然後通過實例方法getChildContext()創建Context對象。消費者一方,通過組件靜態屬性contextTypes申請要用到的Context屬性,然後通過實例的context訪問Context的屬性。
- 使用Context需要多一些思考,不建議在App中使用Context,但如果開發組件過程中可以確保組件的內聚性,可控可維護,不破壞組件樹的依賴關系,影響范圍小,可以考慮使用Context解決一些問題。
- 通過Context暴露API或許在一定程度上給解決一些問題帶來便利,但個人認為不是一個很好的實踐,需要慎重。
- 舊版本的Context的更新需要依賴setState(),是不可靠的,不過這個問題在新版的API中得以解決。
- 可以把Context當做組件的作用域來看待,但是需要關註Context的可控性和影響范圍,使用之前,先分析是否真的有必要使用,避免過度使用所帶來的一些副作用。
- 可以把Context當做媒介,進行App級或者組件級的數據共享。
- 設計開發一個組件,如果這個組件需要多個組件關聯組合的,使用Context或許可以更加優雅。
以上是我的分享內容,如有不足或者錯誤的地方,歡迎批評指正。
引用
Context – https://reactjs.org/docs/context.html
React 16.3來瞭:帶著全新的Context API – http://cnodejs.org/topic/5a7bd5c4497a08f571384f03
Content Distribution with Slots – https://vuejs.org/v2/guide/components.html#Content-Distribution-with-Slots
到此這篇關於聊一聊我對 React Context 的理解以及應用的文章就介紹到這瞭,更多相關React Context 內容請搜索WalkonNet以前的文章或繼續瀏覽下面的相關文章希望大傢以後多多支持WalkonNet!
推薦閱讀:
- None Found