SpringBoot 如何使用Dataway配置數據查詢接口
Dataway介紹
Dataway 是基於 DataQL 服務聚合能力,為應用提供的一個接口配置工具。使得使用者無需開發任何代碼就配置一個滿足需求的接口。 整個接口配置、測試、冒煙、發佈。一站式都通過 Dataway 提供的 UI 界面完成。UI 會以 Jar 包方式提供並集成到應用中並和應用共享同一個 http 端口,應用無需單獨為 Dataway 開辟新的管理端口。
這種內嵌集成方式模式的優點是,可以使得大部分老項目都可以在無侵入的情況下直接應用 Dataway。進而改進老項目的迭代效率,大大減少企業項目研發成本。
Dataway 工具化的提供 DataQL 配置能力。這種研發模式的變革使得,相當多的需求開發場景隻需要配置即可完成交付。 從而避免瞭從數據存取到前端接口之間的一系列開發任務,例如:Mapper、BO、VO、DO、DAO、Service、Controller 統統不在需要。
Dataway 是 Hasor 生態中的一員,因此在 Spring 中使用 Dataway 首先要做的就是打通兩個生態。根據官方文檔中推薦的方式我們將 Hasor 和 Spring Boot 整合起來。這裡是原文:https://www.hasor.net/web/extends/spring/for_boot.html
第一步:引入相關依賴
<dependency>
    <groupId>net.hasor</groupId>
    <artifactId>hasor-spring</artifactId>
    <version>4.1.3</version>
</dependency>
<dependency>
    <groupId>net.hasor</groupId>
    <artifactId>hasor-dataway</artifactId>
    <version>4.1.3-fix20200414</version><!-- 4.1.3 包存在UI資源缺失問題 -->
</dependency>
hasor-spring 負責 Spring 和 Hasor 框架之間的整合。
hasor-dataway 是工作在 Hasor 之上,利用 hasor-spring 我們就可以使用 dataway瞭。
第二步:配置 Dataway,並初始化數據表
dataway 會提供一個界面讓我們配置接口,這一點類似 Swagger 隻要jar包集成就可以實現接口配置。找到我們 springboot 項目的配置文件 application.properties
# 是否啟用 Dataway 功能(必選:默認false)
HASOR_DATAQL_DATAWAY=true
# 是否開啟 Dataway 後臺管理界面(必選:默認false)
HASOR_DATAQL_DATAWAY_ADMIN=true
# dataway  API工作路徑(可選,默認:/api/)
HASOR_DATAQL_DATAWAY_API_URL=/api/
# dataway-ui 的工作路徑(可選,默認:/interface-ui/)
HASOR_DATAQL_DATAWAY_UI_URL=/interface-ui/
# SQL執行器方言設置(可選,建議設置)
HASOR_DATAQL_FX_PAGE_DIALECT=mysql
Dataway 一共涉及到 5個可以配置的配置項,但不是所有配置都是必須的。
其中 HASOR_DATAQL_DATAWAY、HASOR_DATAQL_DATAWAY_ADMIN 兩個配置是必須要打開的,默認情況下 Datawaty 是不啟用的。
Dataway 需要兩個數據表才能工作,下面是這兩個數據表的簡表語句。下面這個 SQL 可以在 dataway的依賴 jar 包中 “META-INF/hasor-framework/mysql” 目錄下面找到,建表語句是用 mysql 語法寫的。
CREATE TABLE `interface_info` (
    `api_id`          int(11)      NOT NULL AUTO_INCREMENT   COMMENT 'ID',
    `api_method`      varchar(12)  NOT NULL                  COMMENT 'HttpMethod:GET、PUT、POST',
    `api_path`        varchar(512) NOT NULL                  COMMENT '攔截路徑',
    `api_status`      int(2)       NOT NULL                  COMMENT '狀態:0草稿,1發佈,2有變更,3禁用',
    `api_comment`     varchar(255)     NULL                  COMMENT '註釋',
    `api_type`        varchar(24)  NOT NULL                  COMMENT '腳本類型:SQL、DataQL',
    `api_script`      mediumtext   NOT NULL                  COMMENT '查詢腳本:xxxxxxx',
    `api_schema`      mediumtext       NULL                  COMMENT '接口的請求/響應數據結構',
    `api_sample`      mediumtext       NULL                  COMMENT '請求/響應/請求頭樣本數據',
    `api_create_time` datetime     DEFAULT CURRENT_TIMESTAMP COMMENT '創建時間',
    `api_gmt_time`    datetime     DEFAULT CURRENT_TIMESTAMP COMMENT '修改時間',
    PRIMARY KEY (`api_id`)
) ENGINE=InnoDB AUTO_INCREMENT=0 DEFAULT CHARSET=utf8mb4 COMMENT='Dataway 中的API';
CREATE TABLE `interface_release` (
    `pub_id`          int(11)      NOT NULL AUTO_INCREMENT   COMMENT 'Publish ID',
    `pub_api_id`      int(11)      NOT NULL                  COMMENT '所屬API ID',
    `pub_method`      varchar(12)  NOT NULL                  COMMENT 'HttpMethod:GET、PUT、POST',
    `pub_path`        varchar(512) NOT NULL                  COMMENT '攔截路徑',
    `pub_status`      int(2)       NOT NULL                  COMMENT '狀態:0有效,1無效(可能被下線)',
    `pub_type`        varchar(24)  NOT NULL                  COMMENT '腳本類型:SQL、DataQL',
    `pub_script`      mediumtext   NOT NULL                  COMMENT '查詢腳本:xxxxxxx',
    `pub_script_ori`  mediumtext   NOT NULL                  COMMENT '原始查詢腳本,僅當類型為SQL時不同',
    `pub_schema`      mediumtext       NULL                  COMMENT '接口的請求/響應數據結構',
    `pub_sample`      mediumtext       NULL                  COMMENT '請求/響應/請求頭樣本數據',
    `pub_release_time`datetime     DEFAULT CURRENT_TIMESTAMP COMMENT '發佈時間(下線不更新)',
    PRIMARY KEY (`pub_id`)
) ENGINE=InnoDB AUTO_INCREMENT=0 DEFAULT CHARSET=utf8mb4 COMMENT='Dataway API 發佈歷史。';
create index idx_interface_release on interface_release (pub_api_id);
第三步:配置數據源
作為 Spring Boot 項目有著自己完善的數據庫方面工具支持。我們這次采用 druid + mysql + spring-boot-starter-jdbc 的方式。
首先引入依賴
<dependency>
    <groupId>mysql</groupId>
    <artifactId>mysql-connector-java</artifactId>
    <version>5.1.30</version>
</dependency>
<dependency>
    <groupId>com.alibaba</groupId>
    <artifactId>druid</artifactId>
    <version>1.1.21</version>
</dependency>
<dependency>
    <groupId>org.springframework.boot</groupId>
    <artifactId>spring-boot-starter-jdbc</artifactId>
</dependency>
<dependency>
    <groupId>com.alibaba</groupId>
    <artifactId>druid-spring-boot-starter</artifactId>
    <version>1.1.10</version>
</dependency>
然後增加數據源的配置
# db
spring.datasource.url=jdbc:mysql://xxxxxxx:3306/example
spring.datasource.username=xxxxx
spring.datasource.password=xxxxx
spring.datasource.driver-class-name=com.mysql.jdbc.Driver
spring.datasource.type:com.alibaba.druid.pool.DruidDataSource
# druid
spring.datasource.druid.initial-size=3
spring.datasource.druid.min-idle=3
spring.datasource.druid.max-active=10
spring.datasource.druid.max-wait=60000
spring.datasource.druid.stat-view-servlet.login-username=admin
spring.datasource.druid.stat-view-servlet.login-password=admin
spring.datasource.druid.filter.stat.log-slow-sql=true
spring.datasource.druid.filter.stat.slow-sql-millis=1
如果項目已經集成瞭自己的數據源,那麼可以忽略第三步。
第四步:把數據源設置到 Hasor 容器中
Spring Boot 和 Hasor 本是兩個獨立的容器框架,我們做整合之後為瞭使用 Dataway 的能力需要把 Spring 中的數據源設置到 Hasor 中。
首先新建一個 Hasor 的 模塊,並且將其交給 Spring 管理。然後把數據源通過 Spring 註入進來。
@DimModule
@Component
public class ExampleModule implements SpringModule {
    @Autowired
    private DataSource dataSource = null;
    @Override
    public void loadModule(ApiBinder apiBinder) throws Throwable {
        // .DataSource form Spring boot into Hasor
        apiBinder.installModule(new JdbcModule(Level.Full, this.dataSource));
    }
}
Hasor 啟動的時候會調用 loadModule 方法,在這裡再把 DataSource 設置到 Hasor 中。
第五步:在SprintBoot 中啟用 Hasor
@EnableHasor()
@EnableHasorWeb()
@SpringBootApplication(scanBasePackages = { "net.example.hasor" })
public class ExampleApplication {
    public static void main(String[] args) {
        SpringApplication.run(ExampleApplication.class, args);
    }
}
這一步非常簡單,隻需要在 Spring 啟動類上增加兩個註解即可。
第六步:啟動應用
應用在啟動過程中會看到 Hasor Boot 的歡迎信息
 _    _                        ____              _
| |  | |                      |  _ \            | |
| |__| | __ _ ___  ___  _ __  | |_) | ___   ___ | |_
|  __  |/ _` / __|/ _ \| '__| |  _ < / _ \ / _ \| __|
| |  | | (_| \__ \ (_) | |    | |_) | (_) | (_) | |_
|_|  |_|\__,_|___/\___/|_|    |____/ \___/ \___/ \__|
在後面的日志中還可以看到類似下面這些日志。
2020-04-14 13:52:59.696 [main] INFO  n.h.core.context.TemplateAppContext - loadModule class net.hasor.dataway.config.DatawayModule
2020-04-14 13:52:59.697 [main] INFO  n.hasor.dataway.config.DatawayModule - dataway api workAt /api/
2020-04-14 13:52:59.697 [main] INFO  n.h.c.e.AbstractEnvironment - var -> HASOR_DATAQL_DATAWAY_API_URL = /api/.
2020-04-14 13:52:59.704 [main] INFO  n.hasor.dataway.config.DatawayModule - dataway admin workAt /interface-ui/
2020-04-14 13:52:59.716 [main] INFO  net.hasor.core.binder.ApiBinderWrap - mapingTo[901d38f22faa419a8593bb349905ed0e] -> bindType ‘class net.hasor.dataway.web.ApiDetailController' mappingTo: ‘[/interface-ui/api/api-detail]'.
2020-04-14 13:52:59.716 [main] INFO  net.hasor.core.binder.ApiBinderWrap - mapingTo[c6eb9f3b3d4c4c8d8a4f807435538172] -> bindType ‘class net.hasor.dataway.web.ApiHistoryListController' mappingTo: ‘[/interface-ui/api/api-history]'.
2020-04-14 13:52:59.717 [main] INFO  net.hasor.core.binder.ApiBinderWrap - mapingTo[eb841dc72ad54023957233ef602c4327] -> bindType ‘class net.hasor.dataway.web.ApiInfoController' mappingTo: ‘[/interface-ui/api/api-info]'.
2020-04-14 13:52:59.717 [main] INFO  net.hasor.core.binder.ApiBinderWrap - mapingTo[96aebb46265245459ae21d558e530921] -> bindType ‘class net.hasor.dataway.web.ApiListController' mappingTo: ‘[/interface-ui/api/api-list]'.
2020-04-14 13:52:59.718 [main] INFO  net.hasor.core.binder.ApiBinderWrap - mapingTo[7467c07f160244df8f228321f6262d3d] -> bindType ‘class net.hasor.dataway.web.ApiHistoryGetController' mappingTo: ‘[/interface-ui/api/get-history]'.
2020-04-14 13:52:59.719 [main] INFO  net.hasor.core.binder.ApiBinderWrap - mapingTo[97d8da5363c741ba99d87c073a344412] -> bindType ‘class net.hasor.dataway.web.DisableController' mappingTo: ‘[/interface-ui/api/disable]'.
2020-04-14 13:52:59.720 [main] INFO  net.hasor.core.binder.ApiBinderWrap - mapingTo[8ddc3316ef2642dfa4395ca8ac0fff04] -> bindType ‘class net.hasor.dataway.web.SmokeController' mappingTo: ‘[/interface-ui/api/smoke]'.
2020-04-14 13:52:59.720 [main] INFO  net.hasor.core.binder.ApiBinderWrap - mapingTo[cc06c5fb343b471aacedc58fb2fe7bf8] -> bindType ‘class net.hasor.dataway.web.SaveApiController' mappingTo: ‘[/interface-ui/api/save-api]'.
2020-04-14 13:52:59.720 [main] INFO  net.hasor.core.binder.ApiBinderWrap - mapingTo[7915b2b1f89a4e73891edab0264c9bd4] -> bindType ‘class net.hasor.dataway.web.PublishController' mappingTo: ‘[/interface-ui/api/publish]'.
2020-04-14 13:52:59.721 [main] INFO  net.hasor.core.binder.ApiBinderWrap - mapingTo[0cfa34586455414591bdc389bff23ccb] -> bindType ‘class net.hasor.dataway.web.PerformController' mappingTo: ‘[/interface-ui/api/perform]'.
2020-04-14 13:52:59.721 [main] INFO  net.hasor.core.binder.ApiBinderWrap - mapingTo[37fe4af3e2994acb8deb72d21f02217c] -> bindType ‘class net.hasor.dataway.web.DeleteController' mappingTo: ‘[/interface-ui/api/delete]'.
當看到 “dataway api workAt /api/” 、 dataway admin workAt /interface-ui/ 信息時,就可以確定 Dataway 的配置已經生效瞭。
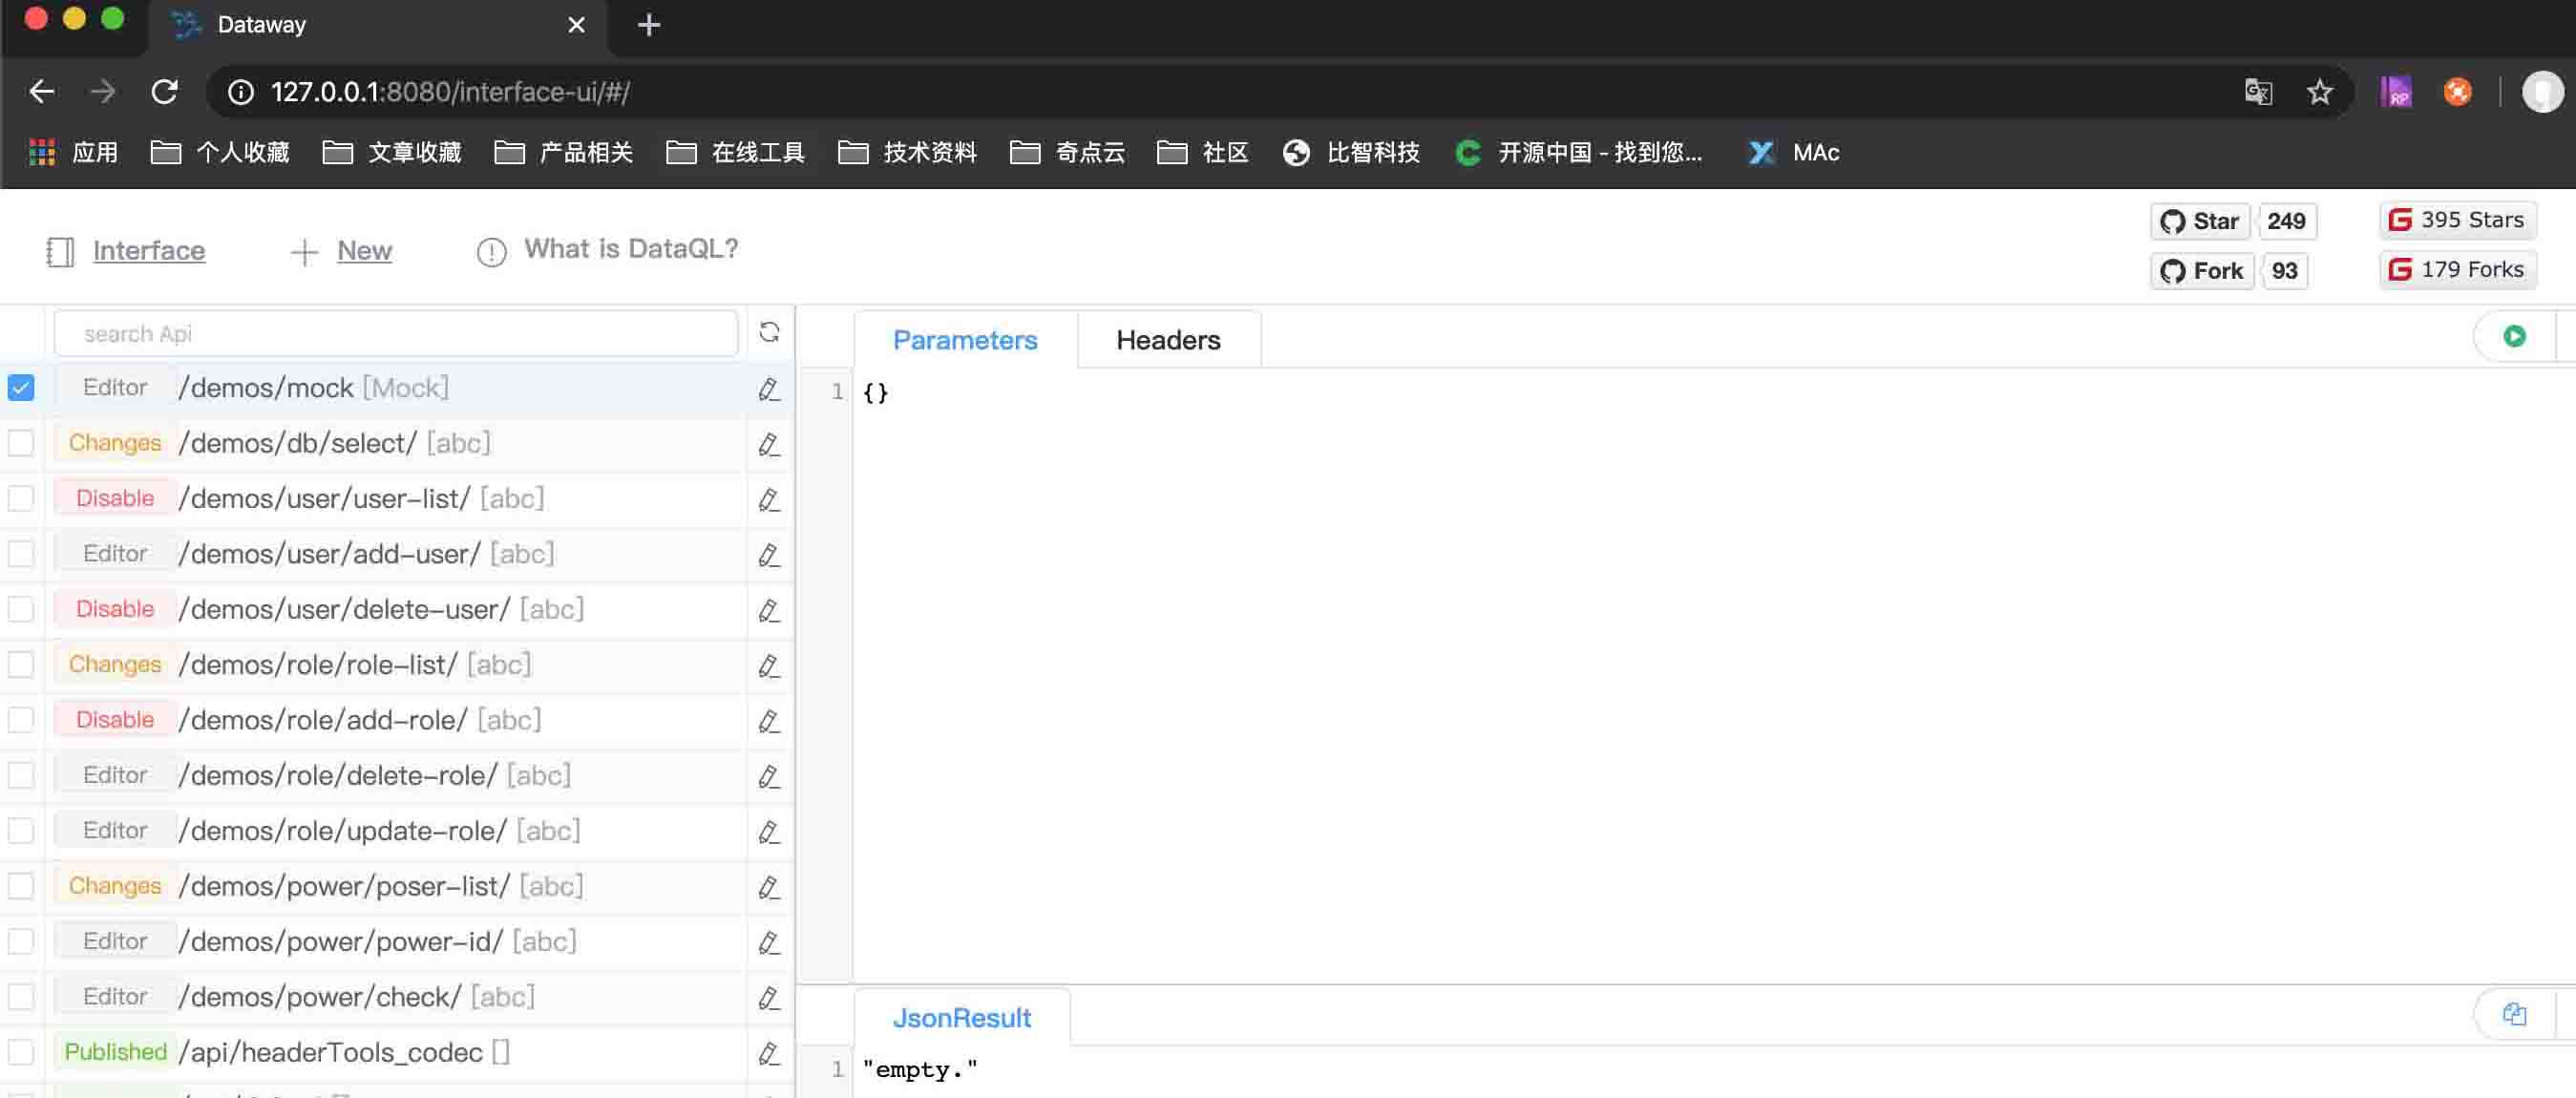
第七步:訪問接口管理頁面進行接口配置
在瀏覽器中輸入 “http://127.0.0.1:8080/interface-ui/” 就可以看到期待已久的界面瞭。

第八步:新建一個接口
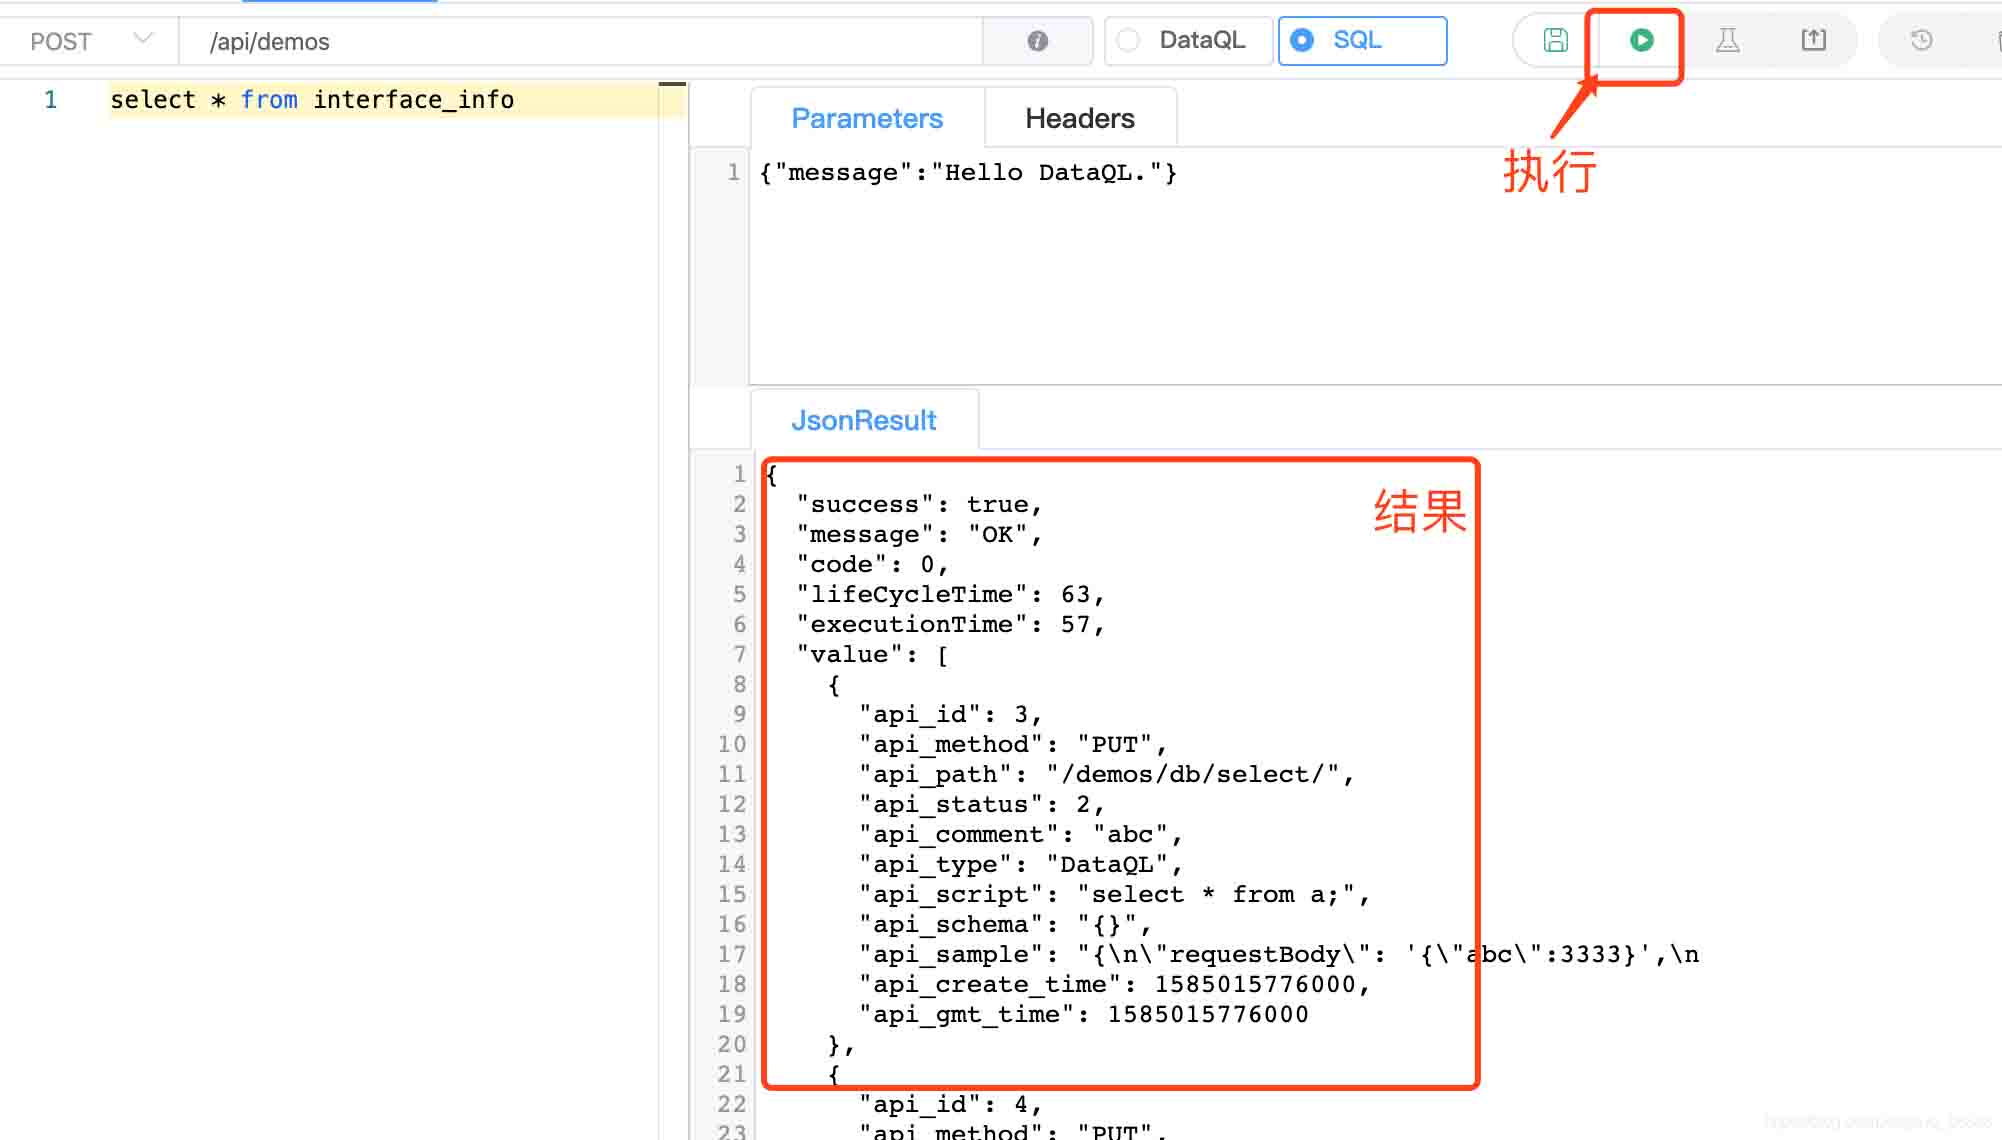
Dataway 提供瞭2中語言模式,我們可以使用強大的 DataQL 查詢語言,也可以直接使用 SQL 語言(在 Dataway 內部 SQL 語言也會被轉換為 DataQL 的形式執行。)

首先我們在 SQL 模式下嘗試執行一條 select 查詢,立刻就可以看到這條 SQL 的查詢結果。

同樣的方式我們使用 DataQL 的方式需要這樣寫:
var query = @@sql()<%
    select * from interface_info
%>
return query()
其中 var query = @@sql()<% … %> 是用來定義SQL外部代碼塊,並將這個定義存入 query 變量名中。 <% %> 中間的就是 SQL 語句。
最後在 DataQL 中調用這個代碼塊,並返回查詢結果。
當接口寫好之後就可以保存發佈瞭,為瞭測試方便,我選用 GET 方式。

接口發佈之後我們直接請求:http://127.0.0.1:8080/api/demos,就看到期待已久的接口返回值瞭。

最後總結
經過上面的幾個步驟我們介紹瞭如何基於 Spring Boot 項目使用 Dataway 來簡單的配置接口。Dataway 的方式確實給人耳目一新,一個接口竟然可以如此簡單的配置出來無需開發任何一行代碼,也不需要做任何 Mapping 實體映射綁定。
- Dataway 官方手冊:https://www.hasor.net/web/dataway/about.html
- DataQL 手冊地址:https://www.hasor.net/web/dataql/what_is_dataql.html
- Hasor 項目的首頁:https://www.hasor.net/web/index.html
以上為個人經驗,希望能給大傢一個參考,也希望大傢多多支持WalkonNet。
推薦閱讀:
- SpringBoot環境Druid數據源使用及特點
- Springboot2 集成 druid 加密數據庫密碼的配置方法
- springboot 整合druid及配置依賴
- SpringBoot項目集成Flyway詳細過程
- springboot 整合fluent mybatis的過程,看這篇夠瞭