Spring Security 實現用戶名密碼登錄流程源碼詳解
引言
你在服務端的安全管理使用瞭 Spring Security,用戶登錄成功之後,Spring Security 幫你把用戶信息保存在 Session 裡,但是具體保存在哪裡,要是不深究你可能就不知道, 這帶來瞭一個問題,如果用戶在前端操作修改瞭當前用戶信息,在不重新登錄的情況下,如何獲取到最新的用戶信息?
探究
無處不在的 Authentication
玩過 Spring Security 的小夥伴都知道,在 Spring Security 中有一個非常重要的對象叫做 Authentication,我們可以在任何地方註入 Authentication 進而獲取到當前登錄用戶信息,Authentication 本身是一個接口,它有很多實現類:
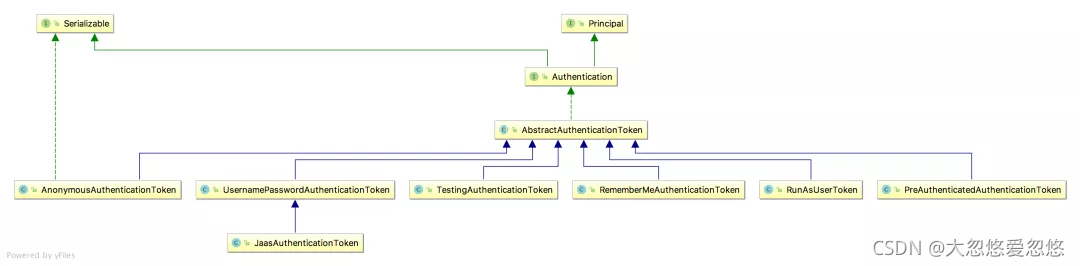
在這眾多的實現類中,我們最常用的就是 UsernamePasswordAuthenticationToken 瞭,但是當我們打開這個類的源碼後,卻發現這個類平平無奇,他隻有兩個屬性、兩個構造方法以及若幹個 get/set 方法;當然,他還有更多屬性在它的父類上。
但是從它僅有的這兩個屬性中,我們也能大致看出,這個類就保存瞭我們登錄用戶的基本信息。那麼我們的登錄信息是如何存到這兩個對象中的?這就要來梳理一下登錄流程瞭。
登錄流程
在 Spring Security 中,認證與授權的相關校驗都是在一系列的過濾器鏈中完成的,在這一系列的過濾器鏈中,和認證相關的過濾器就是 UsernamePasswordAuthenticationFilter::
public class UsernamePasswordAuthenticationFilter extends AbstractAuthenticationProcessingFilter {
//默認的用戶名和密碼對應的key
    public static final String SPRING_SECURITY_FORM_USERNAME_KEY = "username";
    public static final String SPRING_SECURITY_FORM_PASSWORD_KEY = "password";
//當前過濾器默認攔截的路徑
    private static final AntPathRequestMatcher DEFAULT_ANT_PATH_REQUEST_MATCHER = new AntPathRequestMatcher("/login", "POST");
    //默認的請求參數名稱規定
    private String usernameParameter = "username";
    private String passwordParameter = "password";
    //默認隻能是post請求
    private boolean postOnly = true;

    public UsernamePasswordAuthenticationFilter() {
    //設置默認的攔截路徑
        super(DEFAULT_ANT_PATH_REQUEST_MATCHER);
    }

    public UsernamePasswordAuthenticationFilter(AuthenticationManager authenticationManager) {
       //設置默認的攔截路徑,和處理認證的管理器
        super(DEFAULT_ANT_PATH_REQUEST_MATCHER, authenticationManager);
    }

    public Authentication attemptAuthentication(HttpServletRequest request, HttpServletResponse response) throws AuthenticationException {
    //判斷請求方式
        if (this.postOnly && !request.getMethod().equals("POST")) {
            throw new AuthenticationServiceException("Authentication method not supported: " + request.getMethod());
        } else {
        //從請求參數中獲取對應的值
            String username = this.obtainUsername(request);
            username = username != null ? username : "";
            username = username.trim();
            String password = this.obtainPassword(request);
            password = password != null ? password : "";
            //構造用戶名和密碼登錄的認證令牌
            UsernamePasswordAuthenticationToken authRequest = new UsernamePasswordAuthenticationToken(username, password);
            //設置details---deltails裡面默認存放sessionID和remoteaddr
            //authRequest 就是構造好的認證令牌
            this.setDetails(request, authRequest);
            //校驗
            //authRequest 就是構造好的認證令牌
            return this.getAuthenticationManager().authenticate(authRequest);
        }
    }

    @Nullable
    protected String obtainPassword(HttpServletRequest request) {
        return request.getParameter(this.passwordParameter);
    }

    @Nullable
    protected String obtainUsername(HttpServletRequest request) {
        return request.getParameter(this.usernameParameter);
    }

    protected void setDetails(HttpServletRequest request, UsernamePasswordAuthenticationToken authRequest) {
        authRequest.setDetails(this.authenticationDetailsSource.buildDetails(request));
    }

    public void setUsernameParameter(String usernameParameter) {
        Assert.hasText(usernameParameter, "Username parameter must not be empty or null");
        this.usernameParameter = usernameParameter;
    }

    public void setPasswordParameter(String passwordParameter) {
        Assert.hasText(passwordParameter, "Password parameter must not be empty or null");
        this.passwordParameter = passwordParameter;
    }

    public void setPostOnly(boolean postOnly) {
        this.postOnly = postOnly;
    }

    public final String getUsernameParameter() {
        return this.usernameParameter;
    }

    public final String getPasswordParameter() {
        return this.passwordParameter;
    }
}
根據這段源碼我們可以看出:
首先通過 obtainUsername 和 obtainPassword 方法提取出請求裡邊的用戶名/密碼出來,提取方式就是 request.getParameter ,這也是為什麼 Spring Security 中默認的表單登錄要通過 key/value 的形式傳遞參數,而不能傳遞 JSON 參數,如果像傳遞 JSON 參數,修改這裡的邏輯即可
獲取到請求裡傳遞來的用戶名/密碼之後,接下來就構造一個 UsernamePasswordAuthenticationToken 對象,傳入 username 和 password,username 對應瞭 UsernamePasswordAuthenticationToken 中的 principal 屬性,而 password 則對應瞭它的 credentials 屬性。
public class UsernamePasswordAuthenticationToken extends AbstractAuthenticationToken {
    private static final long serialVersionUID = 550L;
    private final Object principal;
    private Object credentials;

    public UsernamePasswordAuthenticationToken(Object principal, Object credentials) {
        super((Collection)null);
        this.principal = principal;
        this.credentials = credentials;
        this.setAuthenticated(false);
    }

    public UsernamePasswordAuthenticationToken(Object principal, Object credentials, Collection<? extends GrantedAuthority> authorities) {
        super(authorities);
        this.principal = principal;
        this.credentials = credentials;
        super.setAuthenticated(true);
    }

    public Object getCredentials() {
        return this.credentials;
    }

    public Object getPrincipal() {
        return this.principal;
    }

    public void setAuthenticated(boolean isAuthenticated) throws IllegalArgumentException {
        Assert.isTrue(!isAuthenticated, "Cannot set this token to trusted - use constructor which takes a GrantedAuthority list instead");
        super.setAuthenticated(false);
    }

    public void eraseCredentials() {
        super.eraseCredentials();
        this.credentials = null;
    }
}
接下來 setDetails 方法給 details 屬性賦值,UsernamePasswordAuthenticationToken 本身是沒有 details 屬性的,這個屬性在它的父類 AbstractAuthenticationToken 中。details 是一個對象,這個對象裡邊放的是 WebAuthenticationDetails 實例,該實例主要描述瞭兩個信息,請求的 remoteAddress 以及請求的 sessionId。

最後一步,就是調用 authenticate 方法去做校驗瞭。
好瞭,從這段源碼中,大傢可以看出來請求的各種信息基本上都找到瞭自己的位置,找到瞭位置,這就方便我們未來去獲取瞭。
接下來我們再來看請求的具體校驗操作。
校驗
在前面的 attemptAuthentication 方法中,該方法的最後一步開始做校驗,校驗操作首先要獲取到一個 AuthenticationManager,這裡拿到的是 ProviderManager ,所以接下來我們就進入到 ProviderManager 的 authenticate 方法中,當然這個方法也比較長,我這裡僅僅摘列出來幾個重要的地方:

    public Authentication authenticate(Authentication authentication) throws AuthenticationException {
    //獲取到主體(用戶名)和憑證(密碼)組成的一個令牌對象的class類對象
        Class<? extends Authentication> toTest = authentication.getClass();
        AuthenticationException lastException = null;
        AuthenticationException parentException = null;
        Authentication result = null;
        Authentication parentResult = null;
        int currentPosition = 0;
        //獲取所有可用來校驗令牌對象的provider數量
        int size = this.providers.size();
        //獲取迭代器
        Iterator var9 = this.getProviders().iterator();
         //遍歷所有provider
        while(var9.hasNext()) {
            AuthenticationProvider provider = (AuthenticationProvider)var9.next();
            //判斷當前provider是否支持當前令牌對象的校驗
            if (provider.supports(toTest)) {
                if (logger.isTraceEnabled()) {
                    Log var10000 = logger;
                    String var10002 = provider.getClass().getSimpleName();
                    ++currentPosition;
                    var10000.trace(LogMessage.format("Authenticating request with %s (%d/%d)", var10002, currentPosition, size));
                }

                try {
                //如果支持就進行認證校驗處理
                    result = provider.authenticate(authentication);
                    //校驗成功返回一個新的authentication
                    //將原先的主體由用戶名換成瞭userdetails對象
                    if (result != null) {
                    //拷貝details到新的令牌對象
                        this.copyDetails(authentication, result);
                        break;
                    }
                } catch (InternalAuthenticationServiceException | AccountStatusException var14) {
                    this.prepareException(var14, authentication);
                    throw var14;
                } catch (AuthenticationException var15) {
                    lastException = var15;
                }
            }
        }

//認證失敗但是 provider 的 parent不為null
        if (result == null && this.parent != null) {
            try {
            //調用 provider 的 parent進行驗證--parent就是providerManager
                parentResult = this.parent.authenticate(authentication);
                result = parentResult;
            } catch (ProviderNotFoundException var12) {
            } catch (AuthenticationException var13) {
                parentException = var13;
                lastException = var13;
            }
        }

//認證成功
        if (result != null) {
         //擦除憑證---密碼
            if (this.eraseCredentialsAfterAuthentication && result instanceof CredentialsContainer) {
                ((CredentialsContainer)result).eraseCredentials();
            }
//發佈認證成功的結果
            if (parentResult == null) {
                this.eventPublisher.publishAuthenticationSuccess(result);
            }
//返回新生產的令牌對象
            return result;
        } else {
        //認證失敗
            if (lastException == null) {
                lastException = new ProviderNotFoundException(this.messages.getMessage("ProviderManager.providerNotFound", new Object[]{toTest.getName()}, "No AuthenticationProvider found for {0}"));
            }

            if (parentException == null) {
                this.prepareException((AuthenticationException)lastException, authentication);
            }

            throw lastException;
        }
    }
這個方法就比較魔幻瞭,因為幾乎關於認證的重要邏輯都將在這裡完成:
首先獲取 authentication 的 Class,判斷當前 provider 是否支持該 authentication。

如果支持,則調用 provider 的 authenticate方法開始做校驗,校驗完成後,會返回一個新的Authentication。一會來和大傢捋這個方法的具體邏輯
這裡的 provider 可能有多個,如果 provider 的 authenticate 方法沒能正常返回一個Authentication,則調用 provider 的 parent 的 authenticate 方法繼續校驗。
copyDetails 方法則用來把舊的 Token 的 details 屬性拷貝到新的 Token 中來。
接下來會調用 eraseCredentials 方法擦除憑證信息,也就是你的密碼,這個擦除方法比較簡單,就是將 Token 中的credentials 屬性置空
最後通過 publishAuthenticationSuccess 方法將登錄成功的事件廣播出去。
大致的流程,就是上面這樣,在 for 循環中,第一次拿到的 provider 是一個 AnonymousAuthenticationProvider,這個 provider 壓根就不支持 UsernamePasswordAuthenticationToken,也就是會直接在 provider.supports 方法中返回 false,結束 for 循環,然後會進入到下一個 if 中,直接調用 parent 的 authenticate 方法進行校驗。
而 parent 就是 ProviderManager,所以會再次回到這個 authenticate 方法中。再次回到 authenticate 方法中,provider 也變成瞭 DaoAuthenticationProvider,這個 provider 是支持 UsernamePasswordAuthenticationToken 的,所以會順利進入到該類的 authenticate 方法去執行,而 DaoAuthenticationProvider 繼承自 AbstractUserDetailsAuthenticationProvider 並且沒有重寫 authenticate 方法,所以 我們最終來到 AbstractUserDetailsAuthenticationProvider#authenticate 方法中:

public Authentication authenticate(Authentication authentication)
		throws AuthenticationException {
	String username = (authentication.getPrincipal() == null) ? "NONE_PROVIDED"
			: authentication.getName();
	user = retrieveUser(username,(UsernamePasswordAuthenticationToken) authentication);
	preAuthenticationChecks.check(user);
	additionalAuthenticationChecks(user,(UsernamePasswordAuthenticationToken) authentication);
	postAuthenticationChecks.check(user);
	//如果用戶沒有使用過,將其放進緩存中
	if (!cacheWasUsed) {
            this.userCache.putUserInCache(user);
        }
	Object principalToReturn = user;
	if (forcePrincipalAsString) {
		principalToReturn = user.getUsername();
	}
	return createSuccessAuthentication(principalToReturn, authentication, user);
}
首先從 Authentication 提取出登錄用戶名。
然後通過拿著 username 去調用 retrieveUser 方法去獲取當前用戶對象,這一步會調用我們自己在登錄時候的寫的 loadUserByUsername 方法,所以這裡返回的 user 其實就是你的登錄對象

接下來調用 preAuthenticationChecks.check 方法去檢驗 user 中的各個賬戶狀態屬性是否正常,例如賬戶是否被禁用、賬戶是否被鎖定、賬戶是否過期等等

additionalAuthenticationChecks 方法則是做密碼比對的,好多小夥伴好奇 Spring Security 的密碼加密之後,是如何進行比較的,看這裡就懂瞭。

最後在 postAuthenticationChecks.check 方法中檢查密碼是否過期。

判斷用戶是否在緩存中存在,如果不存在,就放入緩存中
接下來有一個 forcePrincipalAsString 屬性,這個是是否強制將 Authentication 中的 principal 屬性設置為字符串,這個屬性我們一開始在 UsernamePasswordAuthenticationFilter 類中其實就是設置為字符串的(即 username),但是默認情況下,當用戶登錄成功之後, 這個屬性的值就變成當前用戶這個對象瞭。之所以會這樣,就是因為 forcePrincipalAsString 默認為 false,不過這塊其實不用改,就用 false,這樣在後期獲取當前用戶信息的時候反而方便很多。
最後,通過 createSuccessAuthentication 方法構建一個新的 UsernamePasswordAuthenticationToken,此時認證主體就由用戶名變為瞭userDetails對象
好瞭,那麼登錄的校驗流程現在就基本和大傢捋瞭一遍瞭。那麼接下來還有一個問題,登錄的用戶信息我們去哪裡查找?
用戶信息保存
要去找登錄的用戶信息,我們得先來解決一個問題,就是上面我們說瞭這麼多,這一切是從哪裡開始被觸發的?
我們來到 UsernamePasswordAuthenticationFilter 的父類 AbstractAuthenticationProcessingFilter 中,這個類我們經常會見到,因為很多時候當我們想要在 Spring Security 自定義一個登錄驗證碼或者將登錄參數改為 JSON 的時候,我們都需自定義過濾器繼承自 AbstractAuthenticationProcessingFilter ,毫無疑問,UsernamePasswordAuthenticationFilter#attemptAuthentication 方法就是在 AbstractAuthenticationProcessingFilter 類的 doFilter 方法中被觸發的:
 private void doFilter(HttpServletRequest request, HttpServletResponse response, FilterChain chain) throws IOException, ServletException {
 //不需要認證就直接放行
        if (!this.requiresAuthentication(request, response)) {
            chain.doFilter(request, response);
        } else {
            try {
            //獲取認證的結果---null或者新生產的令牌對象
                Authentication authenticationResult = this.attemptAuthentication(request, response);
               //認證失敗
                if (authenticationResult == null) {
                    return;
                }

                this.sessionStrategy.onAuthentication(authenticationResult, request, response);
                if (this.continueChainBeforeSuccessfulAuthentication) {
                    chain.doFilter(request, response);
                }

                this.successfulAuthentication(request, response, chain, authenticationResult);
            } catch (InternalAuthenticationServiceException var5) {
                this.logger.error("An internal error occurred while trying to authenticate the user.", var5);
                this.unsuccessfulAuthentication(request, response, var5);
            } catch (AuthenticationException var6) {
                this.unsuccessfulAuthentication(request, response, var6);
            }

        }
    }
從上面的代碼中,我們可以看到,當 attemptAuthentication 方法被調用時,實際上就是觸發瞭 UsernamePasswordAuthenticationFilter#attemptAuthentication 方法,當登錄拋出異常的時候,unsuccessfulAuthentication 方法會被調用,而當登錄成功的時候,successfulAuthentication 方法則會被調用,那我們就來看一看 successfulAuthentication 方法:
protected void successfulAuthentication(HttpServletRequest request,
		HttpServletResponse response, FilterChain chain, Authentication authResult)
		throws IOException, ServletException {
		//將新生產的令牌對象放入spring security的上下文環境中
	SecurityContextHolder.getContext().setAuthentication(authResult);
	rememberMeServices.loginSuccess(request, response, authResult);
	// Fire event
	if (this.eventPublisher != null) {
		eventPublisher.publishEvent(new InteractiveAuthenticationSuccessEvent(
				authResult, this.getClass()));
	}
	successHandler.onAuthenticationSuccess(request, response, authResult);
}
在這裡有一段很重要的代碼,就是 SecurityContextHolder.getContext().setAuthentication(authResult); ,登錄成功的用戶信息被保存在這裡,也就是說,在任何地方,如果我們想獲取用戶登錄信息,都可以從 SecurityContextHolder.getContext() 中獲取到,想修改,也可以在這裡修改。
最後大傢還看到有一個 successHandler.onAuthenticationSuccess,這就是我們在 SecurityConfig 中配置登錄成功回調方法,就是在這裡被觸發的
當認證失敗時,會調用登錄失敗處理器,並清空上下文環境中的對象
 protected void unsuccessfulAuthentication(HttpServletRequest request, HttpServletResponse response, AuthenticationException failed) throws IOException, ServletException {
        SecurityContextHolder.clearContext();
        this.logger.trace("Failed to process authentication request", failed);
        this.logger.trace("Cleared SecurityContextHolder");
        this.logger.trace("Handling authentication failure");
        this.rememberMeServices.loginFail(request, response);
        this.failureHandler.onAuthenticationFailure(request, response, failed);
    }
以上就是Spring Security 實現用戶名密碼登錄流程源碼詳解的詳細內容,更多關於Spring Security 用戶名密碼登錄的資料請關註WalkonNet其它相關文章!
推薦閱讀:
- Spring Security認證的完整流程記錄
- Spring Security登陸流程講解
- Security 登錄認證流程詳細分析詳解
- Spring Security 實現多種登錄方式(常規方式外的郵件、手機驗證碼登錄)
- Spring security如何重寫Filter實現json登錄