人臉檢測實戰終極之OpenCV+Python實現人臉對齊
前言
這篇博文的目的是演示如何使用 OpenCV、Python 和面部標志對齊人臉。
給定一組面部標志(輸入坐標),我們的目標是將圖像扭曲並轉換為輸出坐標空間。
在這個輸出坐標空間中,整個數據集中的所有面都應該:
- 在圖像中居中。
- 旋轉,使眼睛位於水平線上(即,旋轉面部,使眼睛位於相同的 y 坐標上)。
- 進行縮放,使面的大小大致相同。
為此,我們將首先調用一個實現的 Python 類FaceAligner ,以使用仿射變換對齊人臉。
註意:仿射變換用於旋轉、縮放、平移等。我們可以將上述所有三個要求打包到一個 cv2.warpAffine 調用中; 訣竅是創建旋轉矩陣 M 。
然後,我們將創建一個示例驅動程序 Python 腳本來接受輸入圖像、檢測人臉並對齊它們。
最後,我們將回顧我們使用 OpenCV 過程進行人臉對齊的結果。
實現面部矯正器
面部對齊算法本身基於 Mastering OpenCV with Practical Computer Vision Projects (Baggio, 2012) 的第 8 章,如果您有 C++ 背景或興趣,我強烈推薦它。 本書在 GitHub 上提供瞭開放訪問的代碼示例。
新建facealigner.py實現FaceAligner類。
# import the necessary packages
from imutils.face_utils.helpers import FACIAL_LANDMARKS_68_IDXS
from imutils.face_utils.helpers import FACIAL_LANDMARKS_5_IDXS
from imutils.face_utils.helpers import shape_to_np
import numpy as np
import cv2
class FaceAligner:
    def __init__(self, predictor, desiredLeftEye=(0.35, 0.35),
        desiredFaceWidth=256, desiredFaceHeight=None):
        # store the facial landmark predictor, desired output left
        # eye position, and desired output face width + height
        self.predictor = predictor
        self.desiredLeftEye = desiredLeftEye
        self.desiredFaceWidth = desiredFaceWidth
        self.desiredFaceHeight = desiredFaceHeight
        # if the desired face height is None, set it to be the
        # desired face width (normal behavior)
        if self.desiredFaceHeight is None:
            self.desiredFaceHeight = self.desiredFaceWidth
導入必要的包
定義的構造函數開始我們的 FaceAligner 類。
我們的構造函數有 4 個參數:
- predictor :面部標志性預測器模型。
- requiredLeftEye :一個可選的 (x, y) 元組,顯示默認值,指定所需的輸出左眼位置。對於此變量,通常會看到 20-40% 范圍內的百分比。這些百分比控制對齊後人臉的可見程度。使用的確切百分比將因應用程序而異。使用 20% 時,您基本上會獲得“放大”的臉部視圖,而使用較大的值時,臉部會顯得更“縮小”。
- requiredFaceWidth :另一個可選參數,以像素為單位定義我們想要的人臉。我們將此值默認為 256 像素。
- requiredFaceHeight :最後一個可選參數,以像素為單位指定我們所需的人臉高度值。
接下來,讓我們決定是想要一張方形的人臉圖像還是矩形的圖像。檢查 requiredFaceHeight 是否為 None ,如果是,我們將其設置為 desiredFaceWidth ,這意味著面部是方形的。方形圖像是典型情況。或者,我們可以為 desiredFaceWidth 和 desiredFaceHeight 指定不同的值以獲得感興趣的矩形區域。
現在我們已經構建瞭我們的 FaceAligner 對象,接下來我們將定義一個對齊人臉的函數。
這個函數有點長,所以我把它分成瞭 5 個代碼塊,讓它更容易理解:
 def align(self, image, gray, rect):
        # convert the landmark (x, y)-coordinates to a NumPy array
        shape = self.predictor(gray, rect)
        shape = shape_to_np(shape)
        # extract the left and right eye (x, y)-coordinates
        (lStart, lEnd) = FACIAL_LANDMARKS_IDXS["left_eye"]
        (rStart, rEnd) = FACIAL_LANDMARKS_IDXS["right_eye"]
        leftEyePts = shape[lStart:lEnd]
        rightEyePts = shape[rStart:rEnd]
定義瞭 align 函數,它接受三個參數:
image : RGB 輸入圖像。
gray :灰度輸入圖像。
rect :由 dlib 的 HOG 人臉檢測器生成的邊界框矩形。
應用 dlib 的面部標志預測器並將標志轉換為 NumPy 格式的 (x, y) 坐標。
接下來,從 helpers.py 腳本中找到的 FACIAL_LANDMARK_IDXS 字典中讀取 left_eye 和 right_eye 區域。 這些 2 元組值存儲在左/右眼開始和結束索引中。
提取leftEyePts 和 rightEyePts 。
接下來,計算每隻眼睛的中心以及眼睛質心之間的角度。
這個角度是對齊我們的圖像的關鍵組成部分。
眼睛之間的綠線夾角,如下圖所示,是我們比較關心的。

接下來是角度計算:
		# compute the center of mass for each eye
        leftEyeCenter = leftEyePts.mean(axis=0).astype("int")
        rightEyeCenter = rightEyePts.mean(axis=0).astype("int")
        # compute the angle between the eye centroids
        dY = rightEyeCenter[1] - leftEyeCenter[1]
        dX = rightEyeCenter[0] - leftEyeCenter[0]
        angle = np.degrees(np.arctan2(dY, dX)) - 180
分別通過平均每隻眼睛的所有 (x, y) 點來計算每隻眼睛的質心,也稱為質心。
給定眼睛中心,我們可以計算 (x, y) 坐標的差異並取反正切以獲得眼睛之間的旋轉角度。
這個角度將允許我們校正旋轉。
為瞭確定角度,我們首先計算 y 方向的增量 dY 。 這是通過在第 38 行找到 rightEyeCenter 和 leftEyeCenter 之間的差異來完成的。
類似地,我們計算 dX ,即第 39 行 x 方向的增量。
接下來,我們計算面部旋轉的角度。 我們使用帶有參數 dY 和 dX 的 NumPy 的 arctan2 函數,然後轉換為度數,同時減去 180 以獲得角度。
在以下代碼塊中,我們計算所需的右眼坐標(作為左眼位置的函數)並計算新結果圖像的比例。
 		# compute the desired right eye x-coordinate based on the
        # desired x-coordinate of the left eye
        desiredRightEyeX = 1.0 - self.desiredLeftEye[0]
        # determine the scale of the new resulting image by taking
        # the ratio of the distance between eyes in the *current*
        # image to the ratio of distance between eyes in the
        # *desired* image
        dist = np.sqrt((dX ** 2) + (dY ** 2))
        desiredDist = (desiredRightEyeX - self.desiredLeftEye[0])
        desiredDist *= self.desiredFaceWidth
        scale = desiredDist / dist
根據所需的左眼 x 坐標計算所需的右眼。從 1.0 中減去 self.desiredLeftEye[0] 因為所需的RightEyeX 值應該與圖像的右邊緣等距,因為相應的左眼 x 坐標與其左邊緣的距離相同。
然後可以通過獲取當前圖像中眼睛之間的距離與所需圖像中眼睛之間的距離的比率來確定人臉的比例
首先,計算歐幾裡得距離比 dist 。
接下來,使用左右眼 x 值之間的差異,計算所需的距離,desiredDist。
通過在第 52 行乘以所需的面寬來更新所需的距離。這實質上是根據所需的寬度縮放的眼睛距離。
最後,比例是通過將 desiredDist 除以我們之前計算的 dist 來計算的。
現在有瞭旋轉角度和比例,需要在計算仿射變換之前采取一些步驟。這包括找到眼睛之間的中點以及計算旋轉矩陣並更新其平移分量:
		# compute center (x, y)-coordinates (i.e., the median point)
        # between the two eyes in the input image
        eyesCenter = (int((leftEyeCenter[0] + rightEyeCenter[0]) // 2),
                      int((leftEyeCenter[1] + rightEyeCenter[1]) // 2))
        # grab the rotation matrix for rotating and scaling the face
        M = cv2.getRotationMatrix2D(eyesCenter, angle, scale)
        # update the translation component of the matrix
        tX = self.desiredFaceWidth * 0.5
        tY = self.desiredFaceHeight * self.desiredLeftEye[1]
        M[0, 2] += (tX - eyesCenter[0])
        M[1, 2] += (tY - eyesCenter[1])
計算 eyeCenter ,即左右眼之間的中點。 這將用於我們的旋轉矩陣計算。 本質上,這個中點位於鼻子的頂部,是我們將面部旋轉的點:

為瞭計算旋轉矩陣 M ,我們使用 cv2.getRotationMatrix2D 指定 eyeCenter 、角度和比例。這三個值中的每一個都先前已計算過,因此請根據需要返回。
cv2.getRotationMatrix2D 的參數說明如下:
- eyeCenter :眼睛之間的中點是我們將圍繞面部旋轉的點。
- angle:我們將面部旋轉到的角度,以確保眼睛位於同一水平線上。
- scale :我們將放大或縮小圖像的百分比,確保圖像縮放到所需的大小。
現在必須更新矩陣的平移分量,使人臉在仿射變換後仍然在圖像中。
取所需面寬的一半並將值存儲為 tX,即 x 方向的平移。
為瞭計算 tY ,y 方向的平移,將所需的面部高度乘以所需的左眼 y 值,desiredLeftEye[1]。
使用 tX 和 tY ,通過從它們對應的眼睛中點值(第 66 行和第 67 行)中減去每個值來更新矩陣的平移分量。
然後應用仿射變換來對齊人臉:
		# apply the affine transformation
        (w, h) = (self.desiredFaceWidth, self.desiredFaceHeight)
        output = cv2.warpAffine(image, M, (w, h),
            flags=cv2.INTER_CUBIC)
        # return the aligned face
        return output
為方便起見,將 desiredFaceWidth 和 desiredFaceHeight 分別存儲到 w 和 h 中(第 70 行)。
然後調用 cv2.warpAffine 執行最後一步。 此函數調用需要 3 個參數和 1 個可選參數:
- image : 人臉圖像。
- M :平移、旋轉和縮放矩陣。
- (w, h) :輸出面所需的寬度和高度。
- flags :用於扭曲的插值算法,在本例中為 INTER_CUBIC 。 要瞭解其他可能的標志和圖像轉換,請參閱 OpenCV 文檔。
最後,對齊的臉面。
對齊人臉
開始編寫人臉對齊腳本,將其命名為Now let’s put this alignment class to work with a simple driver script. Open up a new file, name it align_faces.py:
# import the necessary packages
from imutils.face_utils import FaceAligner
from imutils.face_utils import rect_to_bb
import argparse
import imutils
import dlib
import cv2
# construct the argument parser and parse the arguments
ap = argparse.ArgumentParser()
ap.add_argument("-p", "--shape-predictor", required=True,
help="path to facial landmark predictor")
ap.add_argument("-i", "--image", required=True,
help="path to input image")
args = vars(ap.parse_args())
如果您的系統上沒有安裝 imutils 和/或 dlib,請確保通過 pip 安裝/升級它們:
pip install --upgrade imutils
pip install --upgrade dlib
win10安裝dlib參考:如何安裝dlib gpu版本
# initialize dlib's face detector (HOG-based) and then create
# the facial landmark predictor and the face aligner
detector = dlib.get_frontal_face_detector()
predictor = dlib.shape_predictor(args["shape_predictor"])
fa = FaceAligner(predictor, desiredFaceWidth=256)
使用 dlib 的 get_frontal_face_detector 初始化我們的檢測器對象。
使用 –shape-predictor 來實例化我們的面部標志預測器,這是 dlib 的預訓練預測器的路徑。
通過在第 21 行初始化一個對象 fa 來利用剛剛在上一節中構建的 FaceAligner 類。我們指定瞭 256 像素的人臉寬度。
接下來,加載圖像並為人臉檢測做準備:
# load the input image, resize it, and convert it to grayscale
image = cv2.imread(args["image"])
image = imutils.resize(image, width=800)
gray = cv2.cvtColor(image, cv2.COLOR_BGR2GRAY)
# show the original input image and detect faces in the grayscale
# image
cv2.imshow("Input", image)
rects = detector(gray, 2)
加載由命令行參數 –image 指定的圖像。 調整圖像的大小,保持第 25 行的縱橫比,使其寬度為 800 像素。 然後將圖像轉換為灰度。
處理輸入圖像中的人臉檢測,我們在其中應用瞭 dlib 的人臉檢測器。 此函數返回 rects ,這是我們檢測器發現的人臉周圍的邊界框列表。
在下一個塊中,我們遍歷 rects ,對齊每個人臉,並顯示原始和對齊的圖像。
# loop over the face detections
for rect in rects:
# extract the ROI of the *original* face, then align the face
# using facial landmarks
(x, y, w, h) = rect_to_bb(rect)
faceOrig = imutils.resize(image[y:y + h, x:x + w], width=256)
faceAligned = fa.align(image, gray, rect)
# display the output images
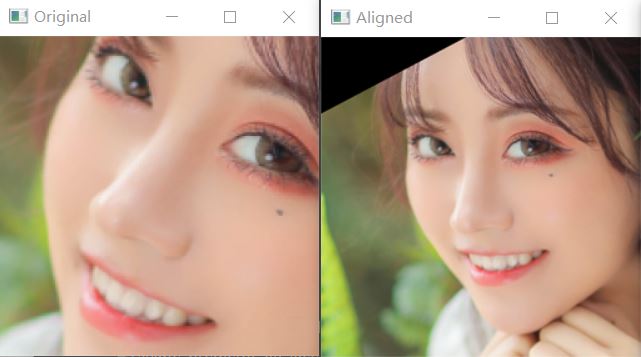
cv2.imshow("Original", faceOrig)
cv2.imshow("Aligned", faceAligned)
cv2.waitKey(0)
開始循環。
對於 dlib 預測的每個邊界框 rect,我們將其轉換為格式 (x, y, w, h)。
隨後,將框的大小調整為 256 像素的寬度,保持縱橫比。將這個原始但調整大小的圖像存儲為 faceOrig 。
對齊圖像,指定圖像、灰度圖像和矩形。
最後,將原始和對應的對齊人臉圖像顯示到各自窗口的屏幕上。
在顯示下一個原始/對齊圖像對之前,等待用戶在任一窗口處於焦點時按下一個鍵。
對所有檢測到的人臉重復上面的過程,然後腳本退出。
展示結果
輸入命令:
python align_faces.py --shape-predictor shape_predictor_68_face_landmarks.dat --image 11.jpg

到此這篇關於人臉檢測實戰終極之OpenCV+Python實現人臉對齊的文章就介紹到這瞭,更多相關Python OpenCV人臉對齊內容請搜索WalkonNet以前的文章或繼續瀏覽下面的相關文章希望大傢以後多多支持WalkonNet!
推薦閱讀:
- 超詳細註釋之OpenCV dlib實現人臉采集
- 樹莓派上利用python+opencv+dlib實現嘴唇檢測的實現
- 基於Python OpenCV和 dlib實現眨眼檢測
- Python人臉檢測實戰之疲勞檢測
- 基於Python實現人臉識別和焦點人物檢測功能