OpenCV圖像處理之七種常用圖像幾何變換
0 程序環境與所學函數
本章程序運行需要導入下面三個庫,並定義瞭一個顯示圖像的函數
所學函數
##放大、縮小
cv.resize(img,dsize,[interpolation])
##平移變換
M = np.array([[...]], dtype=np.float32)
cv.warpAffine(img, M, dsize)
##鏡像變換
cv.flip(img, 1) # 垂直鏡像
cv.flip(img, 0) # 水平鏡像
cv.flit(img, -1) # 水平垂直同時進行
##旋轉變換
M = cv.getRotationMatrix2D(center, angle, scale)
img_rotate = cv.rotate(img, cv.ROTATE_90_CLOCKWISE)
##透視變換
M = cv.getPerspectiveTransform(src, dst)
img = cv.warpPerspective(img, M, dsize)
1 裁剪、放大、縮小
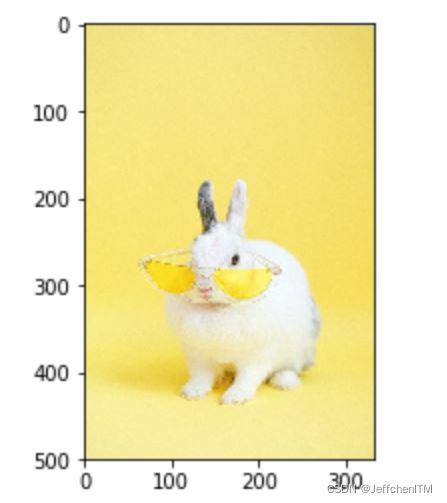
讀入圖像
img =  cv.imread('pic/rabbit500x333.jpg')
show(img)
顯示

裁剪:數組選擇方法(冒號)
#裁剪
rabbit = img[150:450:] #限定行數,列數和三通道
show(rabbit)
顯示

放大和縮小:resize()函數
插值方法
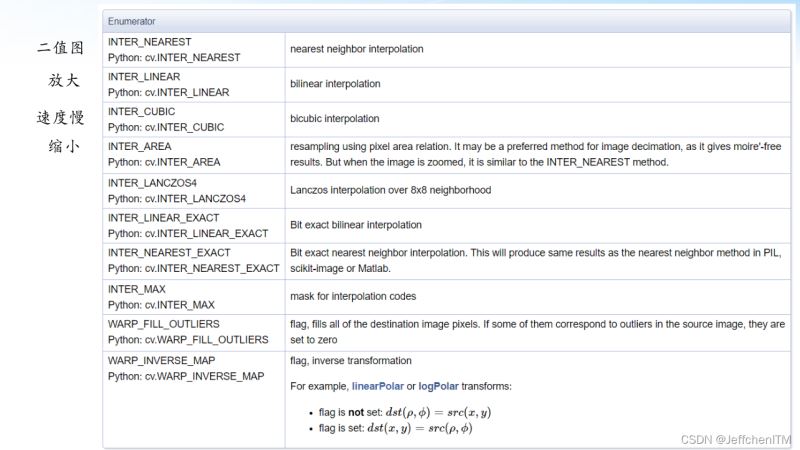
程序實現
#放大縮小
#cv.resize(img,dsize,[interpolation])  dsize表示大小,[interpolation]是插值方法,可選,有默認值
img2 = cv.resize(img,(500,400))  #放大為寬500高400
#使用定義插值方法
#一般來說放大地話選擇LINEAR方法,縮小選擇AREA方法
img3 = cv.resize(img,(500,400),interpolation=cv.INTER_NEAREST)
show(np.hstack([img2,img3]))
顯示

2 平移變換
原理、平移矩陣推導

讀入圖像
img = cv.imread('pic/rabbit500x333.jpg')
show(img)
顯示

程序實現
# M = np.array([[...]],dtype=np.float32)
# cv.warAffine(img,M,dsize) cv裡面圖像仿射變換函數,M是上面矩陣,dsize是輸出圖像大小
M=np.array([
    [1,0,100],
    [0,1,50]
],dtype=np.float32)  #水平向右平移100個像素點,豎直向下平移50個像素點,原理見理論部分

img2 = cv.warpAffine(img,M,(333,500))
show(img2)
顯示

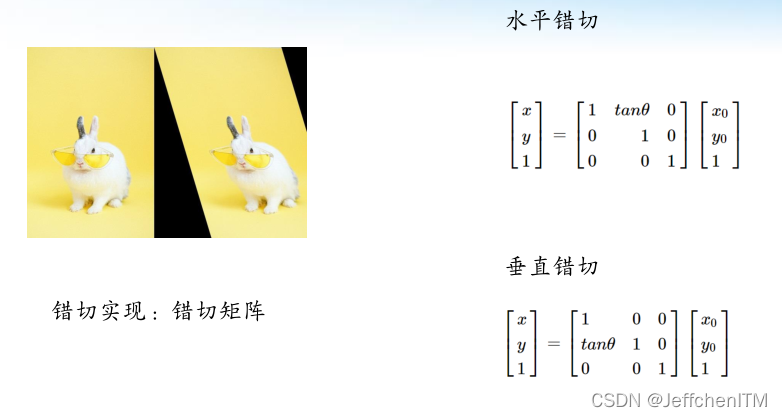
3 錯切變換
原理、錯切矩陣推導

讀入圖像
img = cv.imread('pic/rabbit500x333.jpg')
show(img)
顯示
水平錯切
M = np.array([
    [1,0.2,0],
    [0,1,0]
],dtype=np.float32)

img3 = cv.warpAffine(img,M,(533,500))
show(img3)
顯示

垂直錯切
M = np.array([
    [1,0,0],
    [0.3,1,0]
],dtype=np.float32)

img3 = cv.warpAffine(img,M,(333,700))
show(img3)
顯示

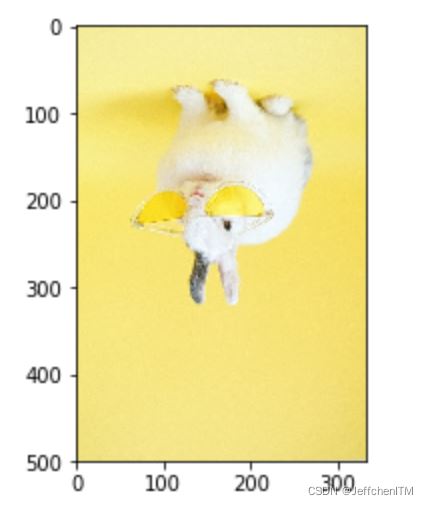
4 鏡像變換
原理、鏡像矩陣推導

讀入圖像
img = cv.imread('pic/rabbit500x333.jpg')
show(img)
顯示

水平鏡像
Mx = np.array([
    [-1,0,333],
    [0,1,0]
],dtype = np.float32)
img2 = cv.warpAffine(img,Mx,(333,500))  #仿射變換函數
show(img2)
顯示

垂直鏡像
My = np.array([
    [1,0,0],
    [0,-1,500]
],dtype=np.float32)

img3 = cv.warpAffine(img,My,(333,500))
show(img3)
顯示
opencv內置函數實現鏡像變換
#垂直鏡像 cv.flip(img,1)
#水平鏡像 cv.flip(img,0)
#水平垂直同時進行 cv.flip(img,-1)
程序實現
img4 = cv.flip(img,1)  #垂直鏡像
img5 = cv.flip(img,0)  #水平鏡像
img6 = cv.flip(img,-1) #水平垂直鏡像同時進行

show(np.hstack([img4,img5,img6]))
顯示

5 旋轉變換
原理、旋轉矩陣推導


讀入圖像
img = cv.imread('pic/rabbit500x333.jpg')
show(img)
顯示

圖像旋轉
beta = np.pi/4
#旋轉矩陣
M  = np.array([
    [np.cos(beta),np.sin(beta),0],
    [-np.sin(beta),np.cos(beta),0]
],dtype=np.float32)

img2 = cv.warpAffine(img,M,(633,300))
show(img2)
顯示

opencv內置獲取旋轉矩陣函數:
M = cv.getRotationMatrix2D(center,angle,scale)
center是旋轉中心,angle是旋轉角度,scale表示放大還是縮小
用上面函數獲取旋轉矩陣並實現圖像旋轉
h,w,c = img.shape  #獲取圖像的高度和寬度,方便後面設置旋轉中心

M2 = cv.getRotationMatrix2D((w//2,h//2),45,1)
img3 = cv.warpAffine(img,M2,(533,500))  #仿射函數實現
show(img3
顯示

opencv內置實現圖像旋轉函數
img_rotate =cv.rotate(img,cv.ROTATE_90_COUNTERCLOCKWISE)
隻能進行90度倍數的旋轉
程序實現
# 逆時針旋轉90度
img_rotate = cv.rotate(img,cv.ROTATE_90_COUNTERCLOCKWISE)
show(img_rotate)
顯示

6 透視變換
M = cv.getPerspectiveTransform(str,dst)
str:原始圖像矩陣端點位置,dst:目標圖像矩陣位置
img2 = cv.warpPerspective(img,M,(w,h))
讀入圖像
img = cv.imread('pic/parthenon500x750.jpg')
show(img)
顯示

程序實現
#在原圖中定位四個點,這裡找的是柱子前面四個點的大概位置,眼睛觀察法找的
str = np.array([
    [210,50],
    [610,270],
    [650,470],
    [150,450]
],dtype=np.float32)

#目標圖像中矩陣
dst = np.array([
    [150,50],
    [650,50],
    [650,470],
    [150,470]
],dtype=np.float32)

h,w,c = img.shape

#透視變換將一個類似矩形的圖形拉成一個矩形
M = cv.getPerspectiveTransform(str,dst)
img2 = cv.warpPerspective(img,M,(w,h))
show(img2)
顯示
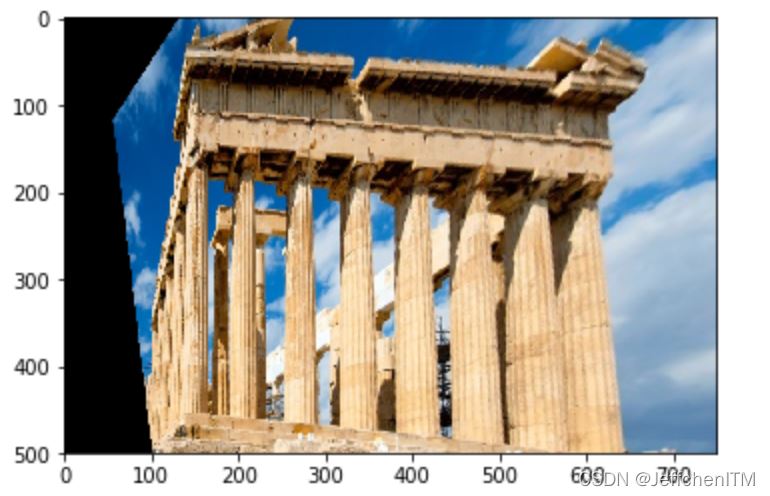
應用:車道檢測、圖片矯正
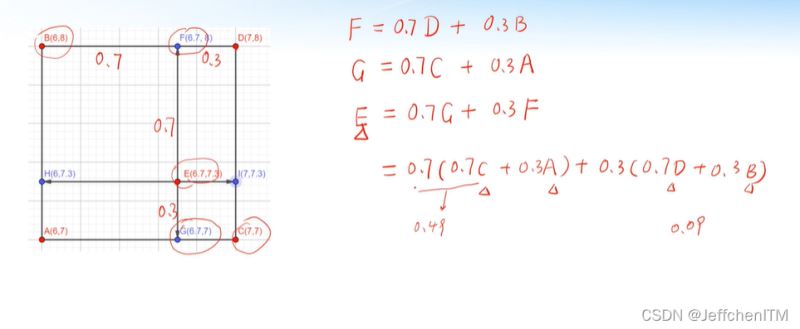
7 最近鄰插值、雙線性插值
原理:

最近鄰插值圖示:

雙線性插值圖示
讀入圖像
img = cv.imread('pic/rabbit50x33.jpg')
show(img)
顯示

程序實現
img1 = cv.resize(img,(330,500),interpolation=cv.INTER_NEAREST) #最近鄰插值
img2 = cv.resize(img,(330,500),interpolation=cv.INTER_LINEAR_EXACT) #精確雙線新插值

show(np.hstack([img1,img2]))
顯示

可以看出最近鄰插值還是比較模糊的,過渡結果沒有雙線性插值平滑
以上就是OpenCV圖像處理之七種常用圖像幾何變換的詳細內容,更多關於OpenCV 圖像幾何變換的資料請關註WalkonNet其它相關文章!
推薦閱讀:
- Python詳細講解圖像處理的而兩種庫OpenCV和Pillow
- C++ opencv圖像處理實現圖片幾何變換示例
- 深入瞭解Python Opencv數據增強
- 如何使用Python的OpenCV庫處理圖像和視頻
- opencv實現圖像幾何變換