Flutter驗證碼輸入框的2種方法實現
本文向您展示瞭在 Flutter 中實現完美的驗證碼輸入框幾種不同方法。
重點是什麼?
真實世界的 完美的驗證碼輸入框或 PIN 輸入 UI 通常滿足以下最低要求:
- 有4個或6個文本域,每個文本域隻能接受1個字符(通常是一個數字)
- 輸入數字後自動聚焦下一個字段
您經常在需要電話號碼確認、電子郵件或雙因素身份驗證的應用程序中看到此功能。
從頭開始制作 OTP 字段
應用預覽
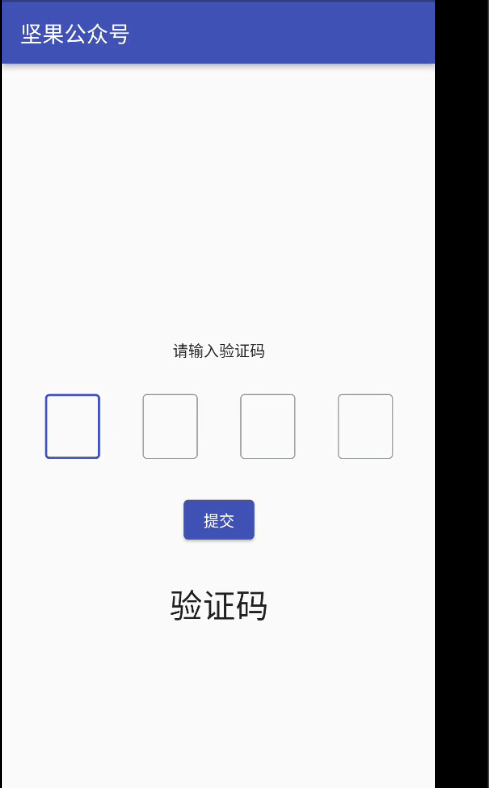
此示例創建一個簡單的 OTP 屏幕。首先,聚焦第一個輸入字段。當您輸入一個數字時,光標將自動移動到下一個字段。當按下提交按鈕時,您輸入的 OTP 代碼將顯示在屏幕上。
以下是它的工作原理:
測試此應用程序時,您應該使用模擬器的軟鍵盤而不是計算機的硬件鍵盤。
代碼
創建一個名為OtpInput的可重用小部件:
// Create an input widget that takes only one digit
class OtpInput extends StatelessWidget {
  final TextEditingController controller;
  final bool autoFocus;
  const OtpInput(this.controller, this.autoFocus, {Key? key}) : super(key: key);

  @override
  Widget build(BuildContext context) {
    return SizedBox(
      height: 60,
      width: 50,
      child: TextField(
        autofocus: autoFocus,
        textAlign: TextAlign.center,
        keyboardType: TextInputType.number,
        controller: controller,
        maxLength: 1,
        cursorColor: Theme.of(context).primaryColor,
        decoration: const InputDecoration(
            border: OutlineInputBorder(),
            counterText: '',
            hintStyle: TextStyle(color: Colors.black, fontSize: 20.0)),
        onChanged: (value) {
          if (value.length == 1) {
            FocusScope.of(context).nextFocus();
          }
        },
      ),
    );
  }
}
main.dart 中的完整源代碼和解釋(我將OtpInput類放在文件底部):
import 'dart:math' as math;

import 'package:flutter/cupertino.dart';
import 'package:flutter/material.dart';
import 'package:async/async.dart';
import 'package:flutter/scheduler.dart';
import 'package:url_strategy/url_strategy.dart';

void main() {
  setPathUrlStrategy();
  runApp(MyApp());
}

class MyApp extends StatelessWidget {
  const MyApp({Key? key}) : super(key: key);
  @override
  Widget build(BuildContext context) {
    return MaterialApp(
      // Hide the debug banner
      debugShowCheckedModeBanner: false,
      title: '堅果',
      theme: ThemeData(
        primarySwatch: Colors.indigo,
      ),
      home: const HomeScreen(),
    );
  }
}

class HomeScreen extends StatefulWidget {
  const HomeScreen({Key? key}) : super(key: key);

  @override
  State<HomeScreen> createState() => _HomeScreenState();
}

class _HomeScreenState extends State<HomeScreen> {
  String _imageUrl =
      'https://luckly007.oss-cn-beijing.aliyuncs.com/image/image-20211124085239175.png';
  double _fontSize = 20;
  String _title = "堅果公眾號";
  // 4 text editing controllers that associate with the 4 input fields
  final TextEditingController _fieldOne = TextEditingController();
  final TextEditingController _fieldTwo = TextEditingController();
  final TextEditingController _fieldThree = TextEditingController();
  final TextEditingController _fieldFour = TextEditingController();

  // This is the entered code
  // It will be displayed in a Text widget
  String? _otp;

  @override
  Widget build(BuildContext context) {
    return Scaffold(
      appBar: AppBar(
        title: Text(_title),
      ),
      body: Column(
        mainAxisAlignment: MainAxisAlignment.center,
        children: [
          const Text('請輸入驗證碼'),
          const SizedBox(
            height: 30,
          ),
          // Implement 4 input fields
          Row(
            mainAxisAlignment: MainAxisAlignment.spaceEvenly,
            children: [
              OtpInput(_fieldOne, true),
              OtpInput(_fieldTwo, false),
              OtpInput(_fieldThree, false),
              OtpInput(_fieldFour, false)
            ],
          ),
          const SizedBox(
            height: 30,
          ),
          ElevatedButton(
              onPressed: () {
                setState(() {
                  _otp = _fieldOne.text +
                      _fieldTwo.text +
                      _fieldThree.text +
                      _fieldFour.text;
                });
              },
              child: const Text('提交')),
          const SizedBox(
            height: 30,
          ),
          // Display the entered OTP code
          Text(
            _otp ?? '驗證碼',
            style: const TextStyle(fontSize: 30),
          )
        ],
      ),
    );
  }
}

// Create an input widget that takes only one digit
class OtpInput extends StatelessWidget {
  final TextEditingController controller;
  final bool autoFocus;
  const OtpInput(this.controller, this.autoFocus, {Key? key}) : super(key: key);

  @override
  Widget build(BuildContext context) {
    return SizedBox(
      height: 60,
      width: 50,
      child: TextField(
        autofocus: autoFocus,
        textAlign: TextAlign.center,
        keyboardType: TextInputType.number,
        controller: controller,
        maxLength: 1,
        cursorColor: Theme.of(context).primaryColor,
        decoration: const InputDecoration(
            border: OutlineInputBorder(),
            counterText: '',
            hintStyle: TextStyle(color: Colors.black, fontSize: 20.0)),
        onChanged: (value) {
          if (value.length == 1) {
            FocusScope.of(context).nextFocus();
          }
        },
      ),
    );
  }
}
使用第三個包
為瞭僅用幾行代碼快速實現您的目標,您可以使用第三方插件。在我們的例子中一些好的是pin_code_fields,otp_text_field等。 下面的例子將使用pin_code_fileds,它提供瞭很多很棒的功能:
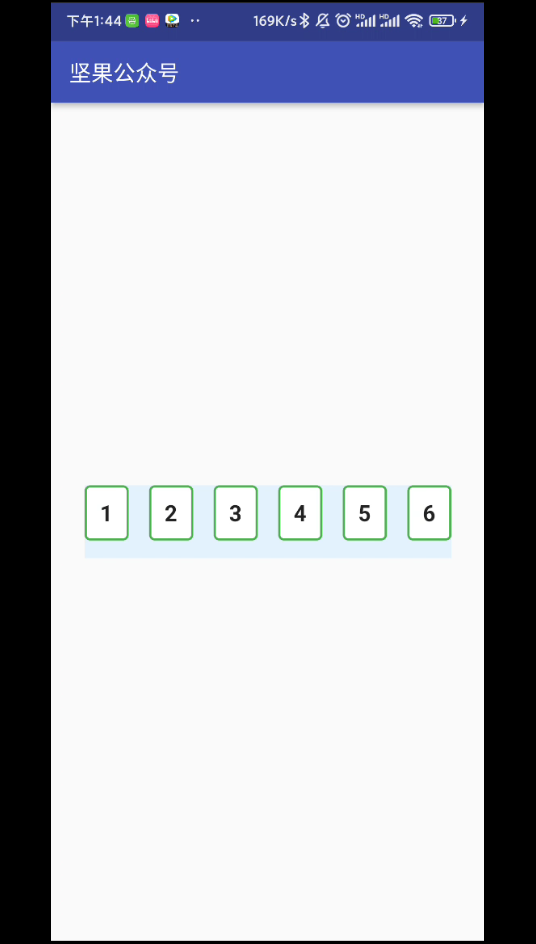
- 自動將下一個字段集中在打字上,將上一個字段集中在委派上
- 可以設置為任意長度
- 高度可定制
- 輸入文本的 3 種不同類型的動畫
- 動畫活動、非活動、選定和禁用字段顏色切換
- 自動對焦選項
- 從剪貼板粘貼 OTP 代碼
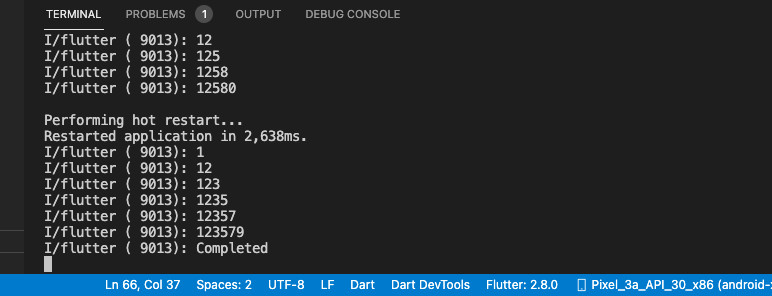
您還可以在終端窗口中看到您輸入的字符:
代碼
1.安裝插件:
flutter pub add pin_code_fields
2.最終代碼:
import 'dart:math' as math;

import 'package:flutter/cupertino.dart';
import 'package:flutter/material.dart';
import 'package:async/async.dart';
import 'package:pin_code_fields/pin_code_fields.dart';
import 'package:url_strategy/url_strategy.dart';

void main() {
  setPathUrlStrategy();
  runApp(MyApp());
}

class MyApp extends StatelessWidget {
  const MyApp({Key? key}) : super(key: key);
  @override
  Widget build(BuildContext context) {
    return MaterialApp(
      // Hide the debug banner
      debugShowCheckedModeBanner: false,
      title: '堅果',
      theme: ThemeData(
        primarySwatch: Colors.indigo,
      ),
      home: const HomeScreen(),
    );
  }
}

class HomeScreen extends StatefulWidget {
  const HomeScreen({Key? key}) : super(key: key);

  @override
  State<HomeScreen> createState() => _HomeScreenState();
}

class _HomeScreenState extends State<HomeScreen> {
  String _imageUrl =
      'https://luckly007.oss-cn-beijing.aliyuncs.com/image/image-20211124085239175.png';
  double _fontSize = 20;
  String _title = "堅果公眾號";
  // 4 text editing controllers that associate with the 4 input fields
  TextEditingController textEditingController = TextEditingController();
  String currentText = "";

  @override
  Widget build(BuildContext context) {
    return Scaffold(
      appBar: AppBar(
        title: Text(_title),
      ),
      body: Padding(
        padding: const EdgeInsets.all(30),
        child: Center(
          child: PinCodeTextField(
            length: 6,
            obscureText: false,
            animationType: AnimationType.fade,
            pinTheme: PinTheme(
              shape: PinCodeFieldShape.box,
              borderRadius: BorderRadius.circular(5),
              fieldHeight: 50,
              fieldWidth: 40,
              activeFillColor: Colors.white,
            ),
            animationDuration: const Duration(milliseconds: 300),
            backgroundColor: Colors.blue.shade50,
            enableActiveFill: true,
            controller: textEditingController,
            onCompleted: (v) {
              debugPrint("Completed");
            },
            onChanged: (value) {
              debugPrint(value);
              setState(() {
                currentText = value;
              });
            },
            beforeTextPaste: (text) {
              return true;
            },
            appContext: context,
          ),
        ),
      ),
    );
  }
}
結論
我們已經介紹瞭 2 個在 Flutter 中創建現代優雅的 完美的驗證碼輸入框/PIN 輸入字段的示例。
到此這篇關於Flutter驗證碼輸入框的2種方法實現的文章就介紹到這瞭,更多相關Flutter驗證碼輸入框內容請搜索WalkonNet以前的文章或繼續瀏覽下面的相關文章希望大傢以後多多支持WalkonNet!
推薦閱讀:
- Flutter折疊控件使用方法詳解
- Flutter 如何正確顯示SnackBar
- Flutter有狀態組件使用詳解
- flutter封裝單選點擊菜單工具欄組件
- Flutter路由fluro引入配置和使用的具體方法