Python+selenium實現趣頭條的視頻自動上傳與發佈
效果展示
效果展示

素材展示
一個為視頻,另一個為像素大小不小於視頻的封面。

實現過程
調用已啟用的瀏覽器
通過調用已啟用的瀏覽器,可以實現直接跳過每次的登錄過程。
使用方法可以參考補充內容
from selenium import webdriver

options = webdriver.ChromeOptions()
options.add_experimental_option("debuggerAddress", "127.0.0.1:5003")
driver = webdriver.Chrome(options = options)
上傳視頻和封面
上傳功能的使用方法可以參考補充內容
# 上傳視頻
driver.find_element_by_xpath('//input[@type="file"]').send_keys(path_mp4)

# 等待視頻上傳完成
while True:
    time.sleep(3)
    try:
        driver.find_element_by_xpath('//*[contains(text(),"上傳成功")]')
        break;
    except Exception as e:
        print("視頻還在上傳中···")

print("視頻已上傳完成!")

# 添加封面
time.sleep(1)
driver.find_element_by_xpath('//*[@class="el-upload"]').click()
time.sleep(1)
driver.find_element_by_xpath('//*[text()="自定義封面"]').click()
time.sleep(1)
driver.find_element_by_xpath('//*[text()="選擇圖片"]/../..//input[@type="file"]').send_keys(path_cover)
time.sleep(3)
driver.find_element_by_xpath('//*[text()="確 定"]').click()
完整源碼展示
import selenium
from selenium import webdriver
import pathlib
import time
from selenium.webdriver.common.keys import Keys

# 基本信息
# 視頻存放路徑
catalog_mp4 = r"C:\Users\Administrator\Desktop\視頻發佈"
# 視頻描述
describe = "裸眼3D看蜘蛛俠 #搞笑 #電影 #視覺震撼"
time.sleep(10)
options = webdriver.ChromeOptions()
options.add_experimental_option("debuggerAddress", "127.0.0.1:5003")
driver = webdriver.Chrome(options = options)

path = pathlib.Path(catalog_mp4)

# 視頻地址獲取
path_mp4 = ""
for i in path.iterdir():
    if(".mp4" in str(i)):
        path_mp4 = str(i);
        break;

if(path_mp4 != ""):
    print("檢查到視頻路徑:" + path_mp4)
else:
    print("未檢查到視頻路徑,程序終止!")
    exit()

# 封面地址獲取
path_cover = ""
for i in path.iterdir():
    if(".png" in str(i) or ".jpg" in str(i)):
        path_cover = str(i);
        break;

if(path_cover != ""):
    print("檢查到封面路徑:" + path_cover)
else:
    print("未檢查到封面路徑,程序終止!")
    exit()

def publish_qutoutiao():
    '''
     作用:發佈趣頭條視頻
    '''

    # 進入創作者頁面,並上傳視頻
    driver.get("https://mp.qutoutiao.net/publish-content/video")
    time.sleep(2)
    driver.find_element_by_xpath('//input[@type="file"]').send_keys(path_mp4)

    # 等待視頻上傳完成
    while True:
        time.sleep(3)
        try:
            driver.find_element_by_xpath('//*[contains(text(),"上傳成功")]')
            break;
        except Exception as e:
            print("視頻還在上傳中···")

    print("視頻已上傳完成!")

    # 輸入標題
    driver.find_element_by_xpath('//*[@placeholder="內容標題5-30字"]').clear()
    time.sleep(2)
    driver.find_element_by_xpath('//*[@placeholder="內容標題5-30字"]').send_keys(describe)

    # 輸入描述信息
    time.sleep(1)
    driver.find_element_by_xpath('//textarea').clear()
    time.sleep(2)
    driver.find_element_by_xpath('//textarea').send_keys(describe)

    # 選擇分類
    time.sleep(1)
    driver.find_element_by_xpath('//*[@placeholder="請選擇分類"]').click()
    time.sleep(1)
    driver.find_element_by_xpath('//*[text()="電影"]').click()
    time.sleep(1)
    driver.find_element_by_xpath('//*[text()="分類:"]').click()
    time.sleep(1)

    # 輸入標簽
    time.sleep(1)
    driver.find_element_by_xpath('//*[@class="content-tag"]//input').click()
    time.sleep(2)
    driver.find_element_by_xpath('//*[@class="content-tag"]//input').send_keys("視覺震撼")
    time.sleep(2)
    driver.find_element_by_xpath('//*[@class="content-tag"]//input').send_keys(Keys.ENTER)
    time.sleep(2)
    driver.find_element_by_xpath('//*[@class="content-tag"]//input').send_keys("搞笑")
    time.sleep(2)
    driver.find_element_by_xpath('//*[@class="content-tag"]//input').send_keys(Keys.ENTER)
    time.sleep(2)
    driver.find_element_by_xpath('//*[@class="content-tag"]//input').send_keys("電影")
    time.sleep(2)
    driver.find_element_by_xpath('//*[@class="content-tag"]//input').send_keys(Keys.ENTER)

    # 添加封面
    time.sleep(1)
    driver.find_element_by_xpath('//*[@class="el-upload"]').click()
    time.sleep(1)
    driver.find_element_by_xpath('//*[text()="自定義封面"]').click()
    time.sleep(1)
    driver.find_element_by_xpath('//*[text()="選擇圖片"]/../..//input[@type="file"]').send_keys(path_cover)
    time.sleep(3)
    driver.find_element_by_xpath('//*[text()="確 定"]').click()


    # 人工進行檢查並發佈
    # time.sleep(3)
    # # 點擊發佈
    # driver.find_element_by_xpath('//*[text()="發佈"]').click()

# 開始執行視頻發佈
publish_qutoutiao()
補充
Python+selenium操作已啟用的chrome瀏覽器
首先在 chrome 快捷方式的目標後面加上這個參數。
前面是代表調試端口,可以隨便用端口,後面指向一個新的文件夾用於存儲用戶數據。
註: 後面的參數如果不加上,端口啟用好像會失敗,目前沒有找到原因。
--remote-debugging-port=5003 --user-data-dir="C:\Py_selenium\auto"

然後雙擊快捷快捷方式打開瀏覽器就好瞭,現在瀏覽器就能被控制瞭。

不確定端口是否啟用,可以在 cmd 用下面的方法查看端口啟用情況。
C:\Users\Administrator>netstat -ano | findstr 5003
  TCP    127.0.0.1:5003         127.0.0.1:53546        FIN_WAIT_2      12180
  TCP    127.0.0.1:5003         127.0.0.1:53547        TIME_WAIT       0
  TCP    127.0.0.1:5003         127.0.0.1:53858        FIN_WAIT_2      12180
  TCP    127.0.0.1:5003         127.0.0.1:53859        TIME_WAIT       0
  TCP    127.0.0.1:5003         127.0.0.1:53900        FIN_WAIT_2      12180
  TCP    127.0.0.1:5003         127.0.0.1:53901        TIME_WAIT       0
  TCP    127.0.0.1:53546        127.0.0.1:5003         CLOSE_WAIT      15540
  TCP    127.0.0.1:53858        127.0.0.1:5003         CLOSE_WAIT      9108
  TCP    127.0.0.1:53900        127.0.0.1:5003         CLOSE_WAIT      16320
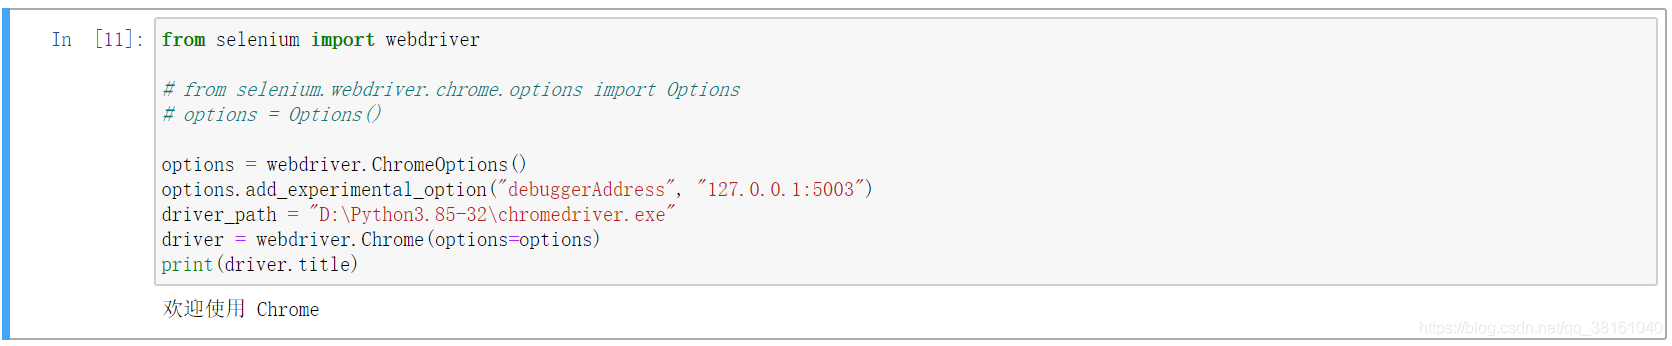
通過訪問調試端口控制已啟用的瀏覽器。
from selenium import webdriver

# 另一個導入chrome參數的方法
# from selenium.webdriver.chrome.options import Options
# options = Options()

options = webdriver.ChromeOptions()
options.add_experimental_option("debuggerAddress", "127.0.0.1:5003")
driver = webdriver.Chrome(options = options)
print(driver.title)
運行效果圖:
Python+selenium實現自動導入、上傳外部文件
一開始我覺得導入外部文件是需要操作 windows 的文件窗口呢,後來發現原來不用那麼麻煩,隻要給文件上傳的元素傳一個本地路徑就好瞭,就是一個 input 類型的。

右鍵元素點擊檢查可以看到對應的元素。

然後 send_keys() 傳入路徑就好瞭。
driver.find_element_by_xpath('//input[@type="file"]').send_keys('C:\\Users\\Administrator\\Desktop\\文件.zip')
以上就是Python+selenium實現趣頭條的視頻自動上傳與發佈的詳細內容,更多關於Python selenium視頻自動上傳與發佈的資料請關註WalkonNet其它相關文章!
推薦閱讀:
- Python+selenium 自動化快手短視頻發佈的實現過程
- Python selenium 實例之通過 selenium 查詢禪道是否有任務或者BUG
- Python編程使用Selenium模擬淘寶登錄實現過程
- 手把手教你搭建python+selenium自動化環境(圖文)
- Python自動化測試之登錄腳本的實現