Vue-CLI多頁分目錄打包的步驟記錄
頁面目錄結構
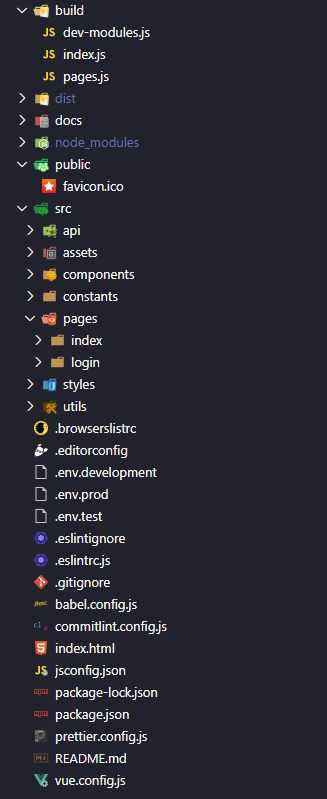
註意需要將默認的 html 模板文件 public/index.html 移動到根目錄下。
安裝依賴
npm i –save-dev cross-env tasksfile
build/pages.js
獲取 Vue CLI 需要的多頁對象
const path = require('path')
const glob = require('glob')
const fs = require('fs')

const isProduction = process.env.NODE_ENV === 'production'

// 自定義不同模塊的頁面 title
const titleMap = {
  index: '首頁'
}

function getPages (globPath) {
  const pages = {}
  glob.sync(globPath).forEach((item) => {
    const stats = fs.statSync(item)
    if (stats.isDirectory()) {
      const basename = path.basename(item, path.extname(item))

      // 如果模塊目錄下有 index.html 則使用該文件為 html 模板文件
      const template = fs.existsSync(`${item}/index.html`)
        ? `${item}/index.html`
        : path.join(__dirname, '../index.html')

      pages[basename] = {
        entry: `${item}/main.js`,
        title: titleMap[basename] || '默認頁面',
        template,
        // 這行代碼很重要
        // 兼容開發和生產時 html 頁面層級一致
        filename: isProduction ? 'index.html' : `${basename}/index.html`
      }
    }
  })
  return pages
}

const pages = getPages(path.join(__dirname, '../src/pages/*'))

module.exports = pages
build/index.js
執行構建命令,循環執行 vue-cli-service build 。
const chalk = require('chalk')
const rimraf = require('rimraf')
const { sh } = require('tasksfile')

const PAGES = require('./pages')

// vue-cli-service --mode 值
const mode = process.env.MODE || 'prod'

// 模塊名,可能為多個
const moduleNames = process.argv[2]

// 全部頁面列表
const pageList = Object.keys(PAGES)

// 有效模塊列表 未指定則為全部頁面列表
const validPageList = moduleNames ? moduleNames.split(',').filter((item) => pageList.includes(item)) : pageList
if (!validPageList.length) {
  console.log(chalk.red('**模塊名不正確**'))
  return
}

console.log(chalk.blue(`有效模塊:${validPageList.join(',')}`))

// 刪除 dist 目錄
rimraf.sync('dist')

console.time('總編譯時間')
const count = validPageList.length
let current = 0
// 逐個執行模塊編譯
for (let i = 0; i < validPageList.length; i += 1) {
  const moduleName = validPageList[i]
  process.env.MODULE_NAME = moduleName

  console.log(chalk.blue(`${moduleName} 模塊開始編譯`))

  // 通過 vue-cli-service build 編譯
  sh(`vue-cli-service build --mode ${mode}`, { async: true }).then(() => {
    console.log(chalk.blue(`${moduleName} 模塊編譯完成`))
    console.log()
    current += 1
    if (current === count) {
      console.log(chalk.blue('-----全部模塊編譯完成-----'))
      console.timeEnd('總編譯時間')
    }
  })
}
build/dev-modules.js
自定義本地開發時需要編譯的模塊,模塊名為 src/pages 下的文件夾名。
// 本地開發需要編譯的模塊
module.exports = [

]
vue.config.js
const chalk = require('chalk')

const devModuleList = require('./build/dev-modules')

const isProduction = process.env.NODE_ENV === 'production'

// 總的頁面
const PAGES = require('./build/pages')

for (const basename in PAGES) {
  if (Object.prototype.hasOwnProperty.call(PAGES, basename)) {
    PAGES[basename].chunks = [
      'chunk-vue',
      'chunk-vendors',
      'chunk-common',
      `${basename}`
    ]
  }
}

let pages = {}
const moduleName = process.env.MODULE_NAME

if (isProduction) {
  // 構建模塊的名稱
  if (!PAGES[moduleName]) {
    console.log(chalk.red('**模塊名不正確**'))
    return
  }
  pages[moduleName] = PAGES[moduleName]
} else {
  // 本地開發編譯的模塊
  // 編譯全部
  if (process.env.DEV_MODULE === 'all') {
    pages = PAGES
  } else {
    // 編譯部分模塊
    const moduleList = [
      // 固定編譯的模塊
      'index',
      'login',
      // 自定義編譯的模塊
      ...devModuleList
    ]
    moduleList.forEach(item => {
      pages[item] = PAGES[item]
    })
  }
}

module.exports = {
  // 這行代碼很重要
  publicPath: isProduction ? './' : '/',
  pages,
  // 這行代碼很重要
  outputDir: isProduction ? `dist/${moduleName}` : 'dist',
  productionSourceMap: false,
  css: {
    loaderOptions: {
      sass: {
        prependData: '@import "~@/styles/variables.scss";'
      }
    }
  },
  chainWebpack: (config) => {
    config.optimization.splitChunks({
      cacheGroups: {
        vue: {
          name: 'chunk-vue',
          test: /[\\/]node_modules[\\/]_?(vue|vue-router|vuex|element-ui)(@.*)?[\\/]/,
          priority: -1,
          chunks: 'initial'
        },
        vendors: {
          name: 'chunk-vendors',
          test: /[\\/]node_modules[\\/]/,
          priority: -10,
          chunks: 'initial'
        },
        common: {
          name: 'chunk-common',
          minChunks: 2,
          priority: -20,
          chunks: 'initial',
          reuseExistingChunk: true
        }
      }
    })
  }
}
package.json
{
  "scripts": {
    "serve": "vue-cli-service serve",
    "serve:all": "cross-env DEV_MODULE=all vue-cli-service serve",
    "build:test": "cross-env MODE=test node build/index.js",
    "build:prod": "cross-env MODE=prod node build/index.js",
    "lint": "vue-cli-service lint",
  }
}
本地開發
本地開發時,npm run serve 會編譯自定義的模塊目錄,npm run serve:all 會編譯全部模塊目錄。
本地開發時編譯後的目錄結構如下:

所以啟動後,需要將地址改為 http://localhost:8080/index/index.html 。
打包結果
構建時, npm run build:prod 打包全部頁面,npm run build:prod index 僅打包 index 頁面。
打包後的目錄結構如下:
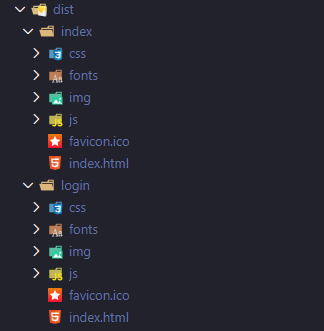
這樣在不同模塊之間跳轉時,可以使用一致的相對路徑跳轉方式, ../index/index.html 。
打包後每個模塊的內容打包到一個單獨目錄下。
Github 地址
總結
到此這篇關於Vue-CLI多頁分目錄打包的文章就介紹到這瞭,更多相關Vue-CLI多頁分目錄打包內容請搜索WalkonNet以前的文章或繼續瀏覽下面的相關文章希望大傢以後多多支持WalkonNet!
推薦閱讀:
- None Found