Android用TextView實現跑馬燈效果代碼
【前言】
在Textview設置的寬度有限,而需要顯示的文字又比較多的情況下,往往需要給Textview設置跑馬燈效果才能讓用戶完整地看到所有設置的文字,所以給TextView設置跑馬燈效果的需求是很常見的
一、新手設置跑馬燈效果
1、先在xml中給Textview設置好對應的屬性
 <TextView
        android:id="@+id/tv"
        android:layout_width="200dp"
        android:layout_height="wrap_content"
        app:layout_constraintLeft_toLeftOf="parent"
        app:layout_constraintRight_toRightOf="parent"
        app:layout_constraintTop_toBottomOf="@id/show_float"
        android:singleLine="true"
        android:ellipsize="marquee"
        android:focusable="true"
        android:focusableInTouchMode="true"
        android:marqueeRepeatLimit="-1"
        android:layout_marginTop="20dp"
        android:padding="10dp"
        android:text="歡迎來到跑馬燈新手村,這是新手示例~"
        android:textColor="@color/white"
        android:background="@drawable/com_live_rounded_rectangle"/>
2、然後在代碼中設置請求獲取焦點即可
        TextView tv = findViewById(R.id.tv);
        tv.requestFocus();
這樣設置之後,跑馬燈的效果就出來瞭

【關鍵點講解】
1、android:layout_width 是限制為固定寬度,同時文本的長度大於所設置的寬度,要是設置android:layout_width 為wrap_content, 那麼Textview的寬度會隨著文本長度變長而拉寬,這樣就不能出現跑馬燈效果
2、android:singleLine="true"設置Textview隻能一行顯示,要是不設置為true,默認會自動換行,顯示為多行,這樣的話,也不能出現跑馬燈效果
3、android:ellipsize="marquee"設置要是文本長度超出Textview的寬度時候,文本應該以跑馬燈效果顯示,這個是設置跑馬燈效果最關鍵的設置,android:ellipsize還可以取值start、end、middle、none,分別是開頭顯示省略號、結尾顯示省略號、中間顯示省略號、直接截斷
4、android:focusable="true"設置Textview可以獲取焦點,跑馬燈效果需要獲取到焦點時候才生效,Textview默認是不獲取焦點的
5、android:focusableInTouchMode="true"設置在觸摸模式下可以獲取焦點,目前智能機基本都是自動進入觸摸模式,其實目前隻要設置android:focusableInTouchMode="true",默認android:focusable也會變為true瞭
6、android:marqueeRepeatLimit="-1"設置跑馬燈循環的次數,-1表示無限循環,不設置的話,默認是循環3次
7、 tv.requestFocus();設置獲取焦點, 隻有當該view的focusable屬性為true時候才生效
【總結】
1、一定要設置android:focusableInTouchMode="true",若是隻設置瞭android:focusable="true"而android:focusableInTouchMode沒設置,那麼跑馬燈效果是不生效的,因為進入觸摸模式之後,isFocusable()返回false,下面看看Texivew startMarquee()源碼就知道需要滿足什麼條件才會開始跑馬燈特效:
     private void startMarquee() {
        // Do not ellipsize EditText
        if (getKeyListener() != null) return;

        if (compressText(getWidth() - getCompoundPaddingLeft() - getCompoundPaddingRight())) {
            return;
        }

		// 1、跑馬燈控制類沒有創建或者跑馬燈效果已經停止
        if ((mMarquee == null || mMarquee.isStopped()) &&
        // 2、當前Textview是獲取到焦點或者被選中狀態
        (isFocused() || isSelected())
        // 3、文本的行數隻有一行
         && getLineCount() == 1
         // 4、文本長度大於Textview的寬度
         && canMarquee()) {

            if (mMarqueeFadeMode == MARQUEE_FADE_SWITCH_SHOW_ELLIPSIS) {
                mMarqueeFadeMode = MARQUEE_FADE_SWITCH_SHOW_FADE;
                final Layout tmp = mLayout;
                mLayout = mSavedMarqueeModeLayout;
                mSavedMarqueeModeLayout = tmp;
                setHorizontalFadingEdgeEnabled(true);
                requestLayout();
                invalidate();
            }

            if (mMarquee == null) mMarquee = new Marquee(this);
            mMarquee.start(mMarqueeRepeatLimit);
        }
    }

     private boolean canMarquee() {
        int width = mRight - mLeft - getCompoundPaddingLeft() - getCompoundPaddingRight();
        return width > 0 && (mLayout.getLineWidth(0) > width
                || (mMarqueeFadeMode != MARQUEE_FADE_NORMAL && mSavedMarqueeModeLayout != null
                        && mSavedMarqueeModeLayout.getLineWidth(0) > width));
    }
二、高端玩傢設置跑馬燈效果
從上面總結的TextView跑馬燈源碼可以看到,隻要isFocusable()或者isSelected()方法返回true,那麼就沒必要管是否觸摸模式,是否可以獲取焦點之類的問題瞭,所以我們可以自定義一個類繼承於TextView,然後重寫isFocusable()直接返回true即可:
public class MarqueeTextView extends TextView {

    public MarqueeTextView(Context context) {
        super(context);
        initView(context);
    }

    public MarqueeTextView(Context context, AttributeSet attrs) {
        super(context, attrs);
        initView(context);
    }

    public MarqueeTextView(Context context, AttributeSet attrs, int defStyleAttr) {
        super(context, attrs, defStyleAttr);
        initView(context);
    }

    private void initView(Context context) {
        this.setEllipsize(TextUtils.TruncateAt.MARQUEE);
        this.setSingleLine(true);
        this.setMarqueeRepeatLimit(-1);
    }

    //最關鍵的部分
    public boolean isFocused() {
        return true;
    }
}
1、直接在Xml中使用自定義的MarqueeTextView,那麼跑馬燈效果就出來瞭,無需任何額外配置
 <com.example.MarqueeTextView
        android:id="@+id/tv"
        android:layout_width="200dp"
        android:layout_height="wrap_content"
        app:layout_constraintLeft_toLeftOf="parent"
        app:layout_constraintRight_toRightOf="parent"
        app:layout_constraintTop_toBottomOf="@id/show_float"
        android:layout_marginTop="20dp"
        android:padding="10dp"
        android:text="歡迎來到跑馬燈高端玩傢局,這是高端玩法示例~"
        android:textColor="@color/white"
        android:background="@drawable/com_live_rounded_rectangle"/>
來看看效果:

三、延伸閱讀
假如有這樣一個需求:因為顯示文本的空間有限,所以隻能用跑馬燈的效果來給用戶展示文本,但是在用戶完整地看完一遍文本之後,需要隱藏掉Textview,那麼問題來瞭,我們怎麼知道跑馬燈效果什麼時候跑完一遍呢?先來看看Textview跑馬燈部分Marquee類的部分源碼:
       void start(int repeatLimit) {
       //重復次數設置0,那就直接停止跑馬燈
            if (repeatLimit == 0) {
                stop();
                return;
            }
           //...省略掉大部分不相關的代碼
                mChoreographer.postFrameCallback(mStartCallback);
            }
        }

      private Choreographer.FrameCallback mStartCallback = new Choreographer.FrameCallback() {
            @Override
            public void doFrame(long frameTimeNanos) {
                mStatus = MARQUEE_RUNNING;
                mLastAnimationMs = mChoreographer.getFrameTime();
                tick();
            }
        };

       void tick() {
            if (mStatus != MARQUEE_RUNNING) {
                return;
            }

            if (textView != null && (textView.isFocused() || textView.isSelected())) {
                long currentMs = mChoreographer.getFrameTime();
                long deltaMs = currentMs - mLastAnimationMs;
                mLastAnimationMs = currentMs;
                float deltaPx = deltaMs * mPixelsPerMs;
                mScroll += deltaPx;
                //要是跑馬燈滾動的距離大於最大距離,那麼回到給mRestartCallback
                if (mScroll > mMaxScroll) {
                    mScroll = mMaxScroll;
                    mChoreographer.postFrameCallbackDelayed(mRestartCallback, MARQUEE_DELAY);
                } else {
                    mChoreographer.postFrameCallback(mTickCallback);
                }
                textView.invalidate();
            }
        }

         private Choreographer.FrameCallback mRestartCallback = new Choreographer.FrameCallback() {
            @Override
            public void doFrame(long frameTimeNanos) {
                if (mStatus == MARQUEE_RUNNING) {
                    if (mRepeatLimit >= 0) {
                        mRepeatLimit--;
                    }
                    start(mRepeatLimit);
                }
            }
        }
從上面對Marquee源碼分析可知,跑馬燈跑完一輪之後會調用到Marquee類 mRestartCallback對象的doFrame方法,那麼我們來一招“偷龍轉鳳”,通過反射把mRestartCallback對象替換成我們自己實例化的對象,那麼在跑馬燈跑完一輪之後就會回調到我們替換的對象中,這樣就實現瞭對跑馬燈效果跑完一輪的監聽,實現源碼如下:
public class MarqueeTextView extends androidx.appcompat.widget.AppCompatTextView {
    private Choreographer.FrameCallback mRealRestartCallbackObj;
    private Choreographer.FrameCallback mFakeRestartCallback;
    private OnShowTextListener mOnShowTextListener;

    public MarqueeTextView(Context context, OnShowTextListener onShowTextListener) {
        super(context);
        initView(context);
        this.mOnShowTextListener = onShowTextListener;

    }

    public MarqueeTextView(Context context, AttributeSet attrs) {
        super(context, attrs);
        initView(context);
    }

    public MarqueeTextView(Context context, AttributeSet attrs, int defStyleAttr) {
        super(context, attrs, defStyleAttr);
        initView(context);
    }


    private void initView(Context context) {
        //繞過隱藏api的限制
        Reflection.unseal(context.getApplicationContext());

        //設置跑馬燈生效條件
        this.setEllipsize(TextUtils.TruncateAt.MARQUEE);
        this.setSingleLine(true);
        this.setFocusable(true);

        //反射設置跑馬燈監聽
        try {
            //從TextView類中找到定義的字段mMarquee
            Field marqueeField = ReflectUtil.getDeclaredField(TextView.class, "mMarquee");
            //獲取Marquee類的構造方法Marquee(TextView v)
            Constructor declaredConstructor = ReflectUtil.getDeclaredConstructor(Class.forName("android.widget.TextView$Marquee"), TextView.class);
            //實例化一個Marquee對象,傳入參數是Textview對象
            Object marqueeObj = declaredConstructor.newInstance(this);
            //從Marquee類中找到定義的字段mRestartCallback,重新開始一輪跑馬燈時候會回調到這個對象doFrame()方法
            Field restartCallbackField = ReflectUtil.getDeclaredField(Class.forName("android.widget.TextView$Marquee"), "mRestartCallback");
            //從Marquee實例對象中獲取到真實的mRestartCallback對象
            mRealRestartCallbackObj = (Choreographer.FrameCallback) restartCallbackField.get(marqueeObj);
            //構造一個假的mRestartCallback對象,用來監聽什麼時候跑完一輪跑馬燈效果
            mFakeRestartCallback = new Choreographer.FrameCallback() {
                @Override
                public void doFrame(long frameTimeNanos) {
                    //這裡還是執行真實的mRestartCallback對象的代碼邏輯
                    mRealRestartCallbackObj.doFrame(frameTimeNanos);
                    Log.i("min77","跑馬燈文本顯示完畢");
                    //回調通知跑完一輪
                    if(MarqueeTextView.this.mOnShowTextListener != null){
                        MarqueeTextView.this.mOnShowTextListener.onComplete(0);
                    }

                }
            };
            //把假的mRestartCallback對象設置給Marquee對象,其實就是代理模式
            restartCallbackField.set(marqueeObj, mFakeRestartCallback);
            //把自己實例化的Marquee對象設置給Textview
            marqueeField.set(this, marqueeObj);


        } catch (Exception e) {
            e.printStackTrace();
            Log.e("min77",e.getMessage());
        }
    }


    //最關鍵的部分
    public boolean isFocused() {
        return true;
    }

    /**
     * 是否顯示完整文本
     */
    public interface OnShowTextListener{
        void onComplete(int delayMillisecond);

    }

}
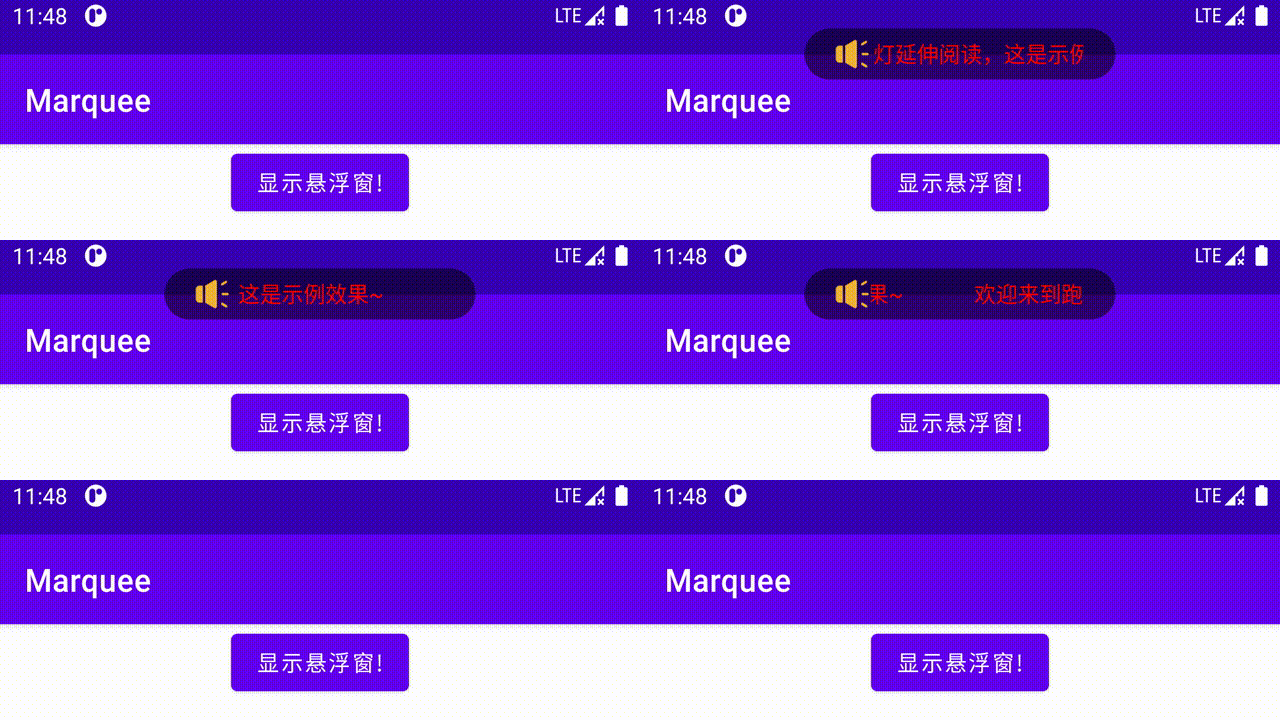
效果如下:

總結
到此這篇關於Android TextView實現跑馬燈效果代碼的文章就介紹到這瞭,更多相關Android TextView跑馬燈效果內容請搜索WalkonNet以前的文章或繼續瀏覽下面的相關文章希望大傢以後多多支持WalkonNet!
推薦閱讀:
- Android文本視圖TextView實現跑馬燈效果
- android跑馬燈出現重復跳動以及不滾動問題的解決方法
- Android實現跑馬燈效果的兩種簡單方式
- Android使用DatePickerDialog顯示時間
- Android中TextView自動適配文本大小的幾種解決方案