python實現pptx批量向PPT中插入圖片
項目背景
實驗結果拍攝瞭一組圖片,數量較大,想要按順序組合排版,比較簡單的方式是在PPT中插入圖片進行排版。但是PPT批量插入圖片後,順序打亂且不顯示圖片名稱,每個圖片單獨調整位置和大小費時費力,於是想到使用工具批量操作。過去瞭解過python自動化辦公模塊,相對來說python也是簡單易用的語言,項目預計不會耗費太大精力,故嘗試學習實踐一番。(非專業學習筆記分享,望各位大佬不吝指導!)
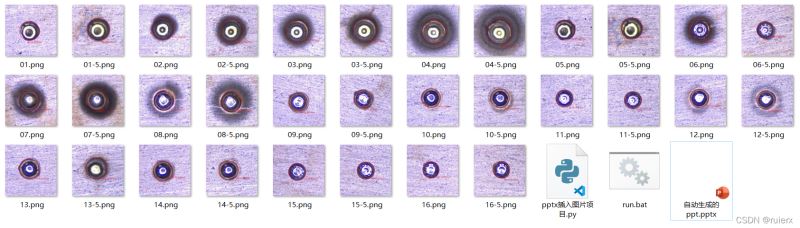
數據為16組實驗,每組實驗重復兩次,共32個圖片,所有圖片為正方形,
命名方式為:
1.png,1-5.png,2.png,2-5.png … … … … 16.png,16-5.png
需嚴格按照順序排列

基礎
安裝
pip install python-pptx
依賴
Python 2.6, 2.7, 3.3, 3.4, or 3.6
lxml
Pillow
XlsxWriter (to use charting features)
基礎操作代碼概覽:
import collections.abc
from pptx import Presentation, util

prs = Presentation() # 實例化一個ppt演示文稿對象

blank_slide_layout = prs.slide_layouts[6] # 實例化空白模板
slide = prs.slides.add_slide(blank_slide_layout) # 向文件中添加空白頁面

img_path = './1.png' # 圖片路徑
# 設置圖片的位置和大小
left = util.Cm(0)
top = util.Cm(0)
width = util.Cm(4)
height = util.Cm(4)
# 在頁面中插入圖片
pic = slide.shapes.add_picture(img_path, left, top, width, height)

prs.save('自動生成的ppt.pptx') # 保存為文件
第一步:建立一個PPT文件
from pptx import Presentation

prs = Presentation()  # 實例化一個ppt演示文稿對象
# 中間補充具體操作添加內容
prs.save('自動生成的ppt.pptx') # 保存為文件
此時踩瞭第一個坑,執行結果報錯:AttributeError: module 'collections' has no attribute 'Container'
原因是python 3.10版本支持問題,此時在開頭多導入一個依賴包collections.abc即可解決。
import collections.abc
第二步:新建頁面
prs.slide_layouts是Presentation對象的默認頁面模板,是一個數組,共11個,可通過循環查看所有默認頁面模板。
prs.slides.add_slide( )方法可向文件中添加模板頁面。默認第7個模板為空白頁面。
n = len(prs.slide_layouts)
print("頁面模板數量:", n)
for i in range(n):
	slide_layout = prs.slide_layouts[i] # 實例化模板頁面
	slide = prs.slides.add_slide(slide_layout) # 向文件中添加模板頁面
單獨添加一個空白頁面僅需如下代碼:
blank_slide_layout = prs.slide_layouts[6] # 實例化空白模板頁面
slide = prs.slides.add_slide(blank_slide_layout) # 向文件中添加空白頁面
第三步:添加圖片
添加圖片可使用如下方法,
pic = slide.shapes.add_picture(img_path, left, top, width, height)
位置和大小屬性默認為英制單位EMU,可轉化為厘米,用如下方法定義:
from pptx import util

img_path = './1.png' # 圖片路徑
left = util.Cm(0)
top = util.Cm(0)
width = util.Cm(4)
height = util.Cm(4)
此時便可得到一個在左上角插入圖片的頁面。
加億點點細節
1. 改變幻燈片頁面大小
默認生成的頁面大小為 4 : 3 大小的頁面畫佈,可通過修改Presentation對象的屬性改變大小,如下:
prs.slide_width = util.Cm(32)
prs.slide_height = util.Cm(18)
2. 根據需要排列圖片位置
# 讀取圖片列表
pic_list = []
for i in listdir():
	if  '.png'  in i:
		pic_list.append(i)
print('圖片列表:\n', pic_list)

# 設置圖片的大小
width = util.Cm(4)
height = util.Cm(4)

for p in pic_list:
	# 圖片路徑
	img_path = './' + p
	# 設置圖片位置
	n = pic_list.index(p)
	if n < 16:
		if  '-'  not  in p:
			top = util.Cm(0)
			left = util.Cm((n - 1) * 2)
		else:
			top = util.Cm(5)
			left = util.Cm(n * 2)
	else:
		if  '-'  not  in p:
			top = util.Cm(10)
			left = util.Cm((n - 17) * 2)
		else:
			top = util.Cm(15)
			left = util.Cm((n - 16) * 2)

# 在頁面中插入圖片
pic = slide.shapes.add_picture(img_path, left, top, width, height)
最終代碼
import collections.abc
from pptx import Presentation, util
from os import listdir

# 實例化一個ppt演示文稿對象
prs = Presentation()
# 調整頁面大小
prs.slide_width = util.Cm(32)
prs.slide_height = util.Cm(19)
# 實例化空白模板
blank_slide_layout = prs.slide_layouts[6]
# 向文件中添加空白頁面
slide = prs.slides.add_slide(blank_slide_layout)

# 讀取圖片列表
pic_list = []
for i in listdir():
	if  '.png'  in i:
		pic_list.append(i)
print('圖片列表:\n', pic_list)

# 設置圖片的大小
width = util.Cm(4)
height = util.Cm(4)

for p in pic_list:
	# 圖片路徑
	img_path = './' + p
	# 設置圖片位置
	n = pic_list.index(p)
	if n < 16:
		if  '-'  not  in p:
			top = util.Cm(0)
			left = util.Cm((n - 1) * 2)
		else:
			top = util.Cm(5)
			left = util.Cm(n * 2)
	else:
		if  '-'  not  in p:
			top = util.Cm(10)
			left = util.Cm((n - 17) * 2)
		else:
			top = util.Cm(15)
			left = util.Cm((n - 16) * 2)
# 在頁面中插入圖片
pic = slide.shapes.add_picture(img_path, left, top, width, height)

# 保存為文件
prs.save('自動生成的ppt.pptx')
項目結果圖

總結
到此這篇關於python實現pptx批量向PPT中插入圖片的文章就介紹到這瞭,更多相關python pptx向PPT插圖片內容請搜索WalkonNet以前的文章或繼續瀏覽下面的相關文章希望大傢以後多多支持WalkonNet!
推薦閱讀:
- Python辦公自動化PPT批量轉換操作
- python自動化辦公操作PPT的實現
- 利用Python自動生成PPT的示例詳解
- python 批量將PPT導出成圖片集的案例
- C# 給PPT中的圖表添加趨勢線的方法