Python基礎之面向對象進階詳解
面向對象三大特征介紹
封裝(隱藏):隱藏對象的屬性和實現細節,知對外提供必要的方法。
繼承:讓子類擁有父類特征,提高瞭代碼的重用性。從設計上是一種增量進化,原有父類設計不變的情況下,可以增加新的功能,或者改進 已有的算法。
多態:一個方法調用由於對象不同會產生不同的行為。
繼承
繼承是代碼復用的一個非常重要的手段,已有的類,我們稱為“父類或者基類”,新的類,我們稱為“子類或者派生類”。

語法格式
Python 支持多重繼承,一個子類可以繼承多個父類。繼承的語法格式如下:
class 子類類名(父類 1[,父類 2,…]):
類體
如果在類定義中沒有指定父類,則默認父類是 object 類。也就是說,object 是所有類的父 類,裡面定義瞭一些所有類共有的默認實現,比如:new()。
定義子類時,必須在其構造函數中調用父類的構造函數。調用格式如下:
父類名.init(self, 參數列表)
# 測試繼承的基本使用
class Person():
    def __init__(self, name, age):
        self.name = name
        self.__age = age #私有屬性
    def print_name(self):
        print(self.name)
class Student(Person):
    def __init__(self, name, age, id):
        Person.__init__(self, name, age)
        self.id = id
stu = Student('sherry',24,'2017')
stu.print_name()
print(Student.mro()) #查看類的繼承層次結構
print(dir(stu))  # 打印所有方法和屬性
print(stu._Person__age) #繼承於父類的私有屬性的訪問
輸出:
sherry
[<class '__main__.Student'>, <class '__main__.Person'>, <class 'object'>]
['_Person__age', '__class__', '__delattr__', '__dict__', '__dir__', '__doc__', '__eq__', '__format__', '__ge__', '__getattribute__', '__gt__', '__hash__', '__init__', '__init_subclass__', '__le__', '__lt__', '__module__', '__ne__', '__new__', '__reduce__', '__reduce_ex__', '__repr__', '__setattr__', '__sizeof__', '__str__', '__subclasshook__', '__weakref__', 'id', 'name', 'print_name']
24
1.類成員的繼承和重寫 成員繼承:子類繼承瞭父類除構造方法之外的所有成員,包括方法,屬性,私有方法,私有屬性,隻不過私有方法和屬性不能直接訪問。
2.方法重寫:子類可以重新定義父類中的方法,這樣就會覆蓋父類的方法,也稱為“重寫”
# 重寫父類方法的測試
class Person():
    def __init__(self, name, age):
        self.name = name
        self.__age = age #私有屬性
    def print_name(self):
        print(self.name)
class Student(Person):
    def __init__(self, name, age, id):
        Person.__init__(self, name, age)
        self.id = id
    def print_name(self):
        '''重寫瞭父類的方法'''
        print('my name is ', self.name)
stu = Student('sherry',24,'2017')
stu.print_name()
輸出:
my name is  sherry
查看類的繼承層次結構
通過類的方法 mro()或者類的屬性__mro__可以輸出這個類的繼承層次結構。
class Person():
    def __init__(self, name, age):
        self.name = name
        self.__age = age #私有屬性
    def print_name(self):
        print(self.name)
class Student(Person):
    def __init__(self, name, age, id):
        Person.__init__(self, name, age)
        self.id = id
    def print_name(self):
        '''重寫瞭父類的方法'''
        print('my name is ', self.name)
# stu = Student('sherry',24,'2017')
print(Student.mro())
輸出:
[<class '__main__.Student'>, <class '__main__.Person'>, <class 'object'>]
object根類
object 類是所有類的父類,因此所有的類都有 object 類的屬性和方法。
dir()查看對象屬性
# 測試繼承的基本使用
class Person():
    def __init__(self, name, age):
        self.name = name
        self.__age = age #私有屬性
    def print_name(self):
        print(self.name)
class Student(Person):
    def __init__(self, name, age, id):
        Person.__init__(self, name, age)
        self.id = id
    def print_name(self):
        '''重寫瞭父類的方法'''
        print('my name is ', self.name)
obj = object()
stu = Student('sherry',24,'2017')
print(dir(obj))
print(dir(stu))
輸出:
['__class__', '__delattr__', '__dir__', '__doc__', '__eq__', '__format__', '__ge__', '__getattribute__', '__gt__', '__hash__', '__init__', '__init_subclass__', '__le__', '__lt__', '__ne__', '__new__', '__reduce__', '__reduce_ex__', '__repr__', '__setattr__', '__sizeof__', '__str__', '__subclasshook__']
['_Person__age', '__class__', '__delattr__', '__dict__', '__dir__', '__doc__', '__eq__', '__format__', '__ge__', '__getattribute__', '__gt__', '__hash__', '__init__', '__init_subclass__', '__le__', '__lt__', '__module__', '__ne__', '__new__', '__reduce__', '__reduce_ex__', '__repr__', '__setattr__', '__sizeof__', '__str__', '__subclasshook__', '__weakref__', 'id', 'name', 'print_name']
str()方法的重寫
object 有一個__str__()方法,用於返回一個對於“對象的描述”,對應於內置函數 str()。經常用於 print()方法,幫助我們查看對象的信息。str()可以重寫。
class Person():
    def __init__(self, name, age):
        self.name = name
        self.__age = age #私有屬性
    def print_name(self):
        print(self.name)
    def __str__(self):
        return 'name:{0} age:{1}'.format(self.name, self.__age)
p = Person('sherry', 24)
print(p)
輸出:
name:sherry age:24
多重繼承
Python 支持多重繼承,一個子類可以有多個“直接父類”。這樣,就具備瞭“多個父 類”的特點。但是由於,這樣會被“類的整體層次”搞的異常復雜,盡量避免使用。(java不支持多重繼承)

class A():
    pass
class B():
    pass
class C(A,B):
    pass
print(C.mro())
輸出:
[<class '__main__.C'>, <class '__main__.A'>, <class '__main__.B'>, <class 'object'>]
MRO()
Python 支持多繼承,如果父類中有相同名字的方法,在子類沒有指定父類名時,解釋器將 “從左向右”按順序搜索。
class A():
    pass
class B():
    pass
class C(A,B):
    pass
print(C.mro())
輸出:
[<class '__main__.C'>, <class '__main__.A'>, <class '__main__.B'>, <class 'object'>]
super()獲得父類定義
在子類中,如果想要獲得父類的方法時,我們可以通過 super()來做。super()獲得父類的定義(不是獲得父類的對象)。
# 測試super()
class A():
    def say(self):
        print('aa')
class B(A):
    def say(self):
        super().say()  #調用父類方法
        A.say(self)		#調用父類方法
        print('bb')
b = B()
b.say()
輸出:
aa
aa
bb
多態
多態(polymorphism)是指同一個方法調用由於對象不同可能會產生不同的行為。
關於多態要註意以下 2 點:
1.多態是方法的多態,屬性沒有多態。
2.多態的存在有 2 個必要條件:繼承、方法重寫。
# 多態
class Man():
    def eat(self):
        print('eat!')
class Chinese(Man):
    def eat(self):
        print('eat with chopsticks')
class English(Man):
    def eat(self):
        print('eat with fork')
class Indian(Man):
    def eat(self):
        print('eat with hand')
def manEat(m):
    if isinstance(m,Man):
        m.eat()
    else:
        print('can not eat!')
manEat(Man())
manEat(Chinese())
manEat(English())
manEat(Indian())
輸出:
eat!
eat with chopsticks
eat with fork
eat with hand
特殊方法和重載運算符
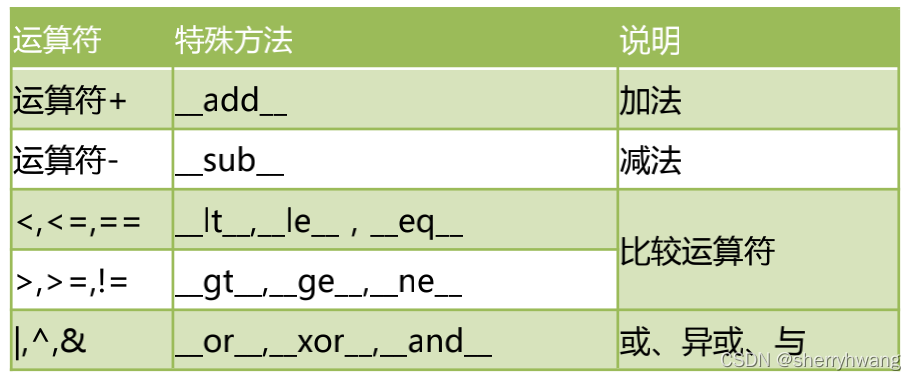
python重的運算符實際上是通過調用對象的特殊方法實現的。
a = 20
b = 30
print(a+b)
print(a.__add__(b))
輸出:
50
50
常見的特殊方法:
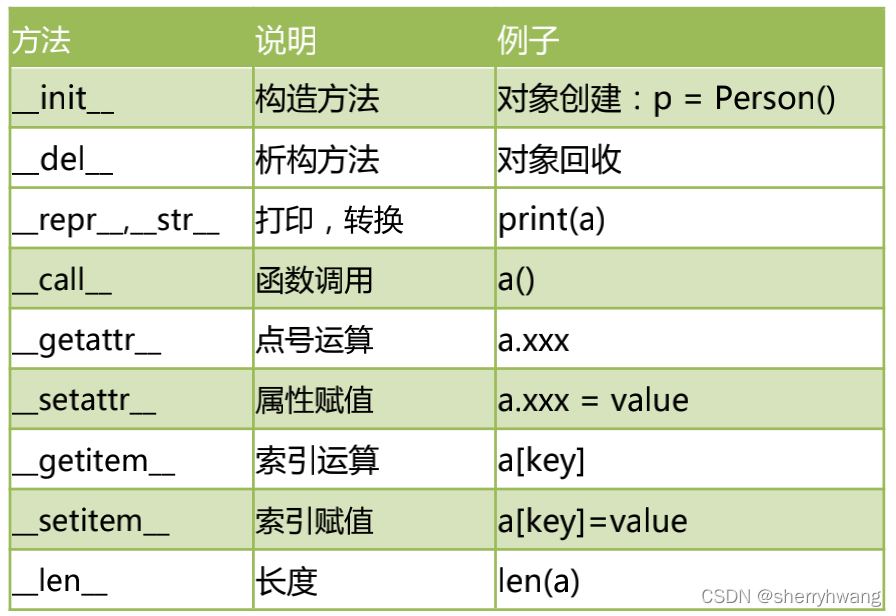
每個運算符實際上都對應瞭相應的方法:

# 測試運算符重載
class Person():
    def __init__(self, name):
        self.name = name
    def __add__(self, other):
        if isinstance(other, Person):
            return '{0}-{1}'.format(self.name, other.name)
    def __mul__(self, other):
        if isinstance(other, int):
            return self.name * other
p1 = Person('Sherry')
p2 = Person('Lily')
print(p1 + p2)
print(p1*10)
輸出:
Sherry-Lily
SherrySherrySherrySherrySherrySherrySherrySherrySherrySherry
特殊屬性
python中包含瞭很多雙下劃線開始和結束的屬性,這些是特殊屬性,有特殊用法。這裡列出常見的特殊屬性:

#測試特殊屬性
class A():
    def say(self):
        print('aa')
class B():
    def say(self):
        print('bb')
class C(B,A):
    def __init__(self,name):
        super().__init__()
        self.name = name
c = C('sherry')
print(c.__dict__) #c對象的屬性列表
print(c.__class__) #c對象的類
print(C.__bases__) #C類的基類
print(C.__mro__)	#C類的繼承關系
print(C.__subclasses__)#C類的子類
輸出:
{'name': 'sherry'}
<class '__main__.C'>
(<class '__main__.B'>, <class '__main__.A'>)
(<class '__main__.C'>, <class '__main__.B'>, <class '__main__.A'>, <class 'object'>)
<built-in method __subclasses__ of type object at 0x7fefdacc8dd0>
對象的淺拷貝和深拷貝
- 變量的賦值操作
隻是形成兩個變量,實際還是指向同一個對象。
- 淺拷貝Python
拷貝一般都是淺拷貝。拷貝時,對象包含的子對象內容不拷貝。因此,源對象 和拷貝對象會引用同一個子對象。
- ·深拷貝使用
使用copy 模塊的 deepcopy 函數,遞歸拷貝對象中包含的子對象。源對象和拷貝對象 所有的子對象也不同。
# 測試淺拷貝和深拷貝
import copy
class MobilePhone():
    def __init__(self, cpu, screen):
        self.cpu = cpu
        self.screen = screen
class CPU():
    def caculate(self):
        print('cpu:\t', self)
class Screen():
    def show(self):
        print('screen:\t',self)
m1 = MobilePhone(CPU(), Screen())
print('測試賦值----')
m0 = m1
print('m1:\t',m1)
m1.cpu.caculate()
m1.screen.show()
print('m0:\t',m0)
m0.cpu.caculate()
m0.screen.show()
print('測試淺復制----')
m2 = copy.copy(m1)
print('m1:\t',m1)
m1.cpu.caculate()
m1.screen.show()
print('m2:\t',m2)
m2.cpu.caculate()
m2.screen.show()
print('測試深復制----')
m3 = copy.deepcopy(m1)
print('m1:\t',m1)
m1.cpu.caculate()
m1.screen.show()
print('m3:\t',m3)
m3.cpu.caculate()
m3.screen.show()
輸出:
測試賦值----
m1:      <__main__.MobilePhone object at 0x7f8b0d6ed190>
cpu:     <__main__.CPU object at 0x7f8b0d6ed130>
screen:  <__main__.Screen object at 0x7f8b0d6ed100>
m0:      <__main__.MobilePhone object at 0x7f8b0d6ed190>
cpu:     <__main__.CPU object at 0x7f8b0d6ed130>
screen:  <__main__.Screen object at 0x7f8b0d6ed100>
測試淺復制----
m1:      <__main__.MobilePhone object at 0x7f8b0d6ed190>
cpu:     <__main__.CPU object at 0x7f8b0d6ed130>
screen:  <__main__.Screen object at 0x7f8b0d6ed100>
m2:      <__main__.MobilePhone object at 0x7f8b0d6a9940>
cpu:     <__main__.CPU object at 0x7f8b0d6ed130>
screen:  <__main__.Screen object at 0x7f8b0d6ed100>
測試深復制----
m1:      <__main__.MobilePhone object at 0x7f8b0d6ed190>
cpu:     <__main__.CPU object at 0x7f8b0d6ed130>
screen:  <__main__.Screen object at 0x7f8b0d6ed100>
m3:      <__main__.MobilePhone object at 0x7f8b0d6ed280>
cpu:     <__main__.CPU object at 0x7f8b0d6ede20>
screen:  <__main__.Screen object at 0x7f8b0d6edd30>
組合
“is-a”關系,我們可以使用“繼承”。從而實現子類擁有的父類的方法和屬性。“is-a” 關系指的是類似這樣的關系:狗是動物,dog is animal。狗類就應該繼承動物類。
“has-a”關系,我們可以使用“組合”,也能實現一個類擁有另一個類的方法和屬性。” has-a”關系指的是這樣的關系:手機擁有 CPU。 MobilePhone has a CPU。
設計模式_工廠模式實現
設計模式是面向對象語言特有的內容,是我們在面臨某一類問題時候固定的做法,設計 模式有很多種,比較流行的是:GOF(Goup Of Four)23 種設計模式。當然,我們沒有 必要全部學習,學習幾個常用的即可。
對於初學者,我們學習兩個最常用的模式:工廠模式和單例模式。
工廠模式實現瞭創建者和調用者的分離,使用專門的工廠類將選擇實現類、創建對象進行統一的管理和控制。
#測試工廠模式
class CarFactory():
    def creatCar(self, brand):
        if brand == '奔馳':
            return Benz()
        elif brand == '寶馬':
            return BMW()
        elif brand == '比亞迪':
            return BYD()
        else:
            print('can not create!')
class Benz():
    pass
class BMW():
    pass
class BYD():
    pass
factory = CarFactory()
c1 = factory.creatCar('奔馳')
c2 = factory.creatCar('寶馬')
c3 = factory.creatCar('比亞迪')
設計模式_單例模式實現
單例模式(Singleton Pattern)的核心作用是確保一個類隻有一個實例,並且提供一個訪問該實例的全局訪問點。
單例模式隻生成一個實例對象,減少瞭對系統資源的開銷。當一個對象的產生需要比較 多的資源,如讀取配置文件、產生其他依賴對象時,可以產生一個“單例對象”,然後永久 駐留內存中,從而極大的降低開銷。
# 測試單例模式
class MySingleton():
    __obj = None
    __init_flag = True
    def __new__(cls, *args, **kwargs):
        if cls.__obj == None:
            cls.__obj = object.__new__(cls)  # __obj對象隻創建一次  obj對象就是Mysingleton對象
        return cls.__obj
    def __init__(self, name):
        if self.__init_flag == True:
            print('init....')
            self.name = name
            self.__init_flag = False
a = MySingleton('aa')
b = MySingleton('bb')
c = MySingleton('cc')
print(a)
print(a.name)
print(b)
print(b.name)
print(c)
print(c.name)
輸出:
init....
<__main__.MySingleton object at 0x7fce0f6e8130>
aa
<__main__.MySingleton object at 0x7fce0f6e8130>
aa
<__main__.MySingleton object at 0x7fce0f6e8130>
aa
工廠模式和單例模式的整合使用
# 測試工廠模式和單例模式的混合使用
class CarFactory():
    __obj = None
    __init_flag = True
    def __new__(cls, *args, **kwargs):
        if cls.__obj == None:
            cls.__obj = object.__new__(cls)
        return cls.__obj
    def __init__(self):
        if self.__init_flag:
            print('init factory')
            self.__init_flag = False

    def creatCar(self, brand):
        if brand == '奔馳':
            return Benz()
        elif brand == '寶馬':
            return BMW()
        elif brand == '比亞迪':
            return BYD()
        else:
            print('can not create!')
class Benz():
    pass
class BMW():
    pass
class BYD():
    pass
factory = CarFactory()
c1 = factory.creatCar('奔馳')
c2 = factory.creatCar('寶馬')
c3 = factory.creatCar('比亞迪')
factory2 = CarFactory()
print(factory)
print(factory2)
輸出:
init factory
<__main__.CarFactory object at 0x7fd286eecc10>
<__main__.CarFactory object at 0x7fd286eecc10>
總結
本篇文章就到這裡瞭,希望能夠給你帶來幫助,也希望您能夠多多關註WalkonNet的更多內容!