解析springBoot-actuator項目構造中health端點工作原理
前言
最近在一個webflux項目中使用spring-boot-actuator提供的健康檢查端點時出瞭點問題,故對spring-boot-actuator的項目構造,工作原理進行瞭全面的梳理,標題之所以寫明health的工作原理,是因為spring-boot-actuator著實是個大工程,除瞭提供health端點,還包含瞭env,log,dump等諸多功能,下面會側重health健康檢查部分,詳細探索下。
actuator功能和集成分離
一般在spring boot中使用actuator的時候,會引入下面這個starter
<dependency>
    <groupId>org.springframework.boot</groupId>
    <artifactId>spring-boot-starter-actuator</artifactId>
</dependency>
在這個starter裡面會包含兩個依賴,一個是功能實現spring-boot-actuator
<dependency>
      <groupId>org.springframework.boot</groupId>
      <artifactId>spring-boot-actuator</artifactId>
      <version>2.1.0.RELEASE</version>
</dependency>
還有一個是和spring boot做集成的config配置,以及Bean自動裝配的依賴,如下:
<dependency>
      <groupId>org.springframework.boot</groupId>
      <artifactId>spring-boot-actuator-autoconfigure</artifactId>
      <version>2.1.0.RELEASE</version>
</dependency>
actuator自動裝載
找到spring-boot-actuator-autoconfigure依賴,定位到org.springframework.boot.actuate.autoconfigure.health包下,有如下的結構:
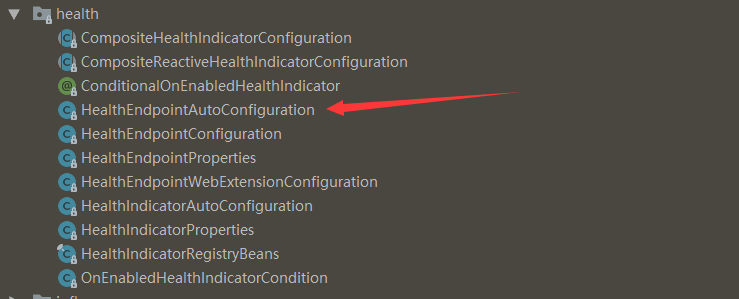
如箭頭所指向的HealthEndpointAutoConfiguration.java自動配置類就是actuator中health的啟動入口,源碼如下:
@Configuration
@EnableConfigurationProperties({ HealthEndpointProperties.class,
      HealthIndicatorProperties.class })
@AutoConfigureAfter(HealthIndicatorAutoConfiguration.class)
@Import({ HealthEndpointConfiguration.class,
      HealthEndpointWebExtensionConfiguration.class })
public class HealthEndpointAutoConfiguration {

}
閱讀上面代碼需要瞭解spring boot自動裝載機制,這裡簡單解讀下,首先@Configuration開啟瞭配置特性,@EnableConfigurationProperties啟用瞭健康檢查端點、健康檢查指示器的屬性配置,@AutoConfigureAfter定義瞭健康檢查自動裝配要在HealthIndicatorAutoConfiguration之後,@Import包含瞭兩個自動裝載類,下面詳解下三個主要的配置類:
健康檢查指示器配置
HEALTHINDICATORAUTOCONFIGURATION
健康檢查指示器定義瞭哪些組件需要被檢測,常見的指示器有JDBC數據源(DataSourceHealthIndicator.java),磁盤健康指示器(DiskSpaceHealthIndicator.java)等。每個指示器對應瞭一個自動裝配的類,根據Bean初始化條件去初始化,如JDBC數據源的初始化條件如下:
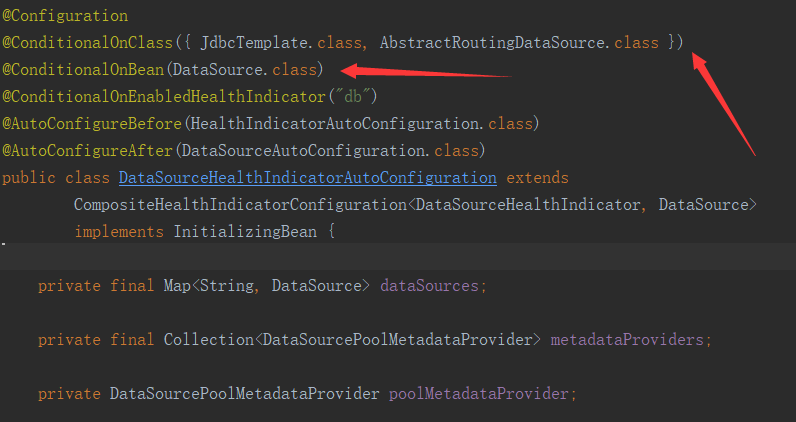
當上Spring上下文中包含DataSource實施,即開啟JDBC健康檢查指示器。這些指示器最終會被收集到指示器註冊器中DefaultHealthIndicatorRegistry.java
健康檢查指示器配置就是完成瞭指示器註冊器的初始化動作,代碼如:
@Bean
	@ConditionalOnMissingBean(HealthIndicatorRegistry.class)
	public HealthIndicatorRegistry healthIndicatorRegistry(
			ApplicationContext applicationContext) {
		return HealthIndicatorRegistryBeans.get(applicationContext);
	}
	public static HealthIndicatorRegistry get(ApplicationContext applicationContext) {
		Map<String, HealthIndicator> indicators = new LinkedHashMap<>();
		indicators.putAll(applicationContext.getBeansOfType(HealthIndicator.class));
		if (ClassUtils.isPresent("reactor.core.publisher.Flux", null)) {
			new ReactiveHealthIndicators().get(applicationContext)
					.forEach(indicators::putIfAbsent);
		}
		HealthIndicatorRegistryFactory factory = new HealthIndicatorRegistryFactory();
		return factory.createHealthIndicatorRegistry(indicators);
	}
可以看到,就是去Spring 應用上下文ApplicationContext中找Bean類型是HealthIndicator.class的實例,如果項目中使用瞭webFlux,會額外註冊Reactive相關的指示器
健康檢查端點配置
端點配置比較簡單,就是實例化一個HealthEndpoint.java,最終健康檢查所有的功能入口都會被抽象匯聚到這個實例裡,配置代碼如下:
@Configuration
@ConditionalOnSingleCandidate(HealthIndicatorRegistry.class)
class HealthEndpointConfiguration {

	@Bean
	@ConditionalOnMissingBean
	@ConditionalOnEnabledEndpoint
	public HealthEndpoint healthEndpoint(HealthAggregator healthAggregator,
			HealthIndicatorRegistry registry) {
		return new HealthEndpoint(
				new CompositeHealthIndicator(healthAggregator, registry));
	}
}
可以看到前提條件是已經有一個健康指示註冊器單例實例瞭
health健康檢查實現
在spring-boot-actuator中,定義瞭@Endpoint註解,用以聲明一個actuator端點,health端點也是一樣,通過@Endpoint(id="health")暴露瞭/actuator/health接口。並通過@ReadOperation註解映射瞭三個方法,如下:
Health health()
訪問http://127.0.0.1:8080/actuator/health時會執行這個方法,調用所有的健康指示器實現,並返回結果
Health healthForComponent(@Selector String component)
訪問http://127.0.0.1:8080/actuator/health/${component}時會執行這個方法,會根據component的值,找到相關的指示器,並檢查返回結果
Health healthForComponentInstance(@Selector String component, @Selector String instance)
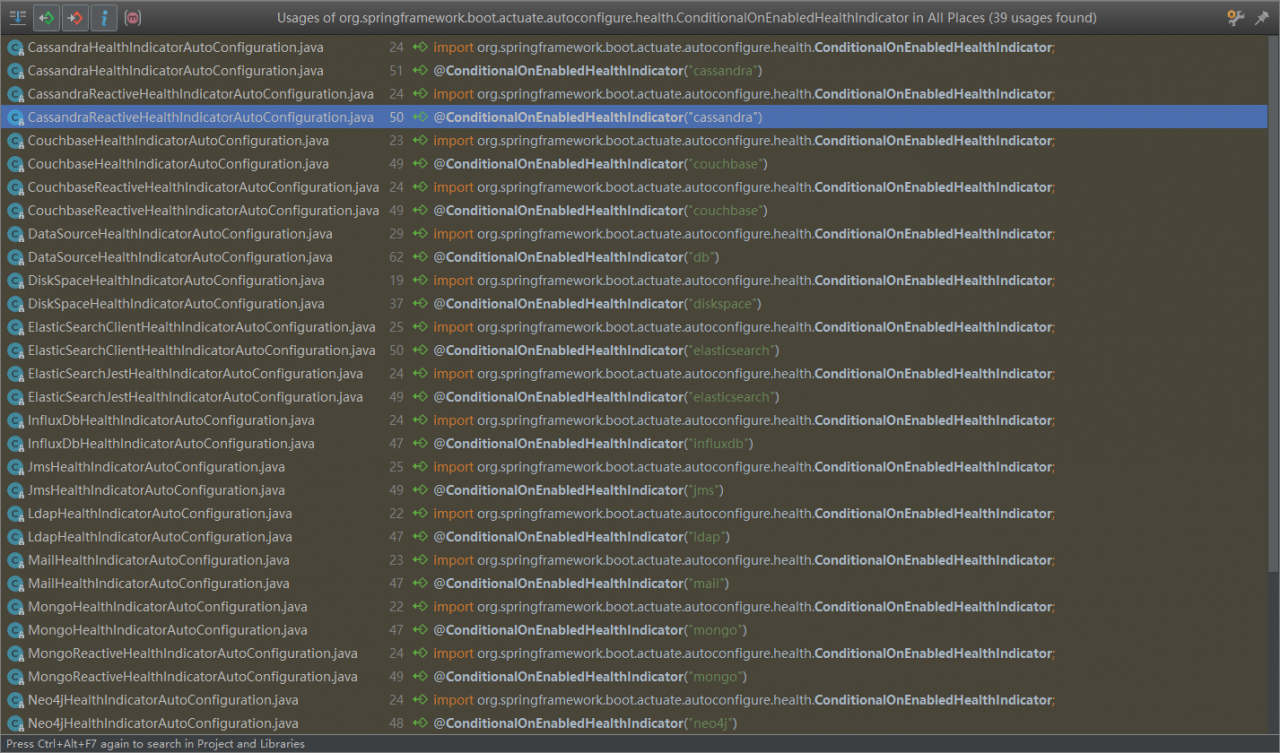
訪問http://127.0.0.1:8080/actuator/health/${component}/${instance}時會執行這個方法,會根據component、instance的值,找到相關的指示器,並檢查返回結果。其中component是組件的name,instance是組件實例的name值。component的name由執行器組件配置類上的註解@ConditionalOnEnabledHealthIndicator來指定,目前包含的指示器組件有如:
我們以redis的指示器RedisHealthIndicator.java來看下,最終指示器是怎麼判斷組件是否健康的,實現如:
public class RedisHealthIndicator extends AbstractHealthIndicator {
	static final String VERSION = "version";
	static final String REDIS_VERSION = "redis_version";
	private final RedisConnectionFactory redisConnectionFactory;
	public RedisHealthIndicator(RedisConnectionFactory connectionFactory) {
		super("Redis health check failed");
		Assert.notNull(connectionFactory, "ConnectionFactory must not be null");
		this.redisConnectionFactory = connectionFactory;
	}
	@Override
	protected void doHealthCheck(Health.Builder builder) throws Exception {
		RedisConnection connection = RedisConnectionUtils
				.getConnection(this.redisConnectionFactory);
		try {
			if (connection instanceof RedisClusterConnection) {
				ClusterInfo clusterInfo = ((RedisClusterConnection) connection)
						.clusterGetClusterInfo();
				builder.up().withDetail("cluster_size", clusterInfo.getClusterSize())
						.withDetail("slots_up", clusterInfo.getSlotsOk())
						.withDetail("slots_fail", clusterInfo.getSlotsFail());
			}
			else {
				Properties info = connection.info();
				builder.up().withDetail(VERSION, info.getProperty(REDIS_VERSION));
			}
		}
		finally {
			RedisConnectionUtils.releaseConnection(connection,
					this.redisConnectionFactory);
		}
	}
}
可以看到,首先判斷瞭連接的類型時集群模式還是單機模式,然後分別調用瞭info指令,去拿redis的版本信息
自定義健康檢查指示器
瞭解到這裡,自定義實現一個組件的健康檢查就容易瞭。首先自定義指示器繼承AbstractHealthIndicator類,實現doHealthCheck方法,然後定義自定義指示器的配置類繼承CompositeHealthIndicatorConfiguration就ok瞭,偽代碼如下:
@ConditionalOnEnabledHealthIndicator("myDb")
@Configuration
public class MyHealthIndicatorAutoConfiguration extends CompositeHealthIndicatorConfiguration<DataSourceHealthIndicator,DataSource> {
    @Bean
    @ConditionalOnMissingBean(name = "myDbHealthIndicator")
    public HealthIndicator dbHealthIndicator() {
        return new MyHealthIndicator();
    }
}
class MyHealthIndicator extends AbstractHealthIndicator{
    @Override
    protected void doHealthCheck(Health.Builder builder) {
        //這裡定義組建健康的邏輯
        builder.up();
    }
}
health其他使用細節
除瞭上面提到的健康檢查不隻/actuator/health端點,還能指定組件檢查外,還提供瞭很多可以通過配置控制的特性,如指示器的開關,什麼時候顯示健康檢查詳情等,具體如下:
management.endpoints.web.base-path=/actuator
management.endpoint.health.enabled=true
management.endpoint.health.show-details=never
management.endpoint.health.roles=admin
management.health.db.enabled=true
文末結語
本著用好每一個組件,不放過任何一個實現細節的原則,對spring-boot-actuator中的health實現原理剖析瞭下。不過actuator真的是個大傢夥,光健康檢查指示器就有18個實現,特別要說明下的是,針對health,在做健康檢查指示器時,會區分web和webFlux。主要原因是在webFlux的環境下,相關的組件也會出Reactive的客戶端,比如redis在webFlux下就可以使用Lettuce。
以上就是解析springBoot-actuator中health端點工作原理的詳細內容,更多關於springBoot-actuator中health原理的資料請關註WalkonNet其它相關文章!
推薦閱讀:
- 一篇文章帶你瞭解Java SpringBoot四大核心組件
- 五分鐘解鎖springboot admin監控新技巧
- springboot Actuator的指標監控可視化功能詳解
- SpringBoot Admin 如何實現Actuator端點可視化監控
- SpringBoot 指標監控actuator的專題