Python簡單實現圖片轉字符畫的實例項目
1. 原理
利用 PIL 庫來獲取圖片並修改大小,
利用灰度值轉換公式把每一個像素的 RGB 值轉為灰度值
gray = int(0.2126*r+0.7152*g+0.0722*b)
再從字符集裡獲取對應的字符
asciis = list('M%$@#&WNBRwm8S5A4E3KXFPH69nsxeazgpqbdoctfhkyvuGZYVTUCI2QOD0L7Jjl1ri!^{}[]()/|;:*<>_~-,. ')
最後將字符連接起來並保存就完成瞭
2. 開始制作
2.1 導入所需的庫
在這個工程中,我們需要的第三方庫是 PIL 庫
但我們不用 pip install PIL 來安裝它,而是使用 pip install pillow
pip install pillow
導入庫
在導入 PIL 庫時,不能用 import pillow,應使用 import PIL
from PIL import Image as Image
2.2 獲取圖片路徑和選項
inputfile = input('inputfile:')
outputfile = input('outputfile:')
distance = {'y':' ','':' ','n':''}
distance = distance[input('distance?(Y/n):')]
re = input("resize?:")
字母占用的位置是矩形的,因此生成出來的字符畫會被“擠壓”。我們可以在字母與字母之間添加空格來防止這種情況的發生。
如果圖片太大瞭,會導致耗費時間過長、亂碼等問題。我們應該對圖片進行必要的縮放。在詢問“resize?”時,可以設置以下幾種回答:
| 回答方式 | 作用 |
|---|---|
| “”,啥也不輸入 | 不縮放 |
| “100”,邊長 | 輸入單個數字時,會按比例縮放為較長邊為此長度的矩形 |
| “100,200”,寬和高 | 縮放為指定寬高的矩形 |
2.3 圖片獲取
使用 PIL 的 open 函數打開圖片
image = Image.open(inputfile)
註意:這裡的 open 函數不要和 python 內置函數 open 混淆
2.4 調整圖片大小
獲取圖片大小
w, h = image.size
獲取變量 re 中存儲的大小信息,並用函數 split 分割
nwh = re.split(',')
for i in range(len(nwh)):
    nwh[i] = int(nwh[i])
調整圖片大小
if len(nwh) == 1:
    #如果項數為1,表示用戶隻輸入瞭一個數字。即按比例縮放為較長邊為此長度的矩形
    ww = int(nwh[0] / max(w,h) * w) #max函數獲取較大值
    hh = int(nwh[0] / max(w,h) * h)
    image = image.resize((ww,hh),Image.ANTIALIAS)
    #改變圖片大小
    #第一個參數放入一個元組,指定寬高
    #第二個參數 Image.ANTIALIAS 表示獲取高質量圖片
else:
    #項數不為1,縮放為指定寬高的矩形
    image = image.resize((nwh[0],nwh[1]),Image.ANTIALIAS)
2.5 轉換字符
指定轉換的字符集
asciis = list('M%$@#&WNBRwm8S5A4E3KXFPH69nsxeazgpqbdoctfhkyvuGZYVTUCI2QOD0L7Jjl1ri!^{}[]()/|;:*<>_~-,. ')
#list函數將字符串轉換為列表
定義轉換字符的函數
def getasc(r,g,b,t=100): #t為透明度
    if t == 0:
        return(' ') #如果是透明的,則直接返回空值
    else:
        asc = ''
        gray = int(0.2126*r+0.7152*g+0.0722*b) #轉灰度值
        asc = asciis[int(len(asciis)/256*(gray))] #獲取字符
        return(asc)
開始轉換字符
for i in range(h):
    for o in range(w): #按行讀取每一個像素的RGB值
        p = image.getpixel((o,i))
        g = getasc(*p) # * 將參數列表轉換為多個項
        txt = txt + g + distance #連接字符
    txt = txt + '\n' #換行
函數 getpixel 獲取指定位置的 RGB 值,它的第一個參數為元組,傳入像素位置 (x,y),如果圖片是 JPG 格式的,它會返回含三項的列表 [r,g,b],如果圖片是 PNG 格式的,它會返回含四項的列表 [r,g,b,t],t 是透明度
2.6 保存文本
使用 python 內置函數 open 保存文件
with open(outputfile,'w') as f: # 'w' 表示寫入
    f.write(txt)
2.7 效果
================== RESTART: D:\Python38-32\Files\ji2a\ji2a.py ==================
=====image to ascii=====
inputfile:
dora.png
outputfile:
dora.txt
distance?(Y/n):
y
resize?(needn’t:”, square:side length, restangle:width,height):
100Opening ‘dora.png’…
Getting…
Saving…
Seccessfully
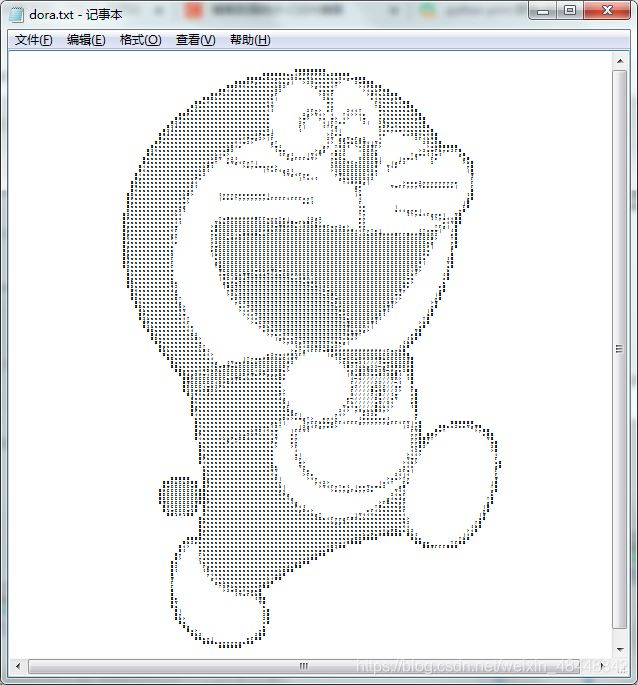
原圖:

結果:
3. 完整代碼
from PIL import Image as Image

asciis = list('M%$@#&WNBRwm8S5A4E3KXFPH69nsxeazgpqbdoctfhkyvuGZYVTUCI2QOD0L7Jjl1ri!^{}[]()/|;:*<>_~-,. ')
#gray = int(0.2126*r+0.7152*g+0.0722*b)

def main():
    global asciis

    print('=====image to ascii=====')

    inputfile, outputfile, distance, re = getargs()

    image = openfile(inputfile)

    image = resize(image,re)
    w, h = image.size

    txt = gettxt(image,w,h,distance)

    savefile(outputfile,txt)

    print('Seccessfully')

def getargs():
    inputfile = input('inputfile:\n')
    outputfile = input('outputfile:\n')
    distance = {'':' ','y':' ','n':''}
    distance = distance[input('distance?(Y/n):\n')]
    re = input("resize?(needn't:'', square:side length, restangle:width,height):\n")

    return(inputfile,outputfile,distance,re)

def openfile(inputfile):
    print("\nOpening '"+inputfile+"'...")
    image = Image.open(inputfile)

    return(image)

def resize(image,re):
    if re != '':
        print('Resizing...')
        nwh = re.split(',')
        for i in range(len(nwh)):nwh[i]=int(nwh[i])
        w, h = image.size

        if len(nwh) == 1:
            ww = int(nwh[0] / max(w,h) * w)
            hh = int(nwh[0] / max(w,h) * h)
            image = image.resize((ww,hh),Image.ANTIALIAS)
        else:
            image = image.resize((nwh[0],nwh[1]),Image.ANTIALIAS)

    return(image)

def gettxt(image,w,h,distance):
    txt = ''
    print('Getting...')

    for i in range(h):
        for o in range(w):
            p = image.getpixel((o,i))
            txt = txt + getasc(*p) + distance
        txt = txt + '\n'

    return(txt)


def getasc(r,g,b,t=100):
    if t == 0:
        return(' ')
    else:
        asc = ''
        gray = int(0.2126*r+0.7152*g+0.0722*b)
        asc = asciis[int(len(asciis)/256*(gray))]
        return(asc)

def savefile(outputfile,txt):
    print('Saving...')

    with open(outputfile,'w') as f:
        f.write(txt)

    return()

if __name__ == '__main__':
    main()
此代碼在 Python3.8 下調試通過
4. 後記
我們的圖片轉字符畫程序完成瞭!
要想將它打造成一個真正的命令行工具,可以加入命令行參數功能,
利用 sys 模塊的 argv 函數獲取命令行參數,
利用 getopt 模塊的 getop 函數解析命令行參數。
到此這篇關於Python簡單實現圖片轉字符畫的實例項目的文章就介紹到這瞭,更多相關Python 圖片轉字符畫內容請搜索WalkonNet以前的文章或繼續瀏覽下面的相關文章希望大傢以後多多支持WalkonNet!
推薦閱讀:
- None Found