深入瞭解vue-router原理並實現一個小demo
插件編寫的基本方法
推薦大傢先看看官方給出的插件使用和開發方法
https://vuejs.bootcss.com/guide/plugins.html
需求分析
我們先看看vue-router的使用步驟
1.use
Vue.use(VueRouter)
註意 :
:
Vue.use()主要是調用插件內部的install方法,並將Vue實例作為參數傳入
2.new 一個router實例
const router = new VueRouter({
  // 實例化router傳入的參數
  mode: 'history',
  base: process.env.BASE_URL,
  routes
})
3.new Vue() ,把實例放在vue的配置項裡面
new Vue({
  router, // 註意router的實例也往裡傳
  render: h => h(App)
}).$mount('#app')
4.使用路由組件<router-view/>、<router-link></router-link>或者在組件中使用this.$router
由此我們看看vue-router內部做瞭什麼?
將$router掛載到全局上實現並聲明瞭兩個組件:<router-view/>、<router-link></router-link>
實現思路
首先我們看看如何將$router掛載到組件上
let Vue; // 保存vue的構造函數,避免打包將其打進去
VueRouter.install = function (_Vue) {
  Vue = _Vue;
  console.log("options", Vue.$options);
  Vue.mixin({
    beforeCreate() {
      console.log("inner", this);
      console.log(" this.$options.router", this.$options.router);
      if (this.$options.router) {
        Vue.prototype.$router = this.$options.router;
      }
    },
  });
  console.log("end");
};
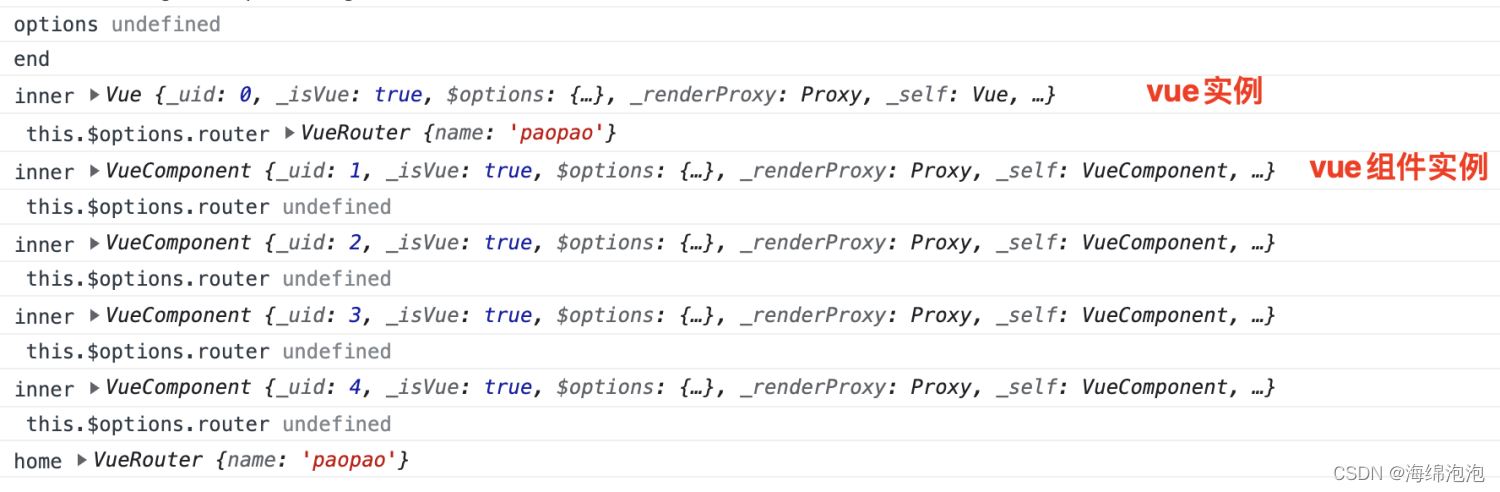
可以看到:
1、第一次執行的時候,即在Vue.use(Router)時,還沒有實例化vue(因為Vue.use()發生在 new Vue()之前),所以Vue.$option本身是拿不到的(ps: option就是new Vue()時傳入的參數,router也往裡面傳),此時既然拿不到router的實例,所以不能直接在install方法裡面掛載;
2、我們可以在use的時候做一個全局混入,在合適的時間點,獲取到Vue根實例配置項中的router實例, 執行掛載。緊接著在new Vue()根實例創建的時候,因為註入瞭router實例,所以再執行全局混入(mixin)中的生命周期時,這個時候根實例的配置項this.$options已經包含瞭router實例,可以此時把router掛載到Vue的原型上。之後所有Vue實例擴展來的VueCompont都可以通過this.$router訪問到這個屬性
如何實現那兩個路由組件
先看看路由組件如何使用
<div id="app">
  <div id="nav">
    <!-- a標簽控制跳轉 -->
    <router-link to="/">Home</router-link> |
    <router-link to="/about">About</router-link>
  </div>
  <!-- 路由出口 -->
  <router-view />
</div>
由上面可以看出,點擊router-link,就相當於點瞭a標簽,然後a標簽的href屬性控制頁面路由發生瞭變化;監聽路由變化,然後仔router-view裡面輸出不同的模板;
先來看看router-link
class VueRouter {
  constructor(options) {
    // 接受傳入的參數
    this.$options = options;
    const initial = "/";
    // 將current變成響應式數據,
    //這樣在hashchange的回掉中修改curent時,
    //用到current的router-view的render函數就會重新渲染
    Vue.util.defineReactive(this, "current", initial);
    // 監聽路由變化
    window.addEventListener("hashchange", () => {
      // 獲取當前url中的hash
      this.current = window.location.hash.slice(1);
    });
  }
}

VueRouter.install = function (_Vue) {
  Vue = _Vue;
  Vue.component("router-view", {
    render(h) {
      // 獲取當前路由所對應的組件,然後把它渲染出來
      const { current, $options } = this.$router;
      // 這裡要註意 我們傳進來的routes是一個路由表,如下圖一
      // 所以這裡我們是找出匹配到當前current路由的項,然後直接渲染組件
      const route = $options.routes.find((item) => {
        return item.path === current;
      });
      let component = route ? route.component : null;

      return h(component);
    },
  });
}
再來看看router-view
class VueRouter {
  constructor(options) {
    // 接受傳入的參數
    this.$options = options;
    const initial = "/";
    // 將current變成響應式數據,
    //這樣在hashchange的回掉中修改curent時,
    //用到current的router-view的render函數就會重新渲染
    Vue.util.defineReactive(this, "current", initial);
    // 監聽路由變化
    window.addEventListener("hashchange", () => {
      // 獲取當前url中的hash
      this.current = window.location.hash.slice(1);
    });
  }
}

VueRouter.install = function (_Vue) {
  Vue = _Vue;
  Vue.component("router-view", {
    render(h) {
      // 獲取當前路由所對應的組件,然後把它渲染出來
      const { current, $options } = this.$router;
      // 這裡要註意 我們傳進來的routes是一個路由表,如下圖一
      // 所以這裡我們是找出匹配到當前current路由的項,然後直接渲染組件
      const route = $options.routes.find((item) => {
        return item.path === current;
      });
      let component = route ? route.component : null;

      return h(component);
    },
  });
}
圖一

完整demo代碼
// 我們要實現什麼
// 1、插件
// 2、兩個組件

// 保存vue的構造函數,避免打包將其打進去
let Vue;
class VueRouter {
  constructor(options) {
    this.$options = options;
    const initial = "/";
    Vue.util.defineReactive(this, "current", initial);
    this.current = "/";
    window.addEventListener("hashchange", () => {
      // 獲取當前url中的hash
      this.current = window.location.hash.slice(1);
    });
  }
}

// 參數1在Vue.use()調用時傳進來,
VueRouter.install = function (_Vue) {
  Vue = _Vue;
  console.log("options", this);

  // 全局混入
  // 目的:延遲下面的邏輯 到 router創建完畢並且附加到選項上時才執行
  Vue.mixin({
    // 在每個組件創建實例時都會執行
    beforeCreate() {
      // this.$options.router ;即new Vue時放進去的router實例
      if (this.$options.router) {
        Vue.prototype.$router = this.$options.router;
      }
    },
  });

  // 註冊並且實現兩個組件
  Vue.component("router-link", {
    props: {
      to: {
        required: true,
      },
    },
    render(h) {
      return h(
        "a",
        {
          attrs: { href: "#" + this.to },
        },
        this.$slots.default
      );
    },
  });
  Vue.component("router-view", {
    render(h) {
      // 獲取當前路由所對應的組件,然後把它渲染出來
      const { current, $options } = this.$router;
      const route = $options.routes.find((item) => {
        return item.path === current;
      });
      let component = route ? route.component : null;

      return h(component);
    },
  });
};

export default VueRouter;
總結
本篇文章就到這裡瞭,希望能夠給你帶來幫助,也希望您能夠多多關註WalkonNet的更多內容!
推薦閱讀:
- vue-route路由管理的安裝與配置方法
- Vue路由router詳解
- vuejs路由的傳參及路由props配置詳解
- vue3配置router路由並實現頁面跳轉功能
- vue項目中路由跳轉頁面不變問題及解決