ELK收集Nginx日志的項目實戰
01 安裝 Nginx 和 ab 工具
1.1 安裝 nginx
sudo apt-get install nginx -y # 安裝Nginx
sudo apt-get install apache2-utils -y  # Ubuntu安裝ab工具
sudo yum -y install httpd-tools 0y # CentOS安裝ab工具
在線安裝完成後,Nginx主要文件目錄構成如下
/etc/nginx  # 配置文件
/etc/nginx/sites-available # 虛擬主機
/usr/sbin/nginx # 啟動程序文件
/var/log/nginx # 日志目錄,包含access.log和error.log
1.2 啟動 Nginx 並測試
啟動Nginx,並使用netstat命令查看端口
systemctl start nginx # 啟動nginx
netstat -lntup|grep nginx # 查看nginx是否啟動成功
使用壓力測試工具測試Nginx,其中-c選項表示並發請求結果數,-n選項表示請求次數。下面命令表示進行100次請求,10個並發請求壓力測試結果。另外,ab壓測工具的一個缺陷是需要在壓測URL後加上/符號。
ab -c 10 -n 100 172.16.255.131/
ab -c 10 -n 100 172.16.255.131/test.html/
壓力測試完成之後,查看Nginx日志可以得到如下結果
root@master:/etc/nginx# tail -f /var/log/nginx/access.log
172.16.255.131 - - [28/Jul/2021:07:19:53 +0000] "GET / HTTP/1.0" 200 612 "-" "ApacheBench/2.3"
172.16.255.131 - - [28/Jul/2021:07:19:53 +0000] "GET / HTTP/1.0" 200 612 "-" "ApacheBench/2.3"
172.16.255.131 - - [28/Jul/2021:07:19:53 +0000] "GET / HTTP/1.0" 200 612 "-" "ApacheBench/2.3"
172.16.255.131 - - [28/Jul/2021:07:19:53 +0000] "GET / HTTP/1.0" 200 612 "-" "ApacheBench/2.3"
172.16.255.131 - - [28/Jul/2021:07:19:53 +0000] "GET / HTTP/1.0" 200 612 "-" "ApacheBench/2.3"
172.16.255.131 - - [28/Jul/2021:07:19:53 +0000] "GET / HTTP/1.0" 200 612 "-" "ApacheBench/2.3"
172.16.255.131 - - [28/Jul/2021:07:19:53 +0000] "GET / HTTP/1.0" 200 612 "-" "ApacheBench/2.3"
172.16.255.131 - - [28/Jul/2021:07:19:53 +0000] "GET / HTTP/1.0" 200 612 "-" "ApacheBench/2.3"
172.16.255.131 - - [28/Jul/2021:07:19:53 +0000] "GET / HTTP/1.0" 200 612 "-" "ApacheBench/2.3"
172.16.255.131 - - [28/Jul/2021:07:19:53 +0000] "GET / HTTP/1.0" 200 612 "-" "ApacheBench/2.3"
02 使用 Filebeat 采集日志並展示
2.1 配置 filebeat 采集 Nginx 日志
在/etc/filebeat/filebeat.yml配置文件中對filebeat進行配置,將nginx的日志路徑/var/log/nginx/access.log添加到filebeat的輸入配置中
vim /etc/filebeat/filebeat.yml # 打開filebeat配置文件
# 采集日志數據配置
filebeat.inputs:
- type: log
  enabled: true
  paths:
    - /var/log/nginx/access.log
2.2 使用 Kibana 展示 Nginx 日志數據
采集日志數據
配置好filebeat采集Nginx日志數據之後,在ES-head中可以看到如下日志內容

創建日志數據索引
然後在服務器啟動kibana並使用瀏覽器訪問http://115.156.128.172:5601/進入kibana。在該頁面中選擇添加數據Add your data

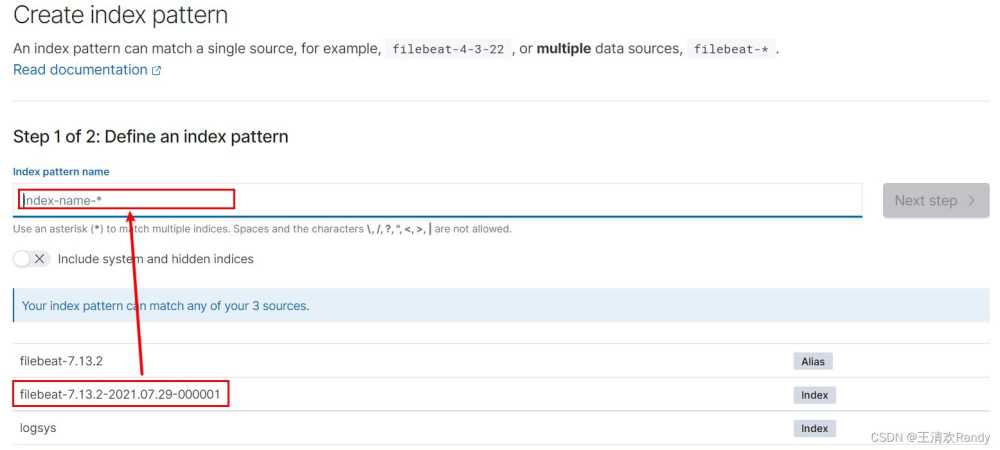
然後,選擇創建索引create index pattern

在提示欄中,選擇對應filebeat采集的日志數據創建索引,並選擇時間戳@timestamp

查看日志數據
完成索引創建之後,使用Discovery查看日志數據

在日志數據通過設置日志范圍和日志字段查看指定日志內容,也可以通過全文搜索和添加過濾器的功能查看指定數據

03 采集 JSON 格式的 Nginx 日志
默認情況下Nginx的日志數據是一條文本條目,日志條目中的字段無法拆分顯示。采用怎樣的方式可以將這種非結構化的日志內容轉化成格式化的內容呢?
# 將如下日志條目
message:172.16.255.131 - - [28/Jul/2021:07:19:53 +0000] "GET / HTTP/1.0" 200 612 "-" "ApacheBench/2.3"
# 轉換成JSON半結構化數據如下
{   "IP Address": 172.16.255.131,
    "Time": [28/Jul/2021:07:19:53 +0000],
    "HTTP Request": GET / HTTP/1.0 200 612,
    "Agent": ApacheBench/2.3 }
3.1 修改 Nginx 日志為 Json 格式
一種方法是直接將Nginx產生的日志采用Json格式保存,編輯Nginx的配置文件/etc/nginx/nginx.conf,添加日志保存樣式
vim /etc/nginx/nginx.conf # 找到http中的logging settings
# 添加如下內容
log_format log_json '{ "@time_local": "$time_local", '
                                    '"remote_addr": "$remote_addr", '
                                    '"referer": "$http_referer", '
                                    '"request": "$request", '
                                    '"status": $status, '
                                    '"bytes": $body_bytes_sent, '
                                    '"agent": "$http_user_agent", '
                                    '"x_forwarded": "$http_x_forwarded_for", '
                                    '"up_addr": "$upstream_addr",'
                                    '"up_host": "$upstream_http_host",'
                                    '"up_resp_time": "$upstream_response_time",'
                                    '"request_time": "$request_time"'
' }';

測試nginx配置文件修改是否有效,得到如下輸出說明成功
root@master:/home/wang# nginx -t
nginx: the configuration file /etc/nginx/nginx.conf syntax is ok
nginx: configuration file /etc/nginx/nginx.conf test is successful
清空Nginx原有的日志數據,重新啟動Nginx並使用ab工具重新對其進行壓測,產生新的日志數據
> /var/log/nginx/access.log # 清空Nginx原有的日志數據
systemctl restart nginx # 重新啟動Nginx
ab -c 10 -n 100 172.16.255.131/ # 使用ab工具重新進行壓測
查看Nginx日志,可以看到Nginx日志已經被重新以Json格式存儲
root@master:/home/wang# tail -f /var/log/nginx/access.log
{ "@timestamp": "30/Jul/2021:03:17:09 +0000", "remote_addr": "172.16.255.131", "referer": "-", "request": "GET / HTTP/1.0", "status": 200, "bytes": 612, "agent": "ApacheBench/2.3", "x_forwarded": "-", "up_addr": "-","up_host": "-","up_resp_time": "-","request_time": "0.000" }
{ "@timestamp": "30/Jul/2021:03:17:09 +0000", "remote_addr": "172.16.255.131", "referer": "-", "request": "GET / HTTP/1.0", "status": 200, "bytes": 612, "agent": "ApacheBench/2.3", "x_forwarded": "-", "up_addr": "-","up_host": "-","up_resp_time": "-","request_time": "0.000" }
{ "@timestamp": "30/Jul/2021:03:17:09 +0000", "remote_addr": "172.16.255.131", "referer": "-", "request": "GET / HTTP/1.0", "status": 200, "bytes": 612, "agent": "ApacheBench/2.3", "x_forwarded": "-", "up_addr": "-","up_host": "-","up_resp_time": "-","request_time": "0.000" }
{ "@timestamp": "30/Jul/2021:03:17:09 +0000", "remote_addr": "172.16.255.131", "referer": "-", "request": "GET / HTTP/1.0", "status": 200, "bytes": 612, "agent": "ApacheBench/2.3", "x_forwarded": "-", "up_addr": "-","up_host": "-","up_resp_time": "-","request_time": "0.000" }
{ "@timestamp": "30/Jul/2021:03:17:09 +0000", "remote_addr": "172.16.255.131", "referer": "-", "request": "GET / HTTP/1.0", "status": 200, "bytes": 612, "agent": "ApacheBench/2.3", "x_forwarded": "-", "up_addr": "-","up_host": "-","up_resp_time": "-","request_time": "0.000" }
{ "@timestamp": "30/Jul/2021:03:17:09 +0000", "remote_addr": "172.16.255.131", "referer": "-", "request": "GET / HTTP/1.0", "status": 200, "bytes": 612, "agent": "ApacheBench/2.3", "x_forwarded": "-", "up_addr": "-","up_host": "-","up_resp_time": "-","request_time": "0.000" }
{ "@timestamp": "30/Jul/2021:03:17:09 +0000", "remote_addr": "172.16.255.131", "referer": "-", "request": "GET / HTTP/1.0", "status": 200, "bytes": 612, "agent": "ApacheBench/2.3", "x_forwarded": "-", "up_addr": "-","up_host": "-","up_resp_time": "-","request_time": "0.000" }
{ "@timestamp": "30/Jul/2021:03:17:09 +0000", "remote_addr": "172.16.255.131", "referer": "-", "request": "GET / HTTP/1.0", "status": 200, "bytes": 612, "agent": "ApacheBench/2.3", "x_forwarded": "-", "up_addr": "-","up_host": "-","up_resp_time": "-","request_time": "0.000" }
{ "@timestamp": "30/Jul/2021:03:17:09 +0000", "remote_addr": "172.16.255.131", "referer": "-", "request": "GET / HTTP/1.0", "status": 200, "bytes": 612, "agent": "ApacheBench/2.3", "x_forwarded": "-", "up_addr": "-","up_host": "-","up_resp_time": "-","request_time": "0.000" }
{ "@timestamp": "30/Jul/2021:03:17:09 +0000", "remote_addr": "172.16.255.131", "referer": "-", "request": "GET / HTTP/1.0", "status": 200, "bytes": 612, "agent": "ApacheBench/2.3", "x_forwarded": "-", "up_addr": "-","up_host": "-","up_resp_time": "-","request_time": "0.000" }
3.2 Filebeat 重新采集 Nginx 日志
配置Filebeat識別Json格式日志
修改Nginx保存日志格式為Json之後,還需要對采集日志的Filebeat進行重新配置,如果不對其進行配置識別Json格式日志,被采集的日志仍然會以文本條目的形式被采集。
# 打開filebeat配置文件
vim /etc/filebeat/filebeat.yml
# 添加配置內容,配置內容可以參考官方手冊
- type: log
      # Change to true to enable this input configuration.
      enabled: true
      # Paths that should be crawled and fetched. Glob based paths.
      paths:
          - /var/log/nginx/access.log
      # 添加如下三行配置內容,識別Json格式日志文件,將日志條目以Json格式解析
      json.keys_under_root: true
      json.overwrite_keys: true
      tags: ["access"]
清空Nginx日志,並重新啟動filebeat;filebeat監控Nginx日志後,采用ab壓測工具生成日志並采集。
> /var/log/nginx/access.log
systemctl restart filebeat
ab -c 10 -n 100 172.16.255.131/
采用ES-head查看采集的日志數據可以看到日志數據以Json格式保存在ES中

使用Kibana查看Json格式的日志條目
創建新的Kibana索引後,使用Discovery查看日志數據,並可以通過日志條目級的字段到達更有效的日志分析目的

3.3 自定義存儲 Filebeat 采集日志的 ES 索引
之前使用Filebeat采集Nginx日志都是采用默認的索引創建方式形如filebeat-7.13.2-2021.07.30-000001,為瞭更好的識別索引和擴大日志采集的時間跨度,需要自定義存儲索引名稱。
自定義存儲索引通過配置Filebeat實現,在Filebeat的配置文件中對輸出進行配置如下:
# 打開filebeat配置文件
vim /etc/filebeat/filebeat.yml
# 添加配置內容,配置內容可以參考官方手冊
# ---------------------------- Elasticsearch template setting ----------------------
setup.template.settings:
  index.number_of_shards: 1
  #index.codec: best_compression
  #_source.enabled: false
setup.template.name: "nginx" # 名字和index中的名字一致
setup.template.pattern: "nginx-*"
setup.template.enabled: false
setup.template.overwrite: true
setup.ilm.enabled: false
# ---------------------------- Elasticsearch Output ----------------------------
output.elasticsearch:
  # Array of hosts to connect to.
  hosts: ["172.16.255.131:9200"]
  # 添加如下五行內容
  # add index settings by wanghaihua at 2021.07.30
  index: "nginx-%{[agent.version]}-%{+yyyy.MM}"  # 限定日期形式{+yyyy.MM}
采用這種配置可以自定義索引樣式,並自定義Kibana中搜索的字段,刪除冗餘的解析字段

04 使用 Filebeat 多節點采集 Nginx 日志數據
4.1 在其他節點上安裝 Filebeat 和 Nginx
從已經安裝好的節點上將filebeat安裝包拷貝到其他節點上
# 拷貝安裝包
scp filebeat-7.13.2-amd64.deb wang@172.16.255.132:/opt/es/
scp filebeat-7.13.2-amd64.deb wang@172.16.255.139:/opt/es/
# 在其他節點上安裝filebeat
cd /opt/es/
sudo dpkg -i filebeat-7.13.2-amd64.deb # 安裝deb包
# 安裝Nginx
sudo apt-get install nginx -y
4.2 在其他節點上配置 Filebeat 和 Nginx
從已經安裝好的節點上將filebeat的配置文件拷貝到其他節點上
# 拷貝filebeat配置文件到一個暫存目錄(直接拷貝到etc目錄下可能存在權限問題)
scp /etc/filebeat/filebeat.yml wang@172.16.255.132:/opt/es/
scp /etc/filebeat/filebeat.yml wang@172.16.255.139:/opt/es/
scp /etc/nginx/nginx.conf wang@172.16.255.132:/opt/es/
scp /etc/nginx/nginx.conf wang@172.16.255.139:/opt/es/
# 在對應節點上將配置文件移動到對應目錄覆蓋原始配置文件
mv /opt/es/filebeat.yml /etc/filebeat/
mv /opt/es/nginx.conf /etc/nginx/
# 修改用戶權限
chown -R root:root /etc/nginx/nginx.conf
chown -R root:root /etc/filebeat/filebeat.yml
4.3 在其他節點上啟動 Filebeat 和 Nginx
啟動Filebeat和Nginx並使用master節點的ab工具進行壓測產生日志數據
# 啟動Filebeat和Nginx
systemctl start nginx
systemctl start filebeat
# 使用master節點的ab工具進行壓測產生日志數據
ab -n 100 -c 20 http://172.16.255.132/node1.html
ab -n 100 -c 20 http://172.16.255.139/node2.html
# 查看產生的日志數據是否為Json格式
tail -f /var/log/nginx/access.log
Filebeat的配置文件將日志數據采集並存儲在ES中,多個節點的日志數據被聚合在一個ES索引中保存。
05 收集 Nginx 錯誤日志
收集錯誤日志的需求:要能夠區分錯誤日志和正常日志,要能夠是使用單獨索引存儲錯誤日志
5.1 配置 Filebeat 采集 Nginx 錯誤日志
在filebeat配置文件etc/filebeat/filebeat.yml的inputs選項中添加如下內容
- type: log
  enabled: true
  paths:
    - /var/log/nginx/error.log
  tags: ["error"]
5.2 配置 Filebeat 采集日志時拆分錯誤日志和正常日志
在filebeat配置文件etc/filebeat/filebeat.yml的輸入中加入tags標識采集的不同類型日志數據,然後在索引設置中配置如下對日志進行拆分
# 在`output`中配置通過tags區分日志
output.elasticsearch:
  hosts: ["172.16.255.131:9200"]
  indices:
      - index: "nginx-access-%{[agent.version]}-%{+yyyy.MM}"
        when.contains:
            tags: "access"
      - index: "nginx-error-%{[agent.version]}-%{+yyyy.MM}"
        when.contains:
            tags: "error"
讓其他節點上采集Nginx日志的Filebeat的配置文件於上述配置一致,直接將該filebeat的配置文件拷貝到其他節點上覆蓋
# 拷貝filebeat配置文件到一個暫存目錄(直接拷貝到etc目錄下可能存在權限問題)
scp /etc/filebeat/filebeat.yml wang@172.16.255.132:/opt/es/
scp /etc/filebeat/filebeat.yml wang@172.16.255.139:/opt/es/
# 在對應節點上將配置文件移動到對應目錄覆蓋原始配置文件
mv /opt/es/filebeat.yml /etc/filebeat/
# 修改用戶權限
chown -R root:root /etc/filebeat/filebeat.yml
06 Filebeat 采集 Nginx 日志的最終配置文件
# ============================== Filebeat inputs ===============================
filebeat.inputs:
- type: log
  enabled: true
  paths:
    - /var/log/nginx/access.log
  json.keys_under_root: true
  json.overwrite_keys: true
  tags: ["access"]

- type: log
  enabled: true
  paths:
    - /var/log/nginx/error.log
  tags: ["error"]
# ======================= Elasticsearch template setting =======================
setup.template.settings:
  index.number_of_shards: 1
setup.template.name: "nginx"
setup.template.pattern: "nginx-*"
setup.template.enabled: false
setup.template.overwrite: true
setup.ilm.enabled: false
# ================================== Outputs ===========================
# ---------------------------- Elasticsearch Output ----------------------------
output.elasticsearch:
  hosts: ["172.16.255.131:9200"]
  indices:
      - index: "nginx-access-%{[agent.version]}-%{+yyyy.MM}"
        when.contains:
            tags: "access"
      - index: "nginx-error-%{[agent.version]}-%{+yyyy.MM}"
        when.contains:
            tags: "error"
# ================================== Logging ===================================
logging.level: info
logging.to_files: true
logging.files:
    path: /var/log/filebeat
    name: filebeat
    keepfiles: 7
    permissions: 0644
到此這篇關於ELK收集Nginx日志的項目實戰的文章就介紹到這瞭,更多相關ELK Nginx日志內容請搜索LevelAH以前的文章或繼續瀏覽下面的相關文章希望大傢以後多多支持LevelAH!
推薦閱讀:
- Nginx如何獲取自定義請求header頭和URL參數詳解
- 聊聊配置 Nginx 訪問與錯誤日志的問題
- ELK收集Tomcat日志的實現
- nginx配置多個前端項目實現步驟
- 記錄一次nginx啟動失敗的解決過程