iOS UITextView 實現類似微博的話題、提及用戶效果
最近接瞭一個需求,在發佈動態的時候,增加類似微博的#話題#、@提及用戶的效果,在此做一簡要記錄。
#話題#
最終效果是:
- 編輯過程中
#話題內容#實時高亮

- 高亮部分可以響應點擊事件

1.高亮
基本思路是:使用正則匹配出成對的#,再利用UITextView的富文本實現高亮效果。
func refreshTopicStyle() {

        let regex = try! NSRegularExpression(pattern: "此處填寫正則表達式",
                                             options:[NSRegularExpression.Options.caseInsensitive])
        // 註意點
        let totalRange = NSMakeRange(0, (inputTextView.attributedText.string as NSString).length)
        let results = regex.matches(in: inputTextView.attributedText.string,
                                    options: NSRegularExpression.MatchingOptions.init(rawValue: 0),
                                    range: totalRange)
        let attributedString: NSMutableAttributedString = NSMutableAttributedString(string: inputTextView.attributedText.string)
        attributedString.setAttributes(normalAttributes, range: totalRange)

        for result in results {
            attributedString.setAttributes(topicAttributes, range: result.range)
        }
        inputTextView.attributedText = attributedString
    }
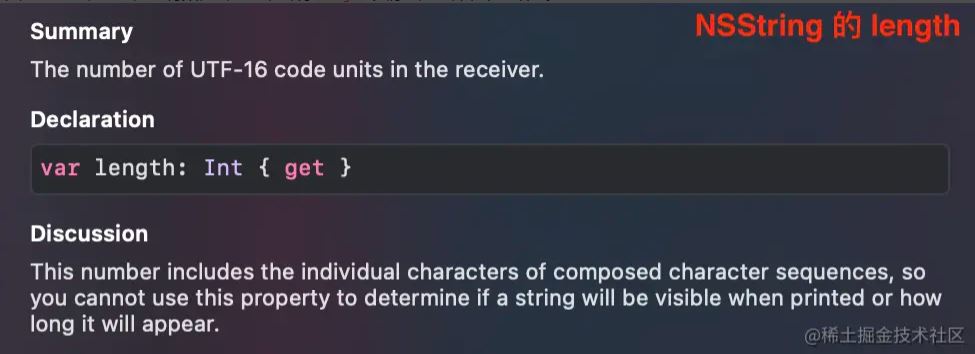
這有一個註意點,計算 totalRange 前,先將 String 轉成瞭 NSString,這是因為此處 NSRange 中的 length 需要的是 UTF-16 長度,也就是與 NSString 的 length 定義一致,而 Swift 中的 String 沒有 length 隻有 count,指的是字符數,當文本中出現 emoji 表情時,二者就不一致瞭。


當然,也有一些其他辦法來處理,如:
let lengthA = inputTextView.textStorage.length
let lengthB = inputTextView.attributedText.string.utf16.count
2.點擊事件
實現高亮部分的點擊事件,目前有3種實現方案:
- 直接給
UITextView添加點擊事件 - 通過設置
LinkAttribute,利用超文本鏈接的點擊實現 - 重寫
UITextView的touches...方法
其中,第二種隻限於在非編輯狀態(即 textView.isEditable = false)下的點擊,故排除,①、③均可,本文采用第一種,主要實現如下:
inputTextView.addTapGesture(self, handler: #selector(tapAttributedText(tap:)))
@objc private func tapAttributedText(tap: UITapGestureRecognizer) {
    guard tap.isKind(of: UITapGestureRecognizer.self), let textView = tap.view as? UITextView else {
        return
    }
    let layoutManager = textView.layoutManager
    var tapLocation = tap.location(in: textView)
    tapLocation.x -= textView.textContainerInset.left
    tapLocation.y -= textView.textContainerInset.top
    let characterIndex = layoutManager.characterIndex(for: tapLocation,
                                                      in: textView.textContainer,
                                                      fractionOfDistanceBetweenInsertionPoints: nil)
    for result in getCheckResult(format: Constants.TopicRegularExpression, text: inputTextView.attributedText.string) {
        if result.range.location < characterIndex, characterIndex < result.range.location + result.range.length {
            // 此處響應點擊事件
            MBProgressHUD.showOnlyText(to: self.view, title: "美好時光")
            return
        }
    }
    inputTextView.becomeFirstResponder()
}
@提及用戶
- 編輯過程中
@提及用戶實時高亮,且隻允許選取的用戶名高亮,手動輸入不高亮;

- 點擊刪除鍵的時候,一次性刪除整個高亮部分

1.高亮
- 記錄位置
本來準備用正則匹配的,但因為隻允許選取的用戶名高亮,純手動輸入的不高亮,所以使用正則匹配就不合理瞭,這裡采用實時記錄、更新已選取用戶名位置的方式實現。
/// 用來保存已選取用戶信息的結構體
struct UserInfo {
    /// 用戶名
    var userName: String
    /// 位置信息
    var range: NSRange
    /// 用於臨時替換的等長字符串
    var placeholder: String
}
- 臨時替換
因為#話題#和@提及用戶可以同時存在,所以需要考慮可能互相影響的問題,比如@提及用戶中間可能出現#,導致前後話題的正則匹配發生錯亂。
解決方案是:先使用一個@開頭且與@提及用戶等長的字符串替換@提及用戶,再執行#話題#的正則匹配,最後再換回來。
2.整體刪除
刪除操作分為兩步:第一次點刪除僅選中整個用戶名(提醒用戶是整體刪除);第二次點刪除才真的刪除文本。
func textView(_ textView: UITextView, shouldChangeTextIn range: NSRange, replacementText text: String) -> Bool {
    if text == "" {
        for (num, user) in usersArray.enumerated() { // usersArray 用於存放已選取的用戶信息
            // ②刪除選中的用戶名
            if textView.selectedRange.location <= user.range.location && NSMaxRange(user.range) <= NSMaxRange(textView.selectedRange) {
                textView.replace(textView.selectedTextRange ?? UITextRange(), withText: "")
                return false
            }
            // ①選中用戶名
            if textView.selectedRange.length == 0 && (textView.selectedRange.location == user.range.location + user.range.length) {
                textView.selectedRange = user.range
                return false
            }
        }
    }
}
到此這篇關於iOS UITextView 實現類似微博的話題、提及功能的文章就介紹到這瞭,更多相關iOS UITextView微博話題內容請搜索WalkonNet以前的文章或繼續瀏覽下面的相關文章希望大傢以後多多支持WalkonNet!
推薦閱讀:
- golang slice元素去重操作
- Redis BloomFilter佈隆過濾器原理與實現
- go語言的四數相加等於指定數算法
- 詳解Golang函數式選項(Functional Options)模式
- Go 修改map slice array元素值操作