vue實現檢測敏感詞過濾組件的多種思路
寫在前面
在做商戶端敏感詞檢測的過程中,發現瞭一些問題,特在此總結。本文的行文思路是編寫敏感詞檢測代碼,前兩個思路未采用組件化的開發思想,後三個思路根據需求變更,采用組件化的思想和mixins混入進行開發。
需求分析v1
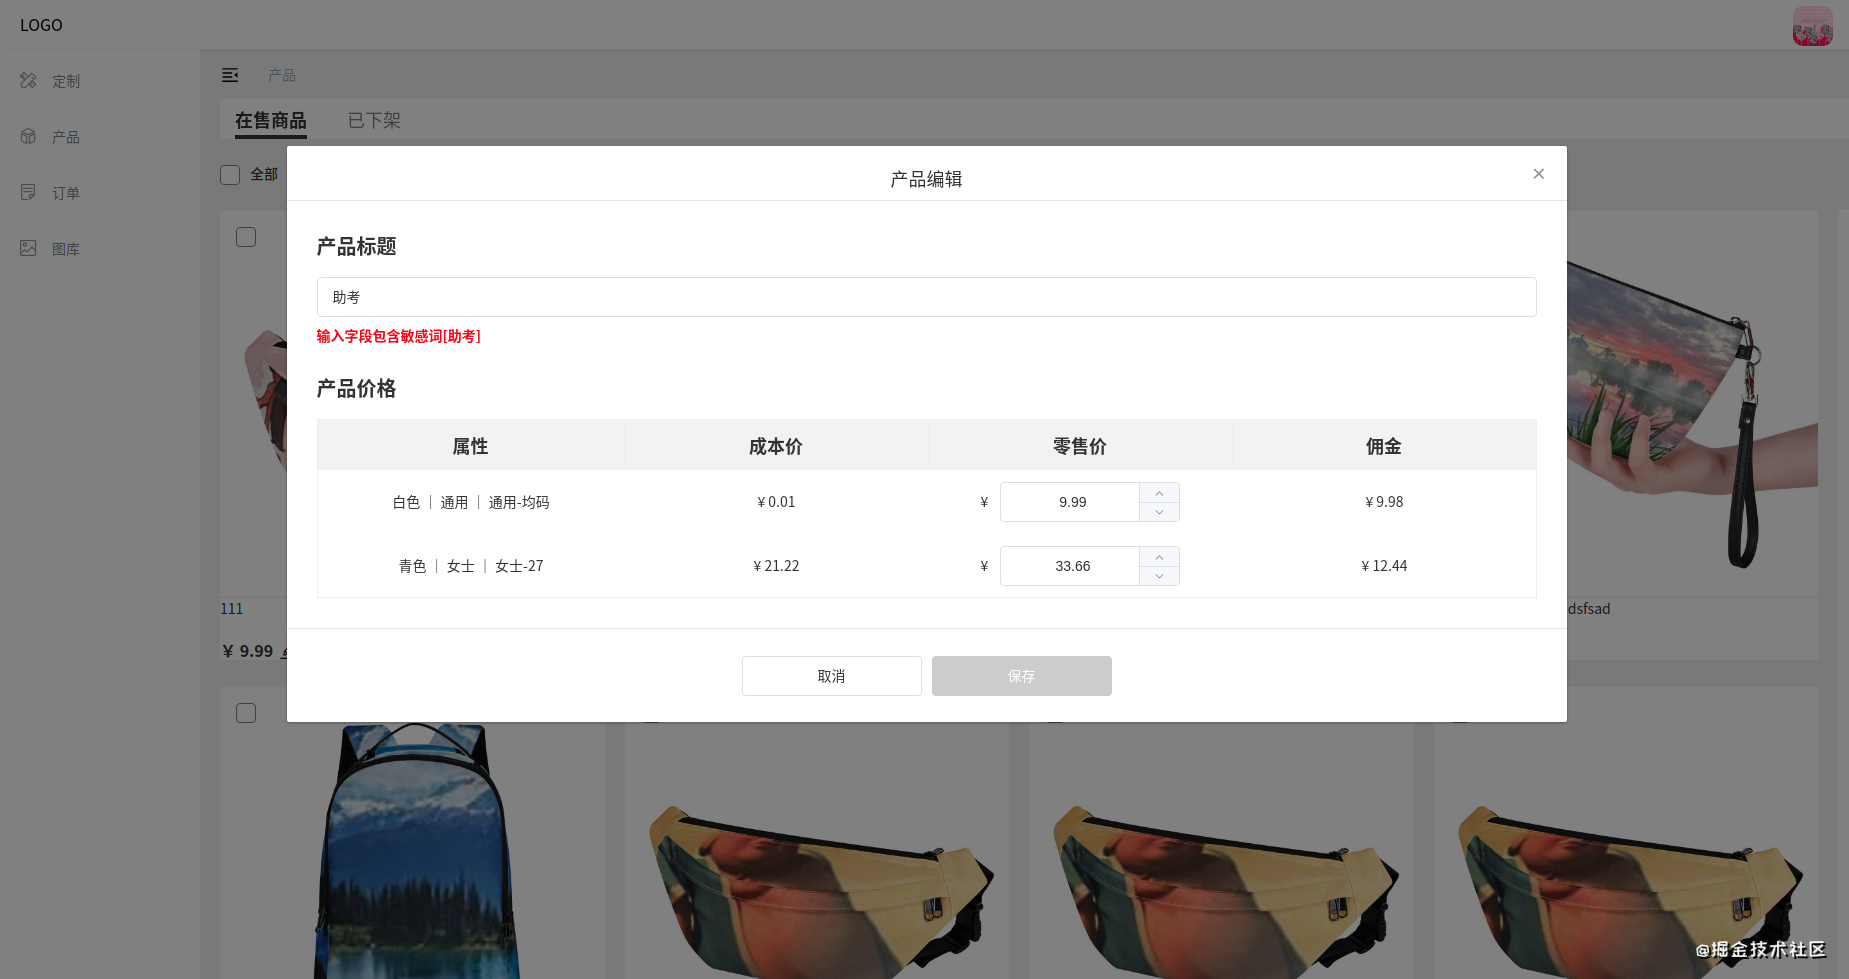
在商戶端產品模塊,點擊產品編輯按鈕,可以修改產品的標題和價格。當沒有填寫產品標題時,置灰保存按鈕;當填寫的產品標題屬於敏感詞時,置灰保存按鈕並給出後端返回的提示。

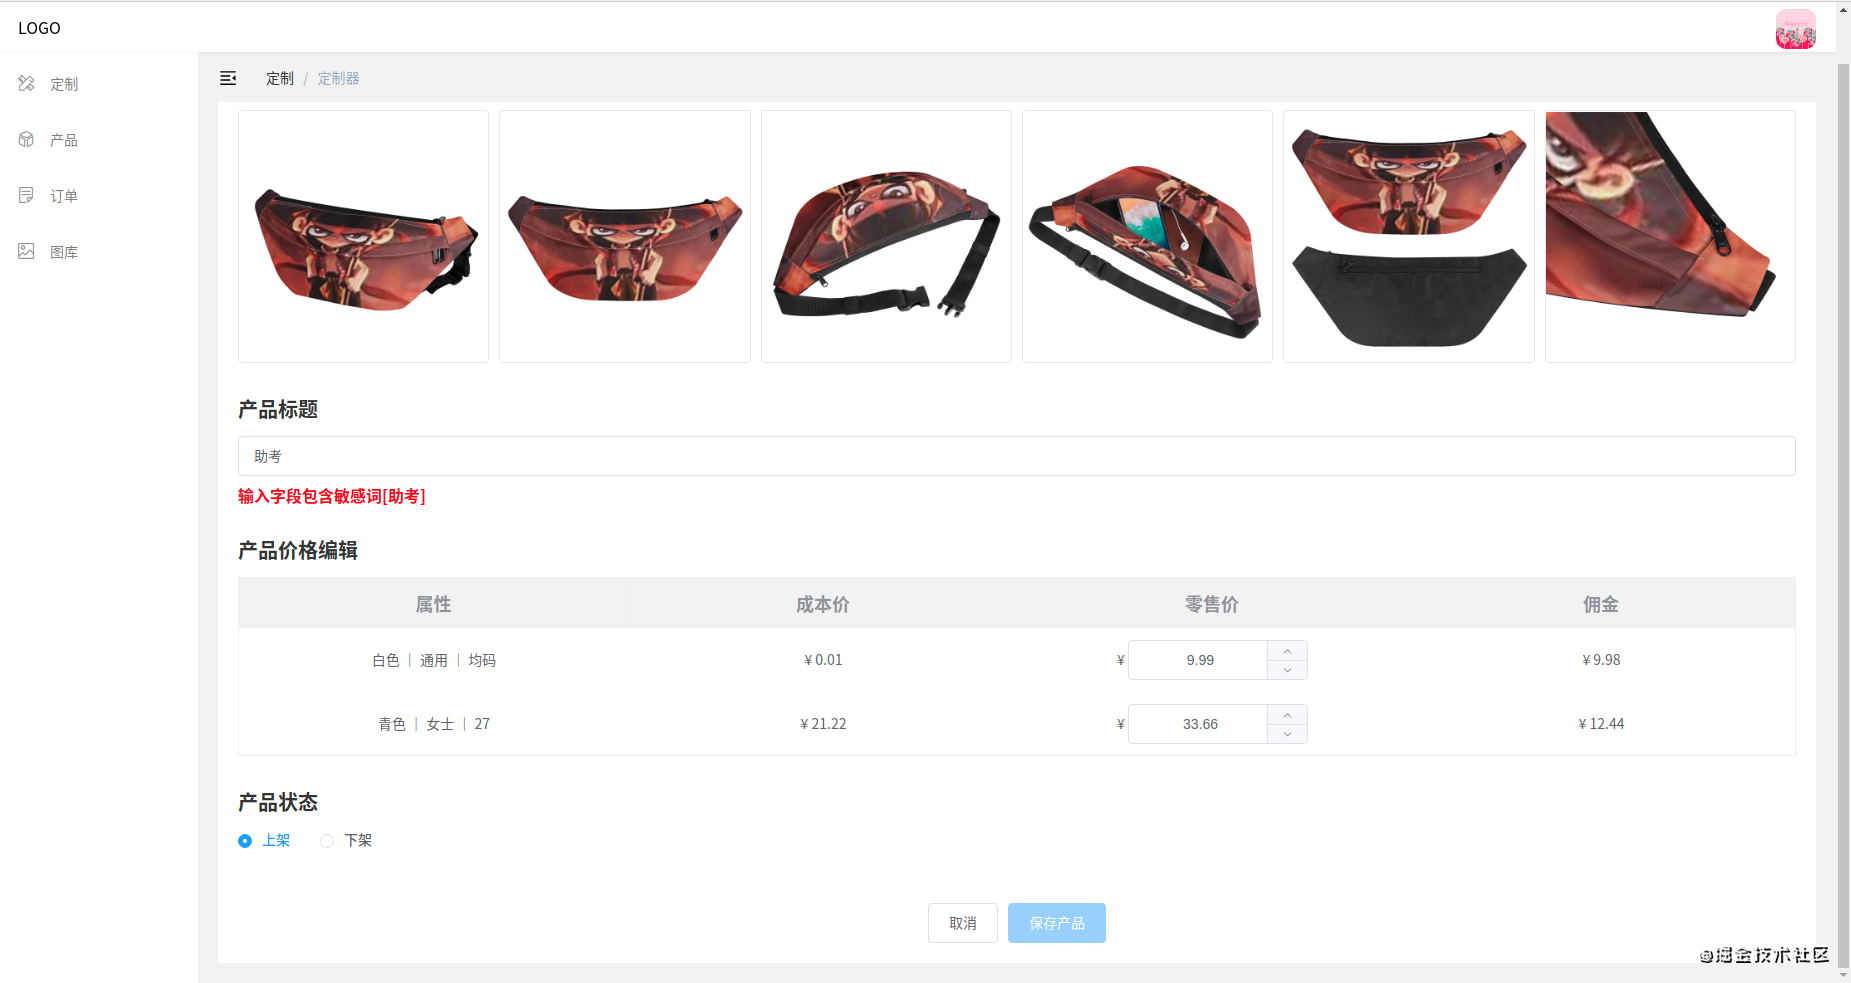
在商戶端定制模塊,定制完成後,直接跳轉到產品編輯頁面,可以修改產品標題和價格。當沒有填寫產品標題時,置灰保存按鈕;當填寫的產品標題屬於敏感詞時,置灰保存按鈕並給出後端返回的提示。

思路一:使用截流方法監聽輸入框的input事件
因為本人負責的是產品模塊,不知道定制模塊的產品標題也需要增加敏感詞檢測,所以最開始並沒有將敏感詞檢測寫成組件。於是有瞭第一種思路:使用截流方法監聽輸入框的input事件。
思路:
1.隻要輸入不為空或者全是空格,每次輸入後都會觸發輸入框的input事件,調用敏感詞檢測接口。頻繁地請求接口會給服務器造成巨大的壓力,因此可以使用截流方法降低接口請求的頻率;
2.為請求的接口增加一個定時器,並添加一個倒計時間,記為1s,每次輸入後都延遲1s請求接口。於是可以在輸入框的input事件觸發後,清除掉上一個定時器。防止定時器疊加,重復請求多次接口,隻保留最後一次input事件觸發的敏感詞檢測的接口請求。這也就意味著,如果用戶連續輸入產品標題,且每次輸入的間隔時間小於1s,則用戶最後一次輸入的信息會被接口檢測是否合乎敏感詞規范;如果用戶間隔著輸入產品標題,且間隔時間都超過1s,則會發起多次接口請求,還是會對服務器造成不小的壓力,所以這種方法還是存在局限性。
//敏感詞檢測的html
<div class="edit-title">產品標題</div>
   <el-input
     v-model="productName"
     placeholder="請輸入產品標題"
     type="text"
     auto-complete="on"
     clearable
     @input="inspectSpams"
   />
<div v-if="showMessage" class="message">{{ errorMessage }}</div>

//保存按鈕的html
<el-button type="primary" @click="save" :disabled="productName === '' || showMessage === true">保存</el-button>
 data() {
    return {
      productName: '',
      errorMessage: '',
      showMessage: false,
      timer: -1
    }
  },
  methods: {
    inspect() {
      if(this.productName.trim() !== '') {
        this.$store.dispatch('products/inspectSpams', this.productName).catch((err)=>{
          this.errorMessage = err.response.data.message
          this.showMessage = true
        })
      }
    },
    inspectSpams() {
      this.showMessage = false
      clearTimeout(this.timer)
      this.timer = setTimeout(() => {
        this.inspect()
      }, 1000)
    }
  }
缺陷: 當為產品標題添加敏感詞後,隻要手速足夠快,在1s內點擊保存按鈕,還是可以成功保存敏感詞,這與我們的需求相違背。
思路二:使用輸入框的失焦和保存按鈕的點擊事件
既然使用輸入框的input事件存在問題,那是否能夠使用輸入框的失焦事件和保存按鈕的點擊事件呢?答案是可以的。隻不過在這個過程中,有兩個問題需要特別註意。
註意事項:
- 需要理解失焦事件。 何為失焦?在輸入框內輸入完標題之後,點擊輸入框外的任意地方都會觸發失焦事件。所以,千萬不要忘記點擊保存按鈕同樣會觸發失焦事件。因此,隻需要在輸入框失焦事件中請求敏感詞檢測接口,無需在點擊事件中重復請求。
- 需要考慮觸發失焦事件和點擊事件帶來的的異步問題。 點擊保存按鈕會同時觸發失焦事件和點擊事件,失焦事件會優先點擊事件執行。失焦事件用於請求敏感詞檢測接口,點擊事件用於修改產品信息。交互邏輯是先請求敏感詞檢測接口,如果接口返回的狀態是成功,則不需要顯示錯誤提示信息;否則需要顯示後端返回的錯誤信息,並禁用保存按鈕。待校驗成功之後再請求修改產品信息的接口。因此,這兩個方法是存在一個先後順序的。而且一定是失焦事件請求敏感詞接口在前,請求修改產品信息在敏感詞接口請求結束之後。不能因為敏感詞檢測過慢導致非法的敏感詞已經成功保存並渲染,此時再請求敏感詞檢測接口是沒必要的。由於無法確定和保證兩個接口的,所以需要增加一個變量來判斷敏感詞接口是否請求結束。如果接口沒有請求結束,需要在點擊事件中重新發起請求;如果接口已經完成請求,則直接return忽略掉。
思路:
- 為輸入框添加失焦事件;
- 為保存按鈕添加點擊事件。
代碼:
<div class="edit-title">產品標題</div>
 <el-input
   v-model="productName"
   placeholder="請輸入產品標題"
   type="text"
   auto-complete="on"
   clearable
   @blur="inspectSpams"
 />
 <div v-if="showMessage" class="message">{{ errorMessage }}</div>

 <el-button type="primary" @click="save" :disabled="!productName || showMessage">保存</el-button>
 data() {
   return {
     showMessage: false,
     productName: '',
     errorMessage: '',
     timer: -1,
     hasVerified: false
   }
 },
 methods: {
  //失焦事件(請求敏感詞檢測接口)
   async inspectSpams() {
     this.hasVerified = false
     this.showMessage = false
     if(this.productName.trim() !== '') {
       await this.$store.dispatch('products/inspectSpams', this.productName).catch((err) => {
         this.errorMessage = err.response.data.message
         this.showMessage = true
       })
     }
     this.hasVerified = true
   },
   //點擊事件(請求修改產品信息接口)
   async save() {
     if(!this.hasVerified) {
        await this.inspectSpams()
     }
     const variants = this.variants.map((variant) => {
       return {
         id: variant.id,
         price: variant.price,
       }
     })
     const params = {
       variants,
       name: this.productName
     }
     params.productId = this.productId
     await this.$store.dispatch('products/editProduct', params)
       .then(async() => {
         await this.getProductListData(this.productStatus, 1)
         this.$message({
           type: 'success',
           message: '產品修改成功!'
         })
       })
       .catch((message) => {
         this.$message({
           type: 'error',
           message
         })
       })
     this.showEditProductDialog = false
   }
 }
思路三:使用mixins抽取敏感詞檢測方法
本以為敏感詞檢測就這樣離我而去瞭,結果收到產品消息,同樣需要給定制模塊的產品標題增添敏感詞檢測。之後就是一頓ctrl+c和ctrl+v操作猛如虎,最後發現代碼冗餘過多,需要對代碼進行整理。此處和後續都隻寫產品模塊的敏感詞檢測邏輯,定制模塊的敏感詞檢測邏輯其實和產品模塊大同小異。 既然定制模塊的產品標題編輯和產品模塊的樣式和邏輯相差無幾,那何不抽取敏感詞檢測公共方法呢?就這麼愉快地決定瞭,鍵盤上一頓狂敲亂打後,混入方法就成型瞭:
export default {
data() {
     return {
         hasVerified: false,
         showMessage: false,
         errorMessage: ''
     }
 },
 methods: {
     async inspectSpams(name) {
         this.hasVerified = false
         this.showMessage = false
         if(name.trim() !== '') {
           await this.$store.dispatch('products/inspectSpams', name).catch((err) => {
             this.errorMessage = err.response.data.message
             this.showMessage = true
           })
         }
         this.hasVerified = true
     }
 }
}
<div class="edit-title">產品標題</div>
<el-input
    v-model="productName"
    placeholder="請輸入產品標題"
    type="text"
    auto-complete="on"
    clearable
    @blur="inspectSpams(productName)"
/>
<div v-if="showMessage" class="message">{{ errorMessage }}</div>

<el-button type="primary" @click="save" :disabled="!productName ||  showMessage">保存</el-button>
import inspectSpams from '@/mixins/inspectSpams'

export default {
     data() {
          return {
              productName: ''
          }
      },
      mixins: [ inspectSpams ],
      methods: {
        //點擊事件(請求修改產品信息接口)
        async save() {
          if(!this.hasVerified) {
              await this.inspectSpams(this.productName)
          }
          const variants = this.variants.map((variant) => {
            return {
              id: variant.id,
              price: variant.price,
            }
          })
          const params = {
            variants,
            name: this.productName
          }
          params.productId = this.productId
          await this.$store.dispatch('products/editProduct', params)
            .then(async() => {
              await this.getProductListData(this.productStatus, 1)
              this.$message({
                type: 'success',
                message: '產品修改成功!'
              })
            })
            .catch((message) => {
              this.$message({
                type: 'error',
                message
              })
            })
          this.showEditProductDialog = false
        }
      }
}
思路四:使用promise封裝敏感詞檢測組件(面向需求v1)
考慮到產品模塊敏感詞檢測和定制模塊的html結構相差無幾,決定封裝一個敏感詞檢測組件,將產品標題敏感詞檢測的html代碼和業務邏輯放在一起。但在這個過程中,有三個問題需要特別註意:
註意事項:
- async函數返回的是一個promise對象;
- 不能直接修改傳入的props值,但是可以通過中間變量,將中間變量和props雙向綁定,從而間接地修改props的值;
- 可以在父組件給props增加sync修飾符,在子組件中對props和中間變量進行監聽。如果任意一方的值發生變化,都會將改變後的值賦予給另一方,從而達到雙向綁定的目的。
思路:
- 編寫敏感詞檢測組件;
- 引入敏感詞檢測組件。
//敏感詞檢測組件
<template>
    <div>
        <el-input v-model="input" placeholder="請輸入產品標題" type="text" clearable @blur="inspectSpams" />
        <div v-if="isShowMessage" class="message">{{ errorMessage }}</div>
    </div>
</template>

<script>
export default {
    props: {
        title: {
            required: true,
            type: String
        }
    },
    data() {
        return {
            input: '',
            isShowMessage: false,
            errorMessage: '',
            hasVerified: true
        }
    },
    watch: {
        title: {
            handler(val) {
                this.input = val
            },
            immediate: true
        },
        input(val) {
            this.$emit('update:title', val)
        }
    },
    methods: {
        async inspectSpams() {
            this.hasVerified = false
            this.isShowMessage = false
            if (this.input !== '') {
                await this.$store.dispatch('products/inspectSpams', this.input).catch((err) => {
                    this.errorMessage = err.response.data.message
                    this.isShowMessage = true
                })
            }
            this.hasVerified = true
        },
        init() {
            this.isShowMessage = false
        },
        async verify() {
            if (!this.hasVerified) {
                await this.inspectSpams()
            }
            const emptyInput = this.input.trim()
            if (emptyInput === '') {
                this.isShowMessage = true
                this.errorMessage = '請輸入產品名稱'
            }
            return new Promise((resvole, reject) => {
                if (Boolean(!emptyInput || this.isShowMessage)) {
                    reject()
                } else {
                    resvole()
                }
            })
        }
    }
}
</script>

<style>
.message {
    font-weight: bold;
    color: red;
    margin-top: 10px;
}
</style>
//引入敏感詞檢測組件
<script>
import { mapState } from 'vuex'
import InspectSpams from  '@/components/InspectSpams'

export default {
 name: 'List',
 components: {
   InspectSpams
 },
 data() {
   return {
     productName: ''
   }
 },
 computed: {
   ...mapState({
     variants: (state) => state.products.detail.variants
   }),
 },
 methods: {
   save() {
     this.$refs.productSpamsRef.verify()
       .then(async()=>{
         const variants = this.variants.map((variant) => {
         return {
           id: variant.id,
           price: variant.price,
         }
       })
       const params = {
         variants,
         name: this.productName
       }
       params.productId = this.productId
       await this.$store.dispatch('products/editProduct', params)
         .then(async() => {
           await this.getProductListData(this.productStatus, 1)
           this.$message({
             type: 'success',
             message: '產品修改成功!'
           })
         })
       this.showEditProductDialog = false
       })
       .catch(()=>{
         this.$message({
           type: 'error',
           message: '請輸入合法的產品名稱'
         })
       })
   },
   getProductListData(status, page) {
     this.$store.dispatch('products/getList', {
       limit: 16,
       status,
       order: 'id',
       direction: 'desc',
       page
     })
   }
}
</script>

<template>
    <div>
      <div class="edit-title">產品標題</div>
      <InspectSpams
         :title.sync="productName"
         ref="productSpamsRef"
      />
      <el-button type="primary" @click="save">保存</el-button>
    </div>
</template>
思路五:使用插槽和mixins封裝敏感詞檢測組件(面向需求v2)
需求變更: 其實相比需求v1來說,也沒發生什麼變化。隻是產品模塊的產品標題必須得填寫,不然得禁止保存按鈕,而定制模塊的產品標題可以不填寫,保存後默認為填寫的產品標題 + 白板名稱。
思路: 既然如此,何不把給錯誤提示的html放入一個組件中,使用插槽占位表示需要檢測的字段,而將敏感詞檢測的邏輯放到mixins中。後續如果還有其它地方需要進行敏感詞檢測,會顯得更加靈活,其實這樣反倒更利於組件的復用原則。
//敏感詞檢測組件
<template>
 <div>
     <slot />
     <div v-if="isShowMessage" class="message">
         {{ errorMessage }}
     </div>
 </div>
</template>

<script>
export default {
 props: {
     isShowMessage: {
         required: true,
         type: Boolean
     },
     errorMessage: {
         required: true,
         type: String
     }
 }
}
</script>

<style>
.message {
 font-weight: bold;
 color: red;
 margin-top: 10px;
}
</style>
//敏感詞檢測的mixins
export default {
 data() {
     return {
         isShowMessage: false,
         errorMessage: '',
         hasVerified: true
     }
 },
 methods: {
     async inspectSpams(name) {
         this.hasVerified = false
         this.isShowMessage = false
         if (name.trim() !== '') {
             await this.$store.dispatch('products/inspectSpams', name).catch((err) => {
                 this.errorMessage = err.response.data.message
                 this.isShowMessage = true
             })
         }
         this.hasVerified = true
     }
 }
}
import InspectSpams from  '@/components/InspectSpams'
import inspectSpams from '@/mixins/inspectSpams'

components: {
 InspectSpams
},
mixins: [ inspectSpams ],

async save() {
   if(!this.hasVerified) {
     await this.inspectSpams(this.productName)
   }
   const variants = this.variants.map((variant) => {
     return {
       id: variant.id,
       price: variant.price,
     }
   })
   const params = {
     variants,
     name: this.productName
   }
   params.productId = this.productId
   await this.$store.dispatch('products/editProduct', params)
     .then(async() => {
       await this.getProductListData(this.productStatus, 1)
       this.$message({
         type: 'success',
         message: '產品修改成功!'
       })
     })
     .catch((message) => {
       this.$message({
         type: 'error',
         message
       })
     })
   this.showEditProductDialog = false
 },

<div class="edit-title">產品標題</div>
<InspectSpams :isShowMessage="isShowMessage" :errorMessage="errorMessage">
 <el-input
     v-model="productName"
     placeholder="請輸入產品標題"
     type="text"
     auto-complete="on"
     clearable
     @blur="inspectSpams(productName)"
 />
</InspectSpams>
優化與改進
1.優化調用敏感詞檢測的條件。如果產品標題沒有發生變化,則不需要再請求敏感詞檢測接口。因為隻有經過檢驗成功的標題才能被成功保存,所以無需多次重復調用接口,需要修改mixins請求接口的條件。
思路: 在根據產品id打開模態框請求產品詳情接口的過程中,將對應產品信息的name字段賦值給新增的originalName變量。在html和js調用混入方法inspectSpams的過程中,將originalName和productName作為變量傳入即可。
//修改後的mixins混入
export default {
    data() {
        return {
            isShowMessage: false,
            errorMessage: '',
            hasVerified: true
        }
    },
    methods: {
        async inspectSpams(originalName, currentName) {
            this.hasVerified = false
            this.isShowMessage = false
            if (originalName !== currentName && currentName.trim() !== '') {
                await this.$store.dispatch('products/inspectSpams', currentName).catch((err) => {
                    this.errorMessage = err.response.data.message
                    this.isShowMessage = true
                })
            }
            this.hasVerified = true
        }
    }
}
2.多次點擊按鈕會重復請求接口。可以使用防抖、按鈕啟用倒計時、封裝axios請求、給button設置loading等方式進行優化。
寫在最後
其實總結得不是很好,編寫的組件也不夠好,思路也不太清晰,記錄在這裡主要是對思路二和思路四做個總結,畢竟對vue的文檔還是不太熟悉。在敏感詞檢測組件中,其實還有很多可以改進的地方,歡迎大傢在評論區中指出。
以上就是vue編寫檢測敏感詞匯組件的多種思路的詳細內容,更多關於vue編寫檢測敏感詞匯組件的資料請關註WalkonNet其它相關文章!
推薦閱讀:
- vue封裝axios的幾種方法
- vue中Promise的使用方法詳情
- C#多線程之線程綁定ThreadLocal類
- 前端常見面試題之async/await和promise的區別
- Vue中的同步和異步調用順序詳解