pytest基本用法簡介
1、安裝pytest,打開dos窗口輸入:
pip install pytest
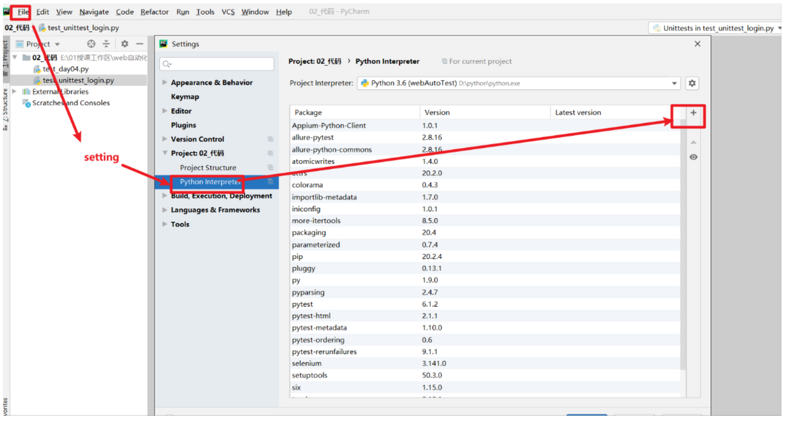
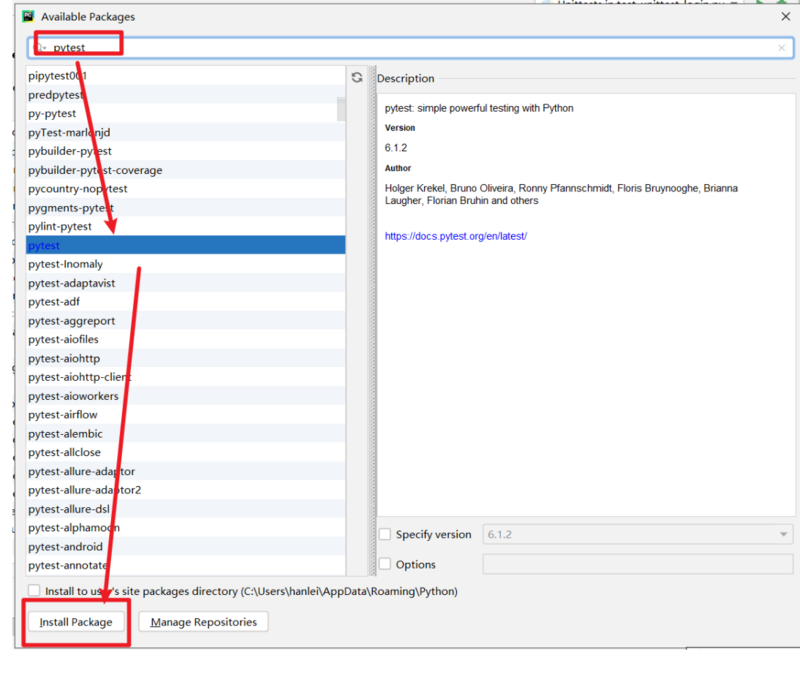
2、通過pycharm工具下載


3、創建pytest測試用例步驟
# 定義測試類
class TestDivide:
 # 定義測試方法
 def test_divide_01(self):
  result = divide(1,1)
  print(result)
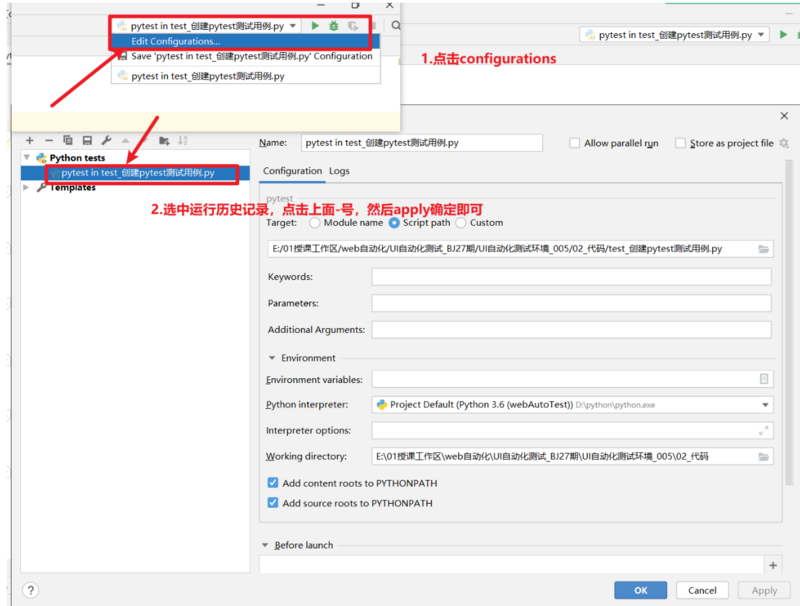
問題:右鍵運行沒有pytest運行的方式的處理步驟
第一步:檢查文件名和文件所在目錄是否合法,對應第一點
第二步:修改默認運行方式為pytest
第三步:刪除歷史運行記錄

4、pytest-函數級別初始化-銷毀的方法
class TestDemo:
 # 不想去調用初始化的動作的方法,讓pytest自動識別接口之後自己進行內部調用
 def setup(self):
  "每個方法在運行之前都會自動調用setup,執行setup下方的代碼"
 def teardown(self):
  "每個方法在運行之後都會自動調用teardown,執行teardown下方的代碼"
# 僅做參考瞭解即可def setup_method(self)/def teardown_method(self)
在後續寫代碼的過程中,如果測試類中存在多個測試方法,且每個測試方法在運行之前都有共同的操作。則可以
使用方法級別的初始化方法來簡化代碼
5、pytest-類級別初始化-銷毀的方法
# 定義測試類
 class TestDeme:
  # 在整個測試類運行之前自動調用的代碼
  def setup_class(self):
   print("整個測試類在運行之前會自動調用的代碼,優先級會高於方法級別初始化方法調用")
# 在整個測試運行完成之後會自動調用的代碼
  def teardown_class(self):
   print("整個測試類在運行完成之後的會調用的代碼,優先級會低於
6、pytest配置文件
1.在工程的根目錄下直接創建的pytest.ini文件,文件名固定不能修改
2.pytest.ini文件需要修改為GBK編碼格式
[pytest]
# 添加命令行參數
addopts = -s
# 文件搜索路徑,要執行的測試用例所在目錄
testpaths = ./TestCase
# 文件名稱,要執行的測試用例的文件名過濾條件
python_files = test_*.py
# 類名稱,要執行測試用例類的名稱過濾條件
python_classes = Test*
# 方法名稱,要執行測試用例方法過濾條件
python_functions = test_*
3.打開pycharm-terminal控制臺輸入pytest即可
7、pytest-html生成測試報告
安裝pytest-html第三方模塊
pip install pytest-html
在pytest.ini配置文件中添加對應的配置
[pytest]
# 添加命令行參數
addopts = -s --html=report/report.html
1.右鍵使用pytest運行單個測試用例的使用pytest.ini的配置文件對運行的條件一樣的有控制
2.pytest.ini文件一般都會直接放在工程的根目錄之下
8、pytest-order測試運行順序
1、下載pytest-ordering的第三方模塊: pip install pytest-ordering
2、指定順序的方式: 記得導包
給測試方法指定順序
給測試類指定順序
# 使用正整數排序,值越小運行優先級越高
@pytest.mark.run(order=101)
class TestDivide:
 @pytest.mark.run(order=3)
 def test_divide_one(self):
  # self.print_start_time()
  result = divide(1, 1)
  print("我是第一個測試方法,但是我想第三個運行")
  # print("end-time={}".format(time.time()))
 @pytest.mark.run(order=1)
 def test_divide_two(self):
  # self.print_start_time()
  result = divide(1, 1)
  print("我是第二個測試方法,但是我想第一個運行")
  # print("end-time={}".format(time.strftime("%Y%m%d%H%M%S")))
 @pytest.mark.run(order=2)
 def test_divide_three(self):
  # self.print_start_time()
  result = divide(1, 1)
  print("我是第三個測試方法,但是我想第二個運行")
  # print("end-time={}".format(time.strftime("%Y%m%d%H%M%S")))
9、pytest-rerunfailures失敗重試
1、安裝pytest-rerunfailures的第三模塊
2、修改pytest.ini的配置文件
[pytest]
addopts = -s --reruns 3 # --rerun表示要失敗重試,3表示重試最大次數
10、pytest-斷言
pytest提供assert斷言的方法
assert 後可以寫任意的表達式.判斷assert後續的代碼運行之後的結果是否為真,如果為真則通過,如果不為
則失敗
# 根據文本判斷元素是否存在
try:
is_suc= self.driver.find_element_by_xpath("//*[text()='{}']".format("會員折
扣"))
except Exception as e:
is_suc = False
assert is_suc
11、參數化
class TestDemo:
  @pytest.mark.parametrize(("divide_no", "divide_no_2", "expect"), [(1, 1, 1), (1, 1, 1), (10, 10, 1)])
 def test_six(self, divide_no, divide_no_2, expect):
  """
  :param divide_no:除數
  :param divide_no_2: 被除數
  :param expect: 期望結果
  :return:
  """
  result = divide(divide_no, divide_no_2)
  assert expect == result

 # 測試數據統一使用標註的列表嵌套元組的格式 : [(),()]
 @pytest.mark.parametrize((定義所有的參數的名稱,需要帶上引號),具體每一組測試數據)
以上就是pytest基本用法簡介的詳細內容,更多關於pytest基本用法的資料請關註WalkonNet其它相關文章!
推薦閱讀:
- python單元測試之pytest的使用
- python單測框架之pytest常見用法
- Python測試框架pytest高階用法全面詳解
- Python基礎教程之pytest參數化詳解
- pytest fixtures裝飾器的使用和如何控制用例的執行順序