Vue實現Google第三方登錄的示例代碼
一、開發者平臺配置
1、進入開發者平臺,首先前往Google API 控制臺選擇或者創建一個項目
谷歌開發者平臺

一堆眼花繚亂的API讓你無從選擇,但是你隻要記住這次進來的目的是:社交API

2.使用這個API之前還需要做一件事,那就是申請一個OAuth 2.0 客戶端 ID
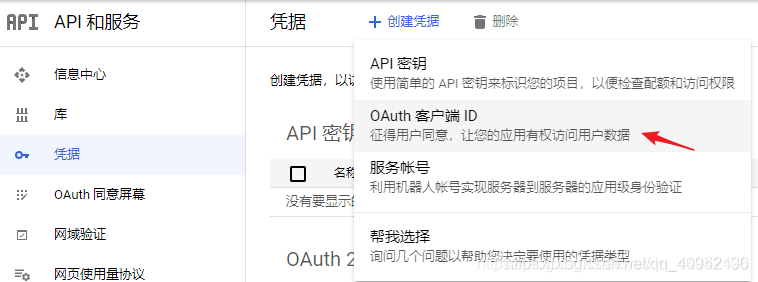
3按照要求填寫你項目的類型、名稱以及來源url
註:創建完成之後,頁面也有一個彈窗將你申請的客戶端ID已經密鑰展示出來,沒錯這個就是一個生成的過程。

4、安裝vue-google-signin-button
npm install vue-google-signin-button --save
5、在main.js中引入並註冊
import GSignInButton from 'vue-google-signin-button'
Vue.use(GSignInButton);
6.index.html引入js文件
<!--谷歌登錄需要的依賴js-->
<script src="//apis.google.com/js/api:client.js"></script>
7、在login.vue中使用組件
<template>
  <g-signin-button
    :params="googleSignInParams"
    @success="onSignInSuccess"
    @error="onSignInError">
    Sign in with Google
  </g-signin-button>
</template>

<script>
export default {
  data () {
    return {
      /**
       * The Auth2 parameters, as seen on
       * https://developers.google.com/identity/sign-in/web/reference#gapiauth2initparams.
       * As the very least, a valid client_id must present.
       * @type {Object}
       */
      googleSignInParams: {
        client_id: 'YOUR_APP_CLIENT_ID.apps.googleusercontent.com'
      }
    }
  },
  methods: {
    onSignInSuccess (googleUser) {
      console.log(googleUser)
      const profile = googleUser.getBasicProfile()
      console.log(profile)
    },
    onSignInError (error) {
      console.log('OH NOES', error)
    }
  }
}
</script>

<style>
.g-signin-button {
  /* This is where you control how the button looks. Be creative! */
  display: inline-block;
  padding: 4px 8px;
  border-radius: 3px;
  background-color: #3c82f7;
  color: #fff;
  box-shadow: 0 3px 0 #0f69ff;
}
</style>

解決問題BUG
1、問題一:初始化沒有引入js
你會發現在初始化的時候頁面會出現一個報錯。

出現這個問題的原因就是插件本身是沒有引入Google.js文件。解決辦法就是Vue的index.html中引入,詳情看下圖。

到此這篇關於Vue實現Google第三方登錄的示例代碼的文章就介紹到這瞭,更多相關Vue Google第三方登錄內容請搜索WalkonNet以前的文章或繼續瀏覽下面的相關文章希望大傢以後多多支持WalkonNet!
推薦閱讀:
- vue使用Google Recaptcha驗證的實現示例
- vue+tp5實現簡單登錄功能
- javascript實現點擊按鈕變色
- vue調用谷歌授權登錄獲取用戶通訊錄的實現示例
- jQuery實現簡單的按鈕顏色變化