Python opencv操作深入詳解
直接讀取圖片
def display_img(file="p.jpeg"):
  img = cv.imread(file)
  print (img.shape)
  cv.imshow('image',img)
  cv.waitKey(0)
  cv.destroyAllWindows()
讀取灰度圖片
def display_gray_img(file="p.jpeg"):
  img = cv.imread(file,cv.IMREAD_GRAYSCALE)
  print (img.shape)
  cv.imshow('image',img)
  cv.waitKey(0)
  cv.destroyAllWindows()
  cv.imwrite("gray_img.png",img)
讀取視頻
def display_video(file="sj.mp4"):
  v = cv.VideoCapture(file)
  if v.isOpened():
    open,frame = v.read()
  else:
    open=False

  while open:
    ret,frame = v.read()
    if frame is None:
      break

    if ret == True:
      gray = cv.cvtColor(frame,cv.COLOR_BGR2GRAY)
      cv.imshow("result",gray)
      if cv.waitKey(10) & 0xFF == 27:
        break
  v.release()
  v.waitKey(0)
  v.destroyAllWindows()
截取圖片
def get_frame_img(file="p.jpeg"):
  img = cv.imread(file)
  print (img.shape)
  cat = img[0:200,0:200]
  cv.imshow('get_frame_img',cat)
  cv.waitKey(0)
  cv.destroyAllWindows()
提取rgb通道
def extrats_rgb_img(file="p.jpeg"):
  img = cv.imread(file)
  b,g,r = cv.split(img)
  print (b.shape,g.shape,r.shape)
  new_img = cv.merge((b,g,r))
  print (new_img.shape)

  copy_img_r = img.copy()
  copy_img_r[:,:,0]=0
  copy_img_r[:,:,1]=0
  cv.imshow("r_img",copy_img_r)

  copy_img_g = img.copy()
  copy_img_g[:,:,0]=0
  copy_img_g[:,:,2]=0
  cv.imshow("g_img",copy_img_g)

  copy_img_b = img.copy()
  copy_img_b[:,:,1]=0
  copy_img_b[:,:,2]=0
  cv.imshow("b_img",copy_img_b)
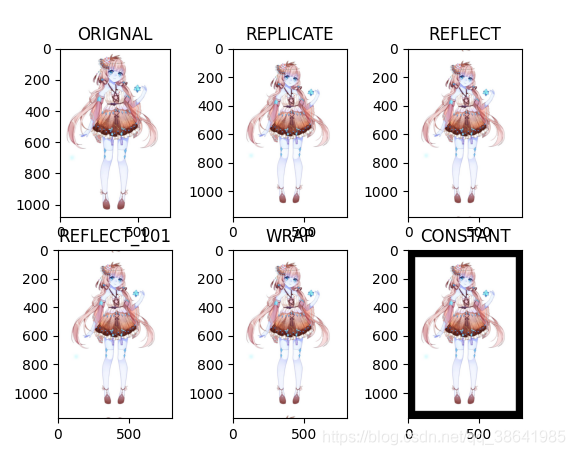
邊界填充
def border_fill_img(file="p.jpeg"):
  border_type = [
    cv.BORDER_REPLICATE,#復制法,復制邊緣
    cv.BORDER_REFLECT, #反射法,對感興趣的圖像中的像素在兩邊進行復制
    cv.BORDER_REFLECT_101,#反射法,以邊緣像素為軸,對稱
    cv.BORDER_WRAP,#外包裝法
    cv.BORDER_CONSTANT#常量法,常量填充
    ]
  border_title = [
    "REPLICATE",
    "REFLECT",
    "REFLECT_101",
    "WRAP",
    "CONSTANT"
    ]
  img = cv.imread(file)
  top_size,bottom_size,left_size,right_size = (50,50,50,50)
  plt.subplot(231)
  plt.imshow(img,"gray")#原始圖像
  plt.title("ORIGNAL")

  for i in range(len(border_type)):
    result = cv.copyMakeBorder(img,top_size,bottom_size,left_size,right_size,border_type[i])
    plt.subplot(232+i)
    plt.imshow(result,"gray")
    plt.title(border_title[i])

  plt.show()
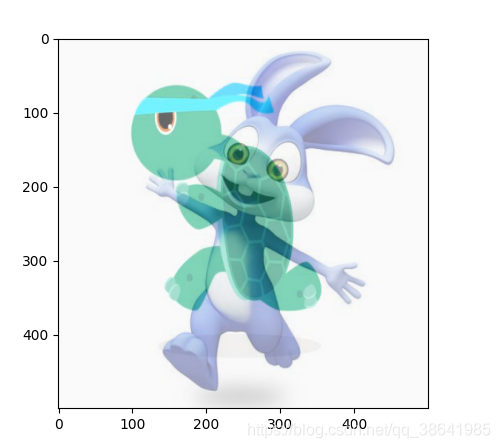
圖像融合,變換
def img_compose(file1="tu.jpeg",file2="gui.jpeg"):
  img_1 = cv.imread(file1)
  img_2 = cv.imread(file2)
  print (img_1.shape)
  print (img_2.shape)
  img_1= cv.resize(img_1,(500,500))
  img_2= cv.resize(img_2,(500,500))
  print (img_1.shape)
  print (img_2.shape)
  res = cv.addWeighted(img_1,0.4,img_2,0.6,0)
  plt.imshow(res)
  plt.show()


  res = cv.resize(img_1,(0,0),fx=3,fy=1)
  plt.imshow(res)
  plt.show()

  res = cv.resize(img_2,(0,0),fx=1,fy=3)
  plt.imshow(res)
  plt.show()
二值化處理
def Binarization(filepath):
  img = cv2.imread(filepath,0)
  limit = 120
  ret,thresh=cv2.threshold(img,limit,255,cv2.THRESH_BINARY_INV)
  plt.imshow(thresh,'gray')
  plt.show()
  return thresh
Binarization('t1.jpg')
到此這篇關於Python opencv操作深入詳解的文章就介紹到這瞭,更多相關Python opencv操作內容請搜索WalkonNet以前的文章或繼續瀏覽下面的相關文章希望大傢以後多多支持WalkonNet!
推薦閱讀:
- opencv python簡易文檔之圖片基本操作指南
- opencv-python圖像處理安裝與基本操作方法
- OpenCV半小時掌握基本操作之圖像基礎操作
- 如何使用Python的OpenCV庫處理圖像和視頻
- Python-OpenCV:cv2.imread(),cv2.imshow(),cv2.imwrite()的區別