Java使用Socket簡單通訊詳解
Java實現基於Socket的簡單通信
一.ServerSocket
1.使用JavaFX寫的小界面,方便觀察客戶端連接情況
    TextArea ta = new TextArea();
        Scene scene = new Scene(new javafx.scene.control.ScrollPane(ta), 450, 200);
        primaryStage.setTitle("Server");
        primaryStage.setScene(scene);
        primaryStage.show();
2.創建ServerSocket並處理客戶端連接並顯示客戶端基本信息
兩個客戶端連接後進行通信,未能實現動態處理。
new Thread(() -> {
try {
ServerSocket serverSocket = new ServerSocket(8000);
Platform.runLater(() -> {
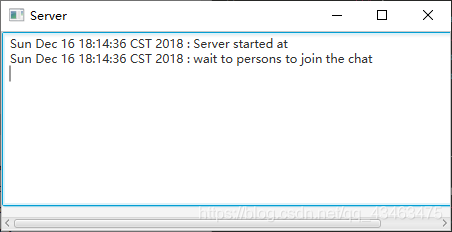
ta.appendText(new Date() + " : Server started at " + "\n");
ta.appendText(new Date() + " : wait to persons to join the chat" + "\n");
});
while (true){
Socket person1 = serverSocket.accept();
number++;
InetAddress inetAddress1 = person1.getInetAddress();
Platform.runLater(() -> {
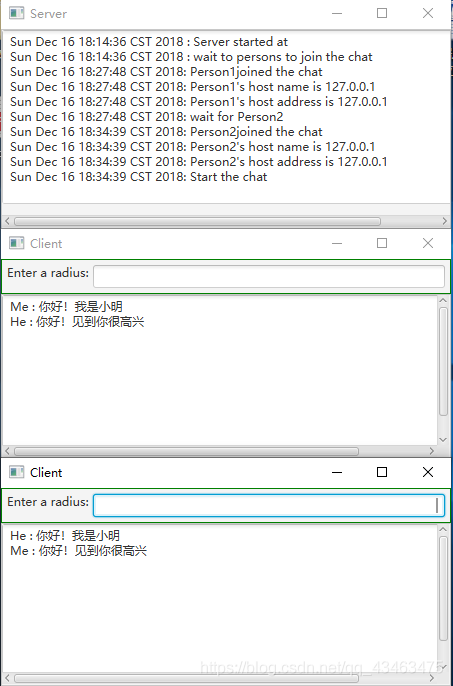
ta.appendText(new Date() + ": Person" + number + "joined the chat" + "\n");
ta.appendText(new Date() + ": Person" + number + "'s host name is " + inetAddress1.getHostName() + "\n");
ta.appendText(new Date() + ": Person" + number + "'s host address is " + inetAddress1.getHostAddress() + "\n");
ta.appendText(new Date() + ": wait for Person2 " + "\n");
});
Socket person2 = serverSocket.accept();
number++;
InetAddress inetAddress2 = person2.getInetAddress();
Platform.runLater(() -> {
ta.appendText(new Date() + ": Person" + number + "joined the chat" + "\n");
ta.appendText(new Date() + ": Person" + number + "'s host name is " + inetAddress2.getHostName() + "\n");
ta.appendText(new Date() + ": Person" + number + "'s host address is " + inetAddress2.getHostAddress() + "\n");
ta.appendText(new Date() + ": Start the chat " + "\n");
});
new Thread(new HandleChat(person1,person2)).start();
try {
Thread.sleep(100);
} catch (InterruptedException e) {
e.printStackTrace();
}
}
} catch (IOException e) {
e.printStackTrace();
}
}).start();
3.新建Handle類處理接收發送兩個客戶端的消息
隻實現瞭一人一句的效果,沒有實現一人連續發送消息對方也能正確接收。
    class HandleChat implements Runnable{
        Socket person1;
        Socket person2;

        public HandleChat(Socket person1,Socket person2){
            this.person1 = person1;
            this.person2 = person2;
        }
        @Override
        public void run() {
            try {
                DataInputStream fromPerson1 = new DataInputStream(person1.getInputStream());
                DataOutputStream toPerson1 = new DataOutputStream(person1.getOutputStream());
                DataInputStream fromPerson2 = new DataInputStream(person2.getInputStream());
                DataOutputStream toPerson2 = new DataOutputStream(person2.getOutputStream());

                while (true){

                    String passage1 = fromPerson1.readUTF();
                    toPerson2.writeUTF(passage1);
                    String passage2 = fromPerson2.readUTF();
                    toPerson1.writeUTF(passage2);

                }
            } catch (IOException e) {
                e.printStackTrace();
            }
        }
    }
思考後將HandleChat類中對兩個客戶端的接收發送消息處理放在兩個線程中,就可以實現兩個客戶端自由通信。
            new Thread(() -> {
                while (true) {
                    try {
                        String passage2 = fromPerson2.readUTF();
                        toPerson1.writeUTF(passage2);
                    } catch (IOException e) {
                        e.printStackTrace();
                    }
                }


            }).start();


            new Thread(() -> {
                while (true) {
                    try {
                        String passage1 = fromPerson1.readUTF();
                        toPerson2.writeUTF(passage1);
                    } catch (IOException e) {
                        e.printStackTrace();
                    }
                }
            }).start();
二.Socket
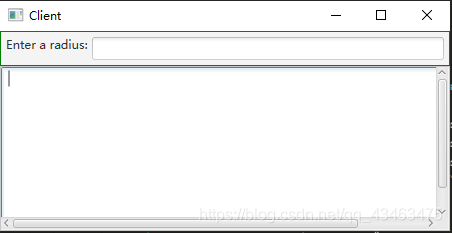
1.同樣的編寫一個客戶端界面
        BorderPane pane = new BorderPane();
        pane.setPadding(new Insets(5));
        pane.setStyle("-fx-border-color: green");
        pane.setLeft(new Label("Enter a radius: "));

        TextField tf = new TextField();
        tf.setAlignment(Pos.BASELINE_RIGHT);
        pane.setCenter(tf);

        BorderPane mainPane = new BorderPane();
        TextArea ta = new TextArea();
        mainPane.setCenter(new ScrollPane(ta));
        mainPane.setTop(pane);

        Scene scene = new Scene(mainPane,450,200);
        primaryStage.setTitle("Client");
        primaryStage.setScene(scene);
        primaryStage.show();
2.創建Socket連接客戶端並獲取輸入輸出流
        try {
//            創建一個連接服務器端的Socket
            Socket socket = new Socket("localhost",8000);
//            獲得輸入輸出流
            toServer = new DataOutputStream(socket.getOutputStream());
            fromServer = new DataInputStream(socket.getInputStream());

        } catch (IOException e) {
            e.printStackTrace();
        }
3.添加編輯框監聽處理消息發送
//        編輯框事件監聽
        tf.setOnAction(e ->{
            String passage = tf.getText().trim();
            tf.clear();
            try {
                toServer.writeUTF(passage);
                toServer.flush();
                ta.appendText("Me "  + ": " + passage + "\n");
            } catch (IOException e1) {
                e1.printStackTrace();
            }
        });
4.創建新線程從服務器上接收消息
//        新線程從服務器讀取信息
        new Thread(() -> {
            while (true) {
                try {
                    String passage = fromServer.readUTF();
                    ta.appendText("He : " + passage + "\n");
                } catch (IOException e) {
                    e.printStackTrace();
                }
            }
        }).start();
三.測試
四.總結
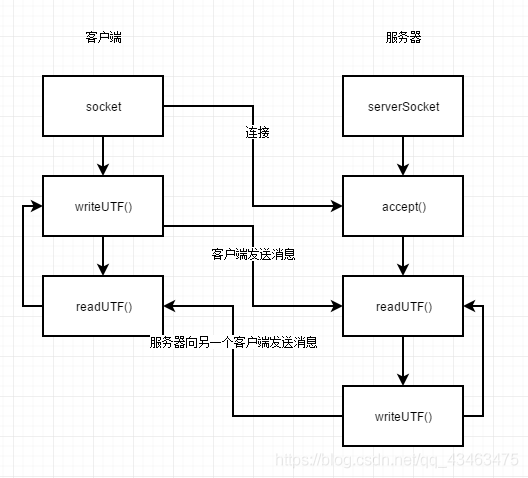
1.原理流程
2.不足之處
隻是簡單實現瞭靜態兩客戶端聊天的功能,並且隻能夠第一個鏈接上的用戶先發送消息,且一人發送消息後隻能等待接收另一個人的消息後才能再次發送消息。之後的時間希望能加以改進。
到此這篇關於Java使用Socket簡單通訊詳解的文章就介紹到這瞭,更多相關Java使用Socket簡單通訊內容請搜索WalkonNet以前的文章或繼續瀏覽下面的相關文章希望大傢以後多多支持WalkonNet!
推薦閱讀:
- Java網絡編程TCP實現聊天功能
- Java基於TCP協議的Socket通信
- java實現多客戶聊天功能
- java使用Socket實現文件上傳功能
- 解決Java中socket使用getInputStream()阻塞問題