一文搞懂Codec2解碼組件
1 前言
在本篇中,我們將關註Codec 2.0以下幾個問題:
1.從頂而下,一個解碼組件是如何創建的
2.組件的接口有哪些,分別是什麼含義
3.組件是如何運行的,輸入與輸出的數據流是怎樣的
2 組件的創建
CCodec在allocate中,通過CreateComponentByName創建瞭具體的解碼組件。
//android/frameworks/av/media/codec2/sfplguin/CCodec.cpp
void CCodec::allocate(const sp<MediaCodecInfo> &codecInfo) {
    ...
    AString componentName = codecInfo->getCodecName();
    std::shared_ptr<Codec2Client> client;

    // set up preferred component store to access vendor store parameters
    //從CCodec調用到component是通過HAL層服務的,默認谷歌的原生服務為
    //android.hardware.media.c2@IComponentStore/software,默認廠商的服務為
    //android.hardware.media.c2@IComponentStore/default,在android小機shell中通過lshal|grep media可以查詢
    //到正在運行的codec2服務,如果廠商已支持codec2,則可以查詢到default服務。如果CCodec中能夠創建到default
    //服務,則可以將該服務設置為Preferred Codec2 ComponentStore,也就是將其作為目標組件。
    client = Codec2Client::CreateFromService("default");
    if (client) {
        ALOGI("setting up '%s' as default (vendor) store", client->getServiceName().c_str());
        SetPreferredCodec2ComponentStore(
                std::make_shared<Codec2ClientInterfaceWrapper>(client));
    }
	//創建具體的解碼組件或者編碼組件,譬如c2.android.avc.decoder
	//所有omx與codec2的編解碼組件支持列表可以在libstagefright/data目錄下的xml中查詢得到,它們的加載與
	//排序情況可以在libstagefright/MediaCodecList.cpp中追蹤
    std::shared_ptr<Codec2Client::Component> comp =
            Codec2Client::CreateComponentByName(
            componentName.c_str(),
            mClientListener,
            &client);
    ...
    ALOGI("Created component [%s]", componentName.c_str());
    mChannel->setComponent(comp);
    auto setAllocated = [this, comp, client] {
        Mutexed<State>::Locked state(mState);
        if (state->get() != ALLOCATING) {
            state->set(RELEASED);
            return UNKNOWN_ERROR;
        }
        state->set(ALLOCATED);
        state->comp = comp;
        mClient = client;
        return OK;
    };
    ...

    // initialize config here in case setParameters is called prior to configure
    Mutexed<Config>::Locked config(mConfig);
    status_t err = config->initialize(mClient, comp);
    ...
    config->queryConfiguration(comp);

    mCallback->onComponentAllocated(componentName.c_str());
}
繼續追蹤Codec2Client::CreateComponentByName接口。
//android/frameworks/av/media/codec2/hidl/client/client.cpp
std::shared_ptr<Codec2Client::Component>
        Codec2Client::CreateComponentByName(
        const char* componentName,
        const std::shared_ptr<Listener>& listener,
        std::shared_ptr<Codec2Client>* owner,
        size_t numberOfAttempts) {
    std::string key{"create:"};
    key.append(componentName);
    std::shared_ptr<Component> component;
    c2_status_t status = ForAllServices(
            key,
            numberOfAttempts,
            [owner, &component, componentName, &listener](
                    const std::shared_ptr<Codec2Client> &client)
                        -> c2_status_t {
                //調用Codec2Client類的createComponent接口,獲取component
                c2_status_t status = client->createComponent(componentName,
                                                             listener,
                                                             &component);
                ...
                return status;
            });
    ...
    return component;
}
追蹤Codec2Client類的createComponent接口。
\\av\media\codec2\hidl\client\client.cpp
c2_status_t Codec2Client::createComponent(
        const C2String& name,
        const std::shared_ptr<Codec2Client::Listener>& listener,
        std::shared_ptr<Codec2Client::Component>* const component) {

    c2_status_t status;
    sp<Component::HidlListener> hidlListener = new Component::HidlListener{};
    hidlListener->base = listener;
    //這裡的mBase是什麼?這裡調用的是IComponentStore的createComponent接口
    Return<void> transStatus = mBase->createComponent(
            name,
            hidlListener,
            ClientManager::getInstance(),
            [&status, component, hidlListener](
                    Status s,
                    const sp<IComponent>& c) {
                status = static_cast<c2_status_t>(s);
                if (status != C2_OK) {
                    return;
                }
                *component = std::make_shared<Codec2Client::Component>(c);
                hidlListener->component = *component;
            });
    ...
    return status;
}
我們先看一下IComponentStore的createComponent接口。
\\av\media\codec2\hidl\1.0\utils\include\codec2\hidl\1.0\ComponentStore.h
struct ComponentStore : public IComponentStore {
    ComponentStore(const std::shared_ptr<C2ComponentStore>& store);
    virtual ~ComponentStore() = default;
    // Methods from ::android::hardware::media::c2::V1_0::IComponentStore.
    virtual Return<void> createComponent(
            const hidl_string& name,
            const sp<IComponentListener>& listener,
            const sp<IClientManager>& pool,
            createComponent_cb _hidl_cb) override;
    virtual Return<void> createInterface(
            const hidl_string& name,
            createInterface_cb _hidl_cb) override;、
    ...
}
該接口的實現為:
\\av\media\codec2\hidl\1.0\utils\ComponentStore.cpp
// Methods from ::android::hardware::media::c2::V1_0::IComponentStore
Return<void> ComponentStore::createComponent(
        const hidl_string& name,
        const sp<IComponentListener>& listener,
        const sp<IClientManager>& pool,
        createComponent_cb _hidl_cb) {

    sp<Component> component;
    std::shared_ptr<C2Component> c2component;
    //C2PlatformComponentStore的createComponent調用
    //調用C2PlatformComponentStore的createComponent接口,返回的是一個C2Component對象
    //譬如,這個對象可以是C2SoftAvcDec Component對象,也可以是VendorHwAvcDec Component對象
    Status status = static_cast<Status>(
            mStore->createComponent(name, &c2component));

    if (status == Status::OK) {
        onInterfaceLoaded(c2component->intf());
        //把前面創建的C2SoftAvcDec“裝載”到Component類中,Client調用Component
        //Component內部會調用到C2SoftAvcDec
        //Component相當於對原生編解碼組件/廠商編解碼組件的統一封裝
        component = new Component(c2component, listener, this, pool);
        if (!component) {
            status = Status::CORRUPTED;
        } else {
            reportComponentBirth(component.get());
            if (component->status() != C2_OK) {
                status = static_cast<Status>(component->status());
            } else {
                component->initListener(component);
                if (component->status() != C2_OK) {
                    status = static_cast<Status>(component->status());
                }
            }
        }
    }
    _hidl_cb(status, component);
    return Void();
}
關於C2PlatformComponentStore的createComponent調用,它的實現在C2Store.cpp中,它繼承於C2ComponentStore類,有幾個重要成員對象,ComponentModule,ComponentLoader,有幾個重要的接口,listComponents(),createComponent(),createInterface()。ComponentLoader包含ComponentModule對象,而ComponentModule主要提供兩個接口,createComponent()與createInterface(),內部也包含著C2ComponentFactory成員以及它的創建與銷毀接口,分別是C2ComponentFactory::CreateCodec2FactoryFunc,C2ComponentFactory::DestroyCodec2FactoryFunc。
    \\av\media\codec2\vndk\C2Store.cpp
    class C2PlatformComponentStore : public C2ComponentStore {
    public:
        virtual std::vector<std::shared_ptr<const C2Component::Traits>> listComponents() override;
        ...
        virtual c2_status_t createInterface(
                C2String name, std::shared_ptr<C2ComponentInterface> *const interface) override;
        virtual c2_status_t createComponent(
                C2String name, std::shared_ptr<C2Component> *const component) override;
        virtual ~C2PlatformComponentStore() override = default;

    private:

        /**
         * An object encapsulating a loaded component module.
         */
        struct ComponentModule : public C2ComponentFactory,
                public std::enable_shared_from_this<ComponentModule> {
            virtual c2_status_t createComponent(
                    c2_node_id_t id, std::shared_ptr<C2Component> *component,
                    ComponentDeleter deleter = std::default_delete<C2Component>()) override;
            virtual c2_status_t createInterface(
                    c2_node_id_t id, std::shared_ptr<C2ComponentInterface> *interface,
                    InterfaceDeleter deleter = std::default_delete<C2ComponentInterface>()) override;
     		...
        protected:
    		...
            void *mLibHandle; ///< loaded library handle
            C2ComponentFactory::CreateCodec2FactoryFunc createFactory; ///< loaded create function
            C2ComponentFactory::DestroyCodec2FactoryFunc destroyFactory; ///< loaded destroy function
            C2ComponentFactory *mComponentFactory; ///< loaded/created component factory
        };

        /**
         * An object encapsulating a loadable component module.
         */
        struct ComponentLoader {
            /**
             * Load the component module.
             *
             * This method simply returns the component module if it is already currently loaded, or
             * attempts to load it if it is not.
             */
            c2_status_t fetchModule(std::shared_ptr<ComponentModule> *module) {
                c2_status_t res = C2_OK;
                std::lock_guard<std::mutex> lock(mMutex);
                std::shared_ptr<ComponentModule> localModule = mModule.lock();
                if (localModule == nullptr) {
                    localModule = std::make_shared<ComponentModule>();
                    res = localModule->init(mLibPath);
                    if (res == C2_OK) {
                        mModule = localModule;
                    }
                }
                *module = localModule;
                return res;
            }

            /**
             * Creates a component loader for a specific library path (or name).
             */
            ComponentLoader(std::string libPath)
                : mLibPath(libPath) {}

        private:
            std::weak_ptr<ComponentModule> mModule; ///< weak reference to the loaded module
        };

        struct Interface : public C2InterfaceHelper {
    	...
        };

        /**
         * Retrieves the component module for a component.
         */
        c2_status_t findComponent(C2String name, std::shared_ptr<ComponentModule> *module);

        /**
         * Loads each component module and discover its contents.
         */
        void visitComponents();
        std::map<C2String, ComponentLoader> mComponents; ///< path -> component module
        std::map<C2String, C2String> mComponentNameToPath; ///< name -> path
        std::vector<std::shared_ptr<const C2Component::Traits>> mComponentList;
    	...
    };
C2PlatformComponentStore::createComponent調用findComponent(name, &module)找到擁有component的ComponentModule,再通過module->createComponent(0, component)調用,找到相應的component。
    \\av\media\codec2\vndk\C2Store.cpp
    c2_status_t C2PlatformComponentStore::createComponent(
            C2String name, std::shared_ptr<C2Component> *const component) {
        // This method SHALL return within 100ms.
        component->reset();
        std::shared_ptr<ComponentModule> module;
        c2_status_t res = findComponent(name, &module);
        if (res == C2_OK) {
            // TODO: get a unique node ID
            res = module->createComponent(0, component);
        }
        return res;
    }
findComponent(name, &module)有兩步,先通過visitComponents()列舉出所有可用的components,再調用ComponentLoader的fetchModule(),找到擁有component的ComponentModule。module可以看作是組件,加載某個module,也就是加載對應的組件,module提供的 createComponent()接口就是用來創建具體component的,譬如C2SoftAvcDec。
    \\av\media\codec2\vndk\C2Store.cpp
    c2_status_t C2PlatformComponentStore::findComponent(
            C2String name, std::shared_ptr<ComponentModule> *module) {
        (*module).reset();
        visitComponents();
        auto pos = mComponentNameToPath.find(name);
        if (pos != mComponentNameToPath.end()) {
            return mComponents.at(pos->second).fetchModule(module);
        }
        return C2_NOT_FOUND;
    }
visitComponents()訪問mComponents對象(這是一個map對象,將path與component module映射關聯,這一映射工作在C2PlatformComponentStore初始化時進行),遍歷所有的mComponents,即pathAndLoader對象,如果一個對象的loader能夠加載成功,則添加到mComponentNameToPath對象中。
    \\av\media\codec2\vndk\C2Store.cpp
    void C2PlatformComponentStore::visitComponents() {
        std::lock_guard<std::mutex> lock(mMutex);
        if (mVisited) {
            return;
        }
        //參考定義 std::map<C2String, ComponentLoader> mComponents; ///< path -> component module
        for (auto &pathAndLoader : mComponents) {
            const C2String &path = pathAndLoader.first;
            ComponentLoader &loader = pathAndLoader.second;
            std::shared_ptr<ComponentModule> module;
            if (loader.fetchModule(&module) == C2_OK) {
                std::shared_ptr<const C2Component::Traits> traits = module->getTraits();
                if (traits) {
                    mComponentList.push_back(traits);
                    mComponentNameToPath.emplace(traits->name, path);
                    for (const C2String &alias : traits->aliases) {
                        mComponentNameToPath.emplace(alias, path);
                    }
                }
            }
        }
        mVisited = true;
    }
loader.fetchModule(&module)這個函數定義在ComponentLoader類中,在這裡再貼一次代碼。
    \\av\media\codec2\vndk\C2Store.cpp
    c2_status_t fetchModule(std::shared_ptr<ComponentModule> *module) {
        c2_status_t res = C2_OK;
        std::lock_guard<std::mutex> lock(mMutex);
        std::shared_ptr<ComponentModule> localModule = mModule.lock();
        if (localModule == nullptr) {
            localModule = std::make_shared<ComponentModule>();
            res = localModule->init(mLibPath);
            if (res == C2_OK) {
                mModule = localModule;
            }
        }
        *module = localModule;
        return res;
    }
對於module,會調用初始化函數,初始化成功就算是fetch到瞭。初始化作瞭什麼工作,參見C2PlatformComponentStore::ComponentModule::init函數,也就是對編解碼庫dlopen成功,可獲得相應的函數地址,譬如,C2SoftAvcDec.cpp中的C2ComponentFactory* CreateCodec2Factory()與void DestroyCodec2Factory()。當然還有其他,不面面俱道瞭。
    \\av\media\codec2\vndk\C2Store.cpp
    c2_status_t C2PlatformComponentStore::ComponentModule::init(
            std::string libPath) {
        ALOGV("in %s", __func__);
        ALOGV("loading dll");
        mLibHandle = dlopen(libPath.c_str(), RTLD_NOW|RTLD_NODELETE);
        createFactory =
            (C2ComponentFactory::CreateCodec2FactoryFunc)dlsym(mLibHandle, "CreateCodec2Factory");
        LOG_ALWAYS_FATAL_IF(createFactory == nullptr,
                "createFactory is null in %s", libPath.c_str());
        destroyFactory =
            (C2ComponentFactory::DestroyCodec2FactoryFunc)dlsym(mLibHandle, "DestroyCodec2Factory");
        LOG_ALWAYS_FATAL_IF(destroyFactory == nullptr,
                "destroyFactory is null in %s", libPath.c_str());
        mComponentFactory = createFactory();
    	...
        std::shared_ptr<C2ComponentInterface> intf;
        c2_status_t res = createInterface(0, &intf);
    	...
        return mInit;
    }
那麼問題來瞭,為什麼谷歌對它自己的codec2插件組C2PlatformComponentStore設計得這麼復雜,能不能簡化一點。
3 組件接口
在codec2/components目錄下,有base, avc, aom, hevc, aac等文件夾,base目錄下是SimpleC2Component.cpp與SimpleC2Interface.cpp以及對應的頭文件,avc目錄下是C2SoftAvcDec.cpp,C2SoftAvcEnc.cpp以及對應的頭文件,其他編解碼器文件夾亦同樣道理。C2SoftAvcDec,C2SoftHevcDec等編解碼器類都是繼承於SimpleC2Component類的,也就是說,SimpleC2Component是components的頂層類,它對接瞭component類的接口,實現瞭編解碼器的公共流程部分,C2SoftAvcDec,C2SoftHevcDec等子類繼承SimpleC2Component的一些接口,實現各自的編解碼操作。
SimpleC2Component實現的component的接口如下:
    \\av\media\codec2\components\base\include\SimpleC2Component.h
    // C2Component
    // From C2Component
    //設置回調
    virtual c2_status_t setListener_vb(
    	const std::shared_ptr<Listener> &listener, c2_blocking_t mayBlock) override;
    //送數據到component,數據打包成某種對象,叫C2Work,這個對象很關鍵,它包含input與output
    virtual c2_status_t queue_nb(std::list<std::unique_ptr<C2Work>>* const items) override;
    //暫時沒有多大用處,不管它
    virtual c2_status_t announce_nb(const std::vector<C2WorkOutline> &items) override;
    //跳播使用,將當前數據沖刷掉
    virtual c2_status_t flush_sm(
    	flush_mode_t mode, std::list<std::unique_ptr<C2Work>>* const flushedWork) override;
    //渲染可用的幀
    virtual c2_status_t drain_nb(drain_mode_t mode) override;
    virtual c2_status_t start() override;
    virtual c2_status_t stop() override;
    virtual c2_status_t reset() override;
    virtual c2_status_t release() override;
    virtual std::shared_ptr<C2ComponentInterface> intf() override;

而C2SoftAvcDec,C2SoftHevcDec等子類繼承SimpleC2Component的接口如下:

    \\av\media\codec2\components\base\include\SimpleC2Component.h
    virtual c2_status_t onInit() = 0;
    virtual c2_status_t onStop() = 0;
    virtual void onReset() = 0;
    virtual void onRelease() = 0;
    virtual c2_status_t onFlush_sm() = 0;
    //最重要的處理函數,處理的對象是C2Work,它包含著輸入輸出,交互配置方面的類。
    virtual void process(
        const std::unique_ptr<C2Work> &work,
        const std::shared_ptr<C2BlockPool> &pool) = 0;
    virtual c2_status_t drain(
        uint32_t drainMode,
        const std::shared_ptr<C2BlockPool> &pool) = 0;
4 組件運行原理
SimpleC2Component有一個成員對象WorkHandler,這個類繼承於AHandler,也就是說,SimpleC2Component內部運行一個線程,來自上層的接口調用,都可以發送消息到onMessageReceived中排隊處理,譬如初始化、停止、重置、釋放以及數據處理等工作,都在隊列中排隊處理,相應的處理都是調用到子類的實現,譬如,onInit(),onStop(),onReset(),onRelease(),以及processQueue()。
我們可以看一下onMessageReceived的實現。
\\av\media\codec2\components\base\SimpleC2Component.cpp
void SimpleC2Component::WorkHandler::onMessageReceived(const sp<AMessage> &msg) {
    std::shared_ptr<SimpleC2Component> thiz = mThiz.lock();
	...
    switch (msg->what()) {
        case kWhatProcess: {
            if (mRunning) {
                if (thiz->processQueue()) {
                    (new AMessage(kWhatProcess, this))->post();
                }
            } else {
                ALOGV("Ignore process message as we're not running");
            }
            break;
        }
        case kWhatInit: {
            int32_t err = thiz->onInit();
            Reply(msg, &err);
            [[fallthrough]];
        }
        case kWhatStart: {
            mRunning = true;
            break;
        }
        case kWhatStop: {
            int32_t err = thiz->onStop();
            Reply(msg, &err);
            break;
        }
        case kWhatReset: {
            thiz->onReset();
            mRunning = false;
            Reply(msg);
            break;
        }
        case kWhatRelease: {
            thiz->onRelease();
            mRunning = false;
            Reply(msg);
            break;
        }
        default: {
            ALOGD("Unrecognized msg: %d", msg->what());
            break;
        }
    }
}
我們看一下AVC解碼器內部是如何處理輸入與輸出數據的,在這個process中,處理完輸入,解碼,處理輸出,在處理output buffer時,process的思路是這樣的:從內存池申請一個GraphicBlock,對應地設置給解碼器Buffer地址以供解碼輸出,如果解碼後有幀輸出,則將當前的GraphicBlock轉換為C2Buffer對象,返回給上層。類似於FFMPEG,你給它一個output frame,它就將解碼圖片填充到frame,你取走顯示。可以推斷,軟解碼器內部應該也有申請一個隊列的buffer,這個隊列維護著解碼所需要的參考圖像。
\\av\media\codec2\components\avc\C2SoftAvcDec.cpp
//省略瞭部分不影響理解主要流程的代碼
void C2SoftAvcDec::process(
        const std::unique_ptr<C2Work> &work,
        const std::shared_ptr<C2BlockPool> &pool) {
    // Initialize output work
    work->result = C2_OK;
    work->workletsProcessed = 0u;
    work->worklets.front()->output.flags = work->input.flags;
    size_t inOffset = 0u;
    size_t inSize = 0u;
    uint32_t workIndex = work->input.ordinal.frameIndex.peeku() & 0xFFFFFFFF;
    C2ReadView rView = mDummyReadView;
    if (!work->input.buffers.empty()) {
    	//為瞭得到輸入數據,層層訪問,真正放數據的地址在rView.data()[]中
    	//把work這個對象用思維導圖畫出來,我們可以更容易的理解work,到底擁有哪些成員,如何訪問
        rView = work->input.buffers[0]->data().linearBlocks().front().map().get();
        inSize = rView.capacity();
        ...
    }
    bool eos = ((work->input.flags & C2FrameData::FLAG_END_OF_STREAM) != 0);
    bool hasPicture = false;

    ALOGV("in buffer attr. size %zu timestamp %d frameindex %d, flags %x",
          inSize, (int)work->input.ordinal.timestamp.peeku(),
          (int)work->input.ordinal.frameIndex.peeku(), work->input.flags);
    size_t inPos = 0;
    while (inPos < inSize) {
    	//ensureDecoderState會從內存池中fetch一個GraphicBlock
    	//實質上也就是調用Gralloc接口取得一個output buffer
        if (C2_OK != ensureDecoderState(pool)) {
            mSignalledError = true;
            work->workletsProcessed = 1u;
            work->result = C2_CORRUPTED;
            return;
        }

        ivd_video_decode_ip_t s_decode_ip;
        ivd_video_decode_op_t s_decode_op;
        {
        	//mOutBlock即是上述fetch到的output buffer,通過map映射可以得到一個wView,類似於rView
        	//wView.data()[]指向out buffer的真正地址
        	//wView.data()[C2PlanarLayout::PLANE_Y]就是要存在Y變量的地址
        	//wView.data()[C2PlanarLayout::PLANE_U]就是要存在U變量的地址
            C2GraphicView wView = mOutBlock->map().get();
            ...
            //setDecodeArgs所作的主要工作是,告訴解碼器,輸入數據的地址是什麼,輸出地址包括Y/U/V
            //分量的地址是什麼,輸入數據的長度是多少
            if (!setDecodeArgs(&s_decode_ip, &s_decode_op, &rView, &wView,
                               inOffset + inPos, inSize - inPos, workIndex)) {
                mSignalledError = true;
                work->workletsProcessed = 1u;
                work->result = C2_CORRUPTED;
                return;
            }

            if (false == mHeaderDecoded) {
                /* Decode header and get dimensions */
                setParams(mStride, IVD_DECODE_HEADER);
            }
            //解碼器庫是用瞭第三方的,已經被谷歌收購
            (void) ivdec_api_function(mDecHandle, &s_decode_ip, &s_decode_op);
        }
        if (s_decode_op.i4_reorder_depth >= 0 && mOutputDelay != s_decode_op.i4_reorder_depth) {
        	//目前不清楚把這個重排序長度告訴上層有什麼作用,TODO
            mOutputDelay = s_decode_op.i4_reorder_depth;
            ALOGV("New Output delay %d ", mOutputDelay);

            C2PortActualDelayTuning::output outputDelay(mOutputDelay);
            std::vector<std::unique_ptr<C2SettingResult>> failures;
            c2_status_t err =
                mIntf->config({&outputDelay}, C2_MAY_BLOCK, &failures);
            if (err == OK) {
                work->worklets.front()->output.configUpdate.push_back(
                    C2Param::Copy(outputDelay));
            }
            continue;
        }
        if (0 < s_decode_op.u4_pic_wd && 0 < s_decode_op.u4_pic_ht) {
            if (mHeaderDecoded == false) {
                mHeaderDecoded = true;
                setParams(ALIGN64(s_decode_op.u4_pic_wd), IVD_DECODE_FRAME);
            }
            if (s_decode_op.u4_pic_wd != mWidth || s_decode_op.u4_pic_ht != mHeight) {
                mWidth = s_decode_op.u4_pic_wd;
                mHeight = s_decode_op.u4_pic_ht;
                CHECK_EQ(0u, s_decode_op.u4_output_present);

                C2StreamPictureSizeInfo::output size(0u, mWidth, mHeight);
                std::vector<std::unique_ptr<C2SettingResult>> failures;
                c2_status_t err = mIntf->config({&size}, C2_MAY_BLOCK, &failures);
                if (err == OK) {
                    work->worklets.front()->output.configUpdate.push_back(
                        C2Param::Copy(size));
                }
                continue;
            }
        }
        (void)getVuiParams();
        hasPicture |= (1 == s_decode_op.u4_frame_decoded_flag);
        if (s_decode_op.u4_output_present) {
        	//通過createGraphicBuffer調用,將mOutBlock"轉換"成C2Buffer對象
        	//把C2Buffer添加到work對象的輸出隊列中
        	//通過listener->onWorkDone_nb回調,可以將work返回到CCodec層
        	//以上是這個函數以及其內部調用的主要實現內容,內部調用的finish()函數屬於SimpleC2Component
            finishWork(s_decode_op.u4_ts, work);
        }
        inPos += s_decode_op.u4_num_bytes_consumed;
    }
    if (eos) {
        drainInternal(DRAIN_COMPONENT_WITH_EOS, pool, work);
        mSignalledOutputEos = true;
    } else if (!hasPicture) {
        fillEmptyWork(work);
    }

    work->input.buffers.clear();
}
在Component中,輸入與輸出對象都封裝在work對象中,甚至上下層的配置交互對象也包括在work對象中,與OMX是不一樣的,OMX的數據對象是BufferHeader,輸入是一個Input BufferHeader,輸出是一個Output BufferHeader,對象中包括buffer地址,分配的buffer大小,有效數據長度,有效數據長度的偏移量,buffer標志等。 那麼,work對象也應該會包括類似的成員。
我們來看兩張思維導圖,全局觀察work對象。

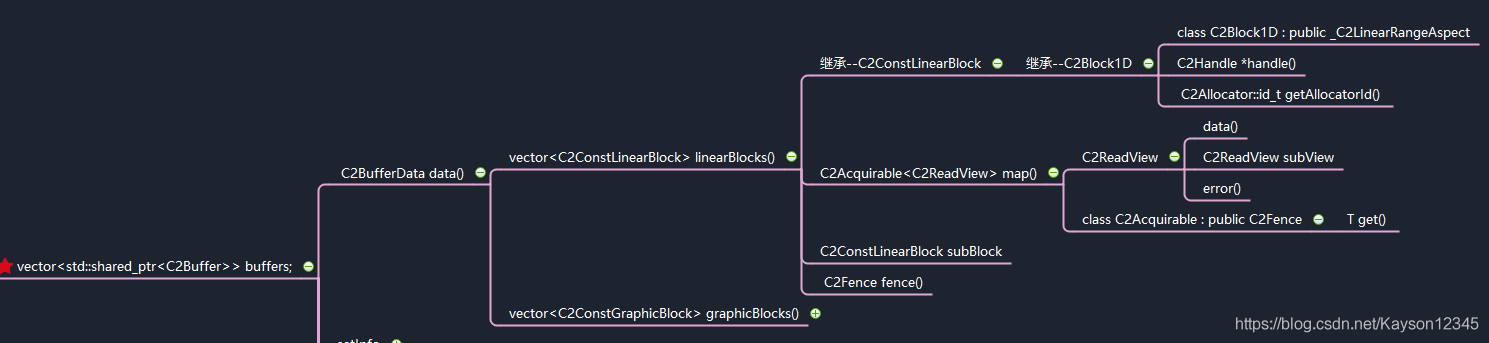
C2SoftAvcDec::process中有一句代碼,從work中訪問rView。
rView = work->input.buffers[0]->data().linearBlocks().front().map().get();
從上述兩圖中,我們可以追蹤這一條訪問線路,訪問C2Work對象的成員C2FrameData,繼續訪問C2FrameData對外的成員vector linearBlocks(),C2ConstLinearBlock有一個方法C2Acquirable map(),這個映射方法返回一個C2ReadView對象,這個C2ReadView對象有一個data()[]數組,指向瞭Y/U/V的向量地址,也就是真正存放解碼數據的內存地址。而Input與Output都是以C2FrameData來描述,Output並非像Input一樣,直接作為C2Work的成員,而是作為C2Work->worklets的成員。worklet是一個list類型,C2SoftAvcDec在存放output buffer的時候,總是存放在第一個worklets的output中,參見思維導圖,output是C2FrameData類型,它擁有一個C2Buffer容器,C2SoftAvcDec總是將新的output buffer丟進容器中,它可以一次丟很多個output buffer,然後一次性通過work回送到上層,上層可以一次性從work中取到多個output buffer去作渲染。C2WorkOrdinalStruct ordinal包括著buffer的pts與frameIndex信息。這裡有個疑問待解決,為什麼output buffer總是存放在第一個worklets的output中,worklets作為一個隊列對象,有什麼其他的意義?
上面我們分析瞭兩個點,一個是模塊的消息處理機制,另一個是如何送數據到解碼器再取出幀數據回送到上層,接下來看第三點,CCodec每次送多少輸入數據下來,component每次處理多少數據,回送輸出數據給CCodec作渲染在哪些地方。
上層是調用SimpleC2Component::queue_nb接口送數據下來的。
\\av\media\codec2\components\base\SimpleC2Component.cpp
c2_status_t SimpleC2Component::queue_nb(std::list<std::unique_ptr<C2Work>> * const items) {
    {
        Mutexed<ExecState>::Locked state(mExecState);
        if (state->mState != RUNNING) {
            return C2_BAD_STATE;
        }
    }
    bool queueWasEmpty = false;
    {
        Mutexed<WorkQueue>::Locked queue(mWorkQueue);
        queueWasEmpty = queue->empty();
        while (!items->empty()) {
            queue->push_back(std::move(items->front()));
            items->pop_front();
        }
    }
    if (queueWasEmpty) {
        (new AMessage(WorkHandler::kWhatProcess, mHandler))->post();
    }
    return C2_OK;
}
觀察上面的代碼,入參是一個列表對象,也就是說,每次送多個work,一個work可以包括一個C2Buffer容器,碼流都是放在容器的第一個元素,雖然一個容器可以放多個C2Buffer,但它就隻放瞭一個C2Buffer。我們可以從下面的代碼中發現,每一次的process,都隻從work中取一個C2Buffer。
 \\av\media\codec2\components\avc\C2SoftAvcDec.cpp
 void C2SoftAvcDec::process(
         const std::unique_ptr<C2Work> &work,
         const std::shared_ptr<C2BlockPool> &pool) {
 	...
     uint32_t workIndex = work->input.ordinal.frameIndex.peeku() & 0xFFFFFFFF;
     C2ReadView rView = mDummyReadView;
     if (!work->input.buffers.empty()) {
     	//關註buffers[0]
         rView = work->input.buffers[0]->data().linearBlocks().front().map().get();
         inSize = rView.capacity();
     }
 }
SimpleC2Component::processQueue()每次隻處理一個work,處理完就把work回送上去。
\\av\media\codec2\components\base\SimpleC2Component.cpp
bool SimpleC2Component::processQueue() {
	....
    ALOGV("start processing frame #%" PRIu64, work->input.ordinal.frameIndex.peeku());
    //處理work
    process(work, mOutputBlockPool);
    ALOGV("processed frame #%" PRIu64, work->input.ordinal.frameIndex.peeku());
    Mutexed<WorkQueue>::Locked queue(mWorkQueue);
    if (work->workletsProcessed != 0u) {
        queue.unlock();
        Mutexed<ExecState>::Locked state(mExecState);
        ALOGV("returning this work");
        std::shared_ptr<C2Component::Listener> listener = state->mListener;
        state.unlock();
        //回送work
        listener->onWorkDone_nb(shared_from_this(), vec(work));
    }
    ...
}
在沒有新送下來的work需要處理的時候,processQueue()會調用drain接口作“渲染”操作,它會看解碼器是否有幀數據生成,有的話,就填充到work中回送到上層。
\\av\media\codec2\components\base\SimpleC2Component.cpp
bool SimpleC2Component::processQueue() {
	....
    if (!work) {
        c2_status_t err = drain(drainMode, mOutputBlockPool);
        if (err != C2_OK) {
            Mutexed<ExecState>::Locked state(mExecState);
            std::shared_ptr<C2Component::Listener> listener = state->mListener;
            state.unlock();
            listener->onError_nb(shared_from_this(), err);
        }
        return hasQueuedWork;
    }
    ...
}
另一個渲染的地方是在process()中,解碼完發現有幀數據的時候,就調用finishWork()將work回送。
\\av\media\codec2\components\avc\C2SoftAvcDec.cpp
void C2SoftAvcDec::process(
        const std::unique_ptr<C2Work> &work,
        const std::shared_ptr<C2BlockPool> &pool) {
	...
        if (s_decode_op.u4_output_present) {
            finishWork(s_decode_op.u4_ts, work);
        }
    ...
}
5 小結
Component內部的邏輯還是比較好理解的,重點在於它是如何申請buffer的,如何將buffer“送”給解碼器,解碼完後是如何取得buffer並返回上層,難點在於work對象層層封裝,當你要訪問實際內存地址時,如何訪問,如果要取得內存的handle,又要如何訪問,這一點通過將work對象一層一層的“繪制”出來,就好懂得多。接下來問題來瞭,在OMX中,上下層的交互配置是通過setParamerter/getParamerter等接口進行的,那麼在Codec2中是如何進行的?Codec2中到底有沒有像OMX一樣的BufferCountActual設計?Codec2在調用nativewindow的setMaxDequeuedBufferCount時是如何確定maxDequeueBufferCount的?GraphicBuffer的生命周期是如何控制的?
到此這篇關於一文搞懂Codec2解碼組件的文章就介紹到這瞭,更多相關Codec2解碼組件內容請搜索WalkonNet以前的文章或繼續瀏覽下面的相關文章希望大傢以後多多支持WalkonNet!
推薦閱讀:
- 一文搞懂Codec2框架解析
- 詳解c++ libuv工作隊列
- Android音視頻開發Media FrameWork框架源碼解析
- C#使用遠程服務調用框架Apache Thrift
- postgresql 性能參數配置方式