JavaScript單例模式實現自定義彈框
本文實例為大傢分享瞭JavaScript單例模式實現自定義彈框的具體代碼,供大傢參考,具體內容如下
功能
- 自定義彈框標題
- 自定義彈框內容
- 自定義彈框確認和關閉時的回調函數
完整代碼
const Dialog = (function () {
 class Dialog {
   constructor () {
     this.ele = document.createElement('div')
     this.ele.className = 'dialog'
     document.body.appendChild(this.ele)
     this.callback = null
     this.setEvent()
   }

   setContent ({ text, topicText, confirmText, cancelText } = options) {
     this.ele.innerHTML = null
     const top = document.createElement('div')
     top.className = 'top'
     const topic = document.createElement('span')
     topic.className = 'topic'
     topic.innerHTML = topicText
     const close = document.createElement('span')
     close.className = 'close'
     close.innerHTML = '×'
     top.appendChild(topic)
     top.appendChild(close)
     const middle = document.createElement('div')
     middle.className = 'middle'
     const content = document.createElement('div')
     content.className = 'content'
     content.innerHTML = text
     middle.appendChild(content)
     const bottom = document.createElement('div')
     bottom.className = 'bottom'
     const confirm = document.createElement('button')
     confirm.className = 'confirm'
     confirm.innerHTML = confirmText
     const cancel = document.createElement('button')
     cancel.className = 'cancel'
     cancel.innerHTML = cancelText
     bottom.appendChild(confirm)
     bottom.appendChild(cancel)
     const wrap = document.createElement('div')
     this.ele.appendChild(top)
     this.ele.appendChild(middle)
     this.ele.appendChild(bottom)
     this.ele.style.display = 'block'
   }

   setEvent () {
     this.ele.addEventListener('click', e => {
       e = e || window.event
       const target = e.target || e.srcElement
       if (target.className === 'close') {
         this.ele.style.display = 'none'
         console.log('close')
       }
       if (target.className === 'confirm') {
         this.ele.style.display = 'none'
         this.callback(true)
       }
       if (target.className === 'cancel') {
         this.ele.style.display = 'none'
         this.callback(false)
       }
     })
   }
 }
 let instance = null
 return function (options, cb) {
   if (!instance) instance = new Dialog()
   instance.setContent(options)
   instance.callback = cb || function () {}
   return instance
 }
 })()

 const dialog = new Dialog({
 text: '提示文字',
 topicText: '標題',
 confirmText: '確定',
 cancelText: '取消'
 }, res => { console.log(res) })
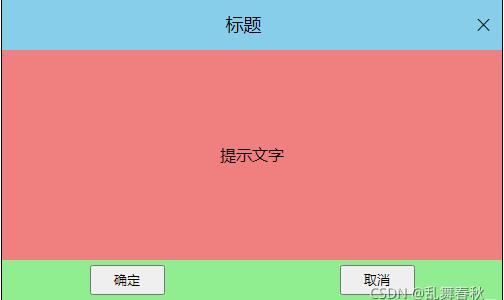
效果圖

以上就是本文的全部內容,希望對大傢的學習有所幫助,也希望大傢多多支持WalkonNet。
推薦閱讀:
- 原生javascript+CSS實現輪播圖效果
- Vue2 Dialog彈窗函數式調用實踐示例
- JavaScript實現餘額數字滾動效果
- 如何使用Vue3設計實現一個Model組件淺析
- JavaScript實例 ODO List分析