springboot 使用QQ郵箱發送郵件的操作方法
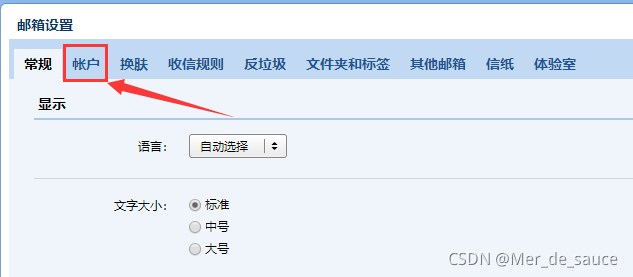
一、QQ郵箱打開POP3/SMTP服務

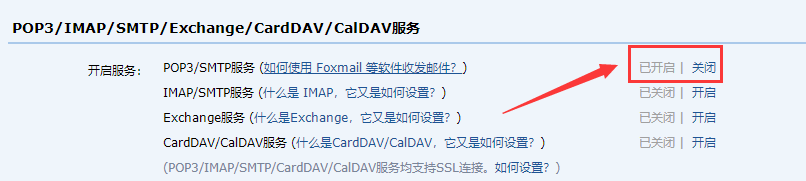
上面的服務開啟後,會得到一串授權密碼在springboot配置中需要用到
二、springboot配置
IDE目錄

1.在pom.xml添加spring-boot-starter-mail起步依賴
 <!-- springboot開發mail項目的起步依賴-->
 <dependency>
     <groupId>org.springframework.boot</groupId>
     <artifactId>spring-boot-starter-mail</artifactId>
 </dependency>
2.在application.properties中配置mail屬性
#靜態資源映射,localhost:8080/ == /resources
spring.resources.static-locations=classpath:META-INF/resources/,classpath:static/,classpath:templates/

#https://blog.csdn.net/jawhiow/article/details/82625842
#如果原先訪問首頁的地址是:http://localhost:8888/index.html   那麼在你配置這個配置後,http://localhost:8888/default/index.html
spring.mvc.static-path-pattern=/*

# 設置郵箱主機
spring.mail.host=smtp.qq.com
# 設置用戶名
spring.mail.username=xxxxxx@qq.com
# 設置密碼,該處的密碼是QQ郵箱開啟SMTP的授權碼而非QQ密碼
spring.mail.password=xxxxxx
# 設置是否需要認證,如果為true,那麼用戶名和密碼就必須的,
# 如果設置false,可以不設置用戶名和密碼,當然也得看你的對接的平臺是否支持無密碼進行訪問的。
spring.mail.properties.mail.smtp.auth=true
# STARTTLS[1]  是對純文本通信協議的擴展。它提供一種方式將純文本連接升級為加密連接(TLS或SSL),而不是另外使用一個端口作加密通信。
spring.mail.properties.mail.smtp.starttls.enable=true
spring.mail.properties.mail.smtp.starttls.required=true

spring.mail.properties.mail.smtp.ssl.enable=true
spring.mail.port=465
3.編寫controller文件
@Controller
public class EmailController {
    @Autowired
    private JavaMailSender javaMailSender;

    @RequestMapping("/")
    public void index(HttpServletRequest request, HttpServletResponse response) throws IOException {
        System.out.println("index.html");
        response.sendRedirect("/index.html");
    }

    @ResponseBody
    @RequestMapping("/emailSend")
    public String emailSend(@RequestParam(value = "email") String eamil){
        System.out.println(eamil);
        String content = "1234";
        try{
            SimpleMailMessage message = new SimpleMailMessage();
            message.setFrom("xxxxxx@qq.com");
            message.setTo(eamil);
            message.setSubject("主題:主題內容");
            message.setText(content);
            //發送郵件
            javaMailSender.send(message);
            System.out.println(eamil+"發送成功");
        }catch (Exception e){
            return "fail";
        }
        return "success";
    }
}
4.編寫網頁頁面
<!DOCTYPE html>
<html lang="en">
<head>
    <meta charset="UTF-8">
    <title>郵件</title>
</head>
<body>
    <form action="/emailSend">
        郵箱:<input type="text" name="email" value="xxxxxx@qq.com">
        <input type="submit">
    </form>
</body>
</html>
5.發送成功


到此這篇關於springboot 使用QQ郵箱 發送郵件的文章就介紹到這瞭,更多相關springboot QQ郵箱 發送郵件內容請搜索WalkonNet以前的文章或繼續瀏覽下面的相關文章希望大傢以後多多支持WalkonNet!
推薦閱讀:
- SpringBoot實現發送電子郵件
- springboot實現發送QQ郵箱
- JavaMail實現簡單郵件發送
- SpringBoot QQ郵箱發送郵件實例代碼
- springboot整合mail實現郵箱的發送功能