SpringSecurity OAuth2單點登錄和登出的實現
Spring Security OAuth 最新官方已經不再維護,以下內容隻用於學習記錄。
GitHub:shpunishment/spring-security-oauth2-demo
1. 單點登錄
單點登錄即有多個子系統,有一個認證中心。當訪問其中任意一個子系統時,如果發現未登錄,就跳到認證中心進行登錄,登錄完成後再跳回該子系統。此時訪問其他子系統時,就已經是登錄狀態瞭。登出統一從認證中心登出,登出後各個子系統就無法訪問瞭,需要再次登錄。
Spring Security OAuth 建立在Spring Security 之上,所以大部分配置還是在Security中,Security完成對用戶的認證和授權,OAuth完成單點登錄。
Spring Security OAuth 的單點登錄主要靠@EnableOAuth2Sso實現,簡化瞭從資源服務器到認證授權服務器的SSO流程,並使用授權碼方式獲取。
1.1 使用內存保存客戶端和用戶信息
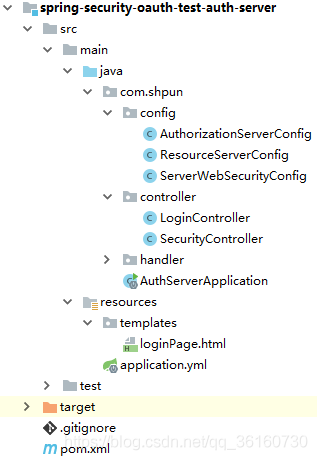
1.1.1 認證中心 auth-server
添加依賴
<dependency>
    <groupId>org.springframework.boot</groupId>
    <artifactId>spring-boot-starter-web</artifactId>
</dependency>
<dependency>
    <groupId>org.springframework.boot</groupId>
    <artifactId>spring-boot-starter-thymeleaf</artifactId>
</dependency>
<dependency>
    <groupId>org.springframework.boot</groupId>
    <artifactId>spring-boot-starter-security</artifactId>
</dependency>
<dependency>
    <groupId>org.springframework.security.oauth</groupId>
    <artifactId>spring-security-oauth2</artifactId>
    <version>2.3.8.RELEASE</version>
</dependency>
<dependency>
    <groupId>org.springframework.boot</groupId>
    <artifactId>spring-boot-starter-data-redis</artifactId>
</dependency>
<!--spring2.0集成redis所需common-pool2-->
<dependency>
    <groupId>org.apache.commons</groupId>
    <artifactId>commons-pool2</artifactId>
    <version>2.4.2</version>
</dependency>
<dependency>
    <groupId>com.alibaba</groupId>
    <artifactId>fastjson</artifactId>
    <version>1.2.60</version>
</dependency>
application.yml
server:
  port: 8000
  servlet:
    context-path: /auth-server
	session:
      cookie:
        name: oauth-auth-server

spring:
  redis:
    # Redis默認情況下有16個分片,這裡配置具體使用的分片,默認是0
    database: 0
    host: localhost
    port: 6379
    # 連接密碼(默認為空)
    password:
    # 連接超時時間(毫秒)
    timeout: 10000ms
    lettuce:
      pool:
        # 連接池最大連接數(使用負值表示沒有限制) 默認 8
        max-active: 8
        # 連接池最大阻塞等待時間(使用負值表示沒有限制) 默認 -1
        max-wait: -1
        # 連接池中的最大空閑連接 默認 8
        max-idle: 8
        # 連接池中的最小空閑連接 默認 0
        min-idle: 0
添加授權服務器配置,主要令牌路徑的安全性,客戶端詳情和令牌存儲。
這裡配置瞭一個客戶端,支持授權碼模式和刷新Token,並且將Token存在Redis中。
@Configuration
@EnableAuthorizationServer
public class AuthorizationServerConfig extends AuthorizationServerConfigurerAdapter {

    private static final String RESOURCE_ID = "resource-1";

    @Autowired
    private PasswordEncoder passwordEncoder;

    @Autowired
    private RedisConnectionFactory redisConnectionFactory;

    /**
     * 配置授權服務器的安全性,令牌端點的安全約束
     *
     * @param security
     * @throws Exception
     */
    @Override
    public void configure(AuthorizationServerSecurityConfigurer security) throws Exception {
        security
                // 開啟 /oauth/check_token
                .tokenKeyAccess("permitAll()")
                // 開啟 /oauth/token_key
                .checkTokenAccess("isAuthenticated()")
                // 允許表單認證
                // 如果配置,且url中有client_id和client_secret的,則走 ClientCredentialsTokenEndpointFilter
                // 如果沒有配置,但是url中沒有client_id和client_secret的,走basic認證保護
                .allowFormAuthenticationForClients();
    }

    /**
     * 配置客戶端,可存在內存和數據庫中
     *
     * @param clients
     * @throws Exception
     */
    @Override
    public void configure(ClientDetailsServiceConfigurer clients) throws Exception {
        clients
                .inMemory()
                .withClient("client_1")
                .resourceIds(RESOURCE_ID)
                .authorizedGrantTypes("authorization_code", "refresh_token")
                .scopes("read")
                .authorities("client")
                .secret(passwordEncoder.encode("123456"))
                // 必須添加,會和請求時重定向地址匹配
                .redirectUris("http://localhost:8001/service1/login")
                // 自動批準,在登錄成功後不會跳到批準頁面,讓資源所有者批準
                //.autoApprove(true);
    }

    /**
     *
     * 配置授權服務器端點的非安全功能,例如令牌存儲,令牌自定義,用戶批準和授予類型
     *
     * @param endpoints
     * @throws Exception
     */
    @Override
    public void configure(AuthorizationServerEndpointsConfigurer endpoints) throws Exception {
        endpoints
                // 令牌存在redis
                .tokenStore(tokenStore());
    }

	/**
     * 配置redis,使用redis存token
     * @return
     */
    @Bean
    public TokenStore tokenStore(){
        return new RedisTokenStore(redisConnectionFactory);
    }
}
添加資源服務器配置,主要配置資源id和需要Token驗證的url
對於相同的url,如果二者都配置瞭驗證,則優先進入ResourceServerConfigurerAdapter,會被 OAuth2AuthenticationProcessingFilter 處理,進行token驗證;而不會進行WebSecurityConfigurerAdapter 的表單認證等。
@Configuration
@EnableResourceServer
public class ResourceServerConfig extends ResourceServerConfigurerAdapter {

    private static final String RESOURCE_ID = "resource-1";

    /**
     * 添加特定於資源服務器的屬性
     *
     * @param resources
     */
    @Override
    public void configure(ResourceServerSecurityConfigurer resources) throws Exception {
        resources
                .resourceId(RESOURCE_ID);
    }

    /**
     * 使用此配置安全資源的訪問規則,配置需要token驗證的url。 默認情況下,所有不在"/oauth/**"中的資源都受到保護。
     *
     * @param http
     * @throws Exception
     */
    @Override
    public void configure(HttpSecurity http) throws Exception {
        // 隻有 /security/getUserInfo 需要token驗證
        http
                .requestMatchers().antMatchers("/security/getUserInfo")
                .and()
                .authorizeRequests()
                .anyRequest().authenticated();
    }
}
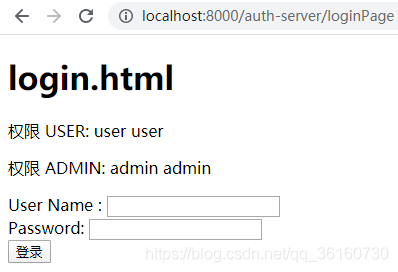
security配置,用戶數據,自定義登錄頁,成功失敗Handler,session,配置非受保護URL等。
這裡添加瞭兩個用戶以及登錄頁等配置。
@Configuration
public class ServerWebSecurityConfig extends WebSecurityConfigurerAdapter {

    /**
     * 認證管理器配置,用於信息獲取來源(UserDetails)以及密碼校驗規則(PasswordEncoder)
     *
     * @param auth
     * @throws Exception
     */
    @Override
    protected void configure(AuthenticationManagerBuilder auth) throws Exception {
        auth
                // 使用內存認證,在內存中保存兩個用戶
                .inMemoryAuthentication()
                .passwordEncoder(passwordEncoder())
                // admin 擁有ADMIN和USER的權限
                .withUser("admin").password(passwordEncoder().encode("admin")).roles("ADMIN", "USER")
                .and()
                // user 擁有USER的權限
                .withUser("user").password(passwordEncoder().encode("user")).roles("USER");
    }

    /**
     * 核心過濾器配置,更多使用ignoring()用來忽略對靜態資源的控制
     * @param web
     * @throws Exception
     */
    @Override
    public void configure(WebSecurity web) throws Exception {
        web
                .ignoring()
                .antMatchers("/static/js/**");
    }

    /**
     * 安全過濾器鏈配置,自定義安全訪問策略
     * @param http
     * @throws Exception
     */
    @Override
    protected void configure(HttpSecurity http) throws Exception {
        http
                .authorizeRequests()
                // /login 和 /oauth/authorize 路徑配置為不需要任何身份驗證,其他所有路徑必須經過驗證
                .antMatchers("/login", "/oauth/authorize").permitAll()
                // 其他請求都需要已認證
                .anyRequest().authenticated()
                .and()
                // 使用表單登錄
                .formLogin()
                // 自定義username 和password參數
                .usernameParameter("login_username")
                .passwordParameter("login_password")
                // 自定義登錄頁地址
                .loginPage("/loginPage")
                // 驗證表單的地址,由過濾器 UsernamePasswordAuthenticationFilter 攔截處理
                .loginProcessingUrl("/login")
                .permitAll()
                .and()
                .csrf().disable();
    }

    @Bean
    public static BCryptPasswordEncoder passwordEncoder() {
        return new BCryptPasswordEncoder();
    }
}
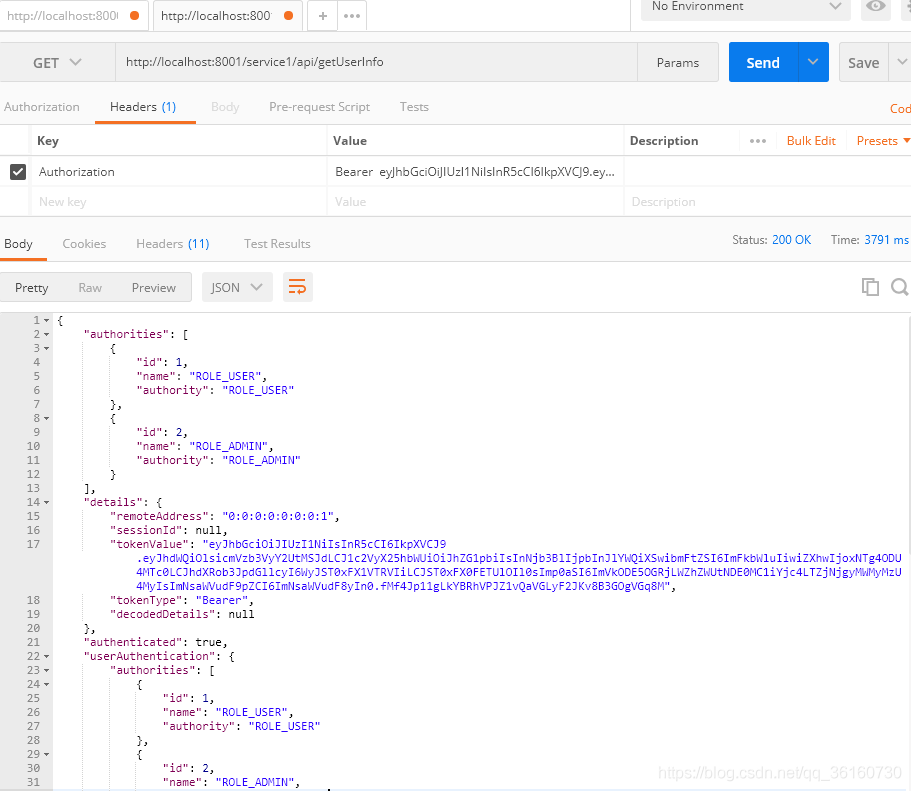
獲取當前用戶信息,供客戶端獲取
@RestController
@RequestMapping("/security")
public class SecurityController {
    @GetMapping("/getUserInfo")
    @ResponseBody
    public Principal getUserInfo(Principal principal) {
        return principal;
    }
}
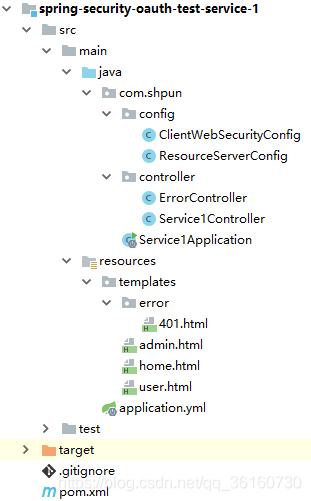
1.1.2 子系統 service-1
添加依賴
<dependency>
    <groupId>org.springframework.boot</groupId>
    <artifactId>spring-boot-starter-web</artifactId>
</dependency>

<dependency>
    <groupId>org.springframework.boot</groupId>
    <artifactId>spring-boot-starter-thymeleaf</artifactId>
</dependency>

<dependency>
    <groupId>org.springframework.security.oauth.boot</groupId>
    <artifactId>spring-security-oauth2-autoconfigure</artifactId>
    <version>2.1.13.RELEASE</version>
</dependency>
application.yml
server:
  port: 8001
  servlet:
    context-path: /service1
	session:
      cookie:
        name: oauth-service-1

security:
  oauth2:
    client:
      clientId: client_1
      clientSecret: 123456
      # 獲取訪問令牌的URI
      accessTokenUri: http://localhost:8000/auth-server/oauth/token
      # 將用戶重定向到的授權URI
      userAuthorizationUri: http://localhost:8000/auth-server/oauth/authorize
    resource:
      # 獲取當前用戶詳細信息
      userInfoUri: http://localhost:8000/auth-server/security/getUserInfo
security配置,如果需要對service-1的url進行控制,需要添加 WebSecurityConfigurerAdapter 配置,可配置子系統中哪些接口需要auth-server的認證,配置非受保護URL等。
@Configuration
// @EnableOAuth2Sso 註解 在繼承 WebSecurityConfigurerAdapter 類的上面時
// 代表著在該子類配置的基礎上增強 OAuth2Sso 相關配置。
@EnableOAuth2Sso
@EnableGlobalMethodSecurity(prePostEnabled = true)
public class ClientWebSecurityConfig extends WebSecurityConfigurerAdapter {
/**
* 安全過濾器鏈配置,自定義安全訪問策略。可配置客戶端不受保護的資源
*
* @param http
* @throws Exception
*/
@Override
public void configure(HttpSecurity http) throws Exception {
http
.antMatcher("/**")
.authorizeRequests()
// 訪問 / /home 不用認證
.antMatchers("/", "/home").permitAll()
.anyRequest().authenticated()
.and()
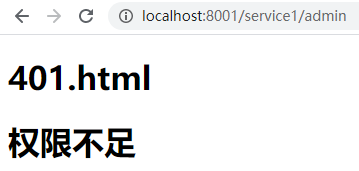
// 權限不足跳轉 /401
.exceptionHandling().accessDeniedPage("/401");
}
/**
* 核心過濾器配置,更多使用ignoring()用來忽略對靜態資源的控制和過濾微服務間feign的接口
*
* @param web
* @throws Exception
*/
@Override
public void configure(WebSecurity web) throws Exception {
web
.ignoring()
.antMatchers("/js/**");
}
}
客戶端資源服務器配置,隻有 /api/* 需要token驗證
@Configuration
@EnableResourceServer
public class ResourceServerConfig extends ResourceServerConfigurerAdapter {

    private static final String RESOURCE_ID = "resource-1";

    /**
     * 添加特定於資源服務器的屬性
     *
     * @param resources
     */
    @Override
    public void configure(ResourceServerSecurityConfigurer resources) throws Exception {
        resources
                .resourceId(RESOURCE_ID);
    }

    /**
     * 使用此配置安全資源的訪問規則,配置需要token驗證的url。 默認情況下,所有不在"/oauth/**"中的資源都受到保護。
     *
     * @param http
     * @throws Exception
     */
    @Override
    public void configure(HttpSecurity http) throws Exception {
        // /api/* 都需要token驗證,會被 OAuth2AuthenticationProcessingFilter 處理
        http
                .requestMatchers()
                .antMatchers("/api/*")
                .and()
                .authorizeRequests()
                .anyRequest().authenticated();
    }
}
service1控制器
@Controllerpublic class Service1Controller {<!--{C}%3C!%2D%2D%20%2D%2D%3E--> @RequestMapping(path = {<!--{C}%3C!%2D%2D%20%2D%2D%3E-->"/", "/home"}) public ModelAndView home() {<!--{C}%3C!%2D%2D%20%2D%2D%3E--> return new ModelAndView("home"); } @PreAuthorize("hasRole('USER')") @RequestMapping("/user") public ModelAndView user() {<!--{C}%3C!%2D%2D%20%2D%2D%3E--> return new ModelAndView("user"); } @PreAuthorize("hasRole('ADMIN')") @RequestMapping("/admin") public ModelAndView admin() {<!--{C}%3C!%2D%2D%20%2D%2D%3E--> return new ModelAndView("admin"); } /** * 測試 /api/* 是否被資源服務器攔截,需要token * @return */ @GetMapping("/api/getUserInfo") @ResponseBody public Principal getUserInfo() {<!--{C}%3C!%2D%2D%20%2D%2D%3E--> return SecurityContextHolder.getContext().getAuthentication(); } @GetMapping("/api2/getUserInfo") @ResponseBody public Principal getUserInfo2() {<!--{C}%3C!%2D%2D%20%2D%2D%3E--> return SecurityContextHolder.getContext().getAuthentication(); }}@Controller
public class Service1Controller {

    @RequestMapping(path = {"/", "/home"})
    public ModelAndView home() {
        return new ModelAndView("home");
    }

    @PreAuthorize("hasRole('USER')")
    @RequestMapping("/user")
    public ModelAndView user() {
        return new ModelAndView("user");
    }

    @PreAuthorize("hasRole('ADMIN')")
    @RequestMapping("/admin")
    public ModelAndView admin() {
        return new ModelAndView("admin");
    }

    /**
     * 測試 /api/* 是否被資源服務器攔截,需要token
     * @return
     */
    @GetMapping("/api/getUserInfo")
    @ResponseBody
    public Principal getUserInfo() {
        return SecurityContextHolder.getContext().getAuthentication();
    }

    @GetMapping("/api2/getUserInfo")
    @ResponseBody
    public Principal getUserInfo2() {
        return SecurityContextHolder.getContext().getAuthentication();
    }
}
1.1.3 測試
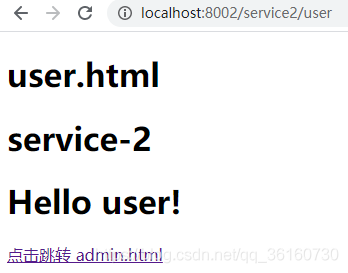
service-2根據service-1復制一遍。
service-1和service-2不用登錄即可訪問 / /home
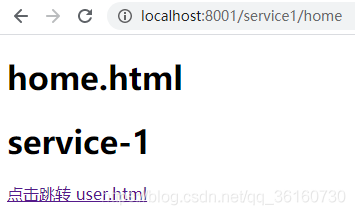
訪問 /user 需要認證的資源,會先到auth-server進行認證
資源所有者批準

批準後才能訪問到 /user
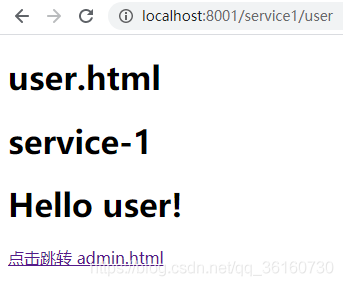
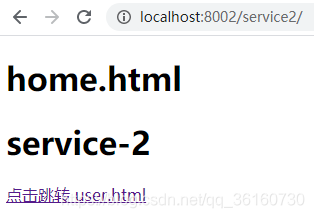
service-2的 /user 也可訪問,即實現瞭單點登錄
訪問 /admin 用戶權限不足
1.2 使用數據庫保存客戶端和用戶信息
隻需要修改auth-server中客戶端和用戶信息的獲取方式。
用戶信息部分,修改security配置,參考 Spring Security 使用 中的使用數據庫保存用戶信息。
由於將Token等信息存在瞭Redis中,所以在數據庫中隻需要保存客戶端信息。修改 AuthorizationServerConfig
@Autowired
private DataSource dataSource;

@Override
public void configure(ClientDetailsServiceConfigurer clients) throws Exception {
    clients
            .withClientDetails(clientDetails(dataSource));
}

/**
 * 獲取客戶端詳細信息服務,JDBC實現
 * @return
 */
@Bean
public ClientDetailsService clientDetails(DataSource dataSource) {
    return new JdbcClientDetailsService(dataSource);
}
添加表和數據,密碼使用BCrypt加密,數據和使用內存時一致。
CREATE TABLE `oauth_client_details`  (
  `client_id` varchar(128) CHARACTER SET utf8 COLLATE utf8_general_ci NOT NULL,
  `resource_ids` varchar(256) CHARACTER SET utf8 COLLATE utf8_general_ci NULL DEFAULT NULL,
  `client_secret` varchar(256) CHARACTER SET utf8 COLLATE utf8_general_ci NULL DEFAULT NULL,
  `scope` varchar(256) CHARACTER SET utf8 COLLATE utf8_general_ci NULL DEFAULT NULL,
  `authorized_grant_types` varchar(256) CHARACTER SET utf8 COLLATE utf8_general_ci NULL DEFAULT NULL,
  `web_server_redirect_uri` varchar(256) CHARACTER SET utf8 COLLATE utf8_general_ci NULL DEFAULT NULL,
  `authorities` varchar(256) CHARACTER SET utf8 COLLATE utf8_general_ci NULL DEFAULT NULL,
  `access_token_validity` int(11) NULL DEFAULT NULL,
  `refresh_token_validity` int(11) NULL DEFAULT NULL,
  `additional_information` varchar(4096) CHARACTER SET utf8 COLLATE utf8_general_ci NULL DEFAULT NULL,
  `autoapprove` varchar(256) CHARACTER SET utf8 COLLATE utf8_general_ci NULL DEFAULT NULL,
  PRIMARY KEY (`client_id`) USING BTREE
) ENGINE = InnoDB CHARACTER SET = utf8 COLLATE = utf8_general_ci ROW_FORMAT = Compact;

INSERT INTO `oauth_client_details` VALUES ('client_1', 'resource-1', '$2a$10$TfM5Bisse4ewbmIDfqZcxuYl5dI39/lEzzvkzlxFELKglHQM78FIu', 'read', 'authorization_code,refresh_token', 'http://localhost:8001/service1/login,http://localhost:8002/service2/login', NULL, NULL, NULL, NULL, NULL);
效果與使用內存時一致。
1.3 單點登錄流程
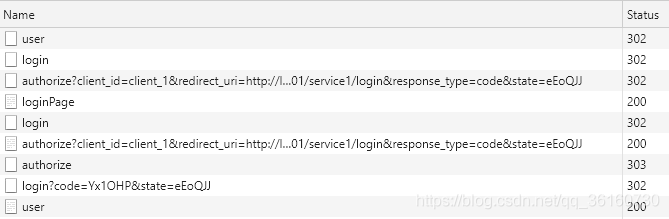
打開F12會看到以下重定向過程,可看到大致步驟:
- 請求授權碼,判斷未登錄,重定向登錄頁
- 登錄成功,重定向繼續請求授權碼,未被資源所有者批準,返回批準頁面
- 資源所有者批準,重定向返回授權碼
- 客戶端獲取到授權碼,請求Token
- 獲取到Token,重定向 /user
1.2.1 請求授權碼,判斷未登錄,重定向登錄頁
訪問客戶端受保護資源 localhost:8001/service1/user,未登錄重定向到 localhost:8001/service1/login 進行登錄認證,因為配置瞭單點登錄@EnableOAuth2Sso,所以單點登錄攔截器會讀取授權服務器的配置,發起獲取授權碼請求
http://localhost:8000/auth-server/oauth/authorize?client_id=client_1&redirect_uri=http://localhost:8001/service1/login&response_type=code&state=eEoQJJ
被auth-server的 AuthorizationEndpoint.authorize() 處理,因為未登錄認證,拋出異常
if (!(principal instanceof Authentication) || !((Authentication) principal).isAuthenticated()) {
	throw new InsufficientAuthenticationException(
			"User must be authenticated with Spring Security before authorization can be completed.");
}
異常在 ExceptionTranslationFilter.doFilter() 中處理
handleSpringSecurityException(request, response, chain, ase);
調用 LoginUrlAuthenticationEntryPoint.commence() 方法,獲取登錄頁地址,並重定向
redirectUrl = buildRedirectUrlToLoginPage(request, response, authException);
1.2.2 登錄成功,重定向繼續請求授權碼,未被資源所有者批準,返回批準頁面
在auth-server中用戶密碼由 AbstractAuthenticationProcessingFilter.doFilter() 處理,UsernamePasswordAuthenticationFilter 繼承自 AbstractAuthenticationProcessingFilter,在父類 doFilter() 方法中,會調用子類實現的 attemptAuthentication 方法,獲取認證信息
authResult = attemptAuthentication(request, response);
在 attemptAuthentication() 方法中,將用戶名和密碼封裝成token並認證,並添加額外信息後,進行認證
this.getAuthenticationManager().authenticate(authRequest);
getAuthenticationManager() 方法獲取 AuthenticationManager 的實現類 ProviderManager,在 authenticate() 方法中,找到合適的 AuthenticationProvider 處理認證,這裡是 DaoAuthenticationProvider,它父類 AbstractUserDetailsAuthenticationProvider 實現瞭該方法
result = provider.authenticate(authentication);
父類會調用 retrieveUser() 方法檢索用戶,實現在 DaoAuthenticationProvider
user = retrieveUser(username,(UsernamePasswordAuthenticationToken) authentication);
這裡是從內存或數據庫中獲取用戶,然後進行密碼校驗,成功後,將信息保存到Authentication,並返回。調用成功Handler,記住我等等。
默認登錄成功,會重定向之前請求的地址
http://localhost:8000/auth-server/oauth/authorize?client_id=client_1&redirect_uri=http://localhost:8001/service1/login&response_type=code&state=eEoQJJ
再次被auth-server的 AuthorizationEndpoint.authorize() 處理,這時有用戶認證信息,獲取client信息,進行檢查,檢查資源所有者是否批準(客戶端可設置是否自動批準)
如果未批準,返回批準頁,請求轉發 forward:/oauth/confirm_access
return getUserApprovalPageResponse(model, authorizationRequest, (Authentication) principal);
1.2.3 資源所有者批準,重定向返回授權碼
用戶批準後,被 AuthorizationEndpoint.approveOrDeny() 方法處理,返回授權碼,並重定向用戶設置的地址(/login),並帶上code和state
return getAuthorizationCodeResponse(authorizationRequest, (Authentication) principal);
1.2.4 客戶端獲取到授權碼,請求Token
在客戶端 AbstractAuthenticationProcessingFilter 中處理
authResult = attemptAuthentication(request, response);
由子類 OAuth2ClientAuthenticationProcessingFilter.attemptAuthentication() 處理,判斷token是否為空
accessToken = restTemplate.getAccessToken();
如果為空,在 AuthorizationCodeAccessTokenProvider.obtainAccessToken() 方法中,獲取返回的授權碼,向auth-server請求Token
return retrieveToken(request, resource, getParametersForTokenRequest(resource, request),getHeadersForTokenRequest(request));
在auth-server中 TokenEndpoint.getAccessToken() 方法獲取token,進行客戶端校驗後生成token並返回
OAuth2AccessToken token = getTokenGranter().grant(tokenRequest.getGrantType(), tokenRequest);
1.2.5 獲取到Token,重定向 /user
回到在客戶端 OAuth2ClientAuthenticationProcessingFilter.attemptAuthentication() 中,獲取到token後,帶上token,向auth-server請求用戶信息。
默認Token是使用uuid,生成用於認證的token和刷新的Token。認證Token默認12小時過期,刷新的Token默認30天過期。
OAuth2Authentication result = tokenServices.loadAuthentication(accessToken.getValue());
在auth-server 被 OAuth2AuthenticationProcessingFilter 處理,從頭部獲取並驗證token後,完成該請求。
客戶端獲取到用戶信息,在客戶端重新完成登錄的流程,最後在默認的登錄成功Handler中獲取到重定向地址(即 /user),並重定向。
1.3 JWT Token
1.3.1 資源服務器未添加tokenServices
隻需要修改auth-server中授權服務器。
添加依賴
<dependency>
    <groupId>org.springframework.security</groupId>
    <artifactId>spring-security-jwt</artifactId>
    <version>1.0.11.RELEASE</version>
</dependency>
自定義生成token攜帶的信息
@Component
public class CustomTokenEnhancer implements TokenEnhancer {
    @Override
    public OAuth2AccessToken enhance(OAuth2AccessToken accessToken, OAuth2Authentication authentication) {
        final Map<String, Object> additionalInfo = new HashMap<>(2);
        UserDetails user = (UserDetails) authentication.getUserAuthentication().getPrincipal();
        additionalInfo.put("userName", user.getUsername());
        additionalInfo.put("authorities", user.getAuthorities());
        ((DefaultOAuth2AccessToken) accessToken).setAdditionalInformation(additionalInfo);
        return accessToken;
    }
}
修改 AuthorizationServerConfig
@Autowired
private CustomTokenEnhancer customTokenEnhancer;

@Autowired
private AuthenticationManager authenticationManager;

@Override
public void configure(AuthorizationServerEndpointsConfigurer endpoints) throws Exception {
    // token增強配置
    TokenEnhancerChain tokenEnhancerChain = new TokenEnhancerChain();
    tokenEnhancerChain.setTokenEnhancers(Arrays.asList(customTokenEnhancer, jwtAccessTokenConverter()));

    endpoints
            // 令牌存在redis
            .tokenStore(tokenStore())
            .tokenEnhancer(tokenEnhancerChain)
            // 密碼授權方式時需要
            .authenticationManager(authenticationManager)
            // /oauth/token 運行get和post
            .allowedTokenEndpointRequestMethods(HttpMethod.GET, HttpMethod.POST);
}

/**
 * 用來生成token的轉換器
 * @return
 */
@Bean
public JwtAccessTokenConverter jwtAccessTokenConverter() {
   JwtAccessTokenConverter jwtAccessTokenConverter = new JwtAccessTokenConverter();
   // 對稱加密,設置簽名,使用下面這個值作為密鑰
   jwtAccessTokenConverter.setSigningKey("oauth");
   return jwtAccessTokenConverter;
}
添加客戶端2,支持密碼授權方式
INSERT INTO `oauth_client_details`(`client_id`, `resource_ids`, `client_secret`, `scope`, `authorized_grant_types`, `web_server_redirect_uri`, `authorities`, `access_token_validity`, `refresh_token_validity`, `additional_information`, `autoapprove`) VALUES ('client_2', 'resource-1', '$2a$10$TfM5Bisse4ewbmIDfqZcxuYl5dI39/lEzzvkzlxFELKglHQM78FIu', 'read', 'password,refresh_token', NULL, NULL, NULL, NULL, NULL, NULL);
測試
使用密碼模式獲取token

使用token獲請求資源服務器保護的接口
流程
在auth-server的 TokenEndpoint 中驗證信息並獲取token。然後帶著token請求,在service-1中被 OAuth2AuthenticationProcessingFilter 處理,doFilter() 方法會提取並驗證token。
按上面的配置,並沒有在資源服務器中配置tokenServices
Authentication authResult = authenticationManager.authenticate(authentication);
所以在加載 Authentication 的時候,tokenServices 為 UserInfoTokenServices,就會調用配置的 userInfoUri 去auth-server獲取用戶信息
OAuth2Authentication auth = tokenServices.loadAuthentication(token);
1.3.2 資源服務器添加tokenServices
auth-server
修改ResourceServerConfig
@Autowired
private TokenStore tokenStore;

@Override
public void configure(ResourceServerSecurityConfigurer resources) throws Exception {
    DefaultTokenServices defaultTokenServices = new DefaultTokenServices();
    defaultTokenServices.setTokenStore(tokenStore);

    resources
            .resourceId(RESOURCE_ID)
            .tokenServices(defaultTokenServices);
}
service-1
添加依賴
<dependency>
    <groupId>org.springframework.boot</groupId>
    <artifactId>spring-boot-starter-data-redis</artifactId>
</dependency>

<!--spring2.0集成redis所需common-pool2-->
<dependency>
    <groupId>org.apache.commons</groupId>
    <artifactId>commons-pool2</artifactId>
    <version>2.4.2</version>
</dependency>
修改application.yml
spring:
  redis:
    # Redis默認情況下有16個分片,這裡配置具體使用的分片,默認是0
    database: 0
    host: localhost
    port: 6379
    # 連接密碼(默認為空)
    password:
    # 連接超時時間(毫秒)
    timeout: 10000ms
    lettuce:
      pool:
        # 連接池最大連接數(使用負值表示沒有限制) 默認 8
        max-active: 8
        # 連接池最大阻塞等待時間(使用負值表示沒有限制) 默認 -1
        max-wait: -1
        # 連接池中的最大空閑連接 默認 8
        max-idle: 8
        # 連接池中的最小空閑連接 默認 0
        min-idle: 0
修改 ResourceServerConfig
@Autowired
private RedisConnectionFactory redisConnectionFactory;

@Override
public void configure(ResourceServerSecurityConfigurer resources) throws Exception {
    DefaultTokenServices defaultTokenServices = new DefaultTokenServices();
    defaultTokenServices.setTokenStore(tokenStore());

    resources
            .resourceId(RESOURCE_ID)
            .tokenServices(defaultTokenServices);
}

/**
 * 配置redis,使用redis存token
 * @return
 */
@Bean
public TokenStore tokenStore(){
    return new RedisTokenStore(redisConnectionFactory);
}
流程
在auth-server的 TokenEndpoint 中驗證信息並獲取token。然後帶著token請求,在service-1中被 OAuth2AuthenticationProcessingFilter 處理,doFilter() 方法會提取並驗證token。
按上面的配置,並沒有在資源服務器中配置tokenServices
Authentication authResult = authenticationManager.authenticate(authentication);
所以在加載 Authentication 的時候,tokenServices 為 DefaultTokenServices,再加上有UserDetails的實現類,可以解析,就不用在調用auth-server
OAuth2Authentication auth = tokenServices.loadAuthentication(token);
2. 單點登出
這裡除瞭部分的資源服務器中配置的api需要token驗證,其他還是依賴於Spring Security的認證。而Spring Security是使用Cookie和Session的記錄用戶。所以可以將認證中心和各個子系統的Cookie設置在同一路徑下,在認證中心登出時,將Cookie一並刪除,實現認證中心和各個子系統的登出。各子系統需要知道認證中心的登出地址。在這裡是http://localhost:8000/auth-server/logout。
修改認證中心和各個子系統的Cookie路徑,測試發現,放在 / 下才可實現
server: servlet: session: cookie: path: /server:
  servlet:
    session:
      cookie:
        path: /
在auth-server添加登出成功的Handler
@Component
public class CustomLogoutSuccessHandler extends AbstractAuthenticationTargetUrlRequestHandler implements LogoutSuccessHandler {
    @Override
    public void onLogoutSuccess(HttpServletRequest request, HttpServletResponse response, Authentication authentication) throws IOException, ServletException {
        // 將子系統的cookie刪掉
        Cookie[] cookies = request.getCookies();
        if(cookies != null && cookies.length>0){
            for (Cookie cookie : cookies){
                cookie.setMaxAge(0);
                cookie.setPath("/");
                response.addCookie(cookie);
            }
        }
        super.handle(request, response, authentication);
    }
}
修改auth-server的ServerWebSecurityConfig,添加logout配置
@Configuration
public class ServerWebSecurityConfig extends WebSecurityConfigurerAdapter {

    @Autowired
    private CustomLogoutSuccessHandler customLogoutSuccessHandler;

    @Override
    protected void configure(HttpSecurity http) throws Exception {
        http
        		...
                .and()
                // 默認為 /logout
                .logout()
                .logoutSuccessHandler(customLogoutSuccessHandler)
                // 無效會話
                .invalidateHttpSession(true)
                // 清除身份驗證
                .clearAuthentication(true)
                .permitAll()
                ...;
    }
}
當然,使用瞭OAuth發放token,應該也需要使token失效。
@Autowired
private TokenStore tokenStore;

@GetMapping("/revokeToken")
public void revokeToken(HttpServletRequest request) {
    String authHeader = request.getHeader("Authorization");
    if (authHeader != null) {
        String tokenValue = authHeader.replace("Bearer", "").trim();
        OAuth2AccessToken accessToken = tokenStore.readAccessToken(tokenValue);
        tokenStore.removeAccessToken(accessToken);
    }
}
3. 總結
- AuthorizationEndpoint 處理 /oauth/authorize;TokenEndpoint 處理 /oauth/token。
- @EnableOAuth2Sso 會將資源服務器標記為OAuth 2.0的客戶端, 它將負責將資源所有者(最終用戶)重定向到用戶必須輸入其憑據的授權服務器。完成後,用戶將被重定向回具有授權碼的客戶端。然後客戶端通過調用授權服務器獲取授權代碼並將其交換為訪問令牌。隻有在此之後,客戶端才能使用訪問令牌調用資源服務器。
- @EnableResourceServer 意味著所屬的服務需要訪問令牌才能處理請求。在調用資源服務器之前,需要先從授權服務器獲取訪問令牌。
- 在資源服務器中配置的路徑,都會被 OAuth2AuthenticationProcessingFilter 處理,獲取token。
- 之前一直在糾結,客戶端獲取到瞭token,為什麼在訪問 /user 的請求頭中並沒有Authorization,亦可請求成功。其實都因為Security。沒有在資源服務器中配置的路徑,登錄認證成功後並不需要攜帶token,而還是使用Security需要的Cookie和Session。
- 如果資源服務器沒有配置tokenService,就會調用配置的userInfoUri去auth-server獲取用戶信息;如果資源服務器配置瞭tokenService,再加上有UserDetails的實現類,可以解析,就不用在調用auth-server的接口。
參考:
Spring Security Oauth2和Spring Boot實現單點登錄
Spring Security Oauth2 單點登錄案例實現和執行流程剖析
Spring Security OAuth2 入門
Spring security. How to log out user (revoke oauth2 token)
從零開始的Spring Security Oauth2(一)
從零開始的Spring Security Oauth2(二)
從零開始的Spring Security Oauth2(三)
Spring Security OAuth2 入門
Spring Security EnableOAuth2Sso註解實現原理
Spring Security OAuth2 使用Redis存儲token鍵值詳解
Spring Security OAuth2實現使用JWT
jwt 官網
jwt 解碼器
到此這篇關於SpringSecurity OAuth2單點登錄和登出的實現的文章就介紹到這瞭,更多相關SpringSecurity OAuth2單點登錄登出內容請搜索WalkonNet以前的文章或繼續瀏覽下面的相關文章希望大傢以後多多支持WalkonNet!
推薦閱讀:
- SpringSecurity OAtu2+JWT實現微服務版本的單點登錄的示例
- java構建OAuth2授權服務器
- spring cloud 使用oauth2 問題匯總
- Springboot開發OAuth2認證授權與資源服務器操作
- SpringSecurityOAuth2 如何自定義token信息