Python+PyQT5實現手繪圖片生成器
手繪圖片生成器可以將導入的彩色圖片通過python分析光源、灰度等操作生成手繪圖片。
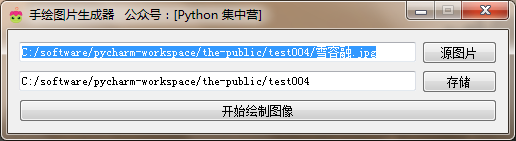
UI界面的整體部分代碼塊,UI界面的設計比較簡單。效果在上面的圖片展示。
class HandImage(QWidget):
    def __init__(self):
        super(HandImage, self).__init__()
        self.init_ui()

    def init_ui(self):
        '''
        UI界面組件及佈局
        :return:
        '''
        self.setWindowTitle('手繪圖片生成器   公眾號:[Python 集中營]')
        self.setWindowIcon(QIcon('手繪圖標.ico'))

        self.setFixedWidth(500)

        self.sou_im_path = QLineEdit()
        self.sou_im_path.setReadOnly(True)

        self.sou_im_path_btn = QPushButton()
        self.sou_im_path_btn.setText('源圖片')
        self.sou_im_path_btn.clicked.connect(self.sou_im_path_btn_clk)

        self.dir_path = QLineEdit()
        self.dir_path.setReadOnly(True)

        self.dir_path_btn = QPushButton()
        self.dir_path_btn.setText('存儲')
        self.dir_path_btn.clicked.connect(self.dir_path_btn_clk)

        self.start_btn = QPushButton()
        self.start_btn.setText('開始繪制圖像')
        self.start_btn.clicked.connect(self.start_btn_clk)

        grid = QGridLayout()
        grid.addWidget(self.sou_im_path, 0, 0, 1, 1)
        grid.addWidget(self.sou_im_path_btn, 0, 1, 1, 1)
        grid.addWidget(self.dir_path, 1, 0, 1, 1)
        grid.addWidget(self.dir_path_btn, 1, 1, 1, 1)
        grid.addWidget(self.start_btn, 2, 0, 1, 2)

        self.thread_ = WorkThread(self)
        self.thread_.finished.connect(self.finished)

        self.setLayout(grid)

    # UI界面上的槽函數

    def sou_im_path_btn_clk(self):
        '''
        選擇源圖片並設置路徑
        :return:
        '''
        im_path = QFileDialog.getOpenFileName(self, os.getcwd(), '打開圖片', 'Image File(*.jpg);;Image File(*.png)')
        self.sou_im_path.setText(im_path[0])

    def dir_path_btn_clk(self):
        '''
        選擇存儲路徑並設置路徑
        :return:
        '''
        dir_path = QFileDialog.getExistingDirectory(self, os.getcwd(), '選擇路徑')
        self.dir_path.setText(dir_path)

    def start_btn_clk(self):
        '''
        開始按鈕綁定的槽函數
        :return:
        '''
        self.start_btn.setEnabled(False)
        self.thread_.start()

    def finished(self, finished):
        '''
        用於子線程傳遞完成信號的槽函數
        :param finished: 信號變量
        :return:
        '''
        if finished is True:
            self.start_btn.setEnabled(True)
其中繪圖用到的第三方庫隻有兩個,主要的還是Pillow圖像處理庫,還有就是numpy科學計算庫用於一些數組計算等的操作。
將第三方的處理庫導入到代碼塊中
from PIL import Image  # 圖像處理模塊
import numpy as np  # 科學計算庫

# PyQt5界面制作及樣式、核心組件
from PyQt5.QtGui import *
from PyQt5.QtWidgets import *
from PyQt5.QtCore import *

# 應用基礎操作相關
import sys
import os
創建用於專門手繪圖像的子線程類,將UI界面的處理邏輯和生成圖像的處理邏輯分開不至於產生無響應的卡死狀態。
class WorkThread(QThread):
    finished = pyqtSignal(bool)

    def __init__(self, parent=None):
        super(WorkThread, self).__init__(parent)
        self.parent = parent
        self.working = True

    def __del__(self):
        self.working = False
        self.wait()

    def run(self):
        # 源圖片路徑
        sou_im_path = self.parent.sou_im_path.text().strip()
        # 存儲路徑
        dir_path = self.parent.dir_path.text().strip()
        if sou_im_path == '' or dir_path == '':
            self.finished.emit(True)
            return
        # 打開需要進行轉的圖像,並進行參數設置,取出來的參數主要圖像的一些梯度值。最後進行數組保存。
        vals = np.asarray(Image.open(sou_im_path).convert('L')).astype('float')

        '''圖像參數處理'''
        depth = 12.0  # 設置初始化深度
        gray_vals = np.gradient(vals)  # 提取圖像灰度的梯度值
        gray_x, gray_y = gray_vals  # 單獨提取橫坐標與縱坐標的灰度值
        print('當前橫坐標的灰度值:', gray_x)
        print('當前縱坐標的灰度值:', gray_y)

        # 重新設置橫坐標合縱坐標的灰度值
        gray_x = gray_x * depth / 100.0
        gray_y = gray_y * depth / 100.0

        # 根據numpy.sqrt()函數計算橫坐標和縱坐標灰度值的平方根
        gray_sqrt = np.sqrt(gray_x ** 2 + gray_y ** 2 + 1.0)

        # 重新計算X軸、Y軸、Z軸的光源
        light_x = gray_x / gray_sqrt
        light_y = gray_y / gray_sqrt
        light_z = 1.0 / gray_sqrt

        # 計算光源的方位角度、俯視角度
        agnle_el = np.pi / 2.2  # 俯視角度
        agnle_az = np.pi / 4.  # 方位角度

        # 分別計算光源對X軸、Y軸、Z軸的影響
        dx = np.cos(agnle_el) * np.cos(agnle_az)  # 光源對x 軸的影響
        dy = np.cos(agnle_el) * np.sin(agnle_az)  # 光源對y 軸的影響
        dz = np.sin(agnle_el)  # 光源對z 軸的影響

        # 設置光源歸一化處理
        light = 255 * (dx * light_x + dy * light_y + dz * light_z)
        light = light.clip(0, 255)

        # 重新構建圖像
        image = Image.fromarray(light.astype('uint8'))
        image.save(dir_path + '/手繪圖像.jpg')
        self.finished.emit(True)
        print('手繪圖像繪制完成!')
主要代碼塊實現都在上面瞭,下面將展示完整的代碼
完整代碼
# -*- coding:utf-8 -*-
# @author Python 集中營
# @date 2022/2/10
# @file test2.py

# done

# 手繪圖片生成器:以雪容融為例一鍵生成...

# 手繪圖片生成器可以將導入的彩色圖片通過python分析光源、灰度等操作生成手繪圖片。

# 其中繪圖用到的第三方庫隻有兩個,主要的還是Pillow圖像處理庫,還有就是numpy科學計算庫用於一些數組計算等的操作。

# 將第三方的處理庫導入到代碼塊中
from PIL import Image  # 圖像處理模塊
import numpy as np  # 科學計算庫

# PyQt5界面制作及樣式、核心組件
from PyQt5.QtGui import *
from PyQt5.QtWidgets import *
from PyQt5.QtCore import *

# 應用基礎操作相關
import sys
import os

# 創建用於專門手繪圖像的子線程類,將UI界面的處理邏輯和生成圖像的處理邏輯分開不至於產生無響應的卡死狀態。
class WorkThread(QThread):
    finished = pyqtSignal(bool)

    def __init__(self, parent=None):
        super(WorkThread, self).__init__(parent)
        self.parent = parent
        self.working = True

    def __del__(self):
        self.working = False
        self.wait()

    def run(self):
        # 源圖片路徑
        sou_im_path = self.parent.sou_im_path.text().strip()
        # 存儲路徑
        dir_path = self.parent.dir_path.text().strip()
        if sou_im_path == '' or dir_path == '':
            self.finished.emit(True)
            return
        # 打開需要進行轉的圖像,並進行參數設置,取出來的參數主要圖像的一些梯度值。最後進行數組保存。
        vals = np.asarray(Image.open(sou_im_path).convert('L')).astype('float')

        '''圖像參數處理'''
        depth = 12.0  # 設置初始化深度
        gray_vals = np.gradient(vals)  # 提取圖像灰度的梯度值
        gray_x, gray_y = gray_vals  # 單獨提取橫坐標與縱坐標的灰度值
        print('當前橫坐標的灰度值:', gray_x)
        print('當前縱坐標的灰度值:', gray_y)

        # 重新設置橫坐標合縱坐標的灰度值
        gray_x = gray_x * depth / 100.0
        gray_y = gray_y * depth / 100.0

        # 根據numpy.sqrt()函數計算橫坐標和縱坐標灰度值的平方根
        gray_sqrt = np.sqrt(gray_x ** 2 + gray_y ** 2 + 1.0)

        # 重新計算X軸、Y軸、Z軸的光源
        light_x = gray_x / gray_sqrt
        light_y = gray_y / gray_sqrt
        light_z = 1.0 / gray_sqrt

        # 計算光源的方位角度、俯視角度
        agnle_el = np.pi / 2.2  # 俯視角度
        agnle_az = np.pi / 4.  # 方位角度

        # 分別計算光源對X軸、Y軸、Z軸的影響
        dx = np.cos(agnle_el) * np.cos(agnle_az)  # 光源對x 軸的影響
        dy = np.cos(agnle_el) * np.sin(agnle_az)  # 光源對y 軸的影響
        dz = np.sin(agnle_el)  # 光源對z 軸的影響

        # 設置光源歸一化處理
        light = 255 * (dx * light_x + dy * light_y + dz * light_z)
        light = light.clip(0, 255)

        # 重新構建圖像
        image = Image.fromarray(light.astype('uint8'))
        image.save(dir_path + '/手繪圖像.jpg')
        self.finished.emit(True)
        print('手繪圖像繪制完成!')


# UI界面的整體部分代碼塊,UI界面的設計比較簡單。效果在下面的圖片展示。

class HandImage(QWidget):
    def __init__(self):
        super(HandImage, self).__init__()
        self.init_ui()

    def init_ui(self):
        '''
        UI界面組件及佈局
        :return:
        '''
        self.setWindowTitle('手繪圖片生成器   公眾號:[Python 集中營]')
        self.setWindowIcon(QIcon('手繪圖標.ico'))

        self.setFixedWidth(500)

        self.sou_im_path = QLineEdit()
        self.sou_im_path.setReadOnly(True)

        self.sou_im_path_btn = QPushButton()
        self.sou_im_path_btn.setText('源圖片')
        self.sou_im_path_btn.clicked.connect(self.sou_im_path_btn_clk)

        self.dir_path = QLineEdit()
        self.dir_path.setReadOnly(True)

        self.dir_path_btn = QPushButton()
        self.dir_path_btn.setText('存儲')
        self.dir_path_btn.clicked.connect(self.dir_path_btn_clk)

        self.start_btn = QPushButton()
        self.start_btn.setText('開始繪制圖像')
        self.start_btn.clicked.connect(self.start_btn_clk)

        grid = QGridLayout()
        grid.addWidget(self.sou_im_path, 0, 0, 1, 1)
        grid.addWidget(self.sou_im_path_btn, 0, 1, 1, 1)
        grid.addWidget(self.dir_path, 1, 0, 1, 1)
        grid.addWidget(self.dir_path_btn, 1, 1, 1, 1)
        grid.addWidget(self.start_btn, 2, 0, 1, 2)

        self.thread_ = WorkThread(self)
        self.thread_.finished.connect(self.finished)

        self.setLayout(grid)

    # UI界面上的槽函數

    def sou_im_path_btn_clk(self):
        '''
        選擇源圖片並設置路徑
        :return:
        '''
        im_path = QFileDialog.getOpenFileName(self, os.getcwd(), '打開圖片', 'Image File(*.jpg);;Image File(*.png)')
        self.sou_im_path.setText(im_path[0])

    def dir_path_btn_clk(self):
        '''
        選擇存儲路徑並設置路徑
        :return:
        '''
        dir_path = QFileDialog.getExistingDirectory(self, os.getcwd(), '選擇路徑')
        self.dir_path.setText(dir_path)

    def start_btn_clk(self):
        '''
        開始按鈕綁定的槽函數
        :return:
        '''
        self.start_btn.setEnabled(False)
        self.thread_.start()

    def finished(self, finished):
        '''
        用於子線程傳遞完成信號的槽函數
        :param finished: 信號變量
        :return:
        '''
        if finished is True:
            self.start_btn.setEnabled(True)


if __name__ == '__main__':
    app = QApplication(sys.argv)
    main = HandImage()
    main.show()
    sys.exit(app.exec_())
以上就是Python+PyQT5實現手繪圖片生成器的詳細內容,更多關於Python PyQT5手繪圖片生成器的資料請關註WalkonNet其它相關文章!