使用pytorch讀取數據集
pytorch讀取數據集
使用pytorch讀取數據集一般有三種情況
第一種
讀取官方給的數據集,例如Imagenet,CIFAR10,MNIST等
這些庫調用torchvision.datasets.XXXX()即可,例如想要讀取MNIST數據集
import torch
import torch.nn as nn
import torch.utils.data as Data
import torchvision
train_data = torchvision.datasets.MNIST(
    root='./mnist/',
    train=True,                                     # this is training data
    transform=torchvision.transforms.ToTensor(),    # Converts a PIL.Image or numpy.ndarray to
                                                    # torch.FloatTensor of shape (C x H x W) and normalize in the range [0.0, 1.0]
    download=True,
)
這樣就會自動從網上下載MNIST數據集,並且以保存好的數據格式來讀取
然後直接定義DataLoader的一個對象,就可以進行訓練瞭
train_loader = Data.DataLoader(dataset=train_data, batch_size=BATCH_SIZE, shuffle=True)
for epoch in range(EPOCH):
    for step, (b_x, b_y) in enumerate(train_loader):   # gives batch data, normalize x when iterate train_loader
    	XXXX
    	XXXX
第二種
這種就比較常用瞭,針對圖像的分類問題
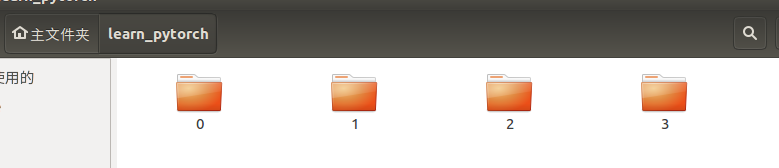
適用情況是,對於圖片的多分類問題,圖片按照指定的格式來存放:
- 根路徑/類別(標簽label)/圖片
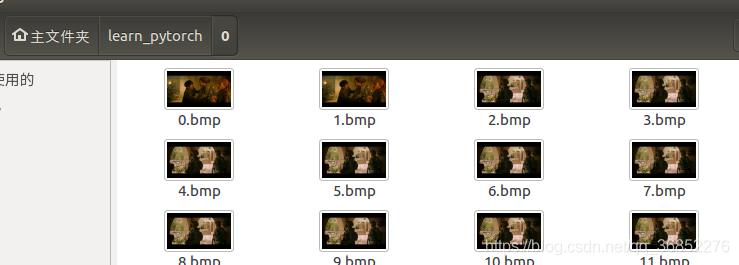
按照上面的格式來存放圖片,根路徑下面保存瞭許多文件夾,每個文件夾中存放瞭某一類的圖片,並且文件夾名就是類的映射,例如這樣,根目錄就是learn_pytorch,下面的每個文件夾代表一個類,類的名字隨便命名,在訓練過程中會自動被映射成0,1,2,3…
保存成這樣的格式之後,就可以直接利用pytorch定義好的派生類ImageFolder來讀取瞭,ImageFolder其實就是Dataset的派生類,專門被定義來讀取特定格式的圖片的,它也是 torchvision庫幫我們方便使用的,比如這樣
然後就可以作為DataLoader的數據集輸入用瞭
from torchvision.datasets import ImageFolder
data_transform = transforms.Compose([
    transforms.ToTensor(),
    transforms.Normalize(mean=[0.5,0.5,0.5], std=[0.5, 0.5, 0.5])
])
dataset = ImageFolder("/home/xxx/learn_pytorch/",transform = data_transform)
train_loader = Data.DataLoader(dataset=dataset, batch_size=BATCH_SIZE, shuffle=True)
它的構造函數要求輸入兩個參數,一個根目錄,一個對數據的操作,因為圖片被自動讀取成PILimage數據格式,因此Totensor()必不可少,而且可以用transforms.Compose把許多操作合成一個參數輸入,就能實現數據增強,非常方便。上面的例子是先轉成tensor,然後歸一化,沒做數據增強的各種操作。如果要數據增強,可以再加一些裁剪、反轉之類的,都可以。比如下面的
transforms.RandomSizedCrop
transforms.RandomHorizontalFlip()
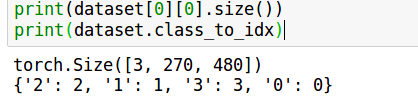
還有一個問題是,如何知道文件夾名被映射成瞭什麼標簽,這個可以直接查看定義的對象的class_to_idx屬性
這個ImageFolder產生的dataset對象,第一維就是第幾張圖片,第二維元素0是圖片矩陣 元素1是label
接下來就是建立模型+訓練瞭
訓練的過程和第一種一樣
第三種
這種情況是最通用的,適用於不是分類問題,或者標簽不是簡單的文件名的映射
思路就是自己定義一個Dataset的派生類,並且對數據的處理、數據增強之類的都需要自己定義,這些定義的時候利用__call_()就可以瞭
實現過程是:
首先
定義一個Dataset的派生類,這個派生類目標是重載兩個魔法方法 __ len __ (),__ getitem__()
__ len __ ()函數是在調用 len(對象)的時候會被調用並返回,重載的目的是,在調用的時候返回數據集的大小__getitem __()函數可讓對象編程可迭代的,定義瞭它之後就可以使得對像被for語句迭代,重載它的目的是能夠使得它每次都迭代返回數據集的一個樣本
現在定義一個派生類
class FaceLandmarksDataset(Dataset):
    """Face Landmarks dataset."""
    def __init__(self, csv_file, root_dir, transform=None):
        """
        Args:
            csv_file (string): Path to the csv file with annotations.
            root_dir (string): Directory with all the images.
            transform (callable, optional): Optional transform to be applied
                on a sample.
        """
        self.landmarks_frame = pd.read_csv(csv_file)
        self.root_dir = root_dir
        self.transform = transform
    def __len__(self):
        return len(self.landmarks_frame)
    def __getitem__(self, idx):
        img_name = os.path.join(self.root_dir,
                                self.landmarks_frame.iloc[idx, 0])
        image = io.imread(img_name)
        landmarks = self.landmarks_frame.iloc[idx, 1:].as_matrix()
        landmarks = landmarks.astype('float').reshape(-1, 2)
        sample = {'image': image, 'landmarks': landmarks}
        if self.transform:
            sample = self.transform(sample)
        return sample
構造函數就是定義瞭一些屬性,例如讀取出保存整個數據集的表格,然後len就是返回瞭數據集的數目,getitem則是定義瞭迭代返回一個數據集樣本,返回值可以是包含訓練樣本和標簽的list,也可以是字典,根據這個不同後面的用法也回不太一樣(無非就是索引是數字還是key的區別)
除此之外,Dataset一般還會要求輸入對數據集的操作,要是不想數據增強,就加個ToTensor就可以(因為要轉換成tensor才能訓練),要是想數據增強就自己加一些新的類(沒錯,ToTensor、各種數據增強的函數其實都是一個類,然後定義的一個對象),接著用transforms.Compose把他們連在一起就可以瞭。上面的transform寫的是None,就是不進行數據處理,直接輸出
然後實例化這個類,就可以作為DataLoader的參數輸入瞭
face_dataset = FaceLandmarksDataset(csv_file='faces/face_landmarks.csv',
                                    root_dir='faces/')
這時候分析一下這個對象,定義它的參數就是init構造函數需要的,然後對他進行迭代的時候會自動調用getitem 例如下面的操作結果是
for i in range(len(face_dataset)):
    sample = face_dataset[i]
    print(sample['image'])
    print(i,sample['image'].shape, sample['landmarks'].shape)
可以看到每次迭代的時候都會輸入一個字典
接下來定義一下DataLoader,就可以去迭代輸入瞭,當然這裡還不行,因為需要將數據集轉換成tensor才能輸入到模型進行訓練
那麼接下來就是考慮剛才那個DataSet類裡的transform怎麼改,最初給的是None,不做處理,因此出來的還是ImageArray,至少要實現ToTensor才行。
實現ToTensor這個類就主要用到瞭 __call __()魔法函數
__ call__()函數比較特殊,可以讓對象本身變成可調用的,可以後面加括號並輸入參數,然後就會自動調用call這個魔法函數
Totensor類的實現如下,註意numpy和tensor數組區別在 一個通道數在後,一個通道數在前,因此還需要交換不同維度的位置
class ToTensor(object):
    """Convert ndarrays in sample to Tensors."""
    def __call__(self, sample):
        image, landmarks = sample['image'], sample['landmarks']
        # swap color axis because
        # numpy image: H x W x C
        # torch image: C X H X W
        image = image.transpose((2, 0, 1))
        return {'image': torch.from_numpy(image),
                'landmarks': torch.from_numpy(landmarks)}
使用的時候先定義一個對象,然後 對象(參數)就會自動調用call函數瞭
再看幾個數據增強的類的實現,它們所有的相似點都是,call函數的參數都是sample,也就是輸入的數據集
class Rescale(object):
    """Rescale the image in a sample to a given size.
    Args:
        output_size (tuple or int): Desired output size. If tuple, output is
            matched to output_size. If int, smaller of image edges is matched
            to output_size keeping aspect ratio the same.
    """
    def __init__(self, output_size):
        assert isinstance(output_size, (int, tuple))
        self.output_size = output_size
    def __call__(self, sample):
        image, landmarks = sample['image'], sample['landmarks']
        h, w = image.shape[:2]
        if isinstance(self.output_size, int):
            if h > w:
                new_h, new_w = self.output_size * h / w, self.output_size
            else:
                new_h, new_w = self.output_size, self.output_size * w / h
        else:
            new_h, new_w = self.output_size
        new_h, new_w = int(new_h), int(new_w)
        img = transform.resize(image, (new_h, new_w))
        # h and w are swapped for landmarks because for images,
        # x and y axes are axis 1 and 0 respectively
        landmarks = landmarks * [new_w / w, new_h / h]
        return {'image': img, 'landmarks': landmarks}
class RandomCrop(object):
    """Crop randomly the image in a sample.
    Args:
        output_size (tuple or int): Desired output size. If int, square crop
            is made.
    """
    def __init__(self, output_size):
        assert isinstance(output_size, (int, tuple))
        if isinstance(output_size, int):
            self.output_size = (output_size, output_size)
        else:
            assert len(output_size) == 2
            self.output_size = output_size
    def __call__(self, sample):
        image, landmarks = sample['image'], sample['landmarks']
        h, w = image.shape[:2]
        new_h, new_w = self.output_size
        top = np.random.randint(0, h - new_h)
        left = np.random.randint(0, w - new_w)
        image = image[top: top + new_h,
                      left: left + new_w]
        landmarks = landmarks - [left, top]
        return {'image': image, 'landmarks': landmarks}
這兩個就很清晰瞭,首先是構造函數要求在定義對象的時候輸入參數,接著再用call實現直接調用對象。
用的時候就可以
transformed_dataset = FaceLandmarksDataset(csv_file='faces/face_landmarks.csv',
root_dir='faces/',
transform=transforms.Compose([
Rescale(256),
RandomCrop(224),
ToTensor()
]))
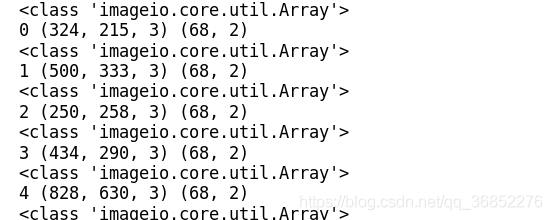
for i in range(len(transformed_dataset)):
sample = transformed_dataset[i]
print(i, sample['image'].size(), sample['landmarks'].size())
if i == 3:
break
分析一下,首先定義重載DataSet類的對象,transform參數寫成上面定義的三個操作類的組合,回頭去看這個類的定義
self.transform = transform
上面就定義瞭一個三個類聯合起來的對象
        if self.transform:
            sample = self.transform(sample)
然後直接調用該對象,調用瞭三個類的call函數,就返回瞭處理後的數據集瞭
最後終於可以迭代訓練瞭
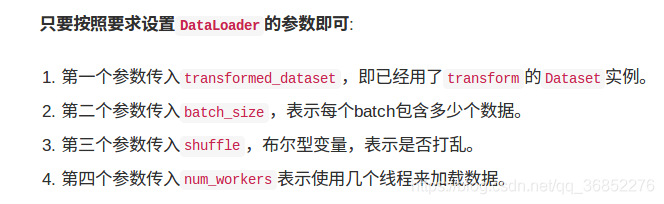
dataloader = DataLoader(transformed_dataset, batch_size=4, shuffle=True, num_workers=4)
定義一個DataLoader的對象,剩下的用法就和第二種的一樣,兩重循環進行訓練瞭,這個DataLoader也有點技巧,就是每次對它迭代的時候,返回的還是DataSet類對象返回值的形式,但是裡面的內容又在前面加瞭一個維度,大小就是batch_size,也就是說,DataLoader對象調用的時候每次從迭代器裡取出來batch_size個樣本,並把它們堆疊起來(這個堆疊是在列表/字典內堆疊的),每次迭代出來的內容還都是一個字典/數組
pytorch學習記錄
這是我隨便搭的一個簡單模型,測試一下
import os
import torch
import torch.nn as nn
import torch.utils.data as Data
import torchvision
import matplotlib.pyplot as plt
from torchvision import transforms
from torchvision.datasets import ImageFolder
import matplotlib.pyplot as plt
%matplotlib inline
#定義幾個參數
EPOCH = 20
BATCH_SIZE = 4
LR = 0.001
#讀取數據
data_transform = transforms.Compose([
transforms.ToTensor(),
transforms.Normalize(mean=[0.5,0.5,0.5], std=[0.5, 0.5, 0.5])
])
dataset = ImageFolder("/home/xxx/learn_pytorch/",transform = data_transform)
print(dataset[0][0].size())
print(dataset.class_to_idx)
#定義
train_loader = Data.DataLoader(dataset=dataset, batch_size=BATCH_SIZE, shuffle=True)
#定義模型類,是 nn.Module的繼承類,思路是先把每個層都定義出來,每個都是模型類的屬性,然後再定義一個成員函數forward()作為前向傳播過程,就可以把每個層連起來瞭,通過這個就搭好瞭整個模型
class CNN(nn.Module):
def __init__(self):
super(CNN,self).__init__()
self.conv1 = nn.Sequential(
nn.Conv2d(3,16,5,1,2),
nn.ReLU(),
nn.MaxPool2d(kernel_size=2),
)
self.conv2 = nn.Sequential(
nn.Conv2d(16, 32, 5, 1, 2),
nn.ReLU(),
nn.MaxPool2d(2),
)
self.conv3 = nn.Sequential(
nn.Conv2d(32, 64, 5, 1, 2),
nn.ReLU(),
nn.MaxPool2d(2),
)
self.conv4 = nn.Sequential(
nn.Conv2d(64, 128, 5, 1, 2),
nn.ReLU(),
nn.MaxPool2d(2),
)
self.out1 = nn.Sequential(
nn.Linear(128*16*30, 1000),
nn.ReLU(),
)
self.out2 = nn.Sequential(
nn.Linear(1000, 100),
nn.ReLU(),
)
self.out3 = nn.Sequential(
nn.Linear(100, 4),
)
def forward(self, x):
x = self.conv1(x)
x = self.conv2(x)
x = self.conv3(x)
x = self.conv4(x)
x = x.view(x.size(0), -1) # flatten the output of conv2 to (batch_size, 32 * 7 * 7)
x = self.out1(x)
x = self.out2(x)
output = self.out3(x)
return output, x # return x for visualization
#如果使用GPU訓練要把模型和tensor放到GPU上,通過.cuda來實現
cnn = CNN().cuda()
print(cnn)
#定義優化器對象、損失函數
optimizer = torch.optim.Adam(cnn.parameters(), lr=LR) # optimize all cnn parameters
loss_func = nn.CrossEntropyLoss() # the target label is not one-hotted
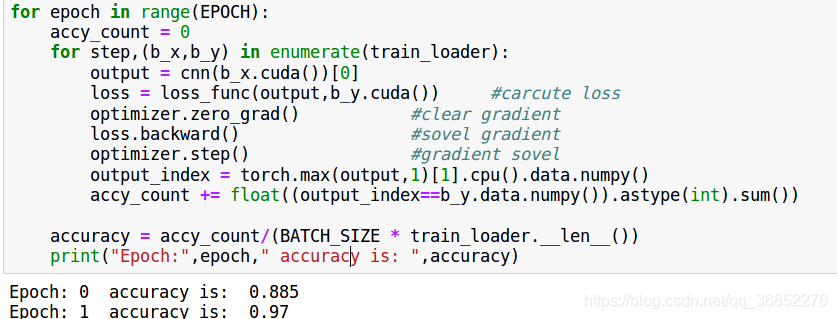
#二重循環開始訓練,外層循環是迭代次數,第二重循環就是每次對batch_size的數據讀取並訓練
for epoch in range(EPOCH):
accy_count = 0
for step,(b_x,b_y) in enumerate(train_loader):
output = cnn(b_x.cuda())[0]
loss = loss_func(output,b_y.cuda()) #carcute loss
optimizer.zero_grad() #clear gradient
loss.backward() #sovel gradient
optimizer.step() #gradient sovel
output_index = torch.max(output,1)[1].cpu().data.numpy()
accy_count += float((output_index==b_y.data.numpy()).astype(int).sum())
accuracy = accy_count/(BATCH_SIZE * train_loader.__len__())
print("Epoch:",epoch," accuracy is: ",accuracy)
註意事項
使用GPU訓練的時候,要把模型、tensor都放在GPU上,就是後面加個.cuda(),例如定義模型對象的時候,cnn.cuda()
還有輸入進模型、計算loss的時候,b_x.cuda() b_y.cuda()
tensor a 轉numpy a.data.numpy()
如果是在GPU上,要先a.cpu().data.numpy()
nn.CrossEntropyLoss()這個損失函數是個大坑,它是softmax + 歸一化,所以使用這個損失函數的時候模型最後就不要再加softmax瞭,不然會發現自己的損失就那幾個值,也降不下去
輸入模型的 input圖像,格式為(batch_size,Nc,H,W)的四維矩陣
以上為個人經驗,希望能給大傢一個參考,也希望大傢多多支持WalkonNet。
推薦閱讀:
- PyTorch數據讀取的實現示例
- Python Pytorch深度學習之數據加載和處理
- pytorch 帶batch的tensor類型圖像顯示操作
- pytorch深度神經網絡入門準備自己的圖片數據
- Pytorch DataLoader shuffle驗證方式