Java數據結構之鏈表的增刪查改詳解
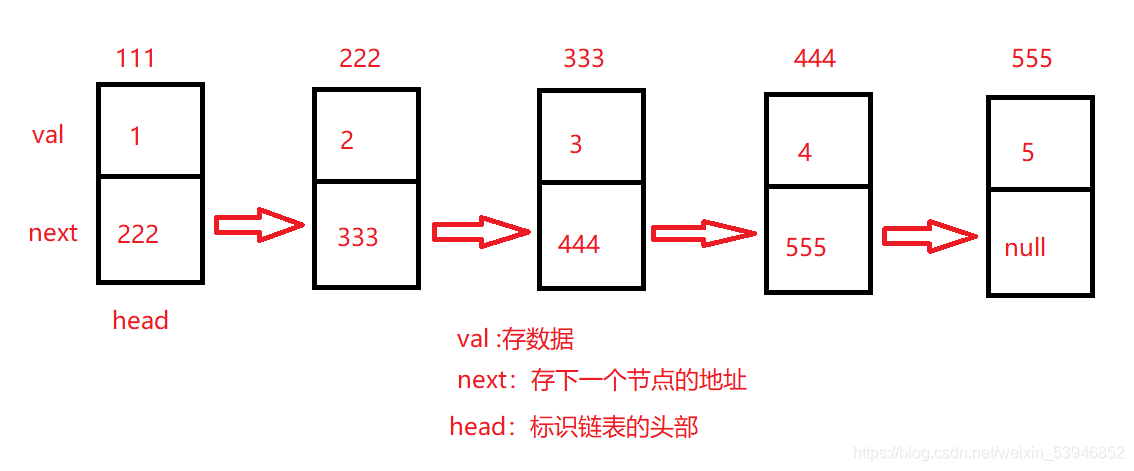
一、鏈表的概念和結構
1.1 鏈表的概念
簡單來說鏈表是物理上不一定連續,但是邏輯上一定連續的一種數據結構
1.2 鏈表的分類
實際中鏈表的結構非常多樣,以下情況組合起來就有8種鏈表結構. 單向和雙向,帶頭和不帶頭,循環和非循環。排列組合和會有8種。
但我這隻是實現兩種比較難的鏈表,理解之後其它6種就比較簡單瞭
1.單向不帶頭非循環鏈表
2.雙向不帶頭非循環鏈表
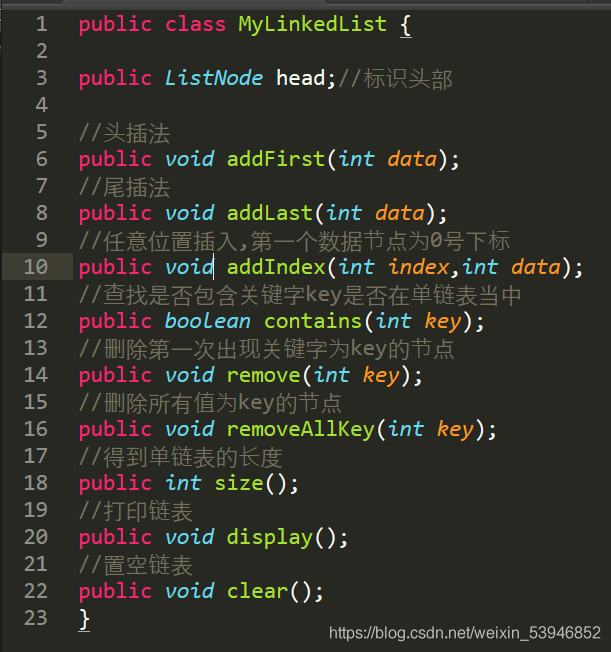
二、單向不帶頭非循環鏈表
2.1 創建節點類型
我們創建瞭一個 ListNode 類為節點類型,裡面有兩個成員變量,val用來存儲數值,next來存儲下一個節點的地址。
還有一個帶一個參數的構造方法在實例化對象的同時給val賦值,因為我們不知道下一個節點的地址所以next是默認值一個null
class ListNode {
    public int val;//數值
    public ListNode next;//下一個節點的地址

    public ListNode(int val) {
        this.val = val;
    }
}
我們在 MyLinkedList 裡創建一個head變量來標識鏈表的頭部,接著就是實現單鏈表的增刪查改瞭
2.2 頭插法
這個頭插法並不要考慮第一次插入,每次插入隻需要把插入的節點node 的next值改成頭節點,再把頭節點指向node

//頭插法
public void addFirst(int data) {
    ListNode node = new ListNode(data);
    node.next = this.head;
    this.head = node;
}
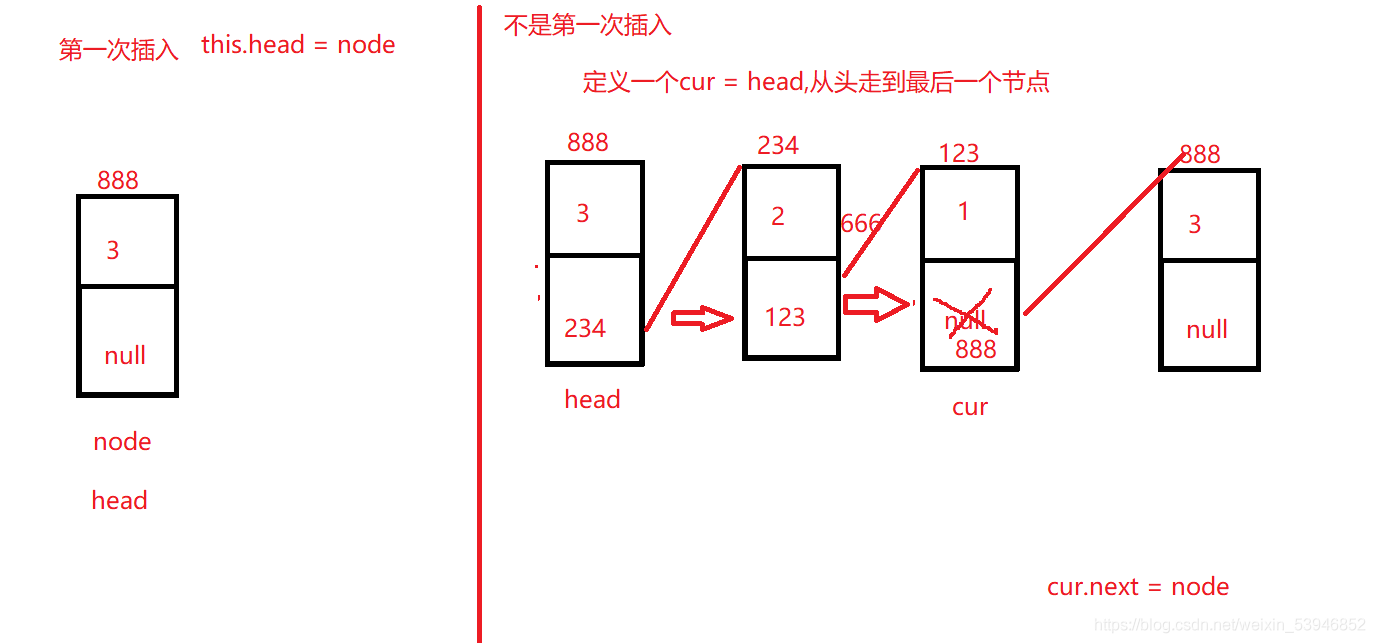
2.3 尾插法
尾插法首先要考慮是不是第一次插入,如果是的話直接把head指向node就好瞭,如果不是第一次插入,則需要定義一個cur來找尾巴節點,把尾巴節點的next值改成node就好瞭。因為如果不用尾巴節點的話,head就無法標識到頭部瞭
//尾插法
public void addLast(int data) {
    ListNode node = new ListNode(data);
    ListNode cur = this.head;
    //第一次插入
    if(this.head == null) {
        this.head = node;
    }else{
        while (cur.next != null) {
            cur = cur.next;
        }
        cur.next = node;
    }
}
2.4 獲取鏈表長度
定義一個計數器count,當cur遍歷完鏈表的時候直接返回count就好
//得到單鏈表的長度
public int size() {
    int count = 0;
    ListNode cur = this.head;
    while (cur != null) {
        cur = cur.next;
        count++;
    }
    return count;
}
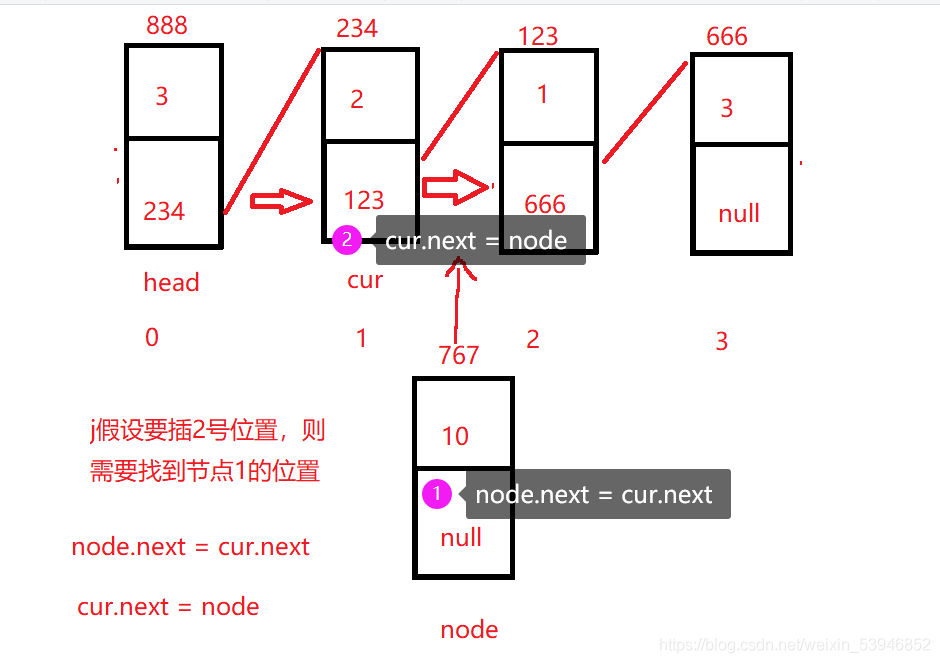
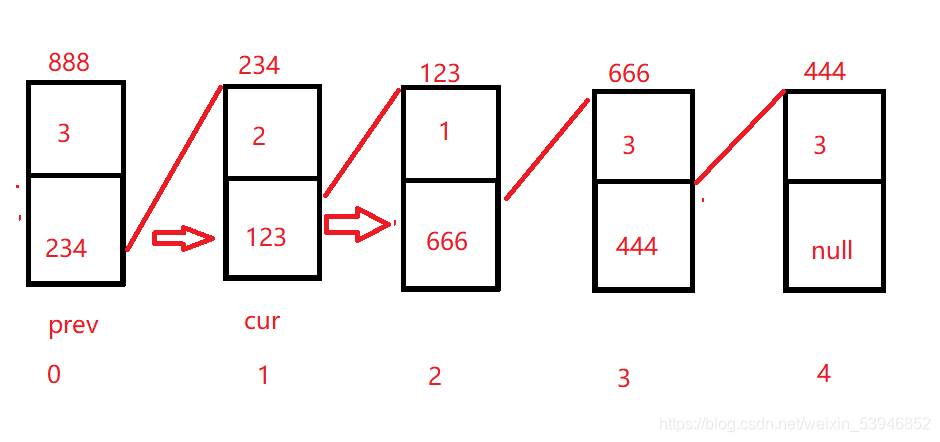
2.5 任意位置插入
我們假設鏈表的頭是從0位置開始的,任意位置插入需要考慮幾點
1.位置的合法性,如果位置小於0,或者大於鏈表長度則位置不合法
2.如果要插入的是0位置直接使用頭插法
3.如果插入的位置等於鏈表長度則使用尾插法,因為我們這鏈表是從0開始的
最關鍵的就是從中間任意位置插入 要從中間位置插入,就需要找到要插入位置的前一個節點的位置。再插入到它們中間。
  /**
     * 讓 cur 向後走 index - 1 步
     * @param index
     * @return
     */
public ListNode findIndexSubOne(int index) {
    int count = 0;
    ListNode cur = this.head;
    while (count != index-1) {
        cur = cur.next;
        count++;
    }
    return  cur;
}
//任意位置插入,第一個數據節點為0號下標
public void addIndex(int index,int data) {
    //判斷合法性
    if(index < 0 || index > size()) {
            System.out.println("index位置不合法");
            return;
    }
    //頭插法
    if(index == 0) {
        this.addFirst(data);
        return;
    }
    //尾插法
    if(index == size()) {
        this.addLast(data);
        return;
    }
    //找前驅,cur指向的是 index 的前一個節點
    ListNode cur = findIndexSubOne(index);
    ListNode node = new ListNode(data);
    node.next = cur.next;
    cur.next = node;
}
2.6 查找關鍵字
當我們要查找鏈表中是否有某一個關鍵字時,隻需要定義一個cur從頭開始遍歷即可
//查找是否包含關鍵字key是否在單鏈表當中
public boolean contains(int key) {
    ListNode cur = this.head;
    while (cur != null) {
        if(cur.val == key) {
            return true;
        }
        cur = cur.next;
    }
    return false;
}
2.7 刪除第一次出現值為key的節點
這個思路其實也很簡單,考慮到兩種情況即可
1.如果要刪除的是頭節點隻需要把頭節點指向它的向一個節點即可
2.還有一種則是不存在key的情況,所以這裡寫瞭一個方法來判讀key是否存在,如果存在則返回key的前一個節點的位置
3.存在則把要刪除的節點的前驅的next改成它的next即可
/**
  * 找要刪除 key 的前一個節點
 * @return
 */
public ListNode searchPrev(int key) {
    ListNode prev = this.head;
    while (prev.next != null) {
        if (prev.next.val == key) {
            return prev;
        }
        prev = prev.next;
    }
    return null;
}
//刪除第一次出現關鍵字為key的節點
public void remove(int key) {
    if(this.head.val == key) {
        this.head = this.head.next;
        return;
    }
    //找 key 的前驅節點
    ListNode prev = searchPrev(key);
    if(prev == null) {
        System.out.println("沒有key這個關鍵字");
        return;
    }
    //刪除
    ListNode delete = prev.next;
    prev.next = delete.next;
}
2.8 刪除所有值為key的節點
假設要刪除的是3,思路:
定義兩個節點點類型的變量,prev指向head,cur指向head的下一個節點。
如果判斷cur的val值是要刪除的值,如果是則直接跳過這個節點 如果不是則讓prev和cur往後走,直到整個鏈表遍歷完。
到最後會發現頭節點並沒有遍歷到,循環結束後則需要判讀頭節點是不是要刪除的節點
記住一定要邊畫圖邊寫代碼!
//刪除所有值為key的節點
public void removeAllKey(int key) {
    ListNode prev = this.head;
    ListNode cur = this.head.next;
    while (cur != null) {
        if(cur.val == key) {
            prev.next = cur.next;
            cur = cur.next;
        }else {
            prev = cur;
            cur = cur.next;
        }
    }
    //判斷第一個節點是否是要刪除的節點
    if(this.head.val == key) {
        this.head = this.head.next;
    }
}
2.9 遍歷打印鏈表
定義一個cur直接遍歷打印就好
//打印鏈表
public void display() {
    ListNode cur = this.head;
    while (cur != null) {
        System.out.print(cur.val+" ");
        cur = cur.next;
    }
    System.out.println();
}
置空鏈表
置空鏈表隻需要一個個置空即可,並不建議直接把頭節點置空這種暴力做法
//置空鏈表
public void clear() {
    ListNode cur = this.head;
    //一個個制空
    while (cur != null) {
        ListNode curNext = cur.next;
        cur.next = null;
        cur = curNext;
    }
    this.head = null;
}
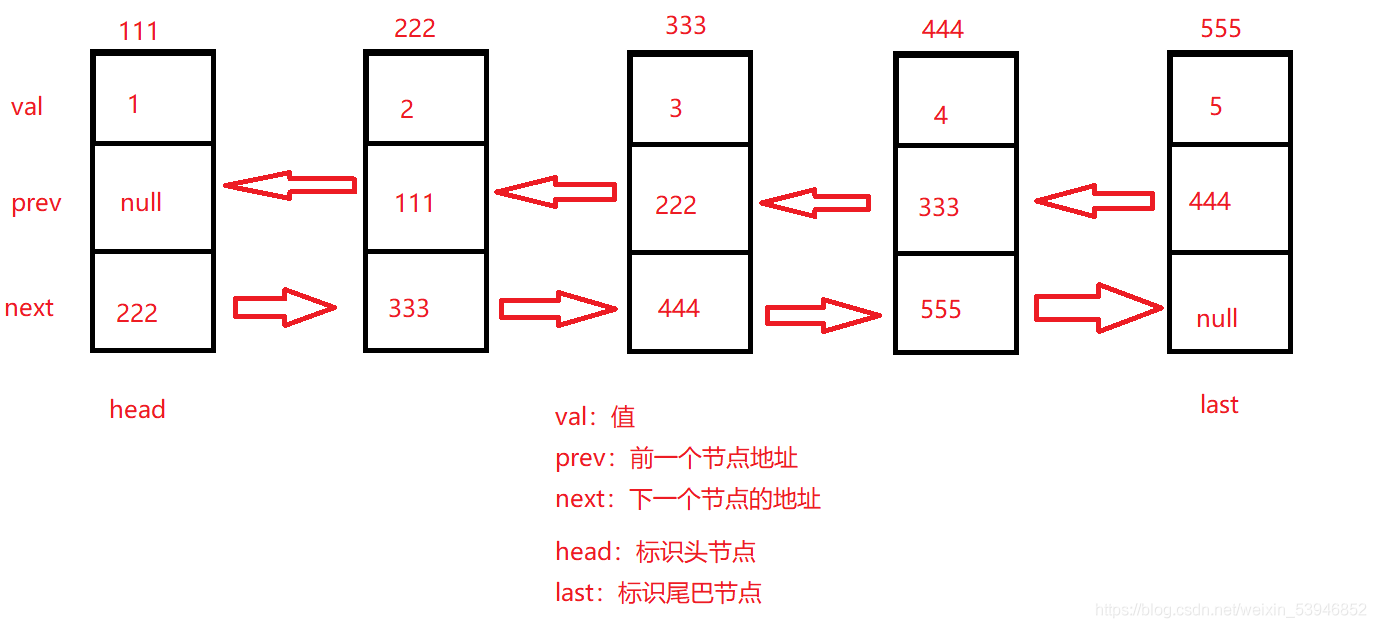
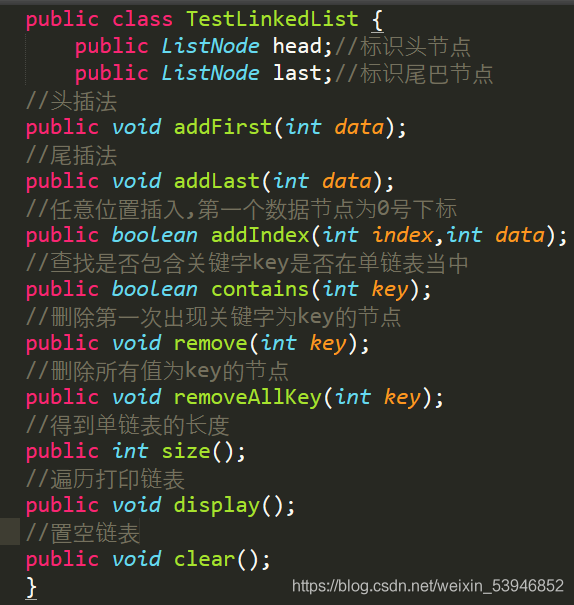
三、雙向不帶頭非循環鏈表
雙向鏈表和單向鏈表的最大的區別就是多瞭一個前驅節點prev,同樣來實現雙向鏈表的增刪查改
public class TestLinkedList {
    public ListNode head;
    public ListNode last;
}
3.1 創建節點類型
同樣先定義節點類型,比單向鏈表多瞭一個前驅節點而已。
class ListNode {
    public int val;
    public ListNode prev;
    public ListNode next;

    public ListNode (int val) {
        this.val = val;
    }
}
雙向鏈表還定義瞭一個last來標識尾巴節點,而單鏈表隻是標識瞭頭節點。
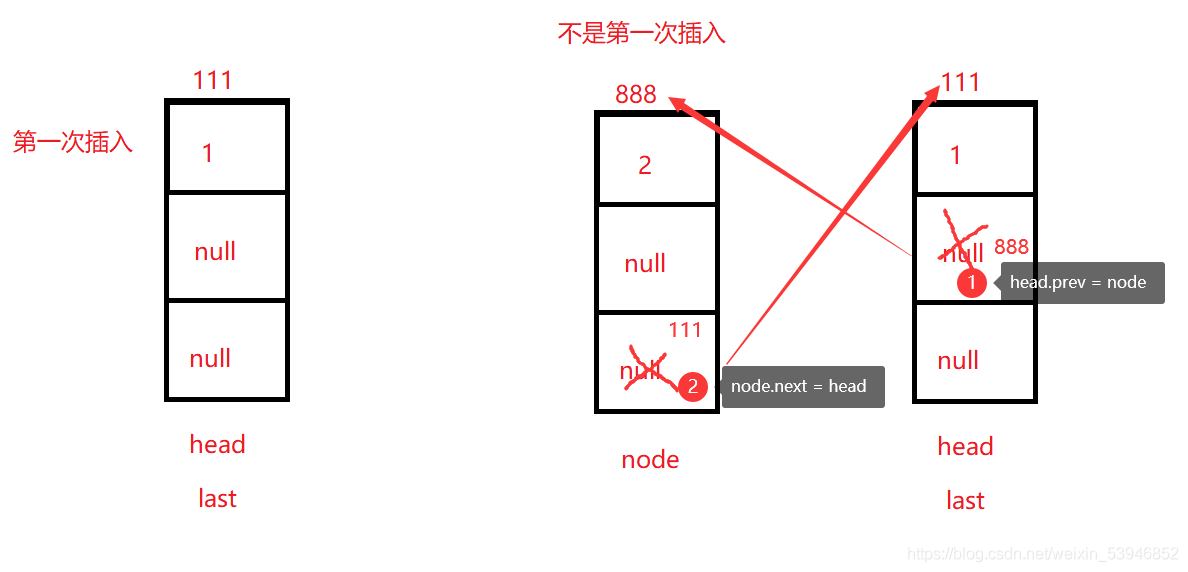
3.2 頭插法
因為這是雙向鏈表,第一次插入要讓head和last同時指向第一個節點。
如果不是第一次插入,則需要
1.把head的前驅節點改成node,
2.再把node的next改成head,
3.然後把頭節點head再指向新的頭節點node。
//頭插法
public void addFirst(int data) {
    ListNode node = new ListNode(data);
    //第一次插入
    if(this.head == null) {
        this.head = node;
        this.last = node;
    }else {
        head.prev = node;
        node.next = this.head;
        this.head = node;
    }
}
3.3 尾插法
雙向鏈表有一個last來標識尾巴節點,所以在尾插的時候不用再找尾巴節點瞭。和頭插法類似
//尾插法
public void addLast(int data) {
    ListNode node = new ListNode(data);
    //第一次插入
    if(this.head == null) {
        this.head = node;
        this.last = node;
    }else {
        this.last.next = node;
        node.prev = this.last;
        this.last = node;
    }
}
3.4 獲取鏈表長度
這個和單鏈表一樣,直接定義個cur遍歷
//得到鏈表的長度
public int size() {
    ListNode cur = this.head;
    int count = 0;
    while (cur != null) {
        count++;
        cur = cur.next;
    }
    return count;
}
3.5 任意位置插入
任意位置插入也和單鏈表類似有三種情況。判斷合法性和頭插尾插就不多瞭主要還是在中間的隨機插入,一定要註意修改的順序!
要修改的地方一共有四個,一定要畫圖理解!
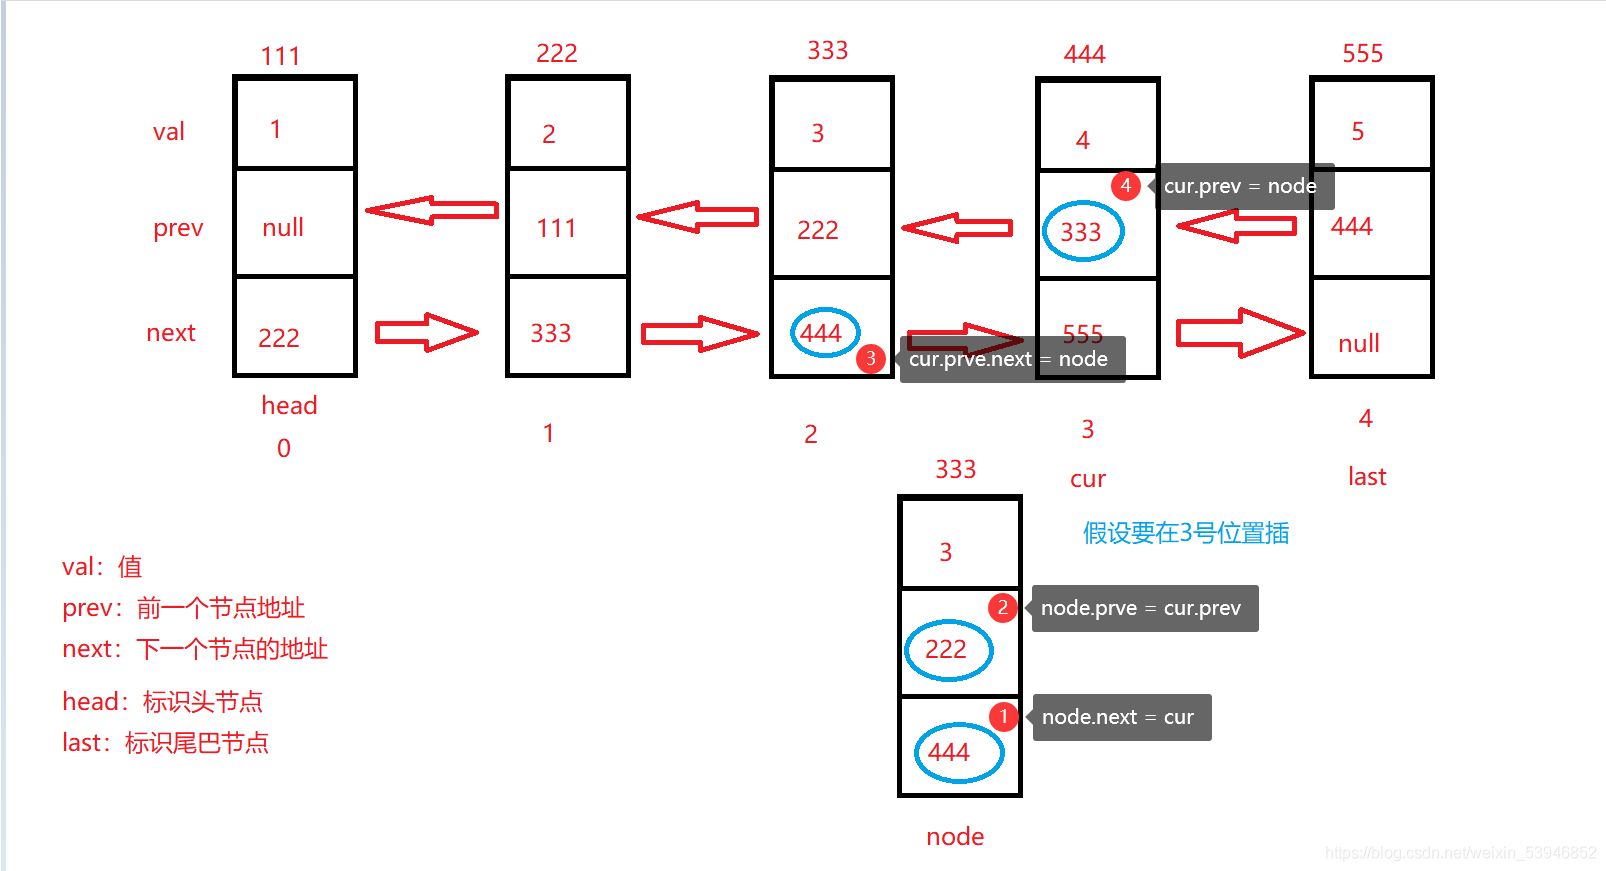
//找要插入的節點的位置
public ListNode searchIndex(int index) {
    ListNode cur = this.head;
    while (index != 0) {
        cur = cur.next;
        index--;
    }
    return  cur;
}
//任意位置插入,第一個數據節點為0號下標
public void addIndex(int index,int data) {
    //判斷index位置的合法性
    if(index < 0 || index > this.size()) {
        System.out.println("index的位置不合法");
        return;
    }
    //頭插法
    if(index == 0) {
        this.addFirst(data);
        return;
    }
    //尾插法
    if(index == this.size()) {
        this.addLast(data);
        return;
    }
    //中間插入
    ListNode node = new ListNode(data);
    ListNode cur = searchIndex(index);
    node.next = cur;
    node.prev = cur.prev;
    cur.prev.next = node;
    cur.prev = node;
}
3.6 查找關鍵字
這裡和單鏈表一樣,直接定義個cur遍歷看看鏈表裡有沒有這個值即可
//查找是否包含關鍵字key是否在單鏈表當中
public boolean contains(int key) {
    ListNode cur = this.head;
    while (cur != null) {
        if(cur.val == key) {
            return true;
        }
        cur = cur.next;
    }
    return false;
}
3.7 刪除第一次出現的關鍵字key的節點
思路:遍歷鏈表找第一次出現的節點,刪完return。一共分三種情況
1.頭節點是要刪除的節點
2.尾巴節點是要刪除的節點
3.中間的節點是要刪除的節點
//刪除第一次出現關鍵字為key的節點
public void remove(int key) {
    ListNode cur = this.head;
    while (cur != null) {
        if(cur.val == key) {
            //要刪除的是頭節點
            if(this.head == cur) {
                this.head = this.head.next;
                this.head.prev = null;
            }else {
                //尾巴節點和中間的節點兩種情況
                cur.prev.next = cur.next;
                if(this.last == cur) {
                    //刪除尾巴節點
                    cur = cur.prev;
                }else {
                    cur.next.prev = cur.prev;
                }
            }
            //已經刪完瞭
            return;
        }else {
            cur = cur.next;
        }
    }
}
3.8 刪除所有值為key的節點
思路和刪除一個key類似,但需要註意兩個點。
1.刪完就不用return瞭,而是繼續往後走,因為這裡是刪除所有為key需要把列表遍歷完
2.還有就是要考慮當整個鏈表都是要刪除的情況,if判斷一下不然會發生空指針異常
//刪除所有值為key的節點
public void removeAllKey(int key) {
    ListNode cur = this.head;
    while (cur != null) {
        if(cur.val == key) {
            //要刪除的是頭節點
            if(this.head == cur) {
                this.head = this.head.next;
                //假設全部是要刪除的節點
                if(this.head != null) {
                    this.head.prev = null;
                }else {
                 //防止最後一個節點不能被回收
                 this.last = null;
                }
            }else {
                //尾巴節點和中間的節點兩種情況
                cur.prev.next = cur.next;
                if(this.last == cur) {
                    //刪除尾巴節點
                    cur = cur.prev;
                }else {
                    cur.next.prev = cur.prev;
                }
            }
            //走一步
            cur = cur.next;
        }else {
            cur = cur.next;
        }
    }
}
3.9 遍歷打印鏈表
//打印鏈表
public void display() {
    ListNode cur = this.head;
    while (cur != null) {
        System.out.print(cur.val+" ");
        cur = cur.next;
    }
    System.out.println();
}
置空鏈表
遍歷鏈表一個一個置為null,再把頭節點和尾巴節點值為null。防止內存泄漏
//置空鏈表
public void clear() {
    ListNode cur = this.head;
    //一個一個置空
    while (cur != null) {
        ListNode curNext = cur.next;
        cur.prev = null;
        cur.next = null;
        cur = curNext;
    }
    this.head = null;
    this.last = null;
}
四、總結
1.這裡實現瞭兩種較難的鏈表:單向不帶頭非循環和雙向不帶頭非循環
2.鏈表物理上不一定連續,但邏輯上一定連續。
3.增:鏈表插入一個元素隻需要修改指向,所以時間復雜度為O(1)
4:刪:鏈表刪除元素,同樣隻需修改指向,時間復雜度為O(1)
5.查:鏈表如果需要查找一個元素需要遍歷鏈表,所以時間復雜度為O(n)
6.改:鏈表要去找到要修改的元素,所以時間復雜度為O(n).
什麼時候用鏈表?
如果是插入和刪除比較頻繁的時候,使用鏈表。註意:是不涉及到移動數據的情況!
到此這篇關於Java數據結構之鏈表的增刪查改詳解的文章就介紹到這瞭,更多相關Java鏈表內容請搜索WalkonNet以前的文章或繼續瀏覽下面的相關文章希望大傢以後多多支持WalkonNet!