OpenCV-Python實現多模板匹配
模板匹配的作用在圖像識別領域作用可大瞭。那什麼是模板匹配?
模板匹配,就是在一幅圖像中尋找另一幅模板圖像最匹配(也就是最相似)的部分的技術。
多模板匹配
在上一篇的實戰中,我們通過人物眼睛的子圖,找出瞭其在圖像中出現位置。但是,有些情況下,並不僅僅隻有一次,比如我們講解傅裡葉變換時,曾介紹一張草原的獅子圖。如果匹配某個草,可能單個圖像內會有很多,這個時候就要找出多個匹配結果。
而函數cv2.minMaxLoc()僅僅能找出最值,無法給出所有匹配區域的位置信息。所以,要想匹配多個結果,就需要進行如下4個步驟:
獲取匹配位置的集合
首先,Numpy庫中的函數where()能夠獲取模板匹配位置的集合。對於不同的輸入,其返回值是不同的。
- 當輸入是一維數組時,返回值是一維索引,隻是一組索引數組。
- 當輸入是二維數組時,返回的是匹配值的位置索引,因此會有兩組索引數組表示返回值的位置。
比如,我們的灰度圖像一般都是二維數組。下面,我們來查找一個二維數組中,值大於8的元素索引:
import numpy as np

img = np.array([[2, 4, 6, 8, 10], [9, 60, 10, 30, 4], [55, 21, 11, 7, 5]])
result = np.where(img > 5)
print(result)
運行之後,控制臺會輸出如下內容:

如果你對Numpy不是很瞭解的化。下面博主在將數據轉換以下,基本上都能看懂瞭。轉換之後,格式如下:

第一行為大於5的值的X坐標,第二行為大於5的值的Y坐標。那麼上面大於5的數組索引為:[0,2],[0,3],[0,4],[1,0],[1,1],[1,2],[1,3],[2,0],[2,1],[2,2],[2,3]。你可以回溯對比看看是不是一致的。
通過np.where()函數可以找出在cv2.matchTemplate()函數的返回值中,哪些位置上的值是大於閾值threshold的。具體操作代碼如下:
loc=np.where(res>threshold)
循環
因為我們找到的原圖對應的模板圖像不止一個,要處理多個值,肯定會用到循環。因此,在獲取匹配值的索引後,可以采用如下語句遍歷所有匹配的位置,對這些位置做標記:
for i in 匹配位置集合:
	標記匹配位置
在循環中使用zip()
函數zip()用可迭代的對象作為參數,將對象中對應的元素打包成一個個元組,然後返回由這些元組組成的列表。
例如,我們獲取的索引為x,y,z。下面我們使用zip()將它們打包成元組。代碼如下:
import cv2
import numpy as np
import matplotlib.pyplot as plt

img = np.array([[2, 4, 6, 8, 10], [9, 60, 10, 30, 4], [55, 21, 11, 7, 5]])
result = np.where(img > 5)
for i in zip(*result):
    print(i)
這裡我們還是使用上面的值,輸出結果如下:

這裡自動將我們剛才滿足條件的索引打包成瞭元素格式。是不是比剛才的控制臺輸出結果更加的直觀呢?
替換坐標
我們上面得到的結果是符合條件的索引:(行號,列號),但我們需要繪制匹配位置的矩形,需要的是(列號,行號)。
所以,在使用cv2.rectangle()繪制矩形前,要先將函數numpy.where()得到的位置索引行列互換,行列互換可以通過如下代碼實現:
import numpy as np

img = np.array([[2, 4, 6, 8, 10], [9, 60, 10, 30, 4], [55, 21, 11, 7, 5]])
result = np.where(img > 5)
for i in zip(*result[::-1]):
    print(i)
運行之後,輸出結果如下:

實戰多模板匹配
既然我們已經瞭解瞭標記繪制多個模板位置的4個步驟。下面,我們直接將上面的代碼整理以下,即可完成多模板的匹配。具體代碼如下所示:
import cv2
import numpy as np
import matplotlib.pyplot as plt

img = cv2.imread("34.jpg", 0)
template = cv2.imread("4_1.jpg", 0)
w, h = template.shape[::-1]
res = cv2.matchTemplate(img, template, cv2.TM_CCOEFF_NORMED)
threshold = 0.9
loc = np.where(res >= 0.9)
for i in zip(*loc[::-1]):
    cv2.rectangle(img, i, (i[0] + w, i[1] + h), 255, 1)
plt.imshow(img, cmap="gray")
plt.axis("off")
plt.show()
這裡的代碼與上面4個步驟一摸一樣,具體就不做過多的講解瞭。運行之後,多個模板也就匹配完成。

附錄:
模板圖

原圖

實例:基於opencv的多目標模板匹配
利用opencv進行多目標模板匹配,隻要是利用其matchTemplate函數,但在多目標(這裡是討論目標圖片中不同大小模板的匹配),以下貼出代碼和圖片,供大傢參考:
#include <opencv2\core\core.hpp>
#include <opencv2\highgui\highgui.hpp>
#include <opencv2\imgproc\imgproc.hpp>
#include <iostream>
#include <math.h>

using namespace std;
using namespace cv;

Point getNextMinLoc(Mat &result, Point minLoc, int maxValue, int templatW, int templatH);

int main(void)
{
 Mat src = imread("1_2.png");
 Mat srcCopy = src.clone();

 Mat temp = imread("1_4.png");
 Mat result;

 if (src.empty() || temp.empty())
 {
  cout << "打開圖片失敗" << endl;
  return 0;
 }

 vector<Mat> templat;
 vector<float> minV;
 vector<Point> minL;

 int srcW, srcH, templatW, templatH, resultH, resultW;
 srcW = src.cols;
 srcH = src.rows;
 templat.push_back(temp);
 double minValue, maxValue;
 Point minLoc, maxLoc;

 for (int i=0;i<10;i++)
 {
  cout << i << ": ";
  templatW = templat[i].cols;
  templatH = templat[i].rows;

  if (srcW < templatW || srcH < templatH)
  {
   cout << "模板不能比原圖大" << endl;
   return 0;
  }

  resultW = srcW - templatW + 1;
  resultH = srcH - templatH + 1;

  result.create(Size(resultW, resultH), CV_32FC1);
  matchTemplate(src, templat[i], result, CV_TM_SQDIFF_NORMED);

  minMaxLoc(result, &minValue, &maxValue, &minLoc, &maxLoc);

  cout << "min1: " << minValue << endl;
  if (minValue<=0.070055)
  {
   rectangle(srcCopy, minLoc, Point(minLoc.x + templatW, minLoc.y + templatH), Scalar(0, 0, 255), 2, 8, 0);

   Point new_minLoc;
   new_minLoc = getNextMinLoc(result, minLoc, maxValue, templatW, templatH);

   float *data = result.ptr<float>(new_minLoc.y);

   cout << "min2: " << data[new_minLoc.x] << " ";
   if (data[new_minLoc.x]<=0.5)
   {
    cout << "進這個函數瞭:" << i << ":" << new_minLoc.x;
    cout << " " << new_minLoc.y;
    rectangle(srcCopy, new_minLoc, Point(new_minLoc.x + templatW, new_minLoc.y + templatH),
     Scalar(0, 255, 0), 2, 8, 0);
    new_minLoc = getNextMinLoc(result, new_minLoc, maxValue, templatW, templatH);
   }

   float *data1 = result.ptr<float>(new_minLoc.y);
   cout << "min3: " << data1[new_minLoc.x] << " " << endl;
   if (data1[new_minLoc.x] <= 0.4)
   {

    rectangle(srcCopy, new_minLoc, Point(new_minLoc.x + templatW, new_minLoc.y + templatH),
     Scalar(255, 0, 0), 2, 8, 0);
   }
  }
  cout << "#" << endl;
  Mat temp_templat;
  resize(templat[i], temp_templat, Size(templat[i].cols / 1.1, templat[i].rows / 1.1));
  templat.push_back(temp_templat);
 }

 imshow("結果", srcCopy);
 waitKey(0);
 return 0;
}

Point getNextMinLoc(Mat &result, Point minLoc, int maxValue, int templatW, int templatH)
{
 //imshow("result", result);
 //cout << "maxvalue: " << maxValue << endl;
 int startX = minLoc.x - templatW / 3;
 int startY = minLoc.y - templatH / 3;
 int endX = minLoc.x + templatW / 3;
 int endY = minLoc.y + templatH / 3;
 if (startX < 0 || startY < 0)
 {
  startX = 0;
  startY = 0;
 }
 if (endX > result.cols - 1 || endY > result.rows - 1)
 {
  endX = result.cols - 1;
  endY = result.rows - 1;
 }
 int y, x;
 for (y = startY; y < endY; y++)
 {
  for (x = startX; x < endX; x++)
  {
   float *data = result.ptr<float>(y);

   data[x] = maxValue;
  }
 }
 double new_minValue, new_maxValue;
 Point new_minLoc, new_maxLoc;
 minMaxLoc(result, &new_minValue, &new_maxValue, &new_minLoc, &new_maxLoc);
 //imshow("result_end", result);
 return new_minLoc;
}


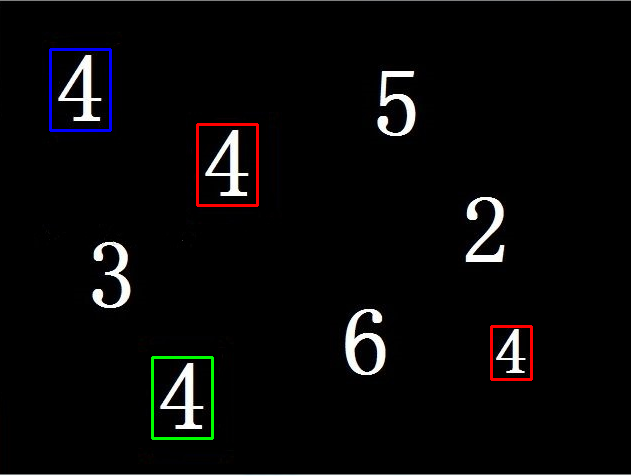
以下是結果圖:
到此這篇關於OpenCV-Python實現多模板匹配的文章就介紹到這瞭,更多相關OpenCV 多模板匹配內容請搜索WalkonNet以前的文章或繼續瀏覽下面的相關文章希望大傢以後多多支持WalkonNet!
推薦閱讀:
- OpenCV計算平均值cv::mean實例代碼
- C++ OpenCV單峰三角閾值法Thresh_Unimodal詳解
- openCV實現圖像分割
- C++ OpenCV模擬實現微信跳一跳
- OpenCV獲取圖像中直線上的數據具體流程