使用 OpenCV 開發虛擬鍵盤的方法
介紹
OpenCV 是最流行的計算機視覺任務庫,它是用於機器學習、圖像處理等的跨平臺開源庫,用於開發實時計算機視覺應用程序。
CVzone 是一個計算機視覺包,它使用 OpenCV 和 Media Pipe 庫作為其核心,使我們易於運行,例如手部跟蹤、人臉檢測、面部標志檢測、姿勢估計等,以及圖像處理和其他計算機視覺相關的應用程序。
使用 OpenCV 實現虛擬鍵盤
讓我們創建一個虛擬鍵盤。
首先,讓我們安裝所需的模塊。
pip install numpy

pip install opencv-python

pip install cvzone

pip install pynput
使用 OpenCV 為虛擬鍵盤導入庫
現在讓我們導入所需的模塊
import cv2
import cvzone
from cvzone.HandTrackingModule import HandDetector
from time import sleep
import numpy as np
from pynput.keyboard import Controller
這裡我們從 cvzone.HandTrackingModule 導入 HandDetector 模塊,然後為瞭使虛擬鍵盤工作,我們需要從 pynput.keyboard 導入Controller。
cap = cv2.VideoCapture(0, cv2.CAP_DSHOW)
cap.set(3, 1280)
cap.set(4, 720)
現在讓我們從 cv2.Videocapture 獲取實時輸入
detector = HandDetector(detectionCon=0.8)
keyboard_keys = [["Q", "W", "E", "R", "T", "Y", "U", "I", "O", "P"],
                  ["A", "S", "D", "F", "G", "H", "J", "K", "L", ";"],
                  ["Z", "X", "C", "V", "B", "N", "M", ",", ".", "/"]]
final_text = ""
我們以 0.8 的檢測置信度初始化 HandDetector 並將其分配給檢測器。
然後我們根據鍵盤的佈局創建一個列表數組,並定義一個空字符串來存儲鍵入的鍵。
定義繪制函數
keyboard = Controller()
def draw(img, buttonList):
    for button in buttonList:
        x, y = button.pos
        w, h = button.size
        cvzone.cornerRect(img, (button.pos[0], button.pos[1],
                                                   button.size[0],button.size[0]), 20 ,rt=0)
        cv2.rectangle(img, button.pos, (int(x + w), int(y + h)), (255, 144, 30), cv2.FILLED)
        cv2.putText(img, button.text, (x + 20, y + 65),
                    cv2.FONT_HERSHEY_PLAIN, 4, (0, 0, 0), 4)
    return img
初始化鍵盤控制器,並定義一個名為draw()的函數,它接受兩個參數,即圖像和按鈕列表並返回圖像。在draw()函數內部,我們使用 cvzone 的cornerRect函數在每個鍵的角落繪制矩形邊緣。這是為瞭讓我們的鍵盤佈局看起來更好看。就像下面的圖片。
你也可以嘗試更改不同的顏色。
class Button():
    def __init__(self, pos, text, size=[85, 85]):
        self.pos = pos
        self.size = size
        self.text = text
然後我們定義一個名為 Button() 的類,並提供位置、文本和大小作為輸入,以便我們可以按照明確定義的順序排列鍵盤按鍵。
buttonList = []
# mybutton = Button([100, 100], "Q")
for k in range(len(keyboard_keys)):
    for x, key in enumerate(keyboard_keys[k]):
        buttonList.append(Button([100 * x + 25, 100 * k + 50], key))
上面的循環將遍歷鍵盤按鍵和 Button 對象,我們在其中給出位置和文本作為輸入附加在一個名為 button list 的列表中。稍後我們可以將這個列表傳遞給 draw 函數以在我們的實時框架之上進行繪制。
使用 OpenCV 的虛擬鍵盤主程序
重要的部分來瞭。
while True:
    success, img = cap.read()
    img = detector.findHands(img)
    lmList, bboxInfo = detector.findPosition(img)
    img = draw(img, buttonList)  # change the draw funtion to transparent_layout for transparent keys
    if lmList:
        for button in buttonList:
            x, y = button.pos
            w, h = button.size

if x < lmList[8][0]<x+w and y < lmList[8][1] < y+h:
cv2.rectangle(img, button.pos, (x + w, y + h),
(0, 255, 255), cv2.FILLED)
cv2.putText(img, button.text, (x + 20, y + 65),
cv2.FONT_HERSHEY_PLAIN, 4, (0, 0, 0), 4)
l, _, _ = detector.findDistance(8,12, img, draw=False)
print(l)

if l < 25:
keyboard.press(button.text)
cv2.rectangle(img, button.pos, (x + w, y + h),
(0, 255, 0), cv2.FILLED)
cv2.putText(img, button.text, (x + 20, y + 65),
cv2.FONT_HERSHEY_PLAIN, 4, (0, 0, 0), 4)
final_text += button.text
sleep(0.20)

cv2.rectangle(img, (25,350), (700, 450),
(255, 255, 255), cv2.FILLED)
cv2.putText(img, final_text, (60, 425),
cv2.FONT_HERSHEY_PLAIN, 4, (0, 0, 0), 4)

# cv2.rectangle(img, (100,100), (200,200),
# (100, 255, 0), cv2.FILLED)
# cv2.putText(img, 'Q', (120,180), cv2.FONT_HERSHEY_PLAIN, 5,
# (0, 0, 0), 5)

# img = mybutton.draw(img)
cv2.imshow("output", img)
cv2.waitKey(1)
在 while 循環中,首先我們讀取實時輸入幀並將其存儲在一個名為img的變量中。然後我們將該圖像傳遞給*檢測器.findHands()*以便在幀中找到手。然後在該圖像中,我們需要找到檢測到的手的位置和邊界框信息。
在這裡我們可以找到我們的食指和中指的頂點之間的距離,如果兩者之間的距離小於某個閾值,那麼我們就可以輸入我們所指示的字母。
一旦我們獲得瞭位置,我們就會遍歷整個位置列表。從該列表中,我們找到按鈕位置和按鈕大小,然後根據明確定義的方式將其繪制在框架上。

圖 1:手地標模型
之後,我們需要找到食指和中指的頂點之間的距離。在上圖中,你可以看到我們需要的最高點是點 8 和點 12。因此,我們需要在距離查找函數中傳遞 8, 12 以獲得它們之間的距離。
在上面的代碼中,你可以看到 detector.findDistance(),我們通過瞭 8、12 和圖像來查找距離,並將繪制標志設置為 false,這樣我們就不需要兩點之間的任何線。
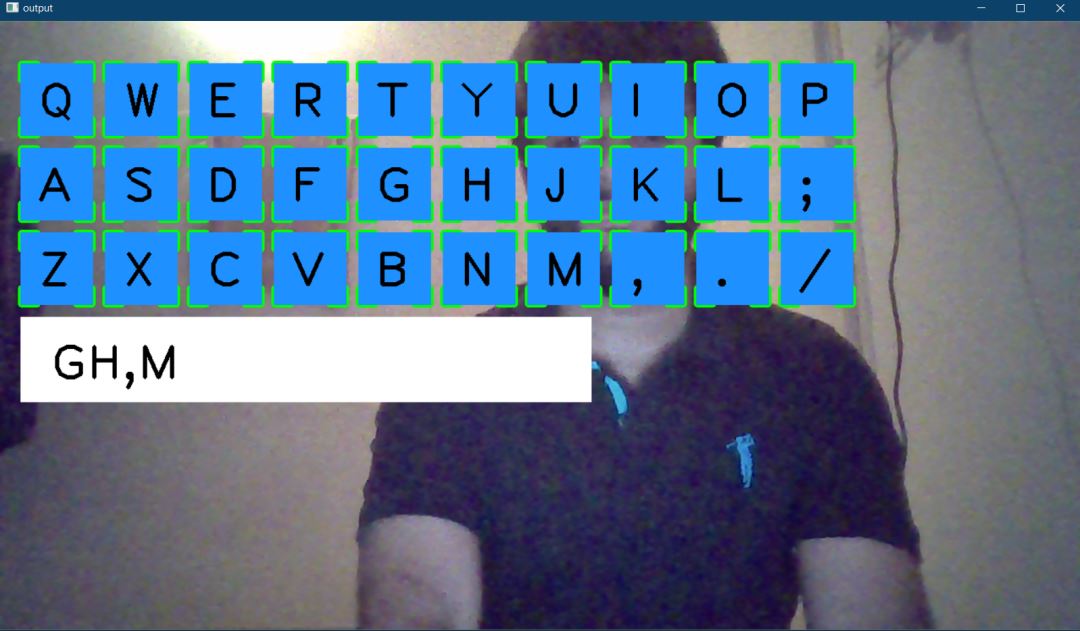
如果點之間的距離非常小,我們將使用 press() 函數來按下按鍵。在上面的代碼keyboard.press() 中,我們傳遞button.text以顯示按下的鍵。最後,我們在鍵盤佈局下方繪制一個小的白色矩形框,以顯示按下的鍵。
一旦你執行瞭整個代碼,它看起來像這樣。
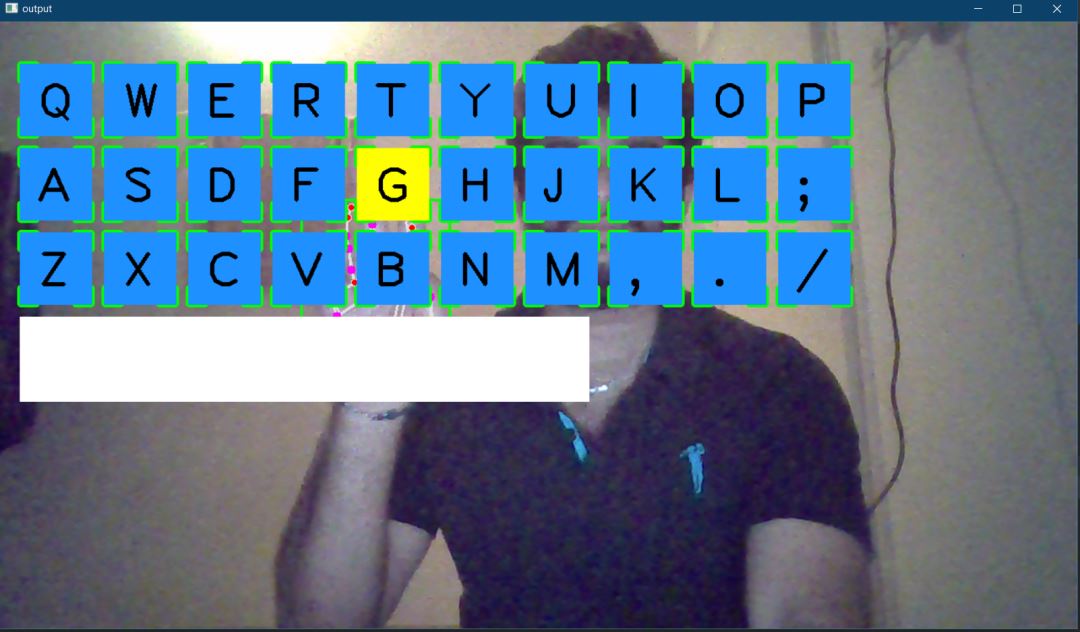
將食指和中指靠近特定字母的頂部後,你可以鍵入該字母。
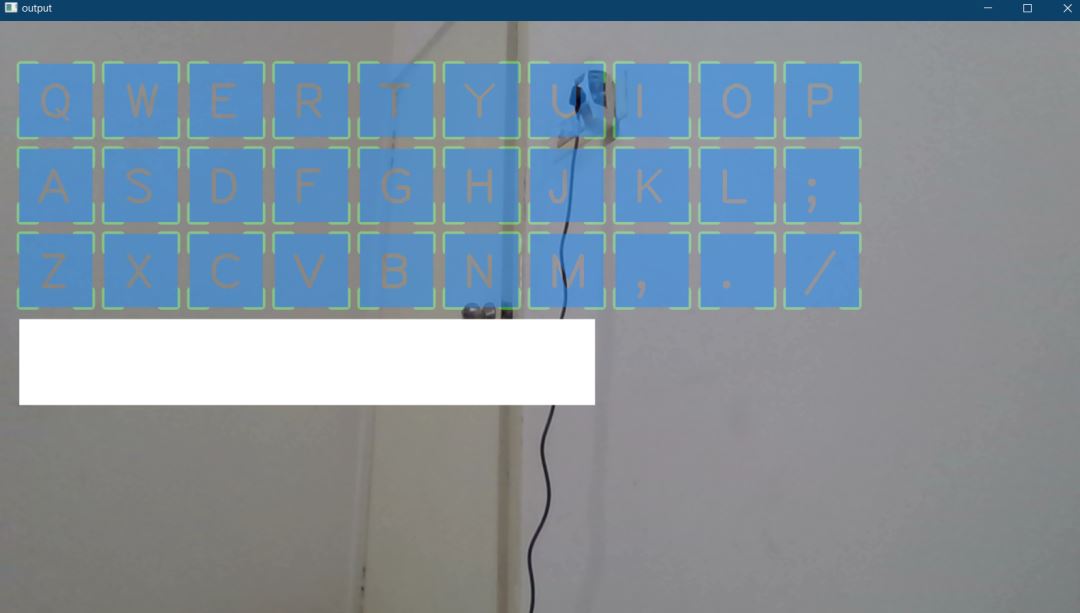
如果你需要更自定義的鍵盤佈局,我們可以使鍵盤佈局透明。我們隻需要添加一個透明佈局函數並將*draw()函數替換為transparent_layout()*函數即可。
讓我們定義transparent_layout()函數。下面是函數的代碼,它采用與draw()函數相同的輸入。在這裡,我們將 numpy 的zero_like()函數分配給 名為imgNew的變量,並對其執行所需的操作,例如獲得角矩形、為每個鍵創建矩形框並將文本放入框內。之後,我們將該圖像復制到一個新變量並創建一個imgNew掩碼,然後我們使用 OpenCV 的*addWeighted()*函數將掩碼放置在實際圖像的頂部。因此,這使鍵盤佈局透明。
自定義鍵盤
def transparent_layout(img, buttonList):
    imgNew = np.zeros_like(img, np.uint8)
    for button in buttonList:
        x, y = button.pos
        cvzone.cornerRect(imgNew, (button.pos[0], button.pos[1],
                                                   button.size[0],button.size[0]), 20 ,rt=0)
        cv2.rectangle(imgNew, button.pos, (x + button.size[0], y + button.size[1]),
                                   (255, 144, 30), cv2.FILLED)
        cv2.putText(imgNew, button.text, (x + 20, y + 65),
                    cv2.FONT_HERSHEY_PLAIN, 4, (0, 0, 0), 4)
        out = img.copy()
        alpaha = 0.5
        mask = imgNew.astype(bool)
        print(mask.shape)
        out[mask] = cv2.addWeighted(img, alpaha, imgNew, 1-alpaha, 0)[mask]
        return out
一旦將while 循環中的*draw()函數替換為transparent_layout()*函數,它將如下所示。(下圖)
使用 OpenCV 的虛擬鍵盤的完整代碼
下面是完整的代碼
import cv2
import cvzone
from cvzone.HandTrackingModule import HandDetector
from time import sleep
import numpy as np
from pynput.keyboard import Controller

cap = cv2.VideoCapture(0, cv2.CAP_DSHOW)
cap.set(3, 1280)
cap.set(4, 720)

detector = HandDetector(detectionCon=0.8)
keyboard_keys = [["Q", "W", "E", "R", "T", "Y", "U", "I", "O", "P"],
                  ["A", "S", "D", "F", "G", "H", "J", "K", "L", ";"],
                  ["Z", "X", "C", "V", "B", "N", "M", ",", ".", "/"]]

final_text = ""

keyboard = Controller()


def draw(img, buttonList):
    for button in buttonList:
        x, y = button.pos
        w, h = button.size
        cvzone.cornerRect(img, (button.pos[0], button.pos[1],
                                                   button.size[0],button.size[0]), 20 ,rt=0)
        cv2.rectangle(img, button.pos, (int(x + w), int(y + h)), (255, 144, 30), cv2.FILLED)
        cv2.putText(img, button.text, (x + 20, y + 65),
                    cv2.FONT_HERSHEY_PLAIN, 4, (0, 0, 0), 4)
    return img


def transparent_layout(img, buttonList):
    imgNew = np.zeros_like(img, np.uint8)
    for button in buttonList:
        x, y = button.pos
        cvzone.cornerRect(imgNew, (button.pos[0], button.pos[1],
                                                   button.size[0],button.size[0]), 20 ,rt=0)
        cv2.rectangle(imgNew, button.pos, (x + button.size[0], y + button.size[1]),
                                   (255, 144, 30), cv2.FILLED)
        cv2.putText(imgNew, button.text, (x + 20, y + 65),
                    cv2.FONT_HERSHEY_PLAIN, 4, (0, 0, 0), 4)

    out = img.copy()
    alpaha = 0.5
    mask = imgNew.astype(bool)
    print(mask.shape)
    out[mask] = cv2.addWeighted(img, alpaha, imgNew, 1-alpaha, 0)[mask]
    return out


class Button():
    def __init__(self, pos, text, size=[85, 85]):
        self.pos = pos
        self.size = size
        self.text = text


buttonList = []
# mybutton = Button([100, 100], "Q")
for k in range(len(keyboard_keys)):
    for x, key in enumerate(keyboard_keys[k]):
        buttonList.append(Button([100 * x + 25, 100 * k + 50], key))


while True:
    success, img = cap.read()
    img = detector.findHands(img)
    lmList, bboxInfo = detector.findPosition(img)
    img = draw(img, buttonList)  # change the draw funtion to transparent_layout for transparent keys

    if lmList:
        for button in buttonList:
            x, y = button.pos
            w, h = button.size

            if x < lmList[8][0]<x+w and y < lmList[8][1] < y+h:
                cv2.rectangle(img, button.pos, (x + w, y + h),
                              (0, 255, 255), cv2.FILLED)
                cv2.putText(img, button.text, (x + 20, y + 65),
                            cv2.FONT_HERSHEY_PLAIN, 4, (0, 0, 0), 4)
                l, _, _ = detector.findDistance(8,12, img, draw=False)
                print(l)

                if l < 25:
                    keyboard.press(button.text)
                    cv2.rectangle(img, button.pos, (x + w, y + h),
                                  (0, 255, 0), cv2.FILLED)
                    cv2.putText(img, button.text, (x + 20, y + 65),
                                cv2.FONT_HERSHEY_PLAIN, 4, (0, 0, 0), 4)
                    final_text += button.text
                    sleep(0.20)

    cv2.rectangle(img, (25,350), (700, 450),
                  (255, 255, 255), cv2.FILLED)
    cv2.putText(img, final_text, (60, 425),
                cv2.FONT_HERSHEY_PLAIN, 4, (0, 0, 0), 4)

    # cv2.rectangle(img, (100,100), (200,200),
    #               (100, 255, 0), cv2.FILLED)
    # cv2.putText(img, 'Q', (120,180), cv2.FONT_HERSHEY_PLAIN, 5,
    #             (0, 0, 0), 5)

    # img = mybutton.draw(img)
    cv2.imshow("output", img)
    cv2.waitKey(1)
結論
這是虛擬鍵盤的實現,如果你想完善它,你也可以試著添加按鍵聲音,然後我們還可以讓鍵盤佈局在框架內移動。
到此這篇關於使用 OpenCV 開發虛擬鍵盤的方法的文章就介紹到這瞭,更多相關OpenCV 虛擬鍵盤內容請搜索WalkonNet以前的文章或繼續瀏覽下面的相關文章希望大傢以後多多支持WalkonNet!
推薦閱讀:
- OpenCV利用手勢識別實現虛擬拖放效果
- 基於OpenCV的攝像頭測距的實現示例
- Python+Opencv實戰之人臉追蹤詳解
- 基於opencv和pillow實現人臉識別系統(附demo)
- Python+OpenCV手勢檢測與識別Mediapipe基礎篇