如何利用python寫GUI及生成.exe可執行文件
一.GUI(Graphical User Interface(圖形用戶接口))
1.導入需要用到的包
import tkinter as tk
import tkinter.messagebox
import copy
import os
2.獲取文件夾中所有圖片
def get_picture(dirs):
    '''獲得所有圖片'''
    picture_list = []
    for dir, dir_abs, files in os.walk(dirs):
        for file in files:
            if file.endswith('.png'):  # 註意檢查分析數據格式
                picture_list.append(os.path.join(dir, file))
    return picture_list
3.定義一個類windows
class Window:
    button_list = []
    object_list = []
    pictures = get_picture("F:\\pic\\class-1\\classresnet\\data\\dangerous")
    file = pictures[0]
    is_show = True
    index = 0
    image_file = ''
4.創建窗口和frame
    def __init__(self):
        '''創建窗口和frame'''
        self.window = tk.Tk()
        self.window.title('護目鏡安全檢測')
        self.window.geometry('600x400')
        self.frame = tk.Frame(self.window)
        self.frame.pack()
        self.frame_l = tk.Frame(self.frame)
        self.frame_r = tk.Frame(self.frame)
        self.frame_l.pack(side='left')
        self.frame_r.pack(side='right')
        self.frame_ll = tk.Frame(self.frame_r)
        self.frame_rr = tk.Frame(self.frame_r)
        self.frame_ll.pack(side='left')
        self.frame_rr.pack(side='right')
5.定義需要用到的函數(下一頁、上一頁等按鈕要用到的)
    def next_picture(self):
        '''下一張圖片'''
        self.index = self.pictures.index(self.file)
        self.index += 1
        if self.index < len(self.pictures):
            self.checkout_button()
            self.file = self.pictures[self.index]
            self.create_canvas(self.file)
        else:
            self.index = len(self.pictures) - 1
            tkinter.messagebox.showinfo('提示', '已近是最後一張瞭')

    def checkout_button(self):
        '''判斷列表中是否隻有button對象'''
        object_list_copy = copy.copy(self.object_list)
        for ob in self.object_list:
            if ob in self.button_list:
                pass
            else:
                b = object_list_copy.pop(self.object_list.index(ob))
                b.destroy()
        self.object_list = object_list_copy

    def pre_picture(self):
        '''上一頁'''
        self.index = self.pictures.index(self.file)
        self.index -= 1
        if self.index >= 0:
            self.checkout_button()
            self.file = self.pictures[self.index]
            self.create_canvas(self.file)
        else:
            self.index = 0
            tkinter.messagebox.showinfo('提示', '已經是第一張瞭')

    def show_picture(self):
        '''展示圖片和翻頁按鈕'''
        self.file = self.pictures[0]
        if self.is_show:
            self.is_show = False
            self.create_canvas(self.file)
            button1 = tk.Button(self.frame_ll, text='上一張', font=('Arial', 12), width=10, height=1, bg='orange',
                                command=self.pre_picture, relief='ridge', )
            button1.pack()
            button2 = tk.Button(self.frame_rr, text='下一張', font=('Arial', 12), width=10, height=1, bg='orange',
                                command=self.next_picture, relief='ridge', )
            button2.pack()
            self.button_list.append(button1)
            self.button_list.append(button2)
            self.object_list.extend(self.button_list)
        else:
            self.is_show = True
            while self.object_list:
                o = self.object_list.pop()
                o.destroy()
6.創建按鈕、畫佈,調用主程序
    def new_button(self):
        '''創建展示按鈕'''"開始檢測和顯示結果可在此處新添加tk.button"
        tk.Button(self.frame_l, text='開始讀取', font=('Arial Black', 12), width=10, height=1, bg='green',
                  command=self.show_picture, relief='ridge').pack()
        # tk.Button(self.frame_l, text='開始檢測', font=('Arial Black', 12), width=10, height=1, bg='blue',command=classresnet, relief='ridge').pack()

    def create_canvas(self, file):
        '''用畫佈展示圖片'''
        self.image_file = tk.PhotoImage(file=file)
        canvas = tk.Canvas(self.frame_r, height=500, width=600, bg='gray')
        canvas.create_image(1, 1, anchor='nw', image=self.image_file)
        canvas.pack()
        self.object_list.append(canvas)

    def run(self):
        '''主程序調用'''
        self.window.mainloop()

if __name__ == '__main__':

    w = Window()
    w.new_button()
    w.run()
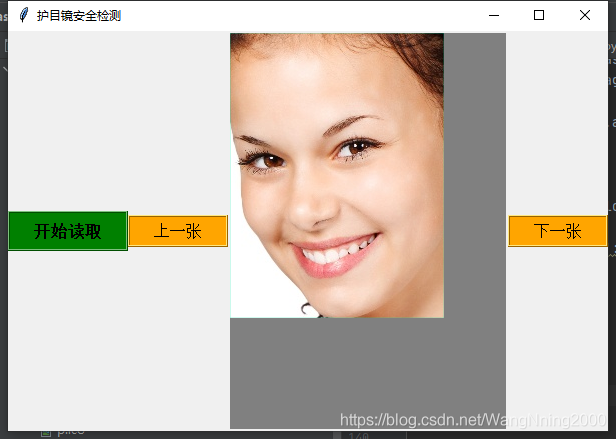
效果展示

完整代碼
import tkinter as tk
import tkinter.messagebox
import copy
import os
# from glob2 import glob
# import main

"""Graphical User Interface(圖形用戶接口)"""
def get_picture(dirs):
    '''獲得所有圖片'''
    picture_list = []
    for dir, dir_abs, files in os.walk(dirs):
        for file in files:
            if file.endswith('.png'):  # 註意檢查分析數據格式
                picture_list.append(os.path.join(dir, file))
    return picture_list


class Window:
    button_list = []
    object_list = []

    # for pngfile in glob("F:\\pic\\class-1\\classresnet\\datas\\*.png"):
    #     main.image_demo()
    #     output_dir = "F:\\pic\\class-1\\classresnet\\data\\try"  # 保存截取的圖像目錄
    #     print('圖片獲取完成 。。。!')
    #
    # main.classresnet()

    pictures = get_picture("F:\\pic\\class-1\\classresnet\\data\\dangerous")
    file = pictures[0]
    is_show = True
    index = 0
    image_file = ''

    def __init__(self):
        '''創建窗口和frame'''
        self.window = tk.Tk()
        self.window.title('護目鏡安全檢測')
        self.window.geometry('600x400')
        self.frame = tk.Frame(self.window)
        self.frame.pack()
        self.frame_l = tk.Frame(self.frame)
        self.frame_r = tk.Frame(self.frame)
        self.frame_l.pack(side='left')
        self.frame_r.pack(side='right')
        self.frame_ll = tk.Frame(self.frame_r)
        self.frame_rr = tk.Frame(self.frame_r)
        self.frame_ll.pack(side='left')
        self.frame_rr.pack(side='right')

    def next_picture(self):
        '''下一張圖片'''
        self.index = self.pictures.index(self.file)
        self.index += 1
        if self.index < len(self.pictures):
            self.checkout_button()
            self.file = self.pictures[self.index]
            self.create_canvas(self.file)
        else:
            self.index = len(self.pictures) - 1
            tkinter.messagebox.showinfo('提示', '已近是最後一張瞭')

    def checkout_button(self):
        '''判斷列表中是否隻有button對象'''
        object_list_copy = copy.copy(self.object_list)
        for ob in self.object_list:
            if ob in self.button_list:
                pass
            else:
                b = object_list_copy.pop(self.object_list.index(ob))
                b.destroy()
        self.object_list = object_list_copy

    def pre_picture(self):
        '''上一頁'''
        self.index = self.pictures.index(self.file)
        self.index -= 1
        if self.index >= 0:
            self.checkout_button()
            self.file = self.pictures[self.index]
            self.create_canvas(self.file)
        else:
            self.index = 0
            tkinter.messagebox.showinfo('提示', '已經是第一張瞭')

    def show_picture(self):
        '''展示圖片和翻頁按鈕'''
        self.file = self.pictures[0]
        if self.is_show:
            self.is_show = False
            self.create_canvas(self.file)
            button1 = tk.Button(self.frame_ll, text='上一張', font=('Arial', 12), width=10, height=1, bg='orange',
                                command=self.pre_picture, relief='ridge', )
            button1.pack()
            button2 = tk.Button(self.frame_rr, text='下一張', font=('Arial', 12), width=10, height=1, bg='orange',
                                command=self.next_picture, relief='ridge', )
            button2.pack()
            self.button_list.append(button1)
            self.button_list.append(button2)
            self.object_list.extend(self.button_list)
        else:
            self.is_show = True
            while self.object_list:
                o = self.object_list.pop()
                o.destroy()

    # def code_button(self):
    #     tk.Button(self.frame_l, text='開始檢測', font=('Arial Black', 12), width=10, height=1, bg='blue',
    #               command=main.classresnet, relief='ridge').pack()

    def new_button(self):
        '''創建展示按鈕'''"開始檢測和顯示結果可在此處新添加tk.button"
        tk.Button(self.frame_l, text='開始讀取', font=('Arial Black', 12), width=10, height=1, bg='green',
                  command=self.show_picture, relief='ridge').pack()
        # tk.Button(self.frame_l, text='開始檢測', font=('Arial Black', 12), width=10, height=1, bg='blue',command=classresnet, relief='ridge').pack()

    def create_canvas(self, file):
        '''用畫佈展示圖片'''
        self.image_file = tk.PhotoImage(file=file)
        canvas = tk.Canvas(self.frame_r, height=500, width=600, bg='gray')
        canvas.create_image(1, 1, anchor='nw', image=self.image_file)
        canvas.pack()
        self.object_list.append(canvas)

    def run(self):
        '''主程序調用'''
        self.window.mainloop()

if __name__ == '__main__':


    w = Window()
    w.new_button()
    w.run()
二.生成exe文件
在windows下,可以使用pyinstaller打包python程序為exe可執行程序。
1.安裝pyinstaller
在cmd命令行窗口運行以下命令安裝pyinstaller
pip install pyinstaller
2.打包python程序
在python程序所在目錄,執行以下命令
pyinstaller -F xxx.py -w
註:如果不加-w,生成的exe文件會同時出現命令行窗口
3.運行exe文件
打包完成後,在對應目錄會出現build和dist文件夾,exe文件就出現在dist文件夾,直接運行即可。
4.常用命令參數
(1) -F 指定打包後隻生成一個exe格式的文件(dist文件隻有一個exe格式的文件T1)
pyinstaller -F T1.py
(2) -i 改變生成程序的icon圖標
pyinstaller -F -i ./my.ico T1.py
(3) -n NAME,–name=NAME 設置產生文件的名字(mypy)
pyinstaller -F -n mypy -i ./my.ico T1.py
效果展示

執行exe應用
因為是exe應用,是可執行文件瞭,所以直接雙擊運行即可,運行效果如下圖所示:

總結
到此這篇關於如何利用python寫GUI及生成.exe可執行文件的文章就介紹到這瞭,更多相關python寫GUI及生成.exe內容請搜索WalkonNet以前的文章或繼續瀏覽下面的相關文章希望大傢以後多多支持WalkonNet!
推薦閱讀:
- Python中的tkinter庫簡單案例詳解
- python實現圖片九宮格分割的示例
- Tkinter canvas的畫佈參數,刪除組件,添加垂直滾動條詳解
- Python GUI編程詳解
- 基於Python實現千圖成像工具的示例代碼