JS前端首屏優化技巧
引言
前段時間領導突然找到我,說新項目的訪問怎麼變得這麼慢,我立馬訪問對應頁面,果然,首頁加載8、9s,這近10s的等待時間,對於用戶來說,無疑是痛苦的。於是乎領導就把這個首頁加載優化的任務交給我瞭。
在經過我的一頓折騰後,首屏加載時間基本都在2s左右,這樣的首屏加載時間,對於用戶來說,算是可以接受的。
因此在此記錄一下,針對首屏優化我做瞭些什麼
打包分析
在 package.json 中添加命令
"report": "vue-cli-service build --report"
然後命令行執行 npm run report,就會在dist目錄下生成一個 report.html 文件,右鍵瀏覽器中打開即可看到打包分析報告。
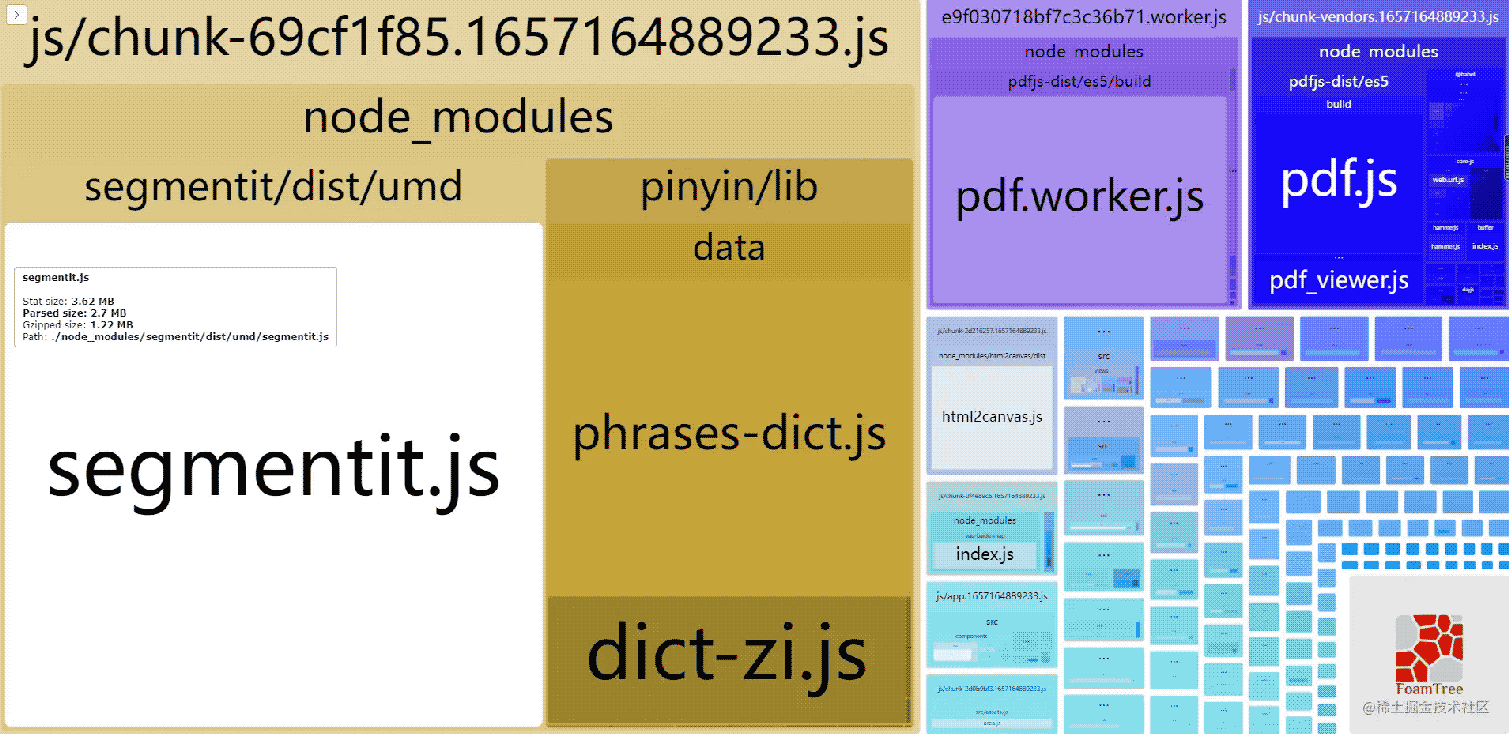
下面我們可以針對報告中的問題逐一進行優化
路由懶加載
vue 中使用
component: () => import("views/home/Home.vue"),
vue.config.js 修改 productionSourceMap 為 false
productionSourceMap: false
首屏請求優化
vue 腳手架默認開啟瞭 preload 與 prefetch,當我們項目很大時,這個就成瞭首屏加載的最大元兇瞭
- preload 與 prefetch 都是一種資源預加載機制;
- preload 是預先加載資源,但並不執行,隻有需要時才執行它;
- prefetch 是意圖預獲取一些資源,以備下一個導航/頁面使用;
- preload 的優先級高於 prefetch。
//vue.config.js
chainWebpack(config) {
  config.plugins.delete('preload') // 刪除默認的preload
  config.plugins.delete('prefetch') // 刪除默認的prefetch
}
原先項目首頁近六百個請求,設置後降到一百左右,減少瞭http的連接,自然也就減少瞭首屏加載時間。
配置前:
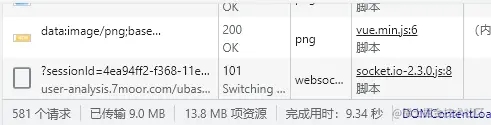
配置後:

圖片壓縮
有時候 ui 給到的圖片資源可能過大,因此我們可以對圖片進行壓縮,這裡推薦常用的在線壓縮網站 tinypng,可以將圖片體積降低至原來的30%左右。而肉眼看起來,圖片的清晰度並沒有差別。

當然,可以你也可以構建流程中加入壓縮圖片
使用 image-webpack-loader:
安裝
npm i image-webpack-loader -D
vue.config.js 配置
chainWebpack: config => {
  // 壓縮圖片
  chainWebpack: (config) => {
    if (isProd) {
      // 圖片壓縮處理
      const imgRule = config.module.rule('images')
      imgRule
        .test(/\.(png|jpe?g|gif|webp)(\?.*)?$/)
        .use('image-webpack-loader')
        .loader('image-webpack-loader')
        .options({ bypassOnDebug: true })
        .end()
    }
}
配置使用 CDN 方式引入資源庫
//vue.config.js
  configureWebpack: config => {
    config.resolve = {
      // 使用 CDN 的包不用打包到文件中
      externals: {
        // 這裡的 element-ui 是 import xx from yy 中的 yy 包名。ELEMENT 則是文件導出的全局變量名字
        'element-ui': 'ELEMENT',
      },
    },
  },
  chainWebpack: config => {
    // 添加 CDN 參數到 htmlWebpackPlugin 配置中
    config.plugin('html').tap(args => {
      args[0].cdn = {
        js: [
          'https://xx.com/CDN/js/index-element-ui@2.13.0.js',
        ],
        css: [
          'https://xx.com/CDN/css/element-ui2.13.0/index.css',
        ],
      };
      return args;
    });
  },
然後在 index.html 中掛載 CDN:
<!DOCTYPE html>
<html lang="zh">
  <head>
    <% for (var i in htmlWebpackPlugin.options.cdn&&htmlWebpackPlugin.options.cdn.css) { %>
    <link href="<%=%20htmlWebpackPlugin.options.cdn.css[i]%20%>" rel="external nofollow"  rel="external nofollow"  rel="preload" as="style">
    <link href="<%=%20htmlWebpackPlugin.options.cdn.css[i]%20%>" rel="external nofollow"  rel="external nofollow"  rel="stylesheet">
    <% } %>
    <!-- 使用 CDN 加速的 JS 文件,配置在 vue.config.js 下 -->
    <% for (var i in htmlWebpackPlugin.options.cdn&&htmlWebpackPlugin.options.cdn.js) { %>
    <script src="<%=%20htmlWebpackPlugin.options.cdn.js[i]%20%>" type="text/javascript"></script>
    <% } %>
  </head>
  <body>
    <div id="app"></div>
  </body>
</html>
公共代碼抽離
  configureWebpack: (config) => {
    // 公共代碼抽離
    config.optimization = {
      splitChunks: {
        cacheGroups: {
          libs: {
            name: "chunk-libs",
            test: /[\\/]node_modules[\\/]/,
            priority: 10,
            chunks: "initial", // only package third parties that are initially dependent
          },
          common: {
            chunks: "all",
            test: /[\\/]src[\\/]js[\\/]/,
            name: "common",
            minChunks: 2,
            maxInitialRequests: 5,
            minSize: 0,
            priority: 60,
          },
          styles: {
            name: "styles",
            test: /\.(sa|sc|c)ss$/,
            chunks: "all",
            enforce: true,
          },
          pinyin: {
            // split pinyin libs
            name: "chunk-pinyin",
            test: /[\\/]node_modules[\\/]_?pinyin(.*)/,
            priority: 40,
            chunks: "async",
            reuseExistingChunk: true,
          },
          html2canvas: {
            // split html2canvas libs
            name: "chunk-html2canvas",
            test: /[\\/]node_modules[\\/]_?html2canvas(.*)/,
            priority: 40,
            chunks: "async",
            reuseExistingChunk: true,
          },
          "vue-pdf": {
            // split vue-pdf libs
            name: "chunk-vue-pdf",
            test: /[\\/]node_modules[\\/]_?vue-pdf(.*)/,
            priority: 40,
            chunks: "async",
            reuseExistingChunk: true,
          },
          runtimeChunk: {
            name: "manifest",
          },
        },
      },
    };
開啟 gzip 壓縮
安裝依賴
npm install compression-webpack-plugin --save-dev
//vue.config.js
const CompressionPlugin = require('compression-webpack-plugin');

module.exports = {
  configureWebpack: config => {
    config.plugins = [
      ...config.plugins,
      // 開啟 gzip 壓縮
      new CompressionPlugin({
        filename: '[path][base].gz',
        algorithm: 'gzip',
       test: /\.js$|\.html$|\.css$|\.jpg$|\.jpeg$|\.png/, // 需要壓縮的文件類型
        threshold: 10240,
        minRatio: 0.8
      })
    ]
  }
}
nginx 也需要相應進行配置:
http {

   gzip on; # 開啟 gzip 壓縮
   gzip_static on; # 若存在靜態 gz 文件,則使用該文件
   gzip_min_length 10k; # 設置允許壓縮的頁面最小字節數
   gzip_buffers 16 8k; # 設置用於處理請求壓縮的緩沖區數量和大小
   gzip_comp_level 1; # 設置壓縮級別 1-9,數字越大,壓縮後的大小越小,也越占用CPU,花費時間越長
   # 對特定的 MIME 類型生效, 其中'text/html'被系統強制啟用
   gzip_types application/javascript text/css font/ttf font/x-woff;
   gzip_vary on; # 是否在 http header中 添加 Vary:Accept-Encoding, on | off
   gzip_http_version 1.1; # 在 http/1.1 的協議下不開啟壓縮
}
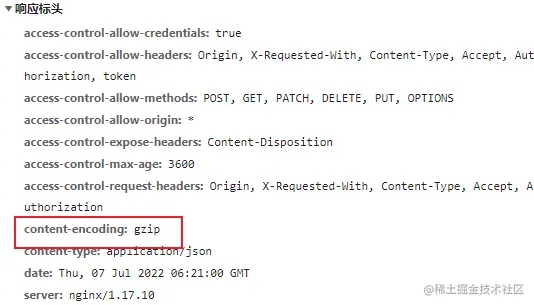
資源響應頭中出現 Content-Encoding: gzip 則代表配置成功
其他優化
當然,除瞭以上所講到的幾種優化手段,還有很多其他的優化方式,比如:
- 白屏加載時的 loading 動畫
- 骨架屏
- 小圖標把圖片替換成 svg
- 路由跳轉時的動畫
以上就是JS前端首屏優化技巧的詳細內容,更多關於JS前端首屏優化的資料請關註WalkonNet其它相關文章!