Android未讀消息拖動氣泡示例代碼詳解(附源碼)
前言
拖動清除未讀消息可以說在很多應用中都很常見,也被用戶廣泛接受。本文是一個可以供參考的Demo,希望能有幫助。
提示:以下是本篇文章正文內容,下面案例可供參考
最終效果圖及思路

實現關鍵:
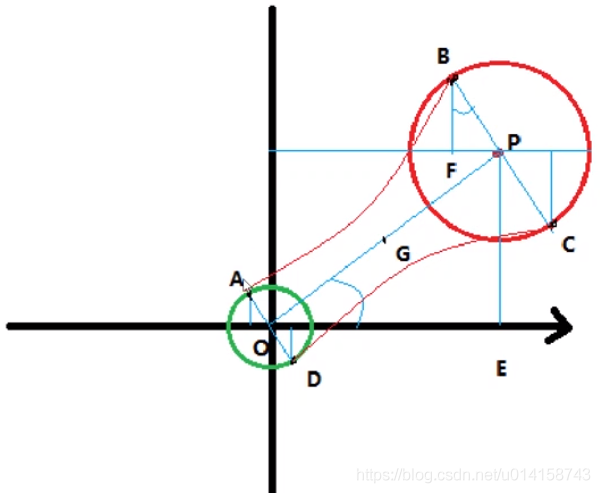
氣泡中間的兩條邊,分別是以ab,cd為數據點,G為控制點的貝塞爾曲線。
步驟:
繪制圓背景以及文本;連接情況繪制貝塞爾曲線;另外端點繪制一個圓
關鍵代碼
1.定義,初始化等
狀態:靜止、連接、分離、消失
在onSizeChanged中初始化狀態,固定氣泡以及可動氣泡的圓心
代碼如下(示例):
@Override
protected void onSizeChanged(int w, int h, int oldw, int oldh) {
 super.onSizeChanged(w, h, oldw, oldh);

 init(w, h);
}

private void init(int w, int h) {
 mBubbleState = BUBBLE_STATE_DEFAULT;

 //設置固定氣泡圓心初始坐標
 if (mBubFixedCenter == null) {
 mBubFixedCenter = new PointF(w / 2, h / 2);
 } else {
 mBubFixedCenter.set(w / 2, h / 2);
 }
 //設置可動氣泡圓心初始坐標
 if (mBubMovableCenter == null) {
 mBubMovableCenter = new PointF(w / 2, h / 2);
 } else {
 mBubMovableCenter.set(w / 2, h / 2);
 }
}
2.onDraw中繪制包括三樣繪制
第一樣:靜止,連接,分離狀態都需要繪制圓背景以及文本:
//靜止,連接,分離狀態都需要繪制圓背景以及文本
if (mBubbleState != BUBBLE_STATE_DISMISS) {
 canvas.drawCircle(mBubMovableCenter.x, mBubMovableCenter.y, mBubMovableRadius, mBubblePaint);
 mTextPaint.getTextBounds(mTextStr, 0, mTextStr.length(), mTextRect);
 canvas.drawText(mTextStr, mBubMovableCenter.x - mTextRect.width() / 2, mBubMovableCenter.y + mTextRect.height() / 2, mTextPaint);
}
第二樣:連接狀態繪制貝塞爾曲線①。
if (mBubbleState == BUBBLE_STATE_CONNECT) {
 //繪制靜止的氣泡
 canvas.drawCircle(mBubFixedCenter.x, mBubFixedCenter.y, mBubFixedRadius, mBubblePaint);
 //計算控制點的坐標
 int iAnchorX = (int) ((mBubMovableCenter.x + mBubFixedCenter.x) / 2);
 int iAnchorY = (int) ((mBubMovableCenter.y + mBubFixedCenter.y) / 2);

 float sinTheta = (mBubMovableCenter.y - mBubFixedCenter.y) / mDist;
 float cosTheta = (mBubMovableCenter.x - mBubFixedCenter.x) / mDist;

 //D
 float iBubFixedStartX = mBubFixedCenter.x - mBubFixedRadius * sinTheta;
 float iBubFixedStartY = mBubFixedCenter.y + mBubFixedRadius * cosTheta;
 //C
 float iBubMovableEndX = mBubMovableCenter.x - mBubMovableRadius * sinTheta;
 float iBubMovableEndY = mBubMovableCenter.y + mBubMovableRadius * cosTheta;

 //A
 float iBubFixedEndX = mBubFixedCenter.x + mBubFixedRadius * sinTheta;
 float iBubFixedEndY = mBubFixedCenter.y - mBubFixedRadius * cosTheta;
 //B
 float iBubMovableStartX = mBubMovableCenter.x + mBubMovableRadius * sinTheta;
 float iBubMovableStartY = mBubMovableCenter.y - mBubMovableRadius * cosTheta;

 mBezierPath.reset();
 mBezierPath.moveTo(iBubFixedStartX, iBubFixedStartY);
 mBezierPath.quadTo(iAnchorX, iAnchorY, iBubMovableEndX, iBubMovableEndY);

 mBezierPath.lineTo(iBubMovableStartX, iBubMovableStartY);
 mBezierPath.quadTo(iAnchorX, iAnchorY, iBubFixedEndX, iBubFixedEndY);
 mBezierPath.close();
 canvas.drawPath(mBezierPath, mBubblePaint);
}
第三樣:消失狀態執行爆炸動畫
// 認為是消失狀態,執行爆炸動畫
if (mBubbleState == BUBBLE_STATE_DISMISS && mCurDrawableIndex < mBurstBitmapsArray.length) {
 mBurstRect.set(
  (int) (mBubMovableCenter.x - mBubMovableRadius),
  (int) (mBubMovableCenter.y - mBubMovableRadius),
  (int) (mBubMovableCenter.x + mBubMovableRadius),
  (int) (mBubMovableCenter.y + mBubMovableRadius));
 canvas.drawBitmap(mBurstBitmapsArray[mCurDrawableIndex], null, mBurstRect, mBubblePaint);
}
3.onTouchEvent中
按下:區分靜止狀態和連接狀態
case MotionEvent.ACTION_DOWN:
 if (mBubbleState != BUBBLE_STATE_DISMISS) {
 mDist = (float) Math.hypot(event.getX() - mBubFixedCenter.x, event.getY() - mBubFixedCenter.y);
 if (mDist < mBubbleRadius + MOVE_OFFSET) {
  //加上MOVE_OFFSET是為瞭方便拖拽
  mBubbleState = BUBBLE_STATE_CONNECT;
 } else {
  mBubbleState = BUBBLE_STATE_DEFAULT;
 }
 }
 break;
移動:判斷是否到瞭分離狀態
case MotionEvent.ACTION_MOVE:
 if (mBubbleState != BUBBLE_STATE_DEFAULT) {
 mDist = (float) Math.hypot(event.getX() - mBubFixedCenter.x, event.getY() - mBubFixedCenter.y);
 mBubMovableCenter.x = event.getX();
 mBubMovableCenter.y = event.getY();
 if (mBubbleState == BUBBLE_STATE_CONNECT) {
  if (mDist < mMaxDist - MOVE_OFFSET) {
  mBubFixedRadius = mBubbleRadius - mDist / 8;
  } else {
  mBubbleState = BUBBLE_STATE_APART;
  }
 }
 invalidate();
 }
 break;
彈起:判斷是否已經到瞭分離狀態,分離狀態爆炸,未分離反彈
case MotionEvent.ACTION_UP:
 if (mBubbleState == BUBBLE_STATE_CONNECT) {
 // 橡皮筋動畫
 startBubbleRestAnim();
 } else if (mBubbleState == BUBBLE_STATE_APART) {
 if (mDist < 2 * mBubbleRadius){
  //反彈動畫
  startBubbleRestAnim();
 }else{
  // 爆炸動畫
  startBubbleBurstAnim();
 }
 }
 break;
4.反彈和爆炸動畫
/**
 * 連接狀態下松開手指,執行類似橡皮筋動畫
 */
private void startBubbleRestAnim() {
 ValueAnimator anim = ValueAnimator.ofObject(new PointFEvaluator(),
  new PointF(mBubMovableCenter.x, mBubMovableCenter.y),
  new PointF(mBubFixedCenter.x, mBubFixedCenter.y));
 anim.setDuration(200);
 anim.setInterpolator(new OvershootInterpolator(5f));
 anim.addUpdateListener(new ValueAnimator.AnimatorUpdateListener() {
 @Override
 public void onAnimationUpdate(ValueAnimator animation) {
  mBubMovableCenter = (PointF) animation.getAnimatedValue();
  invalidate();
 }
 });
 anim.addListener(new AnimatorListenerAdapter() {
 @Override
 public void onAnimationEnd(Animator animation) {
  super.onAnimationEnd(animation);
  mBubbleState = BUBBLE_STATE_DEFAULT;
 }
 });
 anim.start();
}
/**
 * 爆炸動畫
 */
 private void startBubbleBurstAnim() {
 //將氣泡改成消失狀態
 mBubbleState = BUBBLE_STATE_DISMISS;
 ValueAnimator animator = ValueAnimator.ofInt(0, mBurstBitmapsArray.length);
 animator.setInterpolator(new LinearInterpolator());
 animator.setDuration(500);
 animator.addUpdateListener(new ValueAnimator.AnimatorUpdateListener() {
  @Override
  public void onAnimationUpdate(ValueAnimator animation) {
  mCurDrawableIndex = (int) animation.getAnimatedValue();
  invalidate();
  }
 });
 animator.start();
 }
總結
註:①貝塞爾曲線參考博文
本文完,有需要參考的同學→文中Demo下載地址
本系列文章引導頁點擊這裡
到此這篇關於Android未讀消息拖動氣泡示例代碼詳解的文章就介紹到這瞭,更多相關Android未讀消息拖動氣泡內容請搜索WalkonNet以前的文章或繼續瀏覽下面的相關文章希望大傢以後多多支持WalkonNet!
推薦閱讀:
- 關於Unity動畫狀態機Animator使用教程
- Android 實現的下拉刷新效果
- Android實現雅虎新聞摘要加載視差動畫效果
- android實現倒計時動態圈
- Android自定義View實現動畫效果詳解